| Netra CT Server Service Manual
|
   
|
Preparing for FRU Installation and Replacement
|
This chapter describes the steps you need to take before you install, remove, or replace a field-replaceable unit (FRU) in your Netra CT server. This chapter is divided into the following sections:
1.1 Tools Required
You will need the following tools to install, remove, or replace most of the components in a Netra CT server:
- No. 1 Phillips screwdriver
- No. 2 Phillips screwdriver
1.2 Attaching the Antistatic Wrist Strap
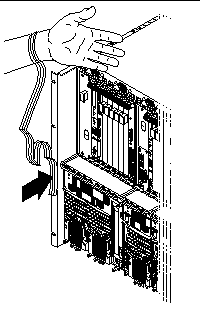
Most field-replaceable units have sensitive electronic components that require antistatic precautions.
1. Get the antistatic wrist strap and electrostatic discharge mat from the ship kit.
2. Place the electrostatic discharge mat close to the system.
3. Unwrap the first two folds of the wrist strap and wrap the adhesive side firmly against your wrist.
4. Peel the liner from the copper foil at the opposite end of the wrist strap and attach the copper end of the strap to a bare metal area on the Netra CT server or on the chassis.
FIGURE 1-1 Attaching the Antistatic Wrist Strap
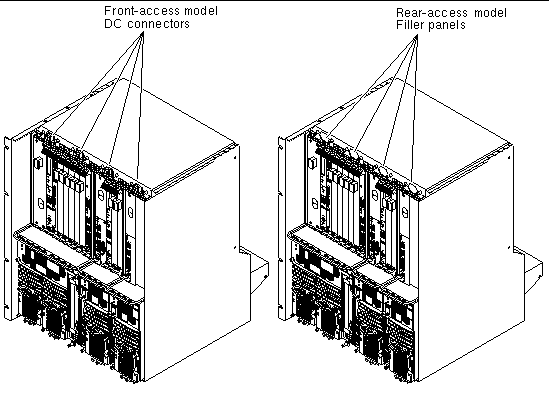
1.3 Determining If You Have a Front-Access or Rear-Access Model
If you are not sure whether you have a front-access or a rear-access model, go to the front of the chassis and look at the top part of the chassis.
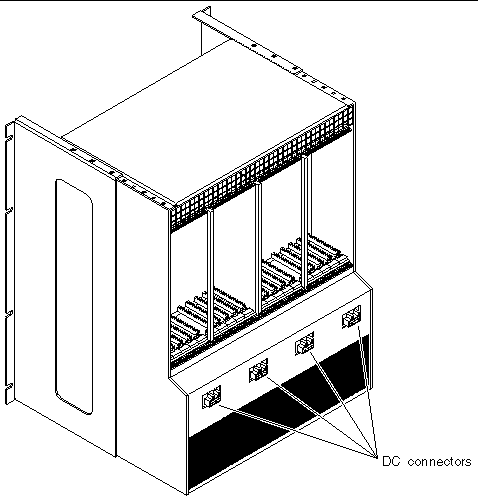
- If you see the DC connectors at the front of the chassis, then you have a front-access model (FIGURE 1-2).
- If you do not see DC connectors at the front of the chassis, and metal filler plates fill the gaps where the DC connectors would normally be, then you have a rear-access model (FIGURE 1-2). The DC or AC connectors are at the rear of the chassis for the rear-access model.
FIGURE 1-2 Front-Access and Rear-Access Models
1.4 Determining If You Have AC- or DC-Powered Servers and Chassis
All of the Netra CT servers installed in a chassis must be either AC or DC; do not mix AC- and DC-powered servers in the same chassis. Even though there are no differences in most of the components in the AC- and DC-powered servers (such as fans, boards, and drives), the differences in the power supplies and the power connectors restrict you from mixing AC- and DC-powered servers in the same chassis.
The label located between the two silver screws at the base of the each power supply unit tells you whether the servers in the chassis are all AC- or DC-powered (FIGURE 1-3).
FIGURE 1-3 Locating the Power Supply Units in the Netra CT Servers

You can also determine if a chassis is powered by AC or DC by looking at the connectors at the rear of the chassis. FIGURE 1-4 shows the connectors at the rear of an AC-powered chassis and FIGURE 1-5 shows the connectors at the rear of a DC-powered chassis.
FIGURE 1-4 AC Connectors on a Netra CT Chassis

FIGURE 1-5 DC Connectors on a Netra CT Chassis
1.5 FRU Categories
In general, the FRUs in a Netra CT server can be divided into two categories:
- Hot-installable/replaceable (referred to hereafter as hot-swappable), meaning that you can install or remove and replace a FRU while the server is running, without interrupting the operation of the server. This category of FRU sometimes requires that you enter hot swap software commands before and after an installation or a removal/replacement to incorporate the new FRU in the system correctly. For more information on the hot swap commands, refer to Chapter 5.
- Non-hot swappable, or cold-swappable, meaning that you must halt (and, in some cases, also power off) the server before installing or removing and replacing a FRU. Note that you must halt power only to the server where you would be removing and replacing the FRUs; any other servers installed in the same chassis can remain running.
Redundant power supplies and hard disk drives in a Netra CT 810 server are a variation of the hot-swappable category. You can replace a single power supply in a redundant configuration while the server is running, without having to enter any software commands, or a single hard disk drive after you have unmounted the drive or disengaged it if you are running a disk management software package.
1.5.1 Hot-Swappable FRUs
The FRUs listed below are hot-swappable:
- I/O cards, both front-access and rear-access models
- Satellite CPU cards
- Alarm cards for both the Netra CT 810 server and the Netra CT 410 server
- Alarm rear transition cards (rear-access model only)1.
- Host CPU card
- Host CPU front transition card (front-access model only)2.
- Host CPU rear transition card (rear-access model only)2.
- Either of the two hard disk drives in a Netra CT 810 server
- DVD or DAT drives occupying the removeable media module
- Fan trays
- System status panels
- System controller boards
- Either of the two power supply units in a Netra CT 810 server
- Power supply unit air filters
- Main air filters
The instructions for removing and replacing these hot-swappable FRUs are covered in P A R T III - Replacing Hot-Swappable FRUs.
1.5.2 Cold-Swappable FRUs
The FRUs listed below are cold-swappable:
- Single power supply in a Netra CT 410 server
- Single or lone remaining power supply in a Netra CT 810 server
- Single hard disk drive in a Netra CT 410 server
- Single or lone remaining hard disk drive in a Netra CT 810 server
- Power distribution units
- Powered-off or empty servers
The instructions for removing and replacing these cold-swappable FRUs are covered in P A R T IV - Replacing Cold-Swappable FRUs.
1.6 Device Names 1.6.1 Device Names for I/O Card Slots in the Netra CT Servers
TABLE 1-1 gives the device names for the I/O card slots in the Netra CT 810 server and TABLE 1-2 gives the device names for the I/O card slots in the Netra CT 410 server.
TABLE 1-1 Device Names for I/O Card Slots in the Netra CT 810 Server
|
Slot Number
|
Device Name
|
|
2
|
/devices/pci@1f,0/pci@1/pci@1/pci@f
|
|
3
|
/devices/pci@1f,0/pci@1/pci@1/pci@e
|
|
4
|
/devices/pci@1f,0/pci@1/pci@1/pci@d
|
|
5
|
/devices/pci@1f,0/pci@1/pci@1/pci@c
|
|
6
|
/devices/pci@1f,0/pci@1/pci@1/pci@b
|
|
7
|
/devices/pci@1f,0/pci@1/pci@1/pci@a
|
|
8
|
/devices/pci@1f,0/pci@1/pci@1/pci@8
|
TABLE 1-2 Device Names for I/O Card Slots in the Netra CT 410 Server
|
Slot Number
|
Device Name
|
|
1
|
/devices/pci@1f,0/pci@1/pci@1/pci@8
|
|
2
|
/devices/pci@1f,0/pci@1/pci@1/pci@f
|
|
4
|
/devices/pci@1f,0/pci@1/pci@1/pci@e
|
|
5
|
/devices/pci@1f,0/pci@1/pci@1/pci@d
|
1.6.2 Device Names for Hard Disk Drives
Following are the device names for the hard disk drives installed in the Netra CT servers:
- Netra CT 810 server:
- HDD 0--c0t0d0
- HDD 1--c1t1d0
- Netra CT 410 server: