Allocate Device
Allocate Device is available to authorized users only. It lets you mount and allocate a device so that you can securely move data on or off the system to another medium. If you try to use a device without allocating it, you will get the error message "Permission Denied."
To Allocate a Device
-
A) Select Allocate Device from the Trusted Path menu.
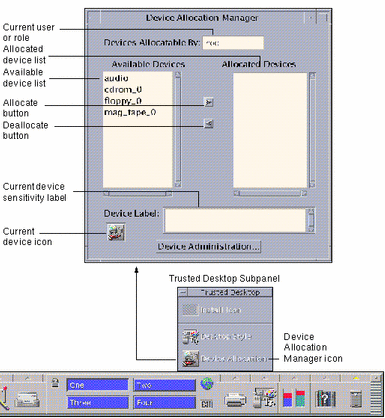
This step causes the Device Allocation Manager to be displayed.
OR
-
B) Select Device Allocation Manager from the Trusted Desktop subpanel in the Front Panel.
This is an alternative step for displaying the Device Allocation Manager (see below).
Figure 4-15 Selecting the Device Allocation Manager from the Trusted Desktop Subpanel

-
Look in the available device list for the device you wish to use.
The devices that you are permitted to allocate at your current sensitivity label appear in this list. Table 4-1 shows some typical device names.
Table 4-1 Device Name AbbreviationsAbbreviated Device Name
Long Version of Device Name
audio
microphone and speakers
floppy_0
floppy drive
mag_tape_0
tape drive (streaming)
cdrom_0
CDROM drive
If the device you want to use does not appear in the list, you should check with your administrator to make sure you are properly authorized. It may also be that the device is in an error state or in use by somebody else.
-
Move the device from the Available Devices list to the Allocated Devices list.
You can accomplish this by:
-
Double-clicking the device name in the Available Devices list
-
Selecting the device and clicking the Allocate (right-pointing) button
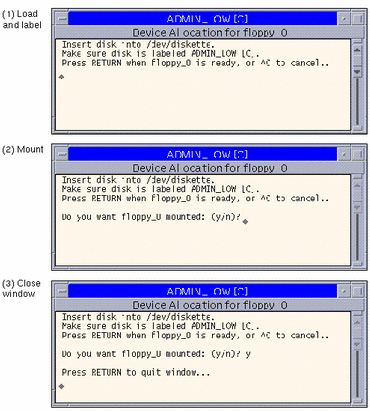
This step opens a cmdtool window running a clean script. The clean script ensures that there is no data left over on the medium from other transactions.
Note that the sensitivity label of the current workspace will be applied to the device. Any data transferred to or from the device's medium must be dominated by this sensitivity label.
-
-
Follow the instructions in the clean script, which are (1) load and make sure the medium has the correct sensitivity label, (2) mount the device, and (3) press return to close the cmdtool window.
Figure 4-16 Clean Script During Allocation

At this point, the medium has been cleaned and the device has been mounted and is ready to be used. The device name now appears in the Allocated Devices list.
Note -Until you close the command tool window, the Device Allocation Manager and the label builder windows are disabled. At this point, you will not be able to use the Device Allocation Manager in this workspace or any other.
-
Use the device to transfer data.
At any point, if you switch to a workspace with a different User ID (by assuming a role) or sensitivity label, you need to make a separate allocation of the device at the sensitivity label for that workspace. When you use the Occupy Workspace command from the window menu to move the Device Allocation Manager to the new workspace, the Available and Allocated Devices lists change to reflect the correct context.
-
Deallocate the device when you are finished.
For the sake of security, you should always deallocate a device when you are finished using it. You can accomplish this by:
-
Double-clicking the device name in the Allocated Devices list
-
Selecting the device and clicking the Deallocate (left-pointing) button
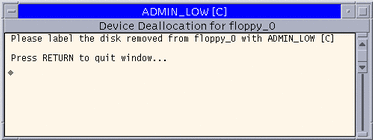
Deallocating a device opens a cmdtool window and runs a clean script that advises you about the labeling of the medium (see below). The script also unmounts the device.
Figure 4-17 Clean Script During Deallocation

If you reboot your system while devices are allocated, they become deallocated.
-
- © 2010, Oracle Corporation and/or its affiliates
