 How To Import
a Farm
Steps
-
Navigate to the Control Center Editor.
-
Choose Import Farm from the File menu.
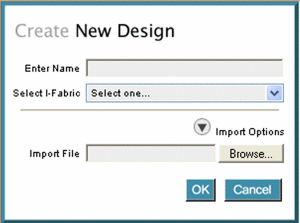
The Create New Design dialog box appears.
-
Type the farm name in the Enter Name field.
The name becomes part of your domain name. For example, farmname.accountname.ifabricname.yourorgname.com
Note –The farm name must conform to DNS naming conventions. See DNS Naming Conventions and Farm Naming Conventions in the Control Center
-
Select an I-Fabric from the drop-down list.
I-Fabrics are named during installation.
-
Click the Import Options button and type the location of the farm to import or click the Browse button to find the location.

-
Click the OK button.
The farm is imported into the Control Center and appears in the Editor screen.
Note –If devices that are configured in the farm are unavailable in the I-Fabric to which the farm is imported, an error message appears. Unavailable devices are highlighted in red text to indicate that reconfiguration must be completed before submitting the imported farm for activation.
See Also
- © 2010, Oracle Corporation and/or its affiliates
