Importing and Exporting Farms
Importing and Exporting Farms
This section includes procedures for importing and exporting farms by using the File menu in the Editor screen. Farms are exported using Farm Export Markup Language (FEML). FEML represents the logical server farm and describes the network and configuration topology for physical resources associated with a logical server farm. FEML differs from FML because it is readable by a browser. Sample FEML farms are installed in a standard location and may be accessed at http://server:port/tcc/sample.jsp for use in the Control Center.
 How To Export
a Farm
Steps
-
Click Editor on the Navigation bar and select and existing farm from the list.
-
Choose Export from the File menu.
The Farm Export dialog box appears.
-
Type the name for the exported file in the Name field.
Note –The exported FEML may be saved with any file name and extension.
-
Select the location for the exported farm, or click the Browse button to find a location.
-
Click the OK button.
The current farm FEML is exported to the selected location.
 Caution –
 Do not modify the exported FEML manually. Manual modification of FEML might prevent successful import.
See Also
 How To Import
a Farm
Steps
-
Navigate to the Control Center Editor.
-
Choose Import Farm from the File menu.
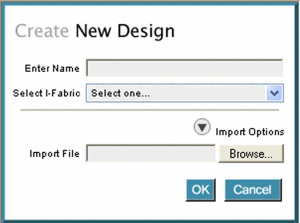
The Create New Design dialog box appears.
-
Type the farm name in the Enter Name field.
The name becomes part of your domain name. For example, farmname.accountname.ifabricname.yourorgname.com
Note –The farm name must conform to DNS naming conventions. See DNS Naming Conventions and Farm Naming Conventions in the Control Center
-
Select an I-Fabric from the drop-down list.
I-Fabrics are named during installation.
-
Click the Import Options button and type the location of the farm to import or click the Browse button to find the location.

-
Click the OK button.
The farm is imported into the Control Center and appears in the Editor screen.
Note –If devices that are configured in the farm are unavailable in the I-Fabric to which the farm is imported, an error message appears. Unavailable devices are highlighted in red text to indicate that reconfiguration must be completed before submitting the imported farm for activation.
See Also
 How To Download
Sample Farms
Steps
-
Type the following URL in the browser's address field to access the download sample farms page.
http://server:port/tcc/sample.jsp
-
Click the filename to download the desired sample farm.
Note –To determine the appropriate sample farm, read the descriptions provided in the right column of the Download Sample Farms table. A sample farm configured for a dual switch should only be used if your I-Fabric includes a dual switch device.
-
Type the location where you would like to save the file.
-
Note the location where you saved the file for future reference.
-
Click the OK button to close the Save dialog box.
-
To import the sample farm, see How To Import a Farm.
- © 2010, Oracle Corporation and/or its affiliates
