| C H A P T E R 2 |
|
Preparing to Service the System |
This chapter describes how to prepare the Sun Fire X4440 for servicing.
The following topics are covered:
This section describes important safety information that you need to know prior to removing or installing parts in the Sun Fire X4440 server.

|
Caution - Never attempt to run the server with the covers removed. Hazardous voltage present. |

|
Caution - Equipment damage possible. The covers must be in place for proper air flow. |
For your protection, observe the following safety precautions when setting up your equipment:
The Sun Fire X4440 server can be serviced with the following tools:
To obtain support for your server, you need your chassis serial number. You can find a chassis serial number label on the server front panel on the left side. See FIGURE 2-1. Another chassis serial number label is on the top of the server.
FIGURE 2-1 Chassis Serial Number Label

|
To view information about a system component, you need the Read Only (o) role enabled.
-> cd /SYS
/SYS
-> cd MB
/SYS/MB
-> show chassis_serial_number type
 /SYS/MB
   Properties:
       chassis_serial_number = 0811QAD01C
       type = Motherboard
For more information, see Sun Integrated Lights Out Manager (ILOM) 3.0 CLI Procedures Guide (820-6412).
To remove main power from the server, use one of the methods shown in the following table.
|
Use a pen, or other non-conducting pointed object, to press and release the Power button on the front panel. Pressing the power button causes Advanced Configuration and Power Interface (ACPI)-enabled operating systems to perform an orderly shutdown of the operating system. Servers not running ACPI-enabled operating systems will shut down to standby power mode immediately. |
|
|
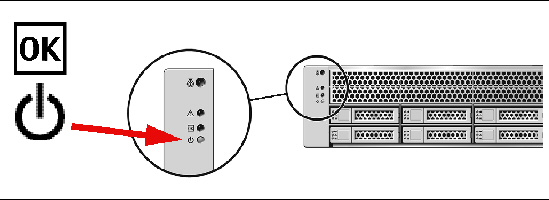
Press and hold the Power button for at least four seconds until the main power is off and the server enters standby power mode. See FIGURE 2-2. When the main power is off, the Power/OK LED on the front panel flashes, indicating that the server is in standby power mode. |
|
|
|
|
|
See Powering Off the Server Using the Service Processor Command Line. |
FIGURE 2-2 Front Panel Power/OK LED

|
Caution - To completely power off the server, you must disconnect the AC power cords from the rear panel of the server. |
You can use the service processor to perform a graceful shutdown of the server and ensure that all of your data is saved and the server is ready for restart.
Refer to the Solaris operating system documentation for additional information.
1. Log in as a superuser or equivalent.
Depending on the type of problem, you might want to view server status or log files, or run diagnostics before you shut down the server.
3. Save any open files and quit all running programs.
Refer to your application documentation for specific information.
4. Shut down all logical domains.
7. Log in to the Service Processor.
The following components can be serviced with the server in the maintenance position:
If the server is installed in a rack with extendable slide rails, use this procedure to extend the server to the maintenance position.
1. (Optional) Type the following command from the service processor (SP) prompt -> to locate the system that requires maintenance.
After you have located the server, press the Locator LED/Locator button to turn it off.
2. Verify that no cables will be damaged or will interfere when the server is extended.
Although the cable management arm (CMA) that is supplied with the server is hinged to accommodate extending the server, you should ensure that all cables and cords are capable of extending.
3. Extend the lower floor arm on the cabinet for safety, if present.
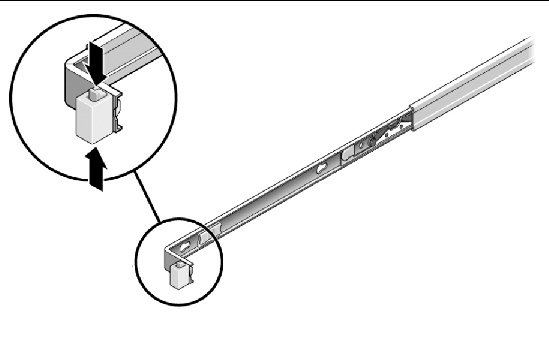
4. From the front of the server, release the two slide release latches (FIGURE 2-3).
Squeeze the green slide release latches to release the slide rails.
FIGURE 2-3 Slide Release Latches
5. While squeezing the slide release latches, slowly pull the server forward until the slide rails latch.
The server must be removed from the rack to service the following components:

|
Caution - If necessary, use two people to dismount and carry the chassis.
|
To remove a server from the rack:
1. Disconnect all cables and power cords from the server.
2. Extend the lower floor arm on the cabinet for safety, if present
3. Extend the server to the maintenance position.
See Extending the Server to the Maintenance Position.
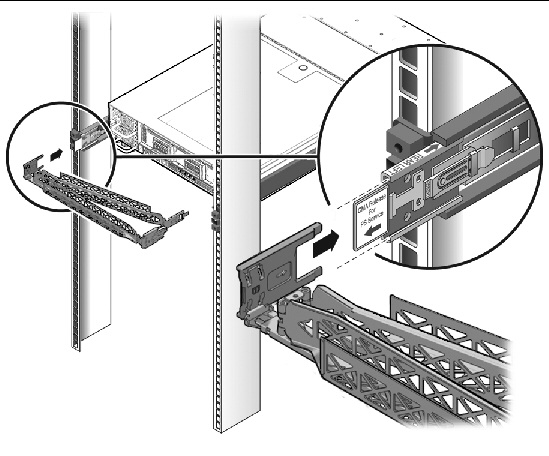
4. Press the metal lever that is located on the inner side of the rail to disconnect the cable management arm (CMA) from the rail assembly (FIGURE 2-4).
The CMA is still attached to the cabinet, but the server chassis is now disconnected from the CMA.
FIGURE 2-4 Metal Lever and Cable Management Arm

|
Caution - If necessary, use two people to dismount and carry the chassis.
|
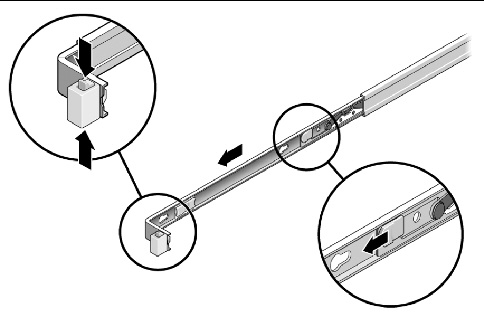
5. From the front of the server, pull the release tabs forward and pull the server forward until it is free of the rack rails (FIGURE 2-5).
A release tab is located on each rail.
FIGURE 2-5 Release Tabs and Slide Assembly
6. Set the server on a sturdy work surface.
Electrostatic discharge (ESD) sensitive devices, such as the motherboards, PCI cards, drives, SSDs, and memory cards, require special handling.

|
Caution - You must disconnect both power supplies before servicing any of the components documented in this chapter. |
Wear an antistatic wrist strap and use an antistatic mat when handling components such as drive assemblies, circuit boards, or PCI cards. When servicing or removing server components, attach an antistatic strap to your wrist and then to a metal area on the chassis. Following this practice equalizes the electrical potentials between you and the server.
| Note - An antistatic wrist strap is not included in the accessory kit for the Sun Fire X4440 Server. However, antistatic wrist straps are still included with options. |
Place static-sensitive components such as motherboards, memory, and other PCBs on an antistatic mat.
1. Prepare an antistatic surface to set parts on during the removal, installation, or replacement process.
Place static-sensitive components such as the printed circuit boards on an antistatic mat. The following items can be used as an antistatic mat:
2. Attach an antistatic wrist strap.
When servicing or removing server components, attach an antistatic strap to your wrist and then to a metal area on the chassis.
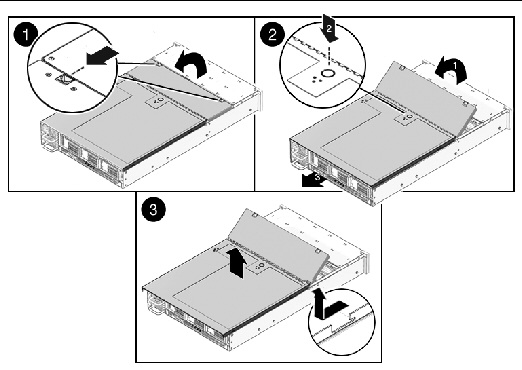
The top cover and fan door are integrated.
| Note - Some field-replaceable units (FRUs) require removal of the rear cover. |
1. Unlatch the fan module door. (FIGURE 2-6 [1])
Pull the two release tabs back to release the door. Rotate the fan door to the open position and hold it there.
2. Press the top cover release button and slide the top cover to the rear about a half-inch (12.7 mm). [2]
3. Lift up and remove the top cover. [3]

|
Caution - If the top cover is removed before the server is powered off, the server will immediately go into Standby mode. |
FIGURE 2-6 Removing the Top Cover
Copyright © 2010, Oracle and/or its affiliates. All rights reserved.