Appendix C
LEDs and Jumpers
This appendix describes the LEDs and jumpers on the Sun Fire X4600 server
and the Sun Fire X4600 M2 server. The information is organized into three
sections:
C.1 External LEDs
See the following figures and tables for information about the LEDs that are
viewable on the outside of the server.
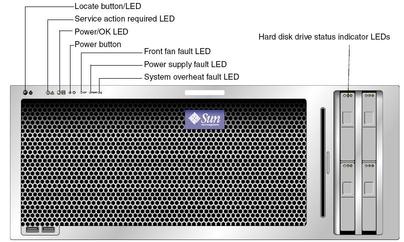
Front Panel LED Functions
|
|
|---|
|
This LED helps you to identify which system in the rack
you are working on in a rack full of servers.
Push and release this button to make the Locate LED blink for 30 minutes. Hold down the button for 5 seconds to initiate a “push-to-test” mode that illuminates all other LEDs both inside and outside of the chassis for 15 seconds.
|
Service Action
Required LED |
|
|
This LED has three states:
Off: Server main power and standby power are off. Blinking: Server is in standby power mode, with AC power applied to only the GRASP board and the power supply fans. On: Server is in main power mode with AC power supplied to all components.
|
|
This LED lights when there is a failed front cooling
fan module. LEDs on the individual fan modules indicate which fan module has
failed. |
|
This LED lights when:
Two power supplies are present in the system but only one has AC power connected. To clear this condition either plug in the second power supply or remove it from the chassis. Any voltage related event occurs in the system. For CPU-related voltage errors the associated CPU Fault LED will also be illuminated.
|
System Overheat Fault LED
|
This LED lights when an upper temperature limit is detected. |
Hard Disk Drive Status
LEDs |
The hard disk drives have three LEDs:
Top LED (blue): reserved for future use. Middle LED (amber): Hard disk drive failed. Bottom LED (green): Hard disk drive is operating properly.
|
|
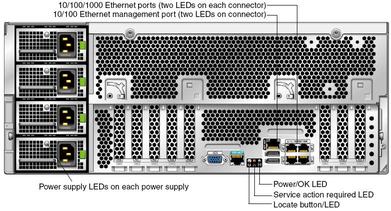
Back Panel LED Functions
|
|
|---|
|
The power supplies have one LED:
|
10/100/1000 Gigabit Ethernet port LEDs (NET0 – NET3)
|
Each connector has two LEDs:
Right side LED on (green): indicates link activity Left side LED green: link is established at 1 gigabit Left side orange: link is established at 10 or 100 megabits
|
10/100 Gigabit Ethernet management port (NET MGT) |
The connector
has two LEDs:
Right side LED on (green): indicates link activity Left side LED green: link is established at 100 megabits Left side orange: link is established at 10 megabits
|
Locate button/LED (Same function as on front panel) |
This LED helps
you to identify which system in the rack you are working on in
a rack full of servers.
Push and release this button to make the Locate LED blink for 30 minutes. Hold down the button for 5 seconds to initiate a “push-to-test” mode that illuminates all other LEDs both inside and outside of the chassis for 15 seconds.
|
Service Action Required LED (Same function as on
front panel) |
|
Power/OK LED (Same function as on front panel) |
This
LED has three states:
Off: Server main power and standby power are off. Blinking: Server is in standby power mode, with AC power applied to only the GRASP board and the power supply fans. On: server is in main power mode with AC power supplied to all components.
|
|

Fan Tray LED Functions
C.2 Internal LEDs
Status indicator LEDs are present several places inside the chassis:
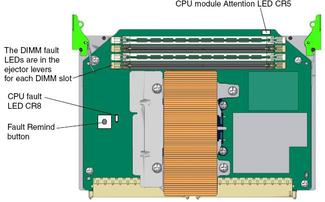
CPU Module LED Functions
|
|
|---|
|
This LED has two states:
Off: CPU module and its components are operating properly. Lit (amber): Either the CPU module, a DIMM, or a CPU has failed.
|
DIMM Fault LED (The
ejector levers on the DIMM slots contain the LEDs.) |
|
|
|
|
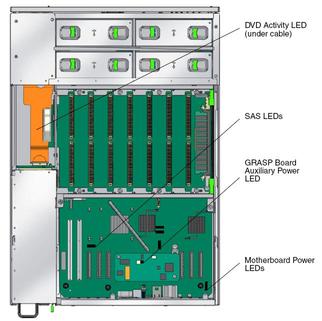
Motherboard and GRASP Board LED Functions
|
|
|---|
GRASP board power status
LED |
|
Motherboard auxiliary power LED (CR21) |
|
Motherboard power LEDs (CR41, CR19, CR34, and CR35 ) |
All four LEDs should be
lit when system is powered up. Any other state indicates fault. |
|
|
|
Blinks in regular pattern when
SAS controller is active. Fault if not blinking after system is out of
reset. |
SAS Activity, Slot 0 (CR8) |
|
SAS Activity, Slot 1
(CR6) |
|
SAS Activity, Slot 2 (CR29) |
|
SAS Activity, Slot 3 (CR30) |
|
|
|
|
|
|
|
|
|
|
C.3 Jumpers
The server motherboard has several jumpers, described in  Jumpers on the Motherboard and
  Jumper Functions . Note
that some jumpers are not meant to be used in the field; these
are labelled “Do not use” in the table.
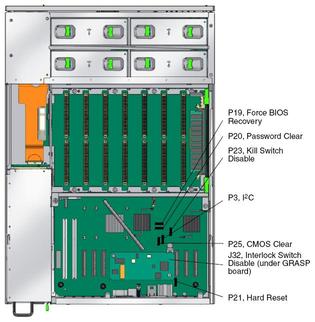
Jumper Functions
|
|
|---|
J32, Interlock Switch Disable |
Do not
use. |
P19, Force BIOS Recovery |
|
P20, Clear Password |
|
P21, Hard Reset |
Bridge to change
reset button action from soft reset to hard reset. |
P23, Kill Switch Disable |
Do not
use. |
P25, Clear CMOS |
|
P3, I2C |
Do not use. |
|

![]() C.1 External LEDs describes LEDs on the exterior of the server chassis.
C.1 External LEDs describes LEDs on the exterior of the server chassis.![]() C.2 Internal LEDs describes LEDs that are visible only with the main cover removed.
C.2 Internal LEDs describes LEDs that are visible only with the main cover removed.![]() C.3 Jumpers describes jumpers on the server motherboard.
C.3 Jumpers describes jumpers on the server motherboard.![]() Sun Fire X4600/X4600 M2 Servers Front Panel LEDs and
Sun Fire X4600/X4600 M2 Servers Front Panel LEDs and ![]() Front Panel LED Functions describe the front panel LEDs.
Front Panel LED Functions describe the front panel LEDs.![]() Sun Fire X4600/X4600 M2 Servers Back Panel LEDs and
Sun Fire X4600/X4600 M2 Servers Back Panel LEDs and ![]() Back Panel LED Functions describe the back panel LEDs.
Back Panel LED Functions describe the back panel LEDs.![]() Fan Tray Fault LED Locations and
Fan Tray Fault LED Locations and ![]() Fan Tray LED Functions describe the fan tray LEDs.
Fan Tray LED Functions describe the fan tray LEDs.


![]() Sun Fire X4600 Fault LED and Button Locations on the CPU module. For information on LED behavior, refer to
Sun Fire X4600 Fault LED and Button Locations on the CPU module. For information on LED behavior, refer to ![]() CPU Module LED Functions.
CPU Module LED Functions.![]() LEDs on Motherboard and GRASP board. For information on LED behavior, refer to
LEDs on Motherboard and GRASP board. For information on LED behavior, refer to ![]() Motherboard and GRASP Board LED Functions
Motherboard and GRASP Board LED Functions 

![]() Jumpers on the Motherboard and
Jumpers on the Motherboard and ![]() Jumper Functions . Note
that some jumpers are not meant to be used in the field; these
are labelled “Do not use” in the table.
Jumper Functions . Note
that some jumpers are not meant to be used in the field; these
are labelled “Do not use” in the table.