Chapter 1 Introduction to the Sun Ultra 27 Workstation
This chapter provides an overview of the Sun Ultra 27 Workstationand includes the following sections:
Checking Package Contents
Carefully unpack all workstation components from the packing cartons. The following items are contained in the package.
|
Hardware |
|
|
Documentation and Media Kit |
|
If you ordered an optional country kit, the kit ships in a separate package and includes a power cable, keyboard, and mouse.
Note –
Use only a Type 7 keyboard and mouse with the Sun Ultra 27 Workstation.
External Connections and Components
Use this section to familiarize yourself with the workstation's external connections and components.
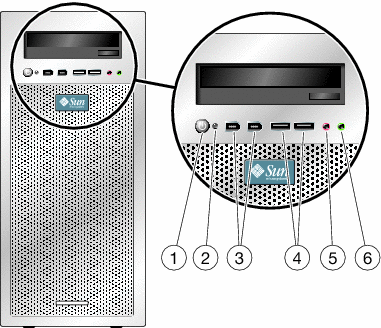
Front Panel

|
1 |
Power button |
4 |
Two USB ports |
|
2 |
Power LED |
5 |
Microphone-in jack |
|
3 |
Two 1394 ports |
6 |
Headphone-out jack |
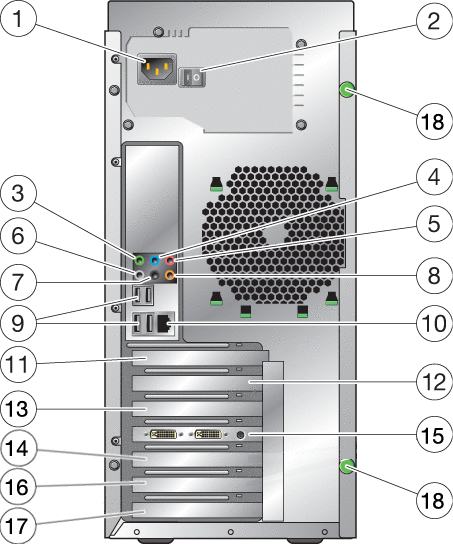
Back Panel

|
1 |
AC power connector |
10 |
Ethernet connector |
|
2 |
11 |
Cover plate (no slot) |
|
|
3 |
Audio jack (green) |
12 |
Slot 0, PCIe2 x16 |
|
4 |
Line-in jack (blue) |
13 |
Slot 1, PCIe2 (x8 mechanical, x4 electrical) |
|
5 |
Microphone jack (blue) |
14 |
Slot 2, PCIe2 x16 |
|
6 |
Audio jack (gray) |
15 |
Slot 3, PCIe x1 |
|
7 |
Audio jack (black) |
16 |
Slot 4, PCI 33MHz, 32–bit slot |
|
8 |
Audio jack (orange) |
17 |
Slot 5, PCIe (x8 mechanical, x4 electrical) |
|
9 |
Four USB 2.0 ports |
18 |
Thumbscrew (for side cover) |
Setting Up the Workstation
This section describes how to connect the power, peripheral devices, and the network.
Note –
For maximum reliability and performance, install your workstation into an environment that conforms to the environmental specifications listed in the section, Environmental Specifications, and ensure correct configuration of the workstation as discussed in this document.
 To Set Up the Workstation
-
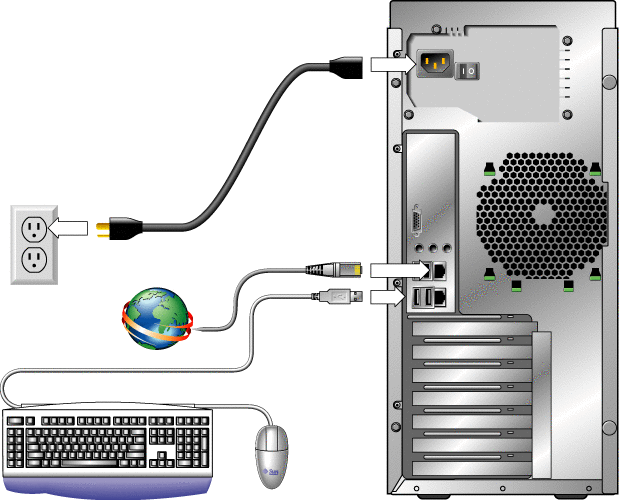
Connect the workstation power cord to a grounded electrical outlet.

-
Connect the keyboard to a USB connector on the back or front panel.
-
Connect the mouse to the USB connector on the underside of the keyboard or to a USB connector on the front or back panel.
-
Connect the Ethernet cable to the Sun Ultra 27 Workstation, and connect the other end of the cable to an Ethernet RJ-45 jack.
-
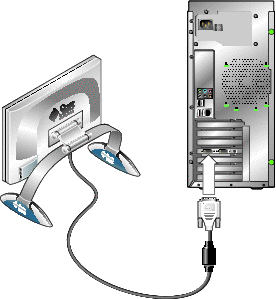
Connect the monitor to the graphics card connector.
For information about connecting multiple monitors, see Appendix A, Configuring the System for Multiple Monitors.

Note –Your graphics card might require a DVI cable to connect to your monitor.
-
Connect any additional external devices to the workstation using the front or back connectors.
If you are adding an external boot device, see the section, Adding and Removing Boot Devices .
Powering the Workstation On and Off
This section describes how to properly power on and off your workstation.
 To Power On the Workstation
-
Turn on the power to the monitor and to all external devices.
-
Turn the power switch on the back of the workstation to the On ( | ) position.
-
Press and release the power switch on the front panel.
-
After several seconds, verify that the Power LED next to the power switch is lit.
The Power LED lights up after the workstation begins the internal booting process.
-
To change the system parameters in the BIOS, press the F2 key during the POST process to access the BIOS Setup Utility.
 Caution –
 Be careful when making changes to the system BIOS, as some changes can cause your system to malfunction. See the Sun Ultra 27 Workstation Service Manual for information about the BIOS Setup Utility.
 To Power Off the Workstation
-
Save your data and close any open applications.
-
Use one of the following power-off options:
-
Use the operating system shutdown command or menu option.
 Caution –
 To avoid data loss, use the first option whenever possible.
-
If the first step does not shut off the workstation power, press and hold the Power button for approximately four seconds.
-
If the preceding options do not power off the workstation, turn the power switch on the back panel to the Off ( 0 ) position.
Note –After powering off the workstation, wait at least 10 seconds before powering on the workstation again.
-
Adding and Removing Boot Devices
The BIOS Setup Utility's Boot screen lists the known devices from which the workstation can boot. To boot from a newly installed or attached device, you must first access the BIOS Setup Utility and add the device to the boot list. You can also remove devices from the list or arrange the order of the devices to specify a boot priority.
Incorrect BIOS settings can cause your workstation to malfunction. Be careful when making changes to the BIOS Setup Utility.
 To Add and Remove Boot Devices
-
Power on the workstation (see Powering the Workstation On and Off).
The system boots.
-
Press the F2 key during system boot.
The BIOS Setup screen appears.
-
Use the arrow keys to navigate to the Boot menu.
-
In the Boot Settings menu, add or remove the device to or from the list of boot devices .
-
If necessary, change the boot device priority by moving higher priority devices towards the top of the list.
-
Press the F10 key to save your settings and exit.
Adding Optional Components
If the current configuration of your workstation allows, you can add optional components, such as expansion and graphics cards, memory, and hard drives. To add optional components to the workstation, see the relevant section and procedures in the Sun Ultra 27 Workstation Service Manual.
Operating System Support
The following operating systems are supported for use with your Sun Ultra 27 Workstation:
-
OpenSolaris OS (available as a preinstalled option, see Chapter 2, Configuring the Optional Preinstalled OpenSolaris Operating System)
-
Solaris 10 OS (available as a preinstalled option, see Chapter 3, Configuring the Optional Preinstalled Solaris Operating System)
-
Red Hat Enterprise Linux
-
SUSE Linux Enterprise Desktop
-
Windows XP, Windows Server 2008, or Windows Vista Ultimate
For an updated list of supported versions of the operating systems listed above, navigate to the Sun Ultra 27 Workstation product page at:
http://www.sun.com/desktop/index.jsp
For information about installing supported versions of Linux, Windows, or a non–preinstalled version of the OpenSolaris or Solaris OS, see the Sun Ultra 27 Workstation Linux, OpenSolaris and Solaris Operating System Installation Guide or the Sun Ultra 27 Workstation Windows Operating System Installation Guide.
Additional Tools and Software
The Sun Ultra 27 Workstation Workstation Tools and Drivers DVD that is included with the workstation contains the following software:
-
Supplemental drivers, which provide support for preinstalled and supported user-installed operating systems. See the appropriate workstation Operating System Installation Guide for information on installing these drivers.
-
Eurosoft Pc-Check diagnostics software, which provides various diagnostics testing options for the Sun Ultra 27 Workstation. See the Sun Ultra 27 Workstation Service Manual for more information.
-
Erase Primary Boot Hard Disk utility, which is used to erase the preinstalled operating system.
-
XpReburn utility, which is used to add drivers to an existing Windows installation CD.
-
2003Reburn utility, which is used to add drivers to an existing Windows 2003 installation CD.
-
Open DOS, which allows you to navigate the CD and run command-line utilities.
Note –
The Tools and Drivers DVD that is shipped with your workstation might not be the latest version. For more information, refer to the Sun Ultra 27 Workstation Product Notes or the product web site for more information.
- © 2010, Oracle Corporation and/or its affiliates
