Introduction to the Sun Ultra 40 Workstation
|
This chapter provides an overview of the Sun Ultra 40 and the Sun Ultra 40 M2 Workstations, including power-on and power-off procedures.
It includes the following sections:
1.1 Workstation Features
TABLE 1-1 shows key components of the Sun Ultra 40 Workstation.
TABLE 1-1 Sun Ultra 40 and Ultra 40 M2 Features
|
Component
|
Ultra 40
|
Ultra 40 M2 Differences
|
|
CPU
|
- Two high-performance AMD Opteron Socket 940 CPUs (single-core or dual-core)
- Processor frequencies: 2.0 GHz and faster
- Up to 1 MB cache
|
- Two high-performance AMD Opteron Socket F/1207 CPUs ( dual-core only)
|
|
Memory
|
- Eight PC3200 DIMM slots
- 512 MB, 1 GB, or 2 GB registered ECC modules supported
- Up to 32 GB ECC memory
|
- Eight DDR2-667 DIMM slots
- 1 GB, 2 GB and 4 GB registered ECC modules supported
|
|
Media storage
|
DVD-ROM and DVD-RW
|
|
|
Hard disk drives
|
Up to four SATA disk drives with optional PCIe HBA for SAS
|
Up to 8 SATA or 8 SAS with optional PCIe HBA for SAS
|
|
Power supply
|
1000W PSU
|
|
|
Network I/O
|
Two on-board 10/100/1000BASE-T Gigabit Ethernet controllers
|
|
|
PCI I/O
|
- Two PCI Express x16 graphics slots
- Two PCI Express x4 expansion slots
- Two PCI 33-MHz 32-bit slots
|
- Same
- Two PCI Express x8 expansion slots (mechanically x16)
- One PCI 33-MHz 32-bit slot
|
|
Other I/O
|
- Eight USB 2.0 connectors (two on the front and six on the back of the workstation)
- Two IEEE 1394a (FireWire) connectors on the front panel
- Line-in/line-out jacks on the back panel
- Microphone-in jack on the front panel
- Headphone-out on the front panel
- SPDIF
|
|
1.2 Operating System and Software
The following sections describe the preinstalled and supported software for the Sun Ultra 40 Workstation.
1.2.1 Preinstalled Operating System and Software
Solaris 10 Operating System, Sun
 Studio 10, Sun Java
 Studio Creator and Sun Java
 Studio Enterprise software are preinstalled on your system.
For information about configuring the preinstalled Solaris 10 OS and other software for the Sun Ultra 40 Workstation, refer to the Ultra 40 Workstation Operating System Installation, Part Number 819-7577.
For detailed information about the Solaris 10 OS and other software, see the Sun software documentation site at:
http://docs.sun.com
1.2.2 Supported Operating Systems
The Solaris 10 Operating System is preinstalled on your workstation. You can also install one of the following supported operating systems:
Sun Ultra 40
- Red Hat Enterprise Linux (RHEL) 4 32-bit/64-bit Update 2
- RHEL 3 32-bit/64-bit Update 6
- SUSE Linux Enterprise (SLES) 32-bit/64-bit SP3
- Pre-installed Solaris 10 x86 Update 1
- Windows XP 32-bit SP2
- Windows XP 64-bit
Sun Ultra 40 M2
- Red Hat Enterprise Linux (RHEL) 4 32-bit/64-bit Update 4
- RHEL 3 32-bit/64-bit Update 8
- SUSE Linux Enterprise Desktop (SLED) 64-bit
- Pre-installed Solaris 10 x86 Update 2
- Windows XP 32-bit SP2
- Windows XP 64-bit
Instructions for installing these operating systems are available in the media sets that are packaged with the operating system software.
Note the following before installing a Linux or Windows XP operating system:
- If you are installing a Linux operating system, you will need to set the BIOS Installed O/S option. For more information, see the Ultra 40 Workstation Operating System Installation Guide.
- If you are installing Windows XP and you plan to configure RAID on your workstation, you will need to install the RAID drivers in conjunction with Windows XP. For more information, see the Ultra 40 Workstation Operating System Installation Guide.
- The default setting in BIOS is “Others.” If you are installing Windows, you will have to change it.
If you want to run Red Hat Enterprise Linux WS or SUSE Linux Enterprise System on the Sun Ultra 40 Workstation, you can order it from the from:
http://wwws.sun.com/software/linux/index.html
Support for additional operating systems will be available after the initial release of the Sun Ultra 40 Workstation. Refer to the following URL for information about the operating systems currently supported:
http://www.sun.com/ultra40
| Note - After installing the operating system, refer to the Ultra 40 Workstation Operating System Installation, part number 819-7577, for further information about updates and drivers that must be installed.
|
1.2.3 Tools and Drivers CD Software
The Sun Ultra 40 Workstation Tools and Drivers CD, included with the workstation, contains the following software:
- Supplemental drivers to support preinstalled or user-installed operating systems. See the Ultra 40 Workstation Operating System Installation, part number 819-7577, for information about installing these drivers.
- Eurosoft PC-Check diagnostics software, which provides various diagnostics testing options for the Sun Ultra 40 Workstation. See Chapter 3 for more information.
- Wipedisk utility to erase the preinstalled operating system.
- XpReburn utility to add drivers to an existing XP installation CD.
- Open DOS.
1.3 Hardware Features
The following sections describe the hardware orientation and features of your Sun Ultra 40 Workstation.
1.3.1 Finding the System Serial Number
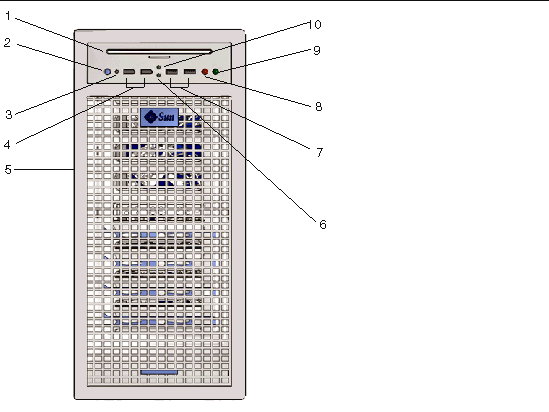
The system serial number is located on the left side of the system toward the front, as shown in FIGURE 1-1 and FIGURE 1-3. See the corresponding table for part number location.
1.3.2 External Features
This section describes the front and back panels of the Sun Ultra 40 Workstation.
FIGURE 1-1 shows the front panel of the Sun Ultra 40 Workstation. TABLE 1-1 lists the controls and indicators.

FIGURE 1-1 Front Panel (Ultra 40 M2 shown)
TABLE 1-2 Front Panel Controls and Indicators
|
Label
|
Button/LED/Port
|
|
1
|
DVD drive
|
|
2
|
Power button
|
|
3
|
Power LED
|
|
4
|
1394 ports (2)
|
|
5
|
Serial number
|
|
6
|
HD activity indicator LED (Ultra 40 M2 only)
|
|
7
|
USB ports (2)
|
|
8
|
Microphone-in jack
|
|
9
|
Headphone-out jack
|
|
10
|
DVD activity indicator LED (Ultra 40 M2 only)
|
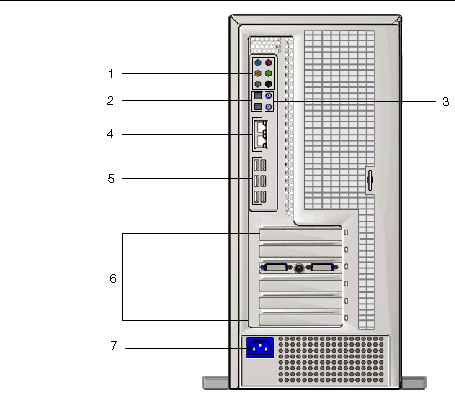
shows the back panel of the Sun Ultra 40 Workstation. TABLE 1-3 lists the controls and indicators.

FIGURE 1-2 Back Panel (Ultra 40 shown)
TABLE 1-3 Back Panel
|
Label
|
Connector/Slot
|
|
1
|
Audio connectors (6)
|
|
2
|
SPDIF coaxial (top: out, bottom: in)
|
|
3
|
SPDIF optical (top: out, bottom: in)
|
|
4
|
Ethernet connectors
(top: NIC1 (secondary), bottom: NIC0 (primary))
|
|
5
|
USB connectors (6)
|
|
6
|
PCI connectors. See TABLE 1-4.
|
|
7
|
Power connector
|
TABLE 1-4 PCI Slots (Top to Bottom)
|
Ultra 40
|
Ultra 40 M2
|
|
PCI-Express x16 graphics slot
|
PCI-Express x16 graphics
|
|
PCI-Express x4 slot
|
PCI-Express x8 (mechanically x16)
|
|
PCI-Express x16 graphics slot (primary)
|
PCI-Express x16 graphics (primary)
|
|
PCI 33 MHz/32-bit PCI 33/32
|
PCI 33/32
|
|
PCI 33 MHz/32-bit (fits 66 MHz/64-bit card)
|
PCI-Express x8 (mechanically x16)
|
|
PCI-Express x4 slot
|
|
1.3.3 Ultra 40 Internal Components
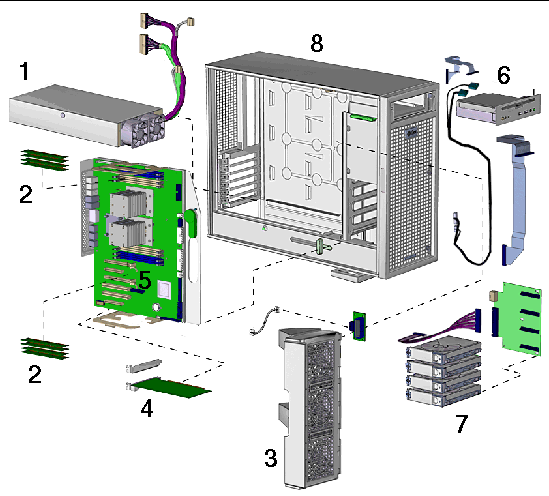
FIGURE 1-3 shows the locations of the components inside the Sun Ultra 40 Workstation.

FIGURE 1-3 Ultra 40 System Components
.
TABLE 1-5 Ultra 40 Components
|
Label
|
Component
|
|
1
|
Power supply
|
|
2
|
Four DIMM slots
|
|
3
|
System fans
|
|
4
|
PCI Express x16 graphics card (optional)
|
|
5
|
PCI Slots:
PCI-Express x16 graphics slot
PCI-Express x4 slot
PCI-Express x16 graphics slot (primary)
PCI 33 MHz/32-bit PCI 33/32
PCI 33 MHz/32-bit (fits 66 MHz/64-bit card)
PCI-Express x4 slot
|
|
6
|
I/O module and DVD drive
|
|
7
|
Hard disk drives (up to 4)
|
|
8
|
Serial number
|
1.3.4 Ultra 40 M2 Internal Components
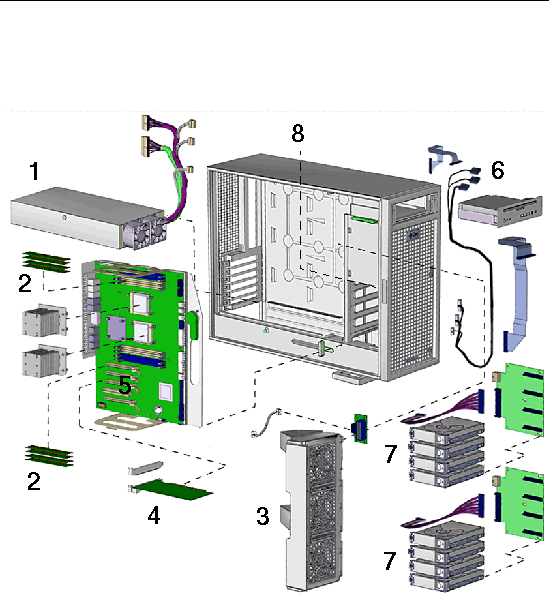
FIGURE 1-4 shows the locations of the components inside the Sun Ultra 40 M2 workstation.

FIGURE 1-4 Ultra 40 M2 System Components
TABLE 1-6 Ultra 40 M2 System Components
|
Label
|
Component
|
|
1
|
Power supply
|
|
2
|
DIMMs
|
|
3
|
System fans
|
|
4
|
PCI Express x16 graphics slot
|
|
5
|
PCI Slots:
PCI-Express x16 graphics
PCI-Express x8 (mechanically x16)
PCI-Express x16 graphics (primary)
PCI 33/32
PCI-Express x8 (mechanically x16)
|
|
6
|
I/O module and DVD drive
|
|
7
|
Hard disk drives (up to 8)
|
|
8
|
Serial number
|
1.4 Powering the Workstation On and Off
This section describes how to power the workstation on and off.
1.4.1 Powering On the Workstation
After you have set up the system properly and connected all the required cables as described in the Ultra 40 Workstation Operating System Installation, part number 819-7577, you can now power on your system.
| Tip - If you are installing optional internal components, such as additional memory, an SLI connector, DIMMs, PCI cards, optical drives, or hard drives, install those components before you power on the workstation. See Chapter 6 for removal and replacement procedures. If you are not installing optional components, you are ready to power on the workstation.
|
To power on the workstation:
1. Turn on the power to the monitor and to all external devices.
2. Press and release the workstation Power button on the front panel (FIGURE 1-1).
3. Wait several seconds, the verify that the platform Power LED next to the Power button is lit.
The platform Power LED lights after the workstation begins the internal booting process (FIGURE 1-1).
4. If you are powering on the workstation for the first time, you might need to configure or install the operating system after the system has finished booting.
See Section 1.2, Operating System and Software for more details.
If you need to change the system parameters in the BIOS, press the F2 key during the POST process to access the BIOS Setup utility.

|
Caution - Be careful when making changes to the system BIOS, as some changes can cause your system to malfunction.
|
1.4.2 Powering Off the Workstation
To power off the workstation:
1. Save your data and close any open applications.
2. Read all of the following power-off options before powering off the workstation:
- Power off the workstation by using the operating system shutdown command or the menus.
In most cases, this shuts down the operating system, then turns off the power to the workstation.
- If the operating system shutdown procedure fails to power off the workstation, or if it is not available, press and release the Power button shown in .
- This initiates an orderly shutdown of the operating system and powers off the workstation.

|
Caution - To avoid data loss, use one of the first two options whenever possible.
|
- If the first two options fail to shut down the workstation, press and hold the Power button for approximately four seconds.
This action shuts down the power to the workstation but does not initiate an orderly shutdown of the system. This method might result in data loss.
If the preceeding options fail to power off the workstation, see Chapter 2 for more options.

|
Caution - After powering off the workstation, wait at least four seconds before powering on the workstation again.
|
1.4.3 Power Interruptions
If the power to the system is interrupted for fewer than 10 seconds, do the following to ensure that the standby power is completely shut off:
1. Unplug the AC power cord from the workstation.
2. Wait 10 or more seconds.
3. Plug the AC power cord into the workstation.
4. Power on the workstation.
| Sun Ultra 40 Workstation Service Manual
|
820-0123-13
|
   
|
Copyright © 2008, Sun Microsystems, Inc. All Rights Reserved.
 10 Operating System, Sun
 Studio 10, Sun Java
 Studio Creator and Sun Java
 Studio Enterprise software are preinstalled on your system.


