| Skip Navigation Links | |
| Exit Print View | |

|
Sun Fire X4800 Server Installation Guide Sun Fire X4800 Server Documentation |
| Skip Navigation Links | |
| Exit Print View | |

|
Sun Fire X4800 Server Installation Guide Sun Fire X4800 Server Documentation |
About This Documentation (PDF and HTML)
Front and Back Features and Components
Unpacking the Server and Identifying the Rack Mounting Hardware
How to Identify Your Rack Mounting Kit
Installing the Server In the Rack Using the Standard Rack Mounting Kit
Contents of the Standard Rack Mounting Kit
Location of the Rack Mounting Kit and the Shipping Bracket Kit
Installing the Server In a Rack Using the Standard Rack Mounting Kit
How to Remove Components to Reduce Weight
How to Replace the Components in the Server
How to Insert the Server Into the Rack
Removing and Installing the Standard Rack Mounting Kit Shipping Brackets
How to Remove the Standard Rack Mounting Kit Shipping Brackets
How to Install the Standard Rack Mounting Kit Shipping Brackets
Installing the Server In the Rack Using the Universal Rack Mounting Kit
Contents of the Universal Rack Mounting Kit
Installing the Server in a Rack Using the Universal Rack Mounting Kit
Installing and Removing the Universal Rack Mounting Kit Shipping Brackets
Removing the Server From the Rack
How to Remove the Server From the Rack
How to Remove the Rack Mounting Hardware from the Rack
Attaching Administration (SP) Cables
Powering the Server On and Off
Getting Service for Your Server
How to Find the Server's Serial Number
Setting Up the Preinstalled Solaris Operating System
Configuring the Preinstalled Oracle Solaris OS
How to Connect to the Server Using the Server's IP Address
(Optional) How to Redirect the Console Output to the Video Port
How to Connect to the Server Using a Serial Capture Program
Oracle Solaris OS Information Products and Training
Communicating With the ILOM and the System Console
About ILOM SP IP Addresses and the ILOM Interfaces
Connecting to the System Console
I/O and Interrupt Resource Allocation
Option ROM and I/O Space Allocation
Allocating MSI Interrupt Space (Oracle Solaris OS Only)
How to Identify and Fix Interrupt Resource Shortages
Sun Fire X4800 Server Specifications
Physical Specifications for the Sun Fire X4800 Server
The rack mounting hardware consists of front and rear adapter brackets with cage nuts, screws, and shelf rails.
 | Caution - The server weighs about 180 pounds (100 kg) when fully loaded with components. To reduce the risk of serious personal injury or equipment damage, use a mechanical lift to install the server into the rack. If a lift is not available, remove components as described in How to Remove Components to Reduce Weight. This reduces the weight of the server to 80 pounds (45 kg). Always load equipment into a rack from the bottom up so that it does not become top-heavy and tip over. Deploy your rack’s anti-tilt bar to prevent the rack from tipping during equipment installation. |
See the following figure.
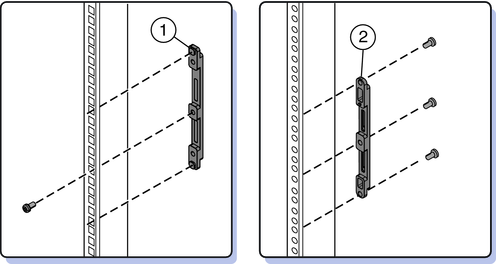
The server ships with two sets of front adapter brackets: one (1) for racks with square holes and one (2) for racks with round holes. Select the adapter brackets that match your rack.
Make sure you orient the adapter brackets correctly, with the arrow pointing up.
Select the screws that match your rack.
Use one M6 per side for a square-hole rack.
Use three M6 or three 10-32 per side for a threaded round-hole rack.
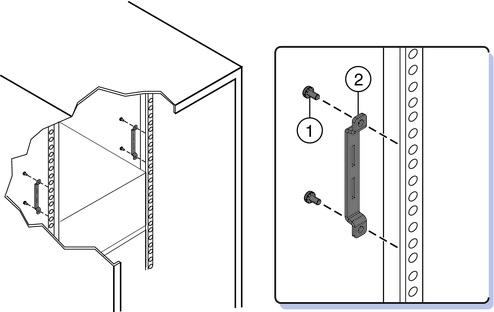
The following figure shows the front adapter brackets being attached to a square-hole rack (1) and a round-hole rack (2).

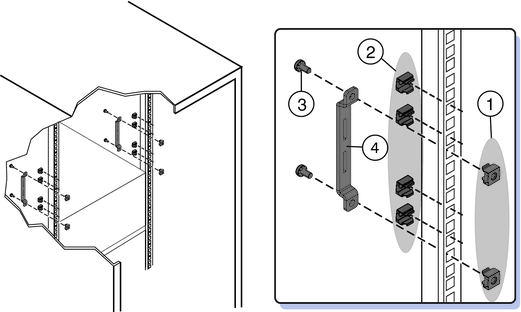
If your rack has square holes, skip this step.

Note the orientation of the cage nuts for the shipping bracket.
They face outside the rack, in the opposite direction of the cage nuts for the adapter brackets.
They are located in the first and third holes above the cage nuts for the adapter brackets.
Note - If you are going to install shipping brackets so you can ship your system in a rack, and your system has a square-hole rack, you must install the rear cage nuts for the shipping bracket on the rack now, before installing the rear adapter bracket. You cannot add the cage nuts for the rear shipping bracket when the rear adapter brackets are in place. See Removing and Installing the Standard Rack Mounting Kit Shipping Brackets for instructions to install the shipping brackets.

The following figure shows a square-hole rack.
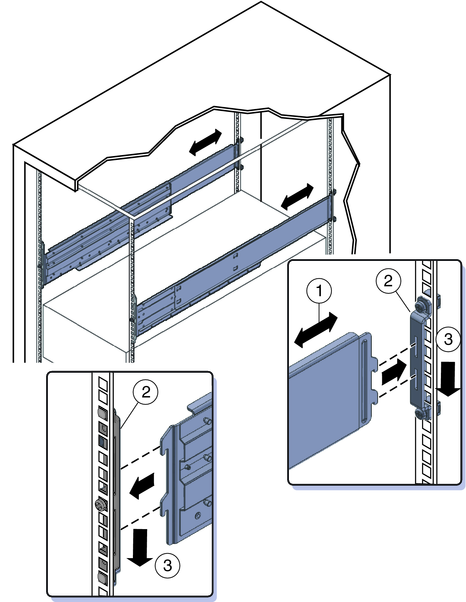
The shelf rails expand (1) to fit the rack, then slip into the slots on the adapter brackets (2), and drop into place (3).
Be certain to place the shelf rails in the proper orientation, with the shelf facing inward and the gap towards the front of the rack.

Next Steps