| C H A P T E R 1 |
|
Creating a MIDlet and MIDlet Suite |
This tutorial shows you how to create a currency converter application. Before you begin, download the source code from the Forte for Java portal, at http://forte.sun.com/ffj/documentation/tutorialsandexamples.html
This chapter gets you started with the Forte for Java 4, Mobile Edition tool. The chapter takes you through the tasks necessary to build a J2ME MIDP/CLDC application:
The currency converter application, called Converter, converts amounts from one currency to another. You can customize the currency displayed, such as euros, yen, or dollars, for both the "from" and "to" currency categories. The application prompts for the "from" currency amount and then displays the equivalent amount in the other currency. There are four Java files for the sample application:
As you go through the tutorial, keep in mind that the Mobile Edition IDE often has more than one way to perform a particular function. The tutorial illustrates one way to perform a function, but there are often other ways to accomplish the same function. For example, functions from the drop-down menus can usually be accessed by right-clicking on an entity and then selecting from its contextual menu. As you grow more familiar with the tool, you will find the operational mode with which you are most comfortable.
You need to perform some basic setup tasks within the Mobile Edition IDE to create and build the sample MIDlet application. Such setup tasks including mounting a filesystem, adding an emulator, and setting the emulator's default skin.
Begin by mounting the filesystem (or directory) within which you want to place the sample application code. Mounting a filesystem lets you browse and work with its files from within the Mobile Edition IDE. The mounted filesystem is included in the Java classpath, which is necessary for compiling, running, and debugging code.
1. From the File menu, choose Mount Filesystem.
This opens a wizard from which you choose the template for the filesystem.
2. Select the Local Directory and click Next.
3. Use the wizard to navigate to the D:\ffjme\exampledir directory. Select this directory and click Finish to complete the mount process.
The D:\ffjme\exampledir directory appears in the Filesystems tab of the Explorer pane. The directory is mounted and you can browse its contents.
An emulator lets you simulate the execution of an application on a target device, just as the user might experience it. It gives you the ability to run and debug applications within the IDE. Typically, an emulator includes a sample of devices that it emulates. These sample devices are called "skins." The J2ME Wireless Toolkit Emulator is one such emulator. It includes a number of example devices or skins, such as a Motorola i85 phone, a Palm OS device, a Default Color Phone, and so forth. You can test your application on any of the Wireless Toolkit Emulator's example devices. This feature also gives you the ability to test the portability of your application across different devices.
To learn more about emulators, see Setting Emulators. In that section, you can see how to set multiple instances of an emulator, which makes it faster and easier to test your application on different devices. For demonstration purposes, the tutorial assumes that you have created three additional instances of the J2ME Wireless Toolkit emulator.
The default emulator is the installed emulator that is invoked when you test your application. For MIDP applications, the tool maintains one default emulator at a time. The default emulator is used for executing MIDlets that are not part of a MIDlet suite and newly created MIDlet suites.
1. In the Runtime tab of the Explorer, expand the Installed Emulators node and right-click the emulator that you want to set as the default emulator. Choose Set As Default.
In this example, the selected emulator, J2ME Wireless Toolkit 1.0.3 (4), is now the default emulator.
2. In the Explorer, right-click the first J2ME Wireless Toolkit instance and choose Properties from the menu.
3. Set the properties for the emulator in the property sheet.
FIGURE 1-1 shows the emulator's property sheet.
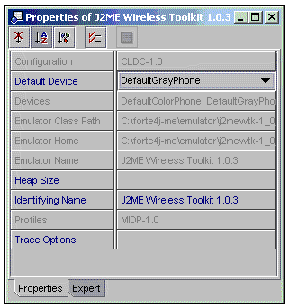
An emulator includes a set of sample devices, which are called skins. You can set one of the emulator's skins to be the default skin, and you can change an emulator's default skin. The default skin is the device that appears when you test your application with the default emulator.
Each version of the Wireless Toolkit emulator can be set to a different default skin. If you want to test an application on different devices, you can easily do so by first setting each installed emulator instance to a different default skin. Then, when you test the application, you change default emulators. Or you can leave the same default emulator in place and change the emulator's default skin.
To set an emulator's default skin:
1. In the Runtime tab of the Explorer, expand the Installed Emulators, and then expand the newly added J2ME Wireless Toolkit (4) emulator to view its skins.
Notice that none of its devices are marked as the default skin.
2. Right-click one of the emulator's skins and choose Set as Default.
In this example, the RIMJavaHandheld device is set to be this emulator's default skin. The IDE indicates the default by appending the word "default" in brackets.
When you enter code through the Source Editor window, you can use the Mobile Edition IDE's code completion feature. For developing MIDlets, set code completion to CLDC/MIDP. You use the code completion feature when you add a method to the MIDlet class.
To set the code completion feature:
1. From the Tools menu in the main window, choose Options.
2. In the Options window, expand the Editing node and click Java Code Completion.
3. In the Java Code Completion property sheet, select the CLDC/MIDP option for the Code Completion Mode.
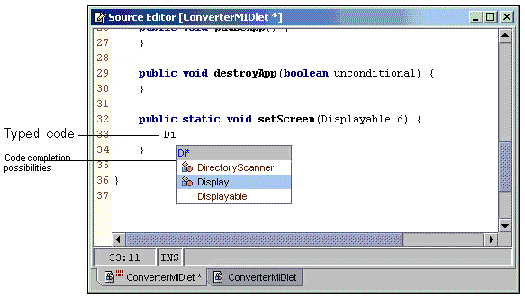
When you type code in the Source Editor window, you can use the code completion feature to help complete the code. (See FIGURE 1-2.)
1. To use code completion, start entering some code and press the Control (Ctrl) key followed by the spacebar.
The tool displays possible values to complete your typing.
2. Use an item from the list by clicking on it and pressing Enter.
3. To narrow the list to a closer match, continue typing.
The code completion display remains open until you press Enter or complete the line of code.
|
Note - If you press Enter without highlighting an item in the list, the code completion display closes without affecting the source code. |
The items in the code completion display continually change to exactly reflect the state of the line of code.
 [ D ]
[ D ]This section of the tutorial shows you how to create, compile, and test a single MIDlet. You'll learn how to create a MIDlet class, and then use the source editor and various tool functions to view and edit the code. Later, the tutorial shows you how to create a MIDlet suite and add an existing MIDlet, such as the MIDlet created here, to that MIDlet suite.
In this tutorial, the new MIDlet is created in the package directory myconverter. When you create a new MIDlet, the tool uses a MIDlet template that contains the appropriate class definition, package and import statements, and the stubs for the required MIDlet methods.
Packages are a means of keeping related Java code together. Packages are often equated to directories. The recommended practice is to keep the Java classes for the same application in one package.
To create a package for the MIDlet:
1. In the Explorer, click the filesystems tab. Then right-click the D:\ffjme\exampledir directory and Choose New  Java Package.
You can place a new package within any directory in the file system structure.
2. In the New Wizard pane, enter the name for the new package, and click Finish.
A new package called myconverter is created in the D:\ffjme\exampledir directory. The package appears as a directory with a folder icon in the Explorer window.
1. In the Explorer, right-click the myconverter package. From the contextual menu, choose New  MIDP
MIDP  MIDlet.
Selecting the MIDlet template starts the wizard for creating a new MIDlet.
2. Enter the name ConverterMIDlet for the new MIDlet. Click Next.
3. Click Finish to create the MIDlet.
4. View the finished MIDlet in the Filesystem tab of the Explorer window and view the code in the Source Editor window.
Notice that ConverterMIDlet extends the javax.microedition.midlet.MIDlet interface and contains the basic MIDlet methods: startApp, pauseApp, and destroyApp.
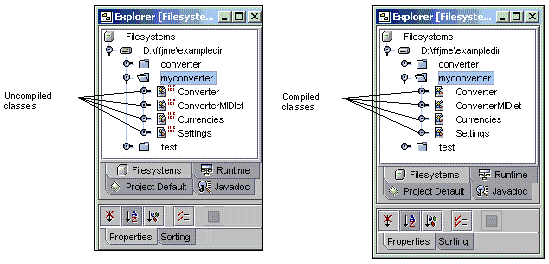
Next to the ConverterMIDlet icon there is a pattern of ones and zeros, indicating that the MIDlet is not compiled. When the MIDlet class is compiled successfully, this pattern no longer appears.
5. Expand the ConverterMIDlet node to view the ConverterMIDlet class and its fields, constructors, and methods.
You can write the code for a MIDlet in one of two ways: either by directly entering code in the Source Editor or by using the tool functions to add methods, fields, constructors, initializers, classes, and interfaces. Typically, you use the tool to add new fields and methods to a class, or modify existing fields and methods, and then later fine-tune the code directly in the Source Editor.
The following procedures show you how to use the tool and the Source Editor to enter or change code. However, to save time and effort, you can also copy the converter code and paste it into the myconverter directory.
1. In the Filesystem tab of the Explorer, right-click the ConverterMIDlet class and choose Add  Field.
The Add New Field dialog box is displayed.
2. Complete the Add New Field dialog box.
3. Double-click the ConverterMIDlet class in the Explorer window to open it in the Source Editor window.
4. Enter the declaration for a new field directly in the code. In the Source Editor window, type the declaration for the storedData field, as follows:
private RecordStore storedData; |
1. Double-click on the setScreen method to open the ConverterMIDlet class in the Source Editor. Enter the implementation code for the setScreen method using the code completion feature.
Use this implementation code for the setScreen method:
Display.getDisplay(instance).setCurrent(d); |
2. Continue entering the code for the ConverterMIDlet class, or copy the source code and paste it into the Source Editor window.
Practice using the features of the tool to enter the remaining code for the ConverterMIDlet class. You might prefer to copy the source code from the converter package and paste it into the Source Editor. If you copy the code, be sure to verify that the package name matches your package.
The ConverterMIDlet class relies on three additional Java classes: Converter, Currencies, and Settings. While these are Java classes, they are not themselves MIDlets. You can use the wizard to create each class just as you created the ConverterMIDlet class.
 Define the converter application's three additional classes by using the tool's Copy function and Paste functions.
The tool's Copy function and Paste function can be used to copy the Java code from the converter directory to the myconverter directory where you've placed the ConverterMIDlet code. Copying and pasting code ensures that the package names are set correctly.
a. Right-click the class you want to copy and choose Copy.
b. Right-click the filesystem in which you want to place the class and choose Paste  Copy.
Copy.
Once you've written your MIDlet, you are ready to compile and test it. A MIDlet class that needs to be compiled is marked with a set of ones and zeroes next to the class icon. See FIGURE 1-3.
 [ D ]
[ D ]
The tool's MIDP compiler combines into one sequence several steps that might otherwise have to be performed individually. The compiler compiles the MIDlet's .java file and produces a binary .class file. The compiler also preverifies the compiled classes. Preverifying occurs after compiling a MIDlet. Mobile Edition IDE passes the compiled class files to a Preverifier, which prepares the MIDlet for the CLDC virtual machine. The Preverifier rearranges the bytecode in the compiled classes to simplify the final stage of byte code verification on the CLDC virtual machine. The Preverifier also checks for the use of virtual machine features that are not supported by the CLDC.
1. In the Explorer, right-click ConverterMIDlet and choose Compile.
You can use the Compile or Build menu items to compile the ConverterMIDlet class and its three related Java classes.
2. Check the Output window for the compilation status.
The Output window for the compiler displays the compiler status, either that compilation was completed successfully or that compilation errors occurred. For example, the Output window displays the message "Finished ConverterMIDlet" when the compiler successfully compiles the ConverterMIDlet. Also, the class icons in the Explorer window no longer display the ones and zeroes.
When a compilation error occurs, the Explorer window marks the icon of the class with the letter "X" circled in red. The Output window displays the line or lines of code that contain the error, and the Source Editor highlights these same lines of code in red. The following figure shows what happens if ConverterMIDlet is compiled with an incomplete line of code.
You can test a MIDlet after you have successfully compiled it. You use the Execute menu item to run a compiled MIDlet. The MIDlet application runs using the default emulator's current (default) device skin.
 In the Explorer, right-click ConverterMIDlet and choose Execute.
The ConverterMIDlet application lets you convert from one currency amount to another. For example, in this test, the application is set to convert from Japanese yen to euros. The current default emulator is set to use the DefaultGrayPhone skin.
Notice that when the application starts, the emulator device displays the name of the application, Converter, at the top of its screen.
To Test a MIDlet on an Emulator's Device Skin:
1. After you execute the MIDlet, the Converter application is running and you are positioned at the application's first prompt or display.
2. Enter the currency amount to convert by clicking the emulator's numeric keys.
3. Click the emulator's up and down arrows to choose the Settings option or Exit option.
4. From Settings, use the same up and down arrows to change the currency type settings, such as from yen to dollars. Use the Save option from the Settings display to convert the amount you entered to the other currency.
While you can work with individual MIDlets for developing and testing purposes, it is best to create MIDlets within a MIDlet suite. The MIDlet suite helps you to package your MIDlet application and prepare it for deployment.
MIDlet suites give you more control over your MIDP applications. A MIDlet suite organizes the source files and attribute files for a MIDP application. When you build a MIDlet suite, the tool automatically creates the necessary JAR file that contains the application files. Mobile Edition IDE also creates the application descriptor file, or JAD file, that is required for deployment.
1. Create a new directory called MyTestSuite in D:\ffjme\exampledir.
This directory will hold the MIDlet suite.
2. In the Explorer, right-click MyTestSuite. Choose New  MIDP
MIDP  MIDlet Suite from the contextual menu.
The MIDletSuite wizard takes you through the steps to create a MIDlet suite.
3. In the MIDletSuite wizard, type the name for the new MIDlet suite. Then click Next.
Name the new MIDlet suite Converter.
4. Select the Use Existing MIDlet option and type the name of the MIDlet class to use, or use the Browse button to locate the MIDlet class and select the converter.ConverterMIDlet class.
5. To set up the MIDlet properties, type ConverterMIDlet as the name that the tool displays for the MIDlet.
6. Choose the default emulator for the MIDlet suite, and click Finish.
In the Choose Emulator pane, select DefaultColorPhone, which is the default device skin for the J2ME Wireless Toolkit 1.0.3 (2) emulator.
7. Expand the MyTestSuite node and examine its contents.
8. In the Filesystems tab of the Explorer window, right-click the ConverterMIDlet icon within Converter suite.
The MIDlet suite wizard creates the Converter suite. The Converter suite contains a ConverterMIDlet which in turn contains the ConverterMIDlet class and its fields, constructors, methods, and bean patterns. The Converter suite also contains a JAR file, the contents of which is the ConverterMIDlet executable. You can view the properties for ConverterMIDlet in the bottom half of the window or through the ConverterMIDlet's property screen.
Recall that the currency converter application consists of a single MIDlet and three Java classes. To run the application, the MIDlet must be packaged together with its Java classes in a JAR file. The MIDlet suite accomplishes the required packaging so that the MIDlet application can be deployed. The MIDlet suite also contains the Java Application Descriptor (JAD) file. Both the JAR file and JAD file are required to package a MIDlet application.
The JAD file contains a predefined set of attributes for a MIDlet in the MIDlet suite. These attributes allow the application management software to identify, retrieve, and install MIDlets. You can define your own application-specific attributes and add them to the JAD file.
A Java Archive (JAR) file contains the Java classes for each MIDlet in the MIDlet suite and any resource files that the MIDlets use. Resource files are other, non-Java files. The JAR file also includes a manifest file that describes the JAR contents and any installation-specific attributes.
1. In the Edit Suite window for the Converter MIDlet suite, click the Jar Contents tab to view the contents of the MIDlet suite's JAR file.
2. Select each class (Converter, Currencies, and Settings) to add to the JAR file and click Add.
Use the Remove or Remove All buttons to remove content from the JAR file.
3. Verify that all classes of the application have been added to the Converter MIDlet suite.
When you finish adding the currency converter application's Java classes to the JAR file, verify that the Jar Content for the suite shows the four application classes: ConverterMIDlet, Converter, Currencies, and Settings.
4. To change a property for the Converter MIDlet suite, select the Converter MIDlet suite in the Explorer window and change an attribute value in its property sheet.
5. After you change a property value (such as the compression level), right-click the Converter MIDlet suite and choose Update JAR so that the new value takes effect.
6. To verify the ConverterMIDlet's JAD file and JAR manifest file, in the Filesystems tab of the Explorer window, right-click the Converter MIDlet suite and choose View Manifest/JAD.
The View Manifest/JAD dialog box appears.
7. In the View Manifest/JAD dialog box, click the Application Descriptor tab to view the contents of the JAD file. Click the Jar Manifest tab to view the JAR manifest file.
Note that the IDE automatically generates both the application descriptor and the manifest from the MIDlet suite property settings and the suite's MIDlets.
1. In the Filesystems tab of the Explorer window, right-click MyTestSuite (the directory that contains the Converter MIDlet suite). From the contextual menu, choose Compile or Compile All (or Build or Build All) to compile the ConverterMIDlet application in the Converter MIDlet suite.
2. In the Filesystems tab of the Explorer window, right-click the Converter MIDlet suite node. From the contextual menu, choose Execute to test the ConverterMIDlet application.
The Execute function compiles the MIDlet application, if necessary, before it executes the application.
Notice that the MIDlet suite's ConverterMIDlet application runs on the emulator device skin that is configured as the default the MIDlet suite. In this case, the DefaultColorPhone skin within the J2ME Wireless Toolkit 1.0.3 (2) installation. See FIGURE 1-4.
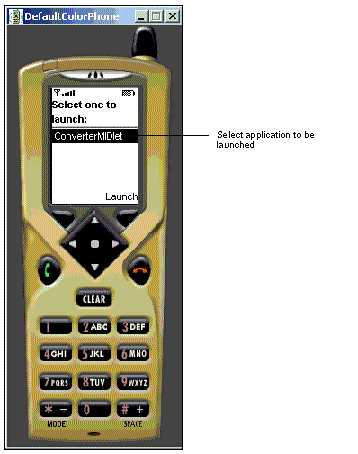
Notice, too, that instead of immediately launching the currency converter application, the emulation device displays a list of applications and asks you to select the application you want to launch. Because you are executing the MIDlet application from within a MIDlet suite, the emulator device displays all the MIDlet applications that are contained by the MIDlet suite and lets you choose from that list. The ConverterMIDlet is the only MIDlet that appears in the display because the Converter MIDlet suite contains only one MIDlet.
You can change the target emulator and device skin for a MIDlet suite. This change applies only to the MIDlet suite's emulator. Each MIDlet suite can use a different emulator or device skin, and these can differ from the emulator that is defined as the default for the Mobile Edition IDE.
1. In the Filesystems tab of the Explorer window, right-click the Converter MIDlet suite and choose Properties.
2. In the MIDlet suite's property sheet, click the Execution tab.
The Execution tab of the property sheet for the MIDlet suite displays the Emulator attribute and its current setting. The Converter MIDlet suite is set to use the second instance of the J2ME Wireless Toolkit 1.0.3 installed emulator, and its default device skin is currently set to DefaultColorPhone.
3. Click the combo box for the Emulator attribute.
You can select from any of the currently installed emulators. The menu displays the default devices that are set for each of the installed emulators.
Another way to change a MIDlet suite's emulator device is to change the emulator instance's default device skin.
To change the target emulator for a MIDlet suite by changing the device skin:
1. From the Runtime tab of the Explorer window, expand the Installed Emulators node, then expand the particular emulator instance.
2. Right-click the device in the emulator's list of device skins and choose the Set as Default option.
In this example, change the default skin for the J2ME Wireless Toolkit 1.0.3 (2) instance to Motorola_i85s. See Setting an Emulator's Default Skin.
3. Verify that you changed the default device skin. In the Filesystems tab of the Explorer window, right-click the ConverterMIDlet suite and choose properties.
Converter's Execution Properties now show the Motorola_i85s as the default device. See FIGURE 1-5. Now, executing the Converter MIDlet suite application lets you test the MIDlet on the Motorola device skin.
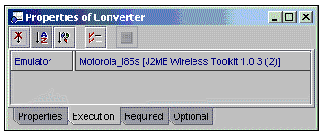
By changing an emulator's default device, you can execute the MIDlet on a different device emulator without having to recompile the MIDlet.
To change the default device for an emulator:
1. In the Runtime tab of the Explorer window, expand the Device Emulator Registry node.
2. Expand the Installed Emulators node and locate the default emulator in the list of installed emulators. In this example, the default emulator is J2ME Wireless toolkit 1.0.3.
3. Right-click the device that you want to use as the new default and choose Set As Default. In this example, right-click MinimumPhone and set it as the default device.
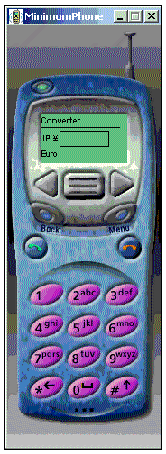
4. From the Filesystems tab of the Explorer window, execute ConverterMIDlet and test the currency conversion application on the MinimumPhone device skin.
The application now runs on the MinimumPhone device skin, as shown in FIGURE 1-6.
Copyright © 2002, Sun Microsystems, Inc. All rights reserved.