Using the REST Binding Component
This guide provides an overview of the REST Binding Component, and includes information and instructions for implementing, configuring, and deploying the binding component in a JBI project. The REST Binding Component provides connectivity for Representational State Transfer (REST) over HTTP in a JBI environment.
The REST Binding Component is based on Jersey, which implements the JSR-311 project for JAX-RS (Java API for RESTful Web Services).
What You Need to Know
These topics provide information you should know before you use the REST Binding Component:
What You Need to Do
These topics provide instructions for using the REST Binding Component:
Reference Information
These topics provide additional reference information about configuring and using the REST Binding Component:
About the REST Binding Component
The REST Binding Component provides external connectivity for REST over HTTP, allowing external systems to call RESTful web services hosted by the JBI platform and allowing JBI components to call external web services. Binding components implement the protocol transformations between abstract messages handled by the JBI Service Engines and concrete messages of the protocol. Other JBI components, such as the BPEL Service Engine, can leverage the REST Binding Component to provide and consume RESTful web services.
The REST Binding Component is based on Jersey 1.0.3.1, which implements the JSR-311 project for JAX-RS (Java API for RESTful Web Services). Jersey provides APIs for extending functionality, a client API for REST, an API for JSON support, and an API for using JAXB with JSON. It also supports annotations defined in JSR-311.
Using REST, data and functionality are resources that are accessed through Uniform Resource Identifiers (URIs), which are usually web links. Each discrete resource is identified by a unique URI. The REST Binding Component uses a simple subset of HTTP operations to transfer and transform the data represented by the resources. The data can be of various formats, including plain text, XML, HTML, JSON, and so on.
The REST BC allows you to specify custom HTTP headers and path parameters where needed. Headers define certain traits of the data being processed, including metadata, application state information, and so on. Metadata includes information about the resource, such as the accepted format and content type. The REST BC performs transformation logic based on the HTTP headers. Path parameters can be either query or matrix in style. Query parameters defined attributes of the whole URI, while matrix parameters only modify segments of the URI.
The transformation of abstract messages to REST messages occurs in the REST Binding Component. WSDL extensibility elements are used to configure this transformation. The WSDL extensibility elements are part of the binding and service sections of WSDL documents. Both the binding and service sections of a WSDL document must be properly configured to determine how the message is transformed and the destination of that message.
REST Binding Component Features
The REST BC provides the following features and functionality to GlassFish ESB:
-
Gives GlassFish ESB applications the ability to provision and consume RESTful web services.
-
Provides easy configuration through a wizard that guides you through the steps of creating a REST WSDL document.
-
Allows you to dynamically set HTTP headers and parameters using normalized message properties in a BPEL process.
-
Allows you to define application variables and configurations so you can port your REST applications from one environment to another.
-
Supports substitution variables in URLs which can be populated from normalized message properties in the BPEL process or from application variables.
-
Supports GET, PUT, POST, DELETE, and HEAD HTTP methods.
-
Supports XML, JSON, and plain text content types.
-
Supports Secure Sockets Layer (SSL).
-
Supports Jersey client filters, so you can modify a REST request or response for an outbound REST client interaction.
Supported HTTP Methods
The REST BC supports a subset of HTTP methods to manipulate the requests and responses processed by GlassFish ESB. Certain HTTP methods, such as GET and HEAD, do not make any changes to the resource or to the message and are thus considered to be “safe”. Other method are idempotent, which means that the results of multiple identical request are the same as for a single request. All supported methods except POST fall under this category.
The following subset of HTTP methods are supported for the REST BC:
-
GET
The GET method retrieves specific information from the server as identified by the request URI.
-
PUT
The PUT method requests that the message body sent with the request be stored under the location provided in the HTTP message.
-
DELETE
The DELETE method deletes the specified resources.
-
POST
The POST method modifies data on the server from which a request was sent.
-
HEAD
The HEAD method is similar to the GET method except the message body is not returned in the response. The response only includes metainformation, such as a response code or corresponding headers.
REST BC Sample Projects
There are several sample projects for the REST Binding Component to help you get started with the REST BC and further understand the information and instructions provided in this document. To download the samples and read information on how to run them, go to http://wiki.open-esb.java.net/Wiki.jsp?page=RestBCSamples.
Working With the REST BC WSDL Document
The WSDL document defines a REST interface for the project. You create and configure the WSDL document using the New WSDL Wizard, and you can further configure the interface using the WSDL Editor in NetBeans.
The following topics provides instructions for working with the WSDL document for REST:
Creating the REST BC WSDL Document
The following topics provide instructions for creating an inbound and outbound REST WSDL document, and also provide reference information for the fields on the New WSDL Wizard.
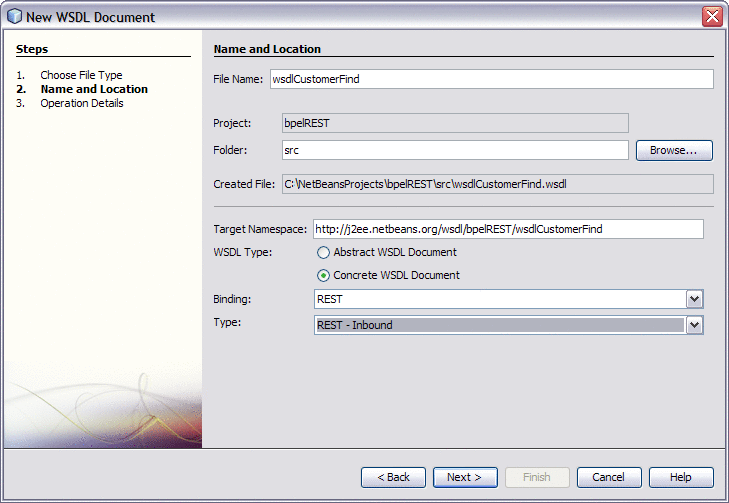
 To Create a WSDL Document for REST Inbound
-
In the NetBeans Projects window, right-click the project or a folder within the project where you want to add the WSDL document.
-
Point to New and then select WSDL Document.
The New WSDL Document Wizard appears.
-
Enter a name for the WSDL document, and verify or update the folder location for the file.
-
Select Concrete WSDL Document.
The Binding and Type fields appear.
-
For the Binding, select REST; for the Type, select REST – Inbound.
-
Click Next.
The Operation Detail window appears with the Get tab displayed.
-
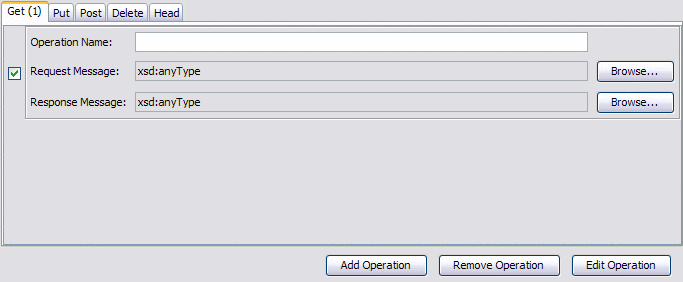
To add a GET operation, do the following:
-
On the Get tab, click Add Operation.
New fields appear on the wizard.
-
Enter a name for the operation, and click the Browse buttons to select the request and response message types.
-
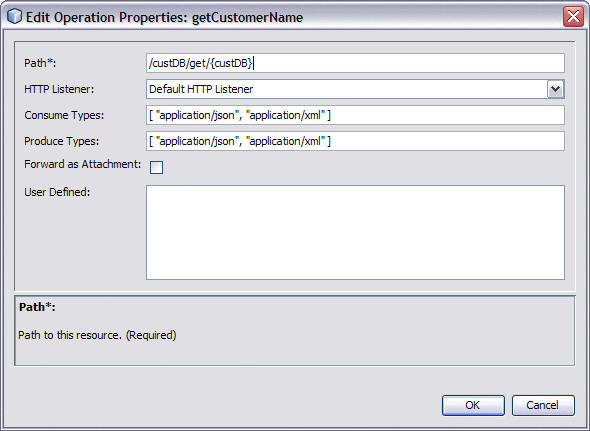
Click Edit Operation.
The Edit Operation Properties window appears.
-
Enter values for the fields described in Table 1.
-
-
To add PUT, POST, DELETE, and HEAD operations, repeat the above steps from the appropriate tab on the wizard.
-
On the New WSDL Document Wizard, click Finish.
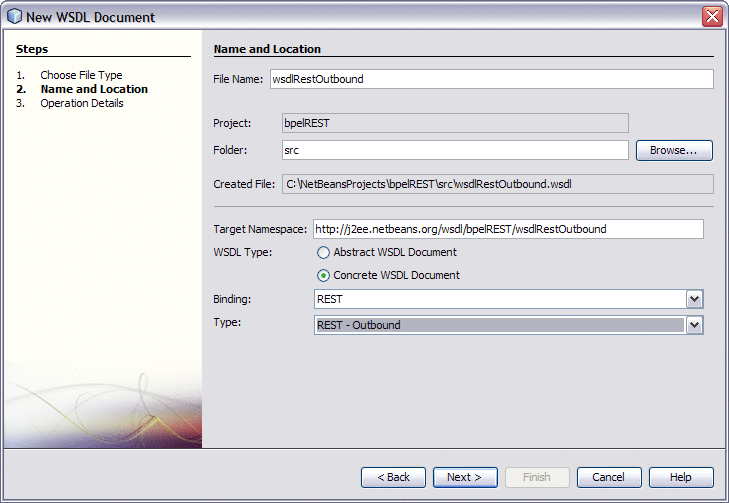
 To Create a WSDL Document for REST Outbound
-
In the NetBeans Projects window, right-click the project or a folder within the project where you want to add the WSDL document.
-
Point to New and then select WSDL Document.
The New WSDL Document Wizard appears.
-
Enter a name for the WSDL document, and verify or update the folder location for the file.
-
Select Concrete WSDL Document.
The Binding and Type fields appear.
-
For the Binding, select REST; for the Type, select REST – Outbound.
-
Click Next.
The Operation Detail window appears with the Get tab displayed.
-
To add a GET operation, do the following:
-
On the Get tab, click Add Operation.
New fields appear on the wizard.

-
Enter a name for the operation, and click the Browse buttons to select the request and response message types.
-
Click Edit Operation.
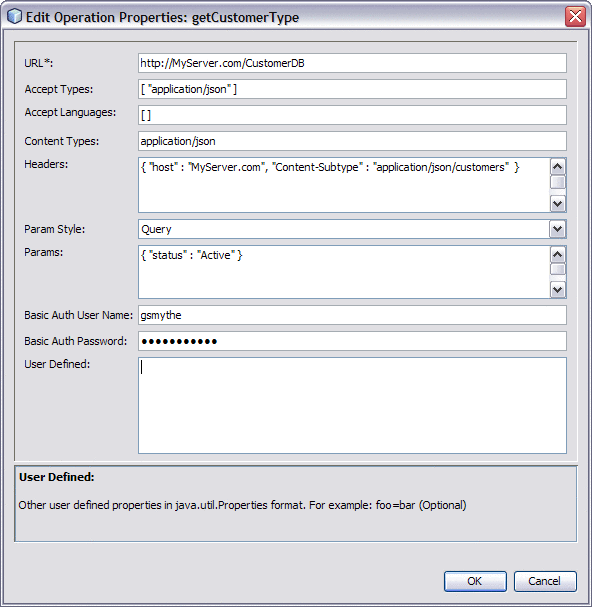
The Edit Operation Properties window appears.
-
Enter values for the fields described in Table 2.
-
-
To add PUT, POST, DELETE, and HEAD operations, repeat the above steps from the appropriate tab on the wizard.
-
On the New WSDL Document Wizard, click Finish.
New WSDL Wizard Properties for REST
The following tables list and describe the inbound and outbound operation properties for the REST BC. These properties are accessed from the Operation Details page of the New WSDL Wizard.
Table 1 Edit Operation Properties (Inbound)|
Property |
Description |
|---|---|
|
Path |
The path to the operation resource. This property is required. |
|
HTTP Listener |
The name of the HTTP listener to bind to. The default value is Default HTTP Listener. This property is optional. |
|
Consume Types |
The acceptable MIME types for the request payload, specified in JSON format. Enter the types in square brackets with each type contained in double-quotes. Separate multiple values by a comma. For example: [ "text/plain", "application/xml" ] This property is optional. |
|
Produce Types |
The acceptable MIME types for the response payload, specified in JSON format as above. This property is optional. |
|
Forward as Attachment |
An indicator of whether to forward the payload as an attachment. Select the check box to have the payload forwarded as an attachment. This property is optional. |
|
User Defined |
A list of user-defined properties in java.util.Properties format (key and value pairs). For example: serverName=test This property is optional. |
Table 2 Edit Operation Properties (Outbound)
Configuring REST BC WSDL Attributes
Once you create the REST BC WSDL document, you can add and update the WSDL attributes that are specific to the REST configuration. The REST BC includes both service-level WSDL elements and binding-level WSDL elements, but some of these elements are placeholders only.
 To Configure REST BC WSDL Attributes
-
In the NetBeans IDE, double-click the WSDL document you want to configure.
The document appears in the WSDL Editor in WSDL view.
-
Click Source.
The view changes to display the source code.
Note –Operation properties cannot be configured in WSDL view.
-
Scroll to the binding element, and modify any of the operation attributes described in REST Operation Element.
-
When you are finished, save and close the file.
Service Level REST WSDL Element
The service-level REST element is rest:address. This is a placeholder element only, and does not need to be configured. When you create a WSDL file in the NetBeans IDE, the New WSDL Wizard generates the empty rest:address element.
The following example illustrates the REST WSDL service element:
<service name="RestOutboundService">
    <port name="RestOutboundWSDL_OutboundPort" binding="tns:RestOutboundBinding">
        <rest:address/>
    </port>
</service>
|
Binding Level REST WSDL Elements
Binding level WSDL elements allow you to define and configure the REST operation performed against the external resource along with information about the resource. The REST Binding Component binding level WSDL elements include the rest:binding and rest:operation extensibility elements, but the rest:binding element is a placeholder.
REST Binding Element
The REST binding extensibility element specifies that the WSDL document is configured for the REST protocol. This is a placeholder element only, and does not need to be configured. When you create a WSDL file in the NetBeans IDE, the New WSDL Wizard generates a binding element, which includes a name you specify and a type that is generated by the wizard, and also includes the empty rest:bindingelement.
The following example illustrates the REST binding element:
<binding name="RestOutboundBinding" type="tns:RestOutboundPortType"> <rest:binding/> ... |
REST Operation Element
The REST operation element includes attributes that define the supported operations, along with payload types, URL information, and HTTP authorization. The REST Binding Component supports the GET, PUT, POST, DELETE, and HEAD operations. These attributes correspond to the properties you can configure from the Edit Operation Properties on the New WSDL Wizard.
When you create a WSDL file in the NetBeans IDE, the New WSDL Wizard generates a rest:operation element in the binding element, and includes any attribute configurations you entered for the operation properties on the wizard.
Table 3 REST BC Inbound WSDL Attributes|
Attribute |
Description |
|---|---|
|
http-listener-name |
The name of the HTTP listener to bind to. The default value is Default HTTP Listener. This property is optional. |
|
path |
The path to the operation resource. This property is required. |
|
method |
The HTTP operation to access the resource specified above. This attribute default to GET. Enter any of the following operations:
For more information, see Supported HTTP Methods. |
|
consume-types |
The acceptable MIME types for the request payload, specified in JSON format. Enter the types in square brackets with each type contained in double-quotes. Separate multiple values by a comma. For example: [ "text/plain", "application/xml" ] This property is optional. |
|
produce-types |
The acceptable MIME types for the response payload, specified in JSON format as above. This property is optional. |
|
forward-as-attachment |
An indicator of whether to forward the payload as an attachment. Select the check box to have the payload forwarded. This property is optional. |
|
user_defined |
A list of user-defined properties in java.util.Properties format (key and value pairs). For example: serverName=test This property is optional. |
Table 4 REST BC Outbound WSDL Attributes
|
Attribute |
Description |
|---|---|
|
url |
The URL to the external resource. This property is required. |
|
method |
The HTTP operation to access the resource specified above. This attribute default to GET. Enter any of the following operations:
For more information, see Supported HTTP Methods. |
|
accept-types |
The acceptable media types for the response, specified in JSON format. Enter the types in square brackets with each type contained in double-quotes. Separate multiple values by a comma. For example: [ "application/json", "text/plain" ] This property is optional. |
|
accept-languages |
The preferred natural languages for the response, specified in JSON format. This property is optional. |
|
content-type |
The content type of the outbound payload. If no value is specified, this defaults to any type. This property is optional. |
|
headers |
Custom HTTP headers for the outbound payload. Enter the headers in curly brackets as name value pairs with the name and value each in double-quotes and separated by a space, a colon, and another space. Separate multiple name value pairs by a comma. For example: { "host" : "MyServer.com", "Content-Subtype" : "application/json/customers"} Custom headers are optional. |
|
param-style |
A style for the URI parameters. Select one of the following options:
|
|
params |
Custom HTTP parameters for the URI. Enter the parameters in curly brackets as name value pairs with the name and value each in double-quotes and separated by a space, a colon, and another space. Separate multiple name value pairs by a comma. For example: { "status" : "Active", "billing" : "Current"} Custom parameters are optional. |
|
basic-auth-username |
The login ID of the user for authentication. If the property is populated, a basic authentication header is added to the HTTP request. |
|
basic-auth-password |
The login password corresponding with the above user name. |
|
user_defined |
A list of user-defined properties in java.util.Properties format (key and value pairs). For example: serverName=test This property is optional. |
The following example illustrates the REST operation element:
<binding name="RestOutboundBinding" type="tns:RestOutboundPortType">
<rest:binding/>
<operation>
<rest:operation>
<![CDATA[
url=http://{bucket}.s3.amazonaws.com/{resource}
method=GET
accept-types=[ "text/plain" ]
accept-languages=[ ]
content-type=
headers={ }
param-style=Query
params={ "status" : "Active", "billing" : "Current" }
basic-auth-username=gsmythe
basic-auth-password=1qazMKO)
]]>
</rest:operation>
...
</operation>
</binding>
|
Configuring the REST Binding Component Runtime Properties
The REST Binding Component's runtime properties apply to all instances of the binding component in a domain, including all provider and consumer endpoints. The properties can be configured from the NetBeans IDE, GlassFish Admin Console, or from a command prompt during a command line installation. This section describes how to configure the properties in NetBeans.
 To Configure REST BC Runtime Properties
-
From the Services window of the NetBeans IDE, expand the Servers node.
-
If the application server is not already started, right-click the server and then select Start.
-
Under the application server, expand JBI and expand Binding Components.
-
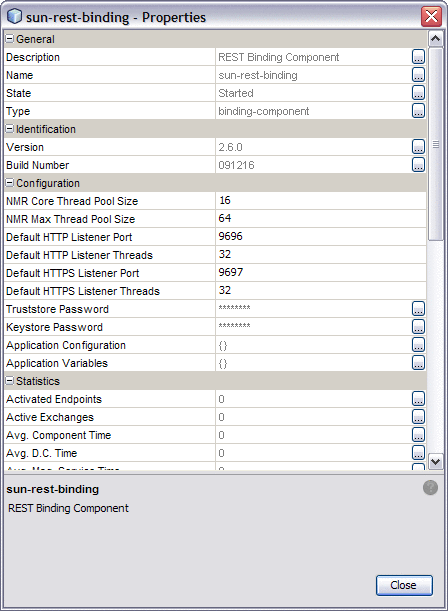
If the REST BC is not started, right-click sun-rest-binding and select Properties.
The Properties Editor appears.
-
Modify any of the properties listed in REST Binding Component Runtime Property Descriptions.
Note –General, identification, and statistic properties are automatically updated by the REST BC. You do not need to modify these properties.
-
To apply the changes, stop and restart the REST BC.
REST Binding Component Runtime Property Descriptions
The REST Binding Component properties specify clustering and security settings, and reference descriptive information for the Binding Component. The following tables list and describe each REST Binding Component runtime property.
Table 5 REST BC General Runtime Properties|
Property |
Description |
|---|---|
|
Description |
A general description of the JBI component. |
|
Name |
A unique name for the REST BC in the JBI environment. If you install more than one REST Binding Component in a JBI environment, make sure that each has a unique name. When the service unit deploys the component, it is matched with target component name defined in its descriptor file, jbi.xml, which can be modified as needed. |
|
State |
The current state of the JBI component. This value can be either Started, Stopped, or Shutdown. |
|
Type |
The type of JBI component (service-engine or binding-component). |
Table 6 REST BC Identification Runtime Properties
|
Property |
Description |
|---|---|
|
Version |
The version number of the installed binding component. |
|
Build Number |
The build number of the installed binding component. |
Table 7 REST BC Configuration Runtime Properties
|
Property |
Description |
|---|---|
|
NMR Core Thread Pool Size |
The number of core threads used concurrently for processing NMR messages. The default value is 16. |
|
NMR Max Thread Pool Size |
The maximum number of threads used concurrently for processing NMR messages. The default value is 64. |
|
Default HTTP Listener Port |
The default HTTP port number for the REST Binding Component. This property is required for clustering and allows the REST Binding Components in the cluster instances to be differentiated by a unique default port number. A default port number is calculated and preassigned when the binding component is initially installed in the application server instance. A file containing the persisted configuration is stored for each component. This is used to assign a unique default port number for each REST Binding Component instance on a computer. The default value is 9696. |
|
Default HTTP Listener Threads |
The maximum number of threads to process RESTful services concurrently using HTTP. The default value is 32. |
|
Default HTTPS Listener Port |
The default HTTP secure port number for the REST Binding Component. This property is required for clustering and allows the REST Binding Components in the cluster instances to be differentiated by unique default port numbers. A default port number is calculated and preassigned when the binding component is initially installed in the application server instance. A file containing the persisted configuration is stored for each component. This is used to assign a unique default port number for each REST Binding Component instance on a computer. The default value is 9697. |
|
Default HTTPS Listener Threads |
The maximum number of threads to process RESTful services concurrently using HTTPS. The default value is 32. |
|
Truststore Password |
The default truststore password, which is used for CA certificate management when establishing SSL connections. |
|
Keystore Password |
The default keystore password, which is used to access the keystore used for key/certificate management when establishing SSL connections. |
|
Application Configuration |
A list of values for a Composite Application's endpoint connectivity parameters, which are normally defined in the WSDL service extensibility elements. The values are applied to a user-named endpoint Config Extension Property. The values defined in an application configuration override the values defined in the WSDL document. For more information, see Creating Application Configurations for Connectivity Parameters (URLs). |
|
Application Variables |
A list of name and value pairs for a given type. The application variable name can be used as a token for a WSDL extensibility element attribute in a corresponding binding. For more information, see Using Application Variables. |
Table 8 REST BC Runtime Statistics
|
Property |
Description |
|---|---|
|
Activated Endpoints |
The number of activated endpoints. |
|
Active Exchanges |
The number of active exchanges. |
|
Avg. Component Time |
The average message exchange component time in milliseconds. |
|
Avg. D.C. Time |
The average message exchange delivery channel time in milliseconds. |
|
Avg. Msg. Service Time |
The average message exchange message service time in milliseconds. |
|
Avg. Response Time |
The average message exchange response time in milliseconds. |
|
Completed Exchanges |
The total number of completed exchanges. |
|
Error Exchanges |
The total number of error exchanges. |
|
Received Dones |
The total number of received dones. |
|
Received Errors |
The total number of received errors. |
|
Received Faults |
The total number of received faults. |
|
Received Replies |
The total number of received replies. |
|
Received Requests |
The total number of received requests. |
|
Sent Dones |
The total number of sent dones. |
|
Sent Errors |
The total number of sent errors. |
|
Sent Faults |
The total number of sent faults. |
|
Sent Replies |
The total number of sent replies. |
|
Sent Requests |
The total number of sent requests. |
|
Up Time |
The up time of this component in milliseconds. |
The Loggers properties specify the level of logging for each event. You can set the logging level for each logger to any of the following levels:
-
FINEST: provides highly detailed tracing
-
FINER: provides more detailed tracing
-
FINE: provides basic tracing
-
CONFIG: provides static configuration messages
-
INFO: provides informative messages
-
WARNING: messages indicate a warning
-
SEVERE: messages indicate a severe failure
-
OFF: no logging messages
By default, these are all set to the INFO level.
Table 9 REST BC Logger Runtime Properties|
Property |
WLM Component |
|---|---|
|
sun-rest-binding |
com.sun.jbi.restbc |
|
RestBC ClientWrapper |
com.sun.jbi.restbc.jbiadapter.JerseyClientWrapper |
|
RestBC Message Processor |
com.sun.jbi.restbc.jbiadapter.MessageProcessor |
|
RestBC Receiver |
com.sun.jbi.restbc.jbiadapter.Receiver |
|
RestBC Bootstrap |
com.sun.jbi.restbc.jbiadapter.RestBootstrap |
|
RestBC Component |
com.sun.jbi.restbc.jbiadapter.RestComponent |
|
RestBC ServiceUnitManager |
com.sun.jbi.restbc.jbiadapter.RestSUManager |
|
RestBC ServiceUnit |
com.sun.jbi.restbc.jbiadapter.ServiceUnit |
|
RestBC InboundDelegator |
com.sun.jbi.restbc.jbiadapter.inbound.InboundDelegator |
|
RestBC RootResource |
com.sun.jbi.restbc.jbiadapter.inbound.JerseyRootResource |
|
RuntimeConfig |
com.sun.jbi.restbc.jbiadapter.mbeans.RuntimeConfig |
Creating Application Configurations for Connectivity Parameters (URLs)
Application Configurations allow you to configure the external connectivity parameters (URLs) for a JBI application and, without changing or rebuilding the application, deploy the same application into a different system. For example, if you have an application that is running in a test environment, you can deploy it to a production environment using new connectivity parameters without rebuilding the application.
The connectivity parameters for the REST BC are normally defined in the WSDL service extensibility elements. When you create and apply application configurations for these parameters, the values defined for the application configuration override the values defined in the WSDL elements. You apply the configurations to the Composite Application by entering the application configuration name in the Config Extension Name property for the appropriate endpoint.
Perform the following procedures to implement application configurations for the REST BC:
Once you create an application configuration, you can modify it as described in To Change Application Configuration Values.
 To Create Application Configurations
You can create several application configurations, which are all referenced by the names you define. Make sure the REST Binding Component is started before you begin this procedure.
-
On the NetBeans IDE Services window, expand Servers > GlassFish v2.1 > JBI > Binding Components.
-
Right-click sun-rest-binding, and then select Properties.
The Properties window appears.
-
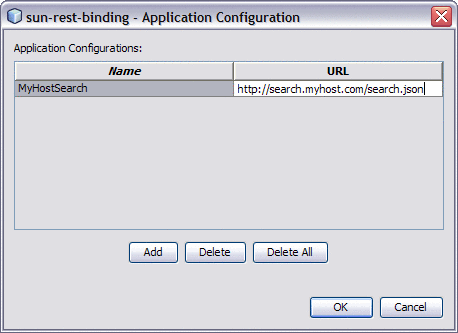
Click the ellipsis next to Application Configuration.
The Application Configuration Editor appears.
-
Click Add.
A new row appears in the configuration list.
-
In the new row, enter a name and URL.
 To Add the Application Configuration to the
Endpoint
-
Open the Composite Application Service Assembly in the CASA Editor.
-
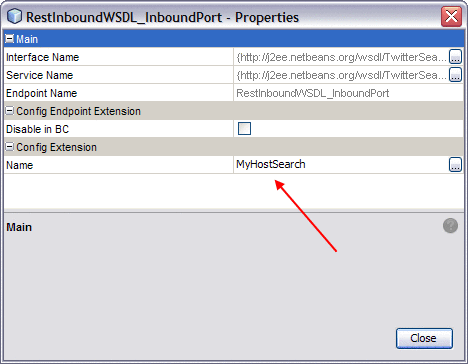
Right-click the endpoint to which you want to add the application configuration, and then click Properties.
The Properties window appears.
-
In the Name property under Config Extension, enter the name of the application configuration.
-
Click Close, and then click Save All on the NetBeans toolbar.
-
Once the application configuration values are defined and added to the endpoint, deploy the application.
 To Change Application Configuration Values
The REST Binding Component must be started in order to perform this procedure.
-
On the NetBeans IDE Services window, expand Servers > GlassFish v2.1 > JBI > Binding Components.
-
Right-click sun-rest-binding, and then select Properties.
The Properties window appears.
-
Click the ellipsis next to Application Configuration.
The Application Configuration Editor appears.
-
Change the value of the URL column for any of the application configurations.
-
To apply the new values, stop and restart any service assemblies that use the application configurations you updated.
Using Application Variables
Application variables allow you to define a list of variable names and values along with their type. The application variable name can then be used as a token for a WSDL extensibility element attribute for the REST BC. For example, you could define a string variable named ServerName with a value of MyHost.com. To reference this in the WSDL document, you would enter ${ServerName}. When you deploy an application that uses application variables, any variable that is referenced in the application's WSDL document is loaded automatically.
Note –
If you start an application and a value is not defined for an application variable, an exception is thrown.
You can define the following four variable types:
-
String – A string value, such as a path or directory.
-
Number – A numeric value.
-
Boolean – A Boolean true or false. When you define a Boolean variable, a check box appears in the value field. Select the check box if the variable value should be true; otherwise, deselect the check box.
-
Password – A login password. The password is masked and appears as asterisks.
Variables allow greater flexibility in WSDL documents. For example, you can use the same WSDL document for multiple runtime environments by using application variables to specify system-specific information. The variable values can be changed from the binding component runtime properties for each specific environment.
To change a property when the application is running, change your Application Variable property value, then right-click your application in the Services window under Servers -> GlassFish -> JBI -> Service Assemblies, and click Stop in the popup menu. When you restart your project, your new settings will take effect.
 To Create an Application Variable
-
On the NetBeans IDE Services window, expand Servers > GlassFish v2.1 > JBI > Binding Components.
-
Right-click sun-rest-binding, and then select Properties.
The Properties window appears.
-
Click the ellipsis next to Application Variables.
The Application Variables Editor appears.
-
Click Add.
A list of possible variable types appears.
-
Select String, Number, Boolean, or Password, and then click OK.
A new row appears in the application list.
-
In the new row, enter a variable name and then do one of the following:
-
For a Boolean variable, select the check box if the variable value should be true; otherwise leave it deselected.
-
For all other variables types, enter the variable value.
Note –If you created a password variable, the value you enter appears as asterisks.
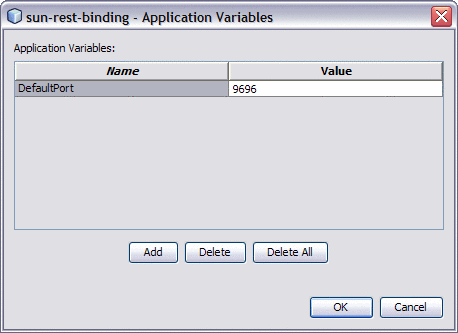
The variable can now be reference from WSDL documents using a dollar sign and curly brackets to indicate the variable; for example, ${MyVariable}.
-
 To Use an Application Variable for Password
Protection
To protect passwords that would otherwise appear as clear text in your WSDL document, you can enter a Password application variable as a token. In the following example, a password application variable is created that uses the name SECRET and the password PROTECT.
-
On the NetBeans IDE Services window, expand Servers > GlassFish v2.1 > JBI > Binding Components.
-
Right-click sun-rest-binding, and then select Properties.
The Properties window appears.
-
Click the ellipsis next to Application Variables.
The Application Variables Editor appears.
-
Click Add, select Password, and then click OK.
A new row appears in the variable list.
-
Enter SECRET as the name, and enter PROTECT as the value.
Because this is a password type, the characters appear as asterisks.
-
Use the application variable name ${SECRET} as the WSDL password attribute, using the dollar sign and curly braces as shown.
Using REST BC Normalized Message Properties in a Business Process
You can define normalized message properties in a BPEL process in order to dynamically assign values to the runtime properties for the REST BC. The normalized message properties for each JBI component are accessed from the BPEL Designer Mapper view. When you expand a variable's Properties folder it exposes the variable's predefined NM properties, as well as the standard BPEL-specific WSDL properties used in correlation sets, assigns, and expressions . If the specific NM property you need is not currently listed, additional NM properties can be added.
Normalized message properties provide the following capabilities:
-
Getting and setting transport context properties, such as REST headers.
-
Getting and setting request parameters.
-
Dynamically configuring REST properties.
Using Predefined Normalized Message Properties
Predefined normalized message properties are automatically available from the BPEL Designer's Mapper view. You can use additional properties by adding them directly to the source code. You can either define these properties using the BPEL Designer Mapper, or by entering the code directly into the source view.
You can perform additional tasks when working with normalized message properties, such as creating additional properties, deleting properties, creating property shortcuts, and so on. For more information, see Using Normalized Message Properties in BPEL Designer and Service Engine User’s Guide.
 To Use Predefined Normalized Message Properties
in Mapper View
You can access most of the normalized message properties from the BPEL Mapper. Certain properties, such as path and query parameters, need to be defined in the Source view.
-
Open the BPEL process you want to edit in the BPEL Designer.
-
In Design view, select the activity to add the normalized message property to.
-
In the BPEL Designer toolbar, click Mapper.
-
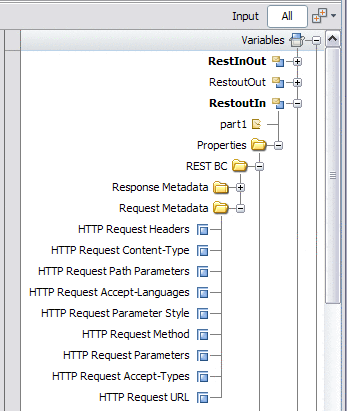
In the Output pane, expand the variable you want to edit, expand Properties, and then expand REST BC.
-
Expand Request Metadata or Response Metadata, depending on the message type.
A list of available normalized message properties appears.
-
Select the normalized message property you want to use, and use the mapper operands to build an expression or assign a value.
For a complete list of normalized message properties for the REST BC, see Normalized Message Properties for REST.
 To Use Predefined Normalized Message Properties
in Source View
You can define any of the normalized message properties using the Source view. You can only access path or query parameters from the Source view.
-
Open the BPEL process you want to edit in the BPEL Designer.
-
In the BPEL Designer toolbar, click Source.
The BPEL source code for the process is now visible.
-
Declare the sxnmp namespace near the beginning of the process element; for example:
xmlns:sxnmp="http://www.sun.com/wsbpel/2.0/process/executable/SUNExtension/NMProperty"
-
Access the property using the property names listed and described in Normalized Message Properties for REST.
For path and query parameters, separate normalized message properties are created for each. For example,
<assign name="AssignActivity">
   <copy>
      <from variable="GetCustomerNameIn"
            sxnmp:nmProperty="org.glassfish.openesb.rest.path-params.custName"/>
      <to>$CustomerQuery_OperationIn.part/ns0:param1</to>
   </copy>
</assign>
Example 1 Using REST BC Normalized Message Properties for Query Parameters
There are two methods to use normalized message properties to encode information as query parameters in an outbound REST call. Both methods are illustrated below in examples that show how to define query parameters for a simple address.
The following example illustrates defining all the parts and assigning their values as a single string.
<copy>
    <from>'{"street":"800 Royal Oaks Blvd.", "city":"Monrovia", "state":"CA", "zip":"91016"}'</from>
    <to variable="YahoomapIn" sxnmp:nmProperty="org.glassfish.openesb.rest.params"/>
</copy>
|
The following example illustrates defining each part as a query parameter and assigning the values individually.
<copy>
    <from>'800 Royal Oaks Blvd.'</from>
    <to variable="YahoomapIn"
        sxnmp:nmProperty="org.glassfish.openesb.rest.params.street"/>
</copy>
<copy>
    <from>'Monrovia'</from>
    <to variable="YahoomapIn"
        sxnmp:nmProperty="org.glassfish.openesb.rest.params.city"/>
</copy>
<copy>
    <from>'CA'</from>
    <to variable="YahoomapIn"
        sxnmp:nmProperty="org.glassfish.openesb.rest.params.state"/>
</copy>
<copy>
    <from>'91016'</from>
    <to variable="YahoomapIn"
        sxnmp:nmProperty="org.glassfish.openesb.rest.params.zip"/>
</copy>
|
Normalized Message Properties for REST
Normalized message properties are either specific to the binding component being used or generally available to all participating JBI components. The following topics describe both types of normalized message properties.
General Normalized Message Properties
The following table lists and described the general properties that are available to all JBI components. All property values are of the type java.lang.String.
Table 10 General Normalized Message Properties|
Property Name in Source |
Property Name in Mapper |
Description and Use |
|---|---|---|
|
org.glassfish.openesb.messaging.groupid |
Group ID |
Uniquely identifies a message with the group to which a message belongs. This property is optional. |
|
org.glassfish.openesb.messaging.messageid |
Message ID |
Uniquely identifies a message. For batch processing this might be a record number (for example, a particular record in a file) or a GUID. This property is mandatory. |
|
org.glassfish.openesb.messaging.lastrecord |
Last Record |
The value is a string representation of boolean ("true" or "false"). This property can be used to signal the last record in a group or the last record in a file. This property is mandatory. |
|
org.glassfish.openesb.exchange.endpointname |
Endpoint Name |
The value a string representation of the endpoint name set on the exchange. This represents the endpoint name of the "owner" of the message, and could be made available by JBI runtime. |
REST Binding Component Normalized Message Properties
The following properties are specific to the REST Binding Component. Available properties are different for request messages than for response messages. All property values are of the type java.lang.String.
Table 11 REST Binding Component NM Properties (Request)Table 12 REST Binding Component NM Properties (Response)
|
Property Name in Source |
Property Name in Mapper |
Description |
|---|---|---|
|
org.glassfish.openesb.rest.response.status |
HTTP Response Status |
The status code for the response. |
|
org.glassfish.openesb.rest.response.url |
HTTP Response Location |
The location header for the response. |
|
org.glassfish.openesb.rest.response.content-type |
HTTP Response Content-Type |
The content type header for the response. |
|
org.glassfish.openesb.rest.response.headers |
HTTP Response Headers |
Other headers for the response. Enter the headers in curly brackets as name value pairs with the name and value each in double-quotes and separated by a space, a colon, and another space. Separate multiple name value pairs by a comma. For example: { "host" : "MyServer.com", "Content-Subtype" : "application/json/customers"} |
|
org.glassfish.openesb.rest.response.headers.* |
Not Applicable |
Arbitrary custom HTTP headers for the response. For example, to add the content type as a custom header parameter, you would enter a property similar to org.glassfish.openesb.rest.headers.content-type. These properties can only be defined using the BPEL Designer's Source view. |
Implementing Jersey Client Filters
You can use Jersey client filters to modify a REST request or response for an outbound REST client interaction. For example, you can define a filter for generating the appropriate authentication header based on user-supplied information. To implement filters, you need to define the logic
 To Define the Jersey Filter
You define the client filter in a Java Application project in NetBeans using the Jersey client API to define the logic. For more information about the Jersey API, see the Jersey 1.0.3.1 Javadocs. The following are the primary classes of interest:
-
com.sun.jersey.api.client.ClientHandlerException
-
com.sun.jersey.api.client.ClientRequest
-
com.sun.jersey.api.client.ClientResponse
-
com.sun.jersey.api.client.filter.ClientFilter
-
Right-click in the Projects window of the NetBeans IDE, and then select New Project.
The New Project Wizard appears.
-
Select Java in the Categories list, and then select Java Application in the Projects list.
-
Click Next.
The Name and Location window appears.
-
Enter a name for the project and a name for the main Java class, and then click Finish.
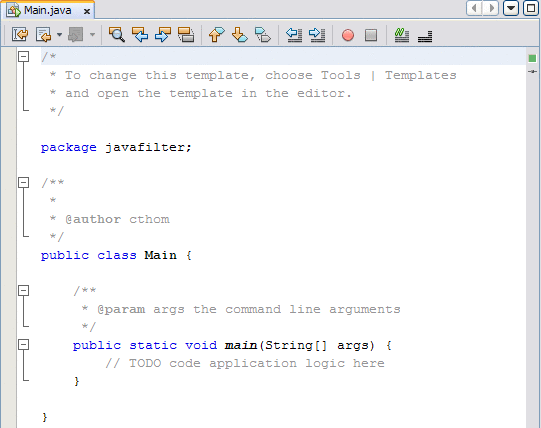
The project is created and a Java file containing the code framework appears in the Java Editor.
-
If you did not specify the class name in the wizard, you can do the following to rename the Java class:
-
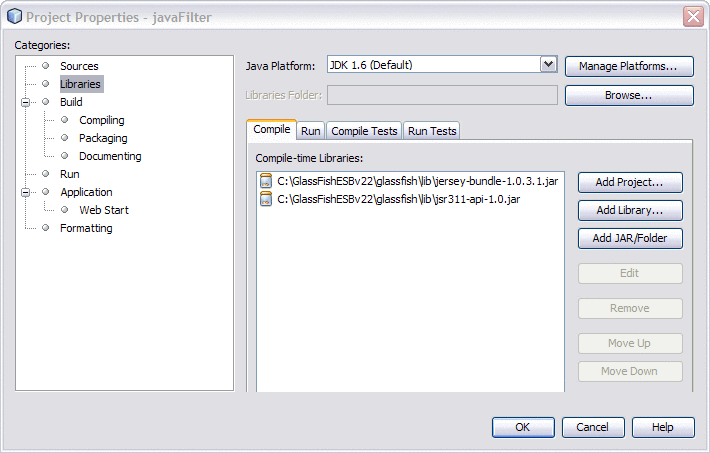
Do the following to add the required Jersey JAR files to the project:
-
In the Project window, right-click the Java application, and then select Properties.
The Properties window appears.
-
Under Categories, select Libraries.
-
Click the Compile tab, and then click Add Jar/Folder.
-
Browse to and select the following Jersey JAR files:
-
jersey-bundle-1.0.3.1.jar
-
jsr311-api-1.0.jar
Tip –You can find these files in glassfish-home/lib.
-
-
Click OK.
-
-
Define the processing logic for the filter in the Java package that was created for you by the wizard.
Use standard Java methods along with the methods defined in the Jersey API to define the filter, exception, and logging logic. See the example following this procedure for a simple implementation.
Example 2 Simple Authentication Filter
The following example illustrates the code for a simple authentication filter that has a user name and password as parameters.
package javafilter;

import com.sun.jersey.api.client.ClientHandlerException;
import com.sun.jersey.api.client.ClientRequest;
import com.sun.jersey.api.client.ClientResponse;
import com.sun.jersey.api.client.filter.ClientFilter;
import java.util.logging.Level;
import java.util.logging.Logger;

public class Filter extends ClientFilter {

   private static final Logger logger = Logger.getLogger(Filter.class.getName());
   private String username;
   private String password;

   public Filter() {
   }

   public void setUsername(String username) {
       this.username = username;
   }

   public void setPassword(String password) {
       this.password = password;
   }

   @Override
   public ClientResponse handle(ClientRequest request) throws ClientHandlerException {

       logger.log(Level.INFO, "inside handle() method, username=" + username +
                  ", password=" + password);

       ClientResponse response = getNext().handle(request);
       return response;
   }
}
|
 To Add the Filter to the Composite Application
Before You Begin
Before you can perform this step, you need to complete the following steps:
-
Create the BPEL Module that implements the REST Binding Component.
-
Create and build the composite application for the BPEL Module.
-
Create he Java Application that defines the filter (as described in To Define the Jersey Filter), and build the Java Application project.
-
Open the composite application for the project in which you want to implement filters.
-
On the CASA Editor, right-click the REST outbound endpoint to which you want to add the filter, and then click Properties.
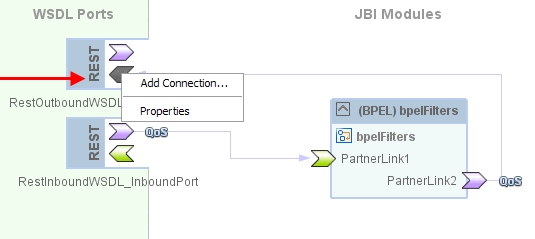
The Properties Editor appears.
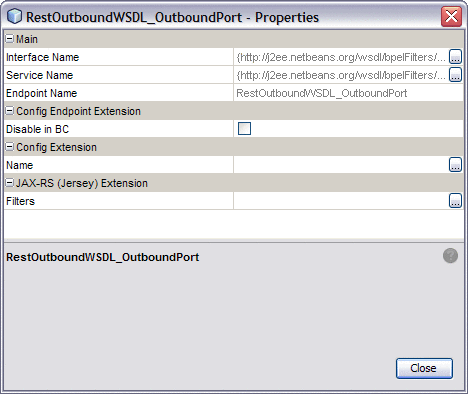
-
Click the ellipsis next to the Filters property under JAX-RS (Jersey) Extension.
The Filters Editor appears.
-
On the Filters Editor, click Add.
-
From the dialog box that appears, navigate to and select the Java Application project you created to define the filter logic. Click Open.
The Select Java Libraries dialog box appears.
-
Click OK on the dialog box. Do not select the Jersey libraries.
The information from the Java Application project is populated into the Filter Editor.
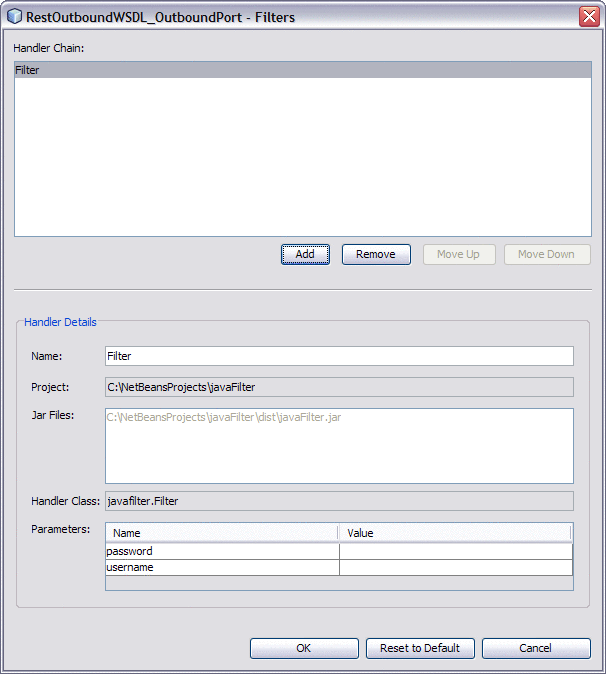
-
If you defined parameters for the filter, enter the parameter values in the Parameters section at the bottom of the editor.
-
Click OK.
The filter name appears in the Filters property.
-
Click Close on the Properties Editor.
- © 2010, Oracle Corporation and/or its affiliates
