Configuring Advanced Task Options
Perform any of the following tasks to configure advanced options for the Worklist Manager task:
Defining Time Limits and Deadlines for a Task
The WLM SE allows you define time periods or a specific date and time after which a task times out if it is not completed. When a task times out, it is treated as a failed process and return to the business process with a system fault.
If you define the timeout as a duration, the timer starts when the tasks is created and the task is timed out once the duration you specify is passed and no action has been taken on the task. The format for defining the duration is PyYmMdDThHmMsS, where y is the number of years, the first m is the number of months, d is the number of days, h is the number of hours, the second m is the number of minutes, and s is the number of seconds,
The following example indicates a duration of one and one-half hours:
P0Y0M0DT1H30M0S
If you define the escalation as a deadline, the task times out once the deadline you specify is passed and no action has been taken on the task. The format for defining the deadline is YYYY-MM-DDTHHmmSS, for example:
2010-01-30T23:00:00
 To Define Task Timeouts
-
Complete the steps under Assigning Users and User Groups to a Task.
-
If the task definition is not opened, open the file in the Task Definition Editor.
-
To define a duration from the start of the task to when it must be completed, do the following:
-
To define a deadline by which the task must be completed, do the following:
-
To remove a deadline or duration, select the line item to remove and then click Remove.
-
When you are done defining timeouts, click Save All on the NetBeans toolbar.
Adding Keywords to a Task
You can enter keywords that can be used to search for tasks on the Worklist Manager Console. Keywords can also be used to add custom columns to the task list on the Worklist Manager Console.
 To Add Keywords
-
Complete the steps under Assigning Users and User Groups to a Task.
-
If the task definition is not opened, open the file in the Task Definition Editor.
-
In the Keywords section of the Task Definition Editor, click Add.
A new line appears in the Keywords list.
-
Enter the keyword in the new line.

-
Repeat the above steps for each keyword to enter.
-
To remove a keyword, select the line to remove and then click Remove.
-
When you are done with your changes, click Save All on the NetBeans toolbar.
Defining Automatic Task Escalations
The WLM SE allows you define time periods or a specific date and time after which a task is automatically escalated to a higher level if it is not completed. Use the Notifications feature of the WLM SE to specify the people or groups to whom an automatic notification should be sent when a task is escalated. You can then select the defined notification for the escalation.
If you define the escalation as a duration, the timer starts when the tasks is created and the task is escalated once the duration you specify is passed and no action has been taken on the task. The format for defining the duration is PyYmMdDThHmMsS, where y is the number of years, the first m is the number of months, d is the number of days, h is the number of hours, the second m is the number of minutes, and s is the number of seconds,
The following example indicates a duration of one and one-half hours:
P0Y0M0DT1H30M0S
If you define the escalation as a deadline, the task is escalated once the deadline you specify is passed and no action has been taken on the task. The format for defining the deadline is YYYY-MM-DDTHHmmSS, for example:
2010-01-30T23:00:00
 To Define Automatic Escalations
When you define automatic escalations, you specify the users or groups to whom the task is escalated, and you can define notifications to be automatically sent out when a task is escalated.
-
Complete the steps under Assigning Users and User Groups to a Task.
-
If the task definition is not opened, open the file in the Task Definition Editor.
-
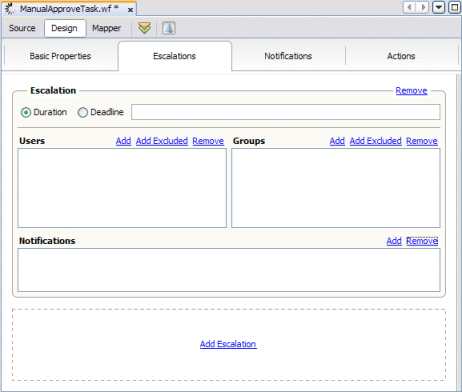
Click the Escalations tab.
-
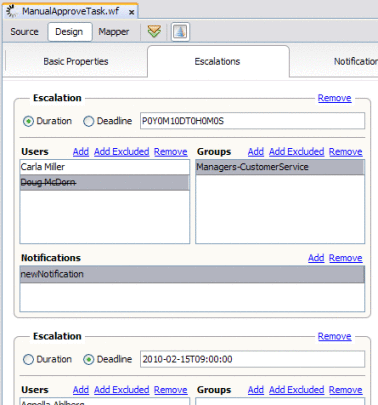
Select either Duration or Deadline.
-
Do one of the following:
-
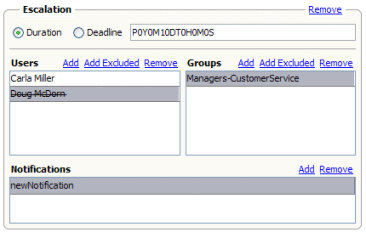
To add a user to whom the task will be escalated, click New in the Users section and then enter the name of the user.
-
To specify a user to whom that task should not be escalated, click Add Excluded in the Users section and then enter the name of the user.
Note –You can use the LDAP browser on the Escalations page to add and exclude users and groups for escalations. For more information about using the LDAP Browser to select users and groups, refer to To Assign LDAP Users and Groups to a Task.
-
To send out automatic notifications when a task is escalated, do the following:
-
Define a notification as described under Defining Automatic Task Notifications.
-
Click the Escalations tab.
-
In the Notifications section for the escalation, click Add.
-
Click in the new line that appears, and then select the name of the notification to add.
-
-
On the NetBeans toolbar, click Save All.
Defining Automatic Task Notifications
Creating notifications is a three–step process. First you define the notification, and specify who will receive the notification and how the email is presented. Then you specify a task action, such as Claimed or Completed, and associate the action with the notification, or you associate the notification with a defined escalation. Finally you configure the Email Binding Component by modifying the automatically generated WSDL file, EmailNotificationHanlder.wsdl, that defines the email binding.
Perform these tasks in the following order to define automatic notifications:
 To Define Automatic Notifications
-
Complete the steps under Assigning Users and User Groups to a Task.
-
If the task definition is not opened, open the file in the Task Definition Editor.
-
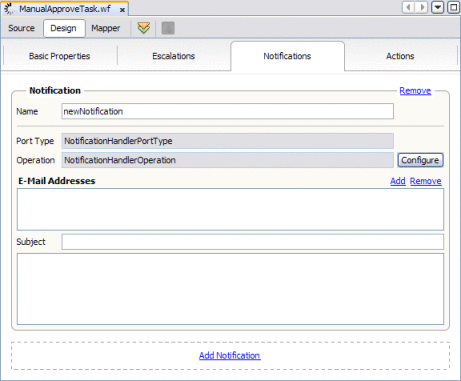
Click the Notification tab.
-
Enter a name for the notification.
-
In the Operation field, select an operation to handle the email notification from the email notification handler WSDL file.
Note –Both the port type and operation are defined in EmailNotificationHandler.wsdl. You only need to modify the operation if you customize the WSDL file. The port type cannot be modified.
-
In the E-Mail Addresses section, click New and then enter an email address for the notification in the new line.
-
In the Subject field, enter a subject for the email that goes out.
-
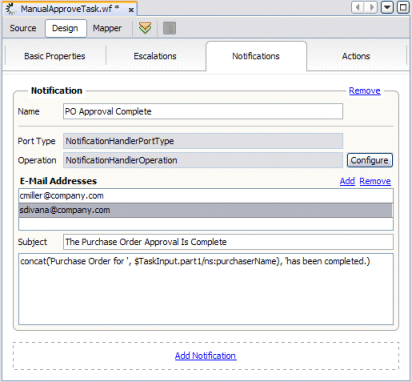
Under the Subject field, enter the text that should appears in the email that goes out.
You can specify this in literal text, as a variable that takes the text from the incoming message, or a combination of both. For more information about XPath expressions, see Using XPath Expressions and Functions in Task Definitions.
-
Continue to To Associate a Notification With a Task Status Change or Escalation.
 To Associate a Notification With a Task Status
Change or Escalation
-
Complete the steps under To Define Automatic Notifications.
-
To associate a task status with the notification, do the following:
-
To associate an escalation with the notification, do the following:
-
On the NetBeans toolbar, click Save All.
 To Configure the Email BC for Task Notification
The Email BC WSDL file need to be configured for your email server.
-
Open EmailNotificationHandler.wsdl in the WSDL Editor.
-
Expand Services > EmailNotificationHandlerService > NotificationHandlerPortTypeBindingPort.
-
Select email:SMTPaddress.
The SMTP address properties appear in the Properties panel.
-
Configure the following properties for your email server:
-
emailServer: The email server host that is used for sending emails.
-
port: The port number for the email server.
-
userName: The user login name used for authentication on the email server.
-
password: The user password used for authentication.
-
useSSL: An indicator of whether to use SSL for connecting to the server.
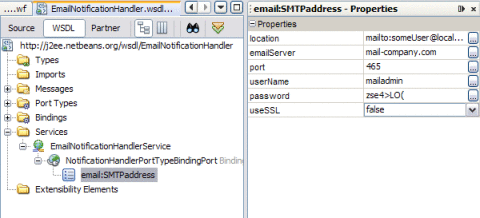
This is how the properties look in the WSDL code view:
<service name="EmailNotificationhandlerService"> <portname="NotificationHandlerPortTypeBindingPort" binding=”tns:NotificationHandlerPortTypeBinding"> <email:SMTPaddress location="mailto:someUser@localhost.com" emailServer=yourServer userSSL="false" port="465" userName="yourUserName" password="yourPassword"/> </port> </service> -
Defining Custom Notifications
By default, the notification feature of the WLM SE uses email to notify users of changes to tasks. You can define a custom notification method, such as invoking a web service when a tasks's status changes.
 To Define a Custom Notification
-
Complete the steps under Assigning Users and User Groups to a Task.
-
If the task definition is not opened, open the file in the Task Definition Editor.
-
Add the notification to the task, as described in To Define Automatic Notifications.
-
Associate the notification with a task action or escalation, as described in To Associate a Notification With a Task Status Change or Escalation.
-
In the WLM project, make a copy of EmailNotificationhandler.wsdl and rename the file.
-
Open the WSDL file you just copied, and change the binding to the required binding type, such as HTTP or JMS, and reconfigure the binding component.
Note –Do not change the operation's message type in this file.
-
In the WLM project, open the task definition file for which you are customizing the notifications.
-
Replace the following line:
<import location="EmailNotificationHandler.wsdl" namespace="http://j2ee.netbeans.org/wsdl/EmailNotificationHandler"/>
with this line:
<import location="new-wsdl-name.wsdl" namespace="new-namespace"
where new-wsdl-name is the name you gave to the WSDL file you copied above and new-namespace is a new namespace.
This replaces the email binding with your custom binding, and the custom binding is invoked when a notification is triggered.
Defining Trigger Actions Using the Mapper
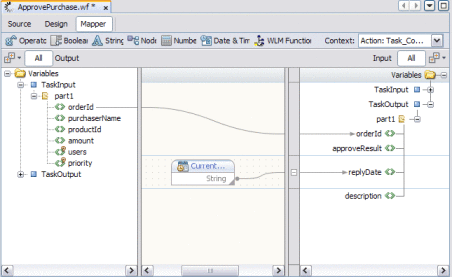
You can define actions that change or assign a value to the output message when a task is changed to a specific status. For example, you could use this feature to assign a timestamp to the task output.
 To Define Trigger Actions Using the Mapper
-
Complete the steps under Assigning Users and User Groups to a Task.
-
If the task definition is not opened, open the file in the Task Definition Editor.
-
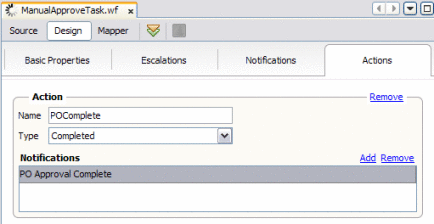
On the Task Definition Editor, click the Actions tab.
-
In the middle of the Actions window, click Add.
-
Enter a name for the action.
-
Select the status that will trigger the action.
When a task changes to the status specified here, the action you define is triggered.
-
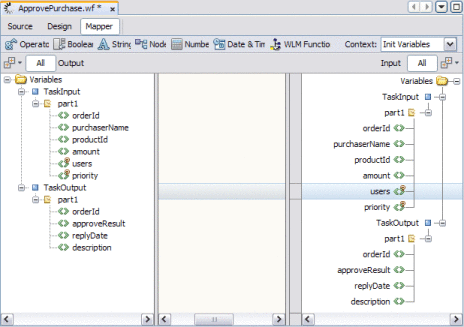
In the Task Definition Editor toolbar, click the Mapper tab.
The Task Mapper appears.
-
In the context field, select the name of the action you just defined.
-
Expand the variable trees until the fields you want to map are visible.
-
To pass a value from an input field to an output field with no changes, select the input field in the left pane and drag a connector to the output field in the right pane.
-
To transform a value from an input field before passing it to an output field, use the operators in the Task Mapper toolbar. For more information, see Using the Task Mapper.
Initializing Variables Using the Mapper
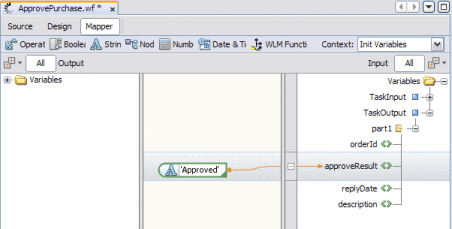
You can define default values for fields in the task output when it is presented to users on the Worklist Manager Console. When users complete the tasks, they can accept the default values or change them.
 To Initialize Variables Using the Mapper
-
Complete the steps under Assigning Users and User Groups to a Task.
-
If the task definition is not opened, open the file in the Task Definition Editor.
-
On the Task Definition Editor, click the Actions tab.
-
In the Task Definition Editor toolbar, click the Mapper tab.
The Task Mapper appears.

-
In the context field, select Init Variables.
-
Expand the tree in the left pane until the field you want to initialize visible, and then select that field.
-
In the Mapper toolbar, click String and then select String Literal.
The String Literal function box is added to the mapping panel.
Note –You can use any combination of functions that you need to define the initialized value. String Literal is used here for illustration purposes.
-
Enter a literal value into the function box, and map it to the output.
- © 2010, Oracle Corporation and/or its affiliates


