| Sun ONE Identity Server 6.1 Administration Guide |
Chapter 7
Authentication OptionsSun™ ONE Identity Server provides a framework for authentication, a process which verifies the identities of users accessing applications within an enterprise. A user must pass an authentication process before accessing the Identity Server console, or any other Identity Server-protected resource. Authentication is implemented through plug-ins that validate the user’s identity. (This plug-in architecture is described more fully in the Sun ONE Identity Server Customization and API Guide.)
The Identity Server console is used to set the default values, to register authentication services, to create an authentication template and to enable the service. This chapter provides an overview of the authentication services and instructions for registering them. It contains the following sections:
Core AuthenticationIdentity Server provides, by default, ten different authentication services, as well as a Core authentication service. The Core authentication service provides overall configuration for the authentication service. Before registering and enabling Anonymous, Certificate-based, HTTP Basic, LDAP, Membership, NT, RADIUS, SafeWord, SecurID, and Unix authentication, the Core authentication must be registered and enabled. Chapter 19, "Core Authentication Attributes" contains a detailed listing of the Core attributes.
Registering and Enabling the Core Service
- Navigate to the Navigation frame of the Organization for which the Core service is to be registered.
- Choose Services from the View menu.
- Click Add in the Navigation frame.
A list of available services displays in the Data frame.
- Select the checkbox for Core Authentication and click Add.
The Core Authentication service will appear in the Navigation frame assuring the administrator that it has been registered.
- Click the Core Authentication Properties arrow.
The message A template does not currently exist for this service. Do you want to create one now? appears in the Data frame.
- Click Create.
The Core attributes appear in the Data frame. Modify the attributes as necessary. An explanation of the Core attributes can be found in Chapter 19, "Core Authentication Attributes" or by clicking the Help link in the upper right corner of the console.
Anonymous AuthenticationBy default, when this module is enabled, a user can log in to Identity Server as an anonymous user. A list of anonymous users can also be defined for this module by configuring the Valid Anonymous User List attribute (see ). Granting anonymous access means that it can be accessed without providing a password. Anonymous access can be limited to specific types of access (for example, access for read or access for search) or to specific subtrees or individual entries within the directory.
Registering and Enabling Anonymous Authentication
You must log in to Identity Server as the Organization Administrator or Top-Level Administrator.
- Navigate to the Navigation frame of the Organization for which Anonymous Authentication is to be registered.
- Choose Services from the View menu.
The Core service, if already registered, displays in the Navigation frame. If it is not already registered, it can be done concurrently with the Anonymous Authentication service.
- Click Add in the Navigation frame.
A list of available services displays in the Data frame.
- Select the checkbox for Anonymous Authentication and click Add.
The Anonymous Authentication service will appear in the Navigation frame assuring the administrator that it has been registered.
- Click the Anonymous Authentication Properties arrow.
The message A template does not currently exist for this service. Do you want to create one now? appears in the Data frame.
- Click Create.
The Anonymous Authentication attributes appear in the Data frame. Modify the attributes as necessary. An explanation of these attributes can be found in Chapter 17, "Anonymous Authentication Attributes" or by clicking the Help link in the upper right corner of the console.
- Click Save.
The Anonymous Authentication service has been enabled.
Logging In Using Anonymous Authentication
In order to log in using Anonymous Authentication, the Core Authentication service attribute "Organization Authentication Modules" must be modified to define Anonymous Authentication. This ensures that when the user logs in using http(s)://hostname:port/DEPLOY_URI/Login?module=Anonymous&org=org_name. To login without the Anonymous Authentication login window, use the following syntax:
http(s)://hostname:port/DEPLOY_URI/Login?module=Anonymous&org=org_name&IDTolken1=user_id
Based on the authentication type that is being used (such as service, role, user, organization), if the authentication module is configured as the default, there is no need to specify the module name in the URL.
Certificate-based AuthenticationCertificate-based Authentication involves using a personal digital certificate (PDC) to identify and authenticate a user. A PDC can be configured to require a match against a PDC stored in Directory Server, and verification against a Certificate Revocation List.
There are a number of things that need to be accomplished before registering the Certificate-based Authentication service to an organization. First, the web container that is installed with the Identity Server needs to be secured and configured for Certificate-based Authentication. Before enabling the Certificate-based service, see Chapter 6, “Using Certificates and Keys” in the Sun ONE Web Server 6.1 Administrator’s Guide for these initial Web Server configuration steps. This document can be found at the following location:
http://docs.sun.com/db/prod/s1websrv#hic
Or, see the Sun ONE Application Sever Administrator’s Guide to Security at the following location:
http://docs.sun.com/db/prod/s1appsrv#hic
Registering and Enabling Certificate-based Authentication
You must log in to Identity Server as the Organization Administrator.
- Navigate to the Navigation frame of the Organization for which Certificate-based Authentication is to be registered.
- Choose Services from the View menu.
The Core service, if already registered, displays in the Navigation frame. If it is not already registered, it can be done concurrently with the Certificate-based Authentication service.
- Click Add in the Navigation frame.
A list of available services displays in the Data frame.
- Select the checkbox for Certificate-based Authentication and click Add.
The Certificate-based Authentication service will appear in the Navigation frame assuring the administrator that it has been registered.
- Click the Certificate-based Authentication Properties arrow.
The message A template does not currently exist for this service. Do you want to create one now? appears in the Data frame.
- Click Create.
The Certificate-based Authentication attributes appear in the Data frame. Modify the attributes as necessary. An explanation of these attributes can be found in Chapter 18, "Certificate Authentication Attributes" or by clicking the Help link in the upper right corner of the console.
- Click Save.
Adding a Platform Server List for Certificate-based Authentication
In order to add you must log in to Identity Server as the Organization Administrator.
- Select the Service Configuration module.
- Choose the Platform service from the list of available services.
- Add server information in the Server List attribute. For more information on the additional server attributes, see Chapter 34, "Platform Service Attributes"
Logging In Using Certificate-based Authentication
In order to make certificate-based authentication the default authentication method, the Core Authentication service attribute Organization Authentication Modules (see ) must be modified. This ensures that when the user logs in using https://hostname:port/deploy_URI/UI/Login?module=Cert, the user will see the Certificate-based Authentication login window. Based on the authentication type that is being used (such as role, user, organization), if the authentication module is configured as the default, there is no need to specify the module name in the URL.
HTTP Basic AuthenticationThis module uses basic authentication, which is the HTTP protocol’s built-in authentication support. The web server issues a client request for username and password, and sends that information back to the server as part of the authorized request. Identity Server retrieves the username and password and then internally authenticates the user to the LDAP authentication module. In order for HTTP Basic to function correctly, the LDAP authentication module must be registered (registering the HTTP Basic module alone will not work). For more information, see "Registering and Enabling LDAP Authentication". Once the user successfully authenticates, he/she will be able to re-authenticate without being prompted for username and password.
Registering and Enabling HTTP Basic Authentication
You must log in to Identity Server as the Organization Administrator or Top-Level Administrator.
- Navigate to the Navigation frame of the Organization for which HTTP Basic Authentication is to be registered.
- Choose Services from the View menu.
The Core service, if already registered, displays in the Navigation frame. If it is not already registered, it can be done concurrently with the HTTP Basic Authentication service.
- Click Add in the Navigation frame.
A list of available services displays in the Data frame.
- Select the checkbox for HTTP Basic Authentication and click Add.
The HTTP Basic Authentication service will appear in the Navigation frame assuring the administrator that it has been registered.
- Click the HTTP Basic Authentication Properties arrow.
The message A template does not currently exist for this service. Do you want to create one now? appears in the Data frame.
- Click Create.
The HTTP Basic Authentication attributes appear in the Data frame. Modify the attributes as necessary. An explanation of these attributes can be found in Chapter 20, "HTTP Basic Authentication Attributes" or by clicking the Help link in the upper right corner of the console.
- Click Save.
The HTPP Basic Authentication service has been enabled.
Logging In Using HTTP Basic Authentication
In order to log in using LDAP Authentication, the Core Authentication service attribute "Organization Authentication Modules" must be modified to define HTTP Basic authentication. This ensures that when the user logs in using http://hostname:port/deploy_URI/UI/Login?module=HTTPBasic, the user will see the authentication login window. Based on the authentication type that is being used (such as service, role, user, organization), if the authentication module is configured as the default, there is no need to specify the module name in the URL. If authentication fails, a new instance should be opened and the user should login again.
LDAP Directory AuthenticationWith the LDAP Authentication service, when a user logs in, he or she is required to bind to the LDAP Directory Server with a specific user DN and password. This is the default authenticating module for all organization-based authentication. If the user provides a user id and password that are in the Directory Server, the user is allowed access to, and is set up with, a valid Identity Server session. LDAP Authentication is enabled by default when Identity Server is installed. The following instructions are provided in the event that the service is disabled.
Registering and Enabling LDAP Authentication
You must log in to Identity Server as the Organization Administrator or Top-Level Administrator.
- Navigate to the Navigation frame of the Organization for which LDAP Authentication is to be registered.
- Choose Services from the View menu.
The Core service, if already registered, displays in the Navigation frame. If it is not already registered, it can be done concurrently with the LDAP Authentication service.
- Click Add in the Navigation frame.
A list of available services displays in the Data frame.
- Select the checkbox for LDAP Authentication and click Add.
The LDAP Authentication service will appear in the Navigation frame assuring the administrator that it has been registered.
- Click the LDAP Authentication Properties arrow.
The message A template does not currently exist for this service. Do you want to create one now? appears in the Data frame.
- Click Create.
The LDAP Authentication attributes appear in the Data frame. Modify the attributes as necessary. An explanation of these attributes can be found in Chapter 21, "LDAP Authentication Attributes" or by clicking the Help link in the upper right corner of the console.
- Enter the password in the Password for Root User Bind attribute. By default, the amldapuser password that was entered during installation is used as the bind user.
To use a different bind user, change the DN of the user in the DN For Root User Bind attribute, and enter the password for that user in the Password for Root User Bind attribute.
- Click Save.
The LDAP Authentication service has been enabled.
Logging In Using LDAP Authentication
In order to log in using LDAP Authentication, the Core Authentication service attribute "Organization Authentication Modules" must be modified to define LDAP Authentication. This ensures that when the user logs in using http://hostname:port/deploy_URI/UI/Login?module=LDAP, the user will see the LDAP Authentication login window. Based on the authentication type that is being used (such as service, role, user, organization), if the authentication module is configured as the default, there is no need to specify the module name in the URL.
Enabling LDAP Authentication Failover
The LDAP authentication attributes include a value field for both a primary and a secondary Directory Server. Identity Server will look to the second server for authentication if the primary server becomes unavailable. For more information, see the LDAP attributes "Primary LDAP Server and Port" and "Secondary LDAP Server and Port".
Multiple LDAP Configuration
As a form of failover or to configure multiple values for an attribute when the Identity Server console only provides one value field, an administrator can define multiple LDAP configurations under one organization. Although these additional configurations are not visible from the console, they work in conjunction with the primary configuration if an initial search for the requesting user’s authorization is not found. For information on multiple LDAP configuration, see “Multi LDAP Configuration” in the Sun ONE Identity Server Customization and API Guide.
Membership AuthenticationMembership authentication is implemented similarly to personalized sites such as my.site.com, or mysun.sun.com. When this service is enabled, a user creates an account and personalizes it without the aid of an administrator. With this new account, the user can access it as a registered user. The user can also access the viewer interface, saved on the user profile database as authorization data and user preferences.
Registering and Enabling Membership Authentication
You must log in to Identity Server as the Organization Administrator or Top-Level Administrator.
- Navigate to the Navigation frame of the Organization for which Membership Authentication is to be registered.
- Choose Services from the View menu.
The Core service, if already registered, displays in the Navigation frame. If it is not already registered, it can be done concurrently with the Membership Authentication service.
- Click Add in the Navigation frame.
A list of available services displays in the Data frame.
- Select the checkbox for Membership Authentication and click Add.
The Membership Authentication service will appear in the Navigation frame assuring the administrator that it has been registered.
- Click the Membership Authentication Properties arrow.
The message A template does not currently exist for this service. Do you want to create one now? appears in the Data frame.
- Click Create.
The Membership Authentication attributes appear in the Data frame. Modify the attributes as necessary. An explanation of these attributes can be found in Chapter 22, "Membership Authentication Attributes" or by selecting the Help link in the upper right corner of the console.
- Enter the password in the Password for Root User Bind attribute. By default, the amldapuser password that was entered during installation is used as the bind user.
To use a different bind user, change the DN of the user in the DN For Root User Bind attribute, and enter the password for that user in the Password for Root User Bind attribute.
- Click Save.
The Membership Authentication service has been enabled.
Logging In Using Membership Authentication
In order to log in using Membership Authentication, the Core Authentication service attribute "Organization Authentication Modules" must be modified to define Membership Authentication. This ensures that when the user logs in using http://hostname:port/deploy_URI/UI/Login?module=Membership, (note case sensitivity) the user will see the Membership Authentication login (Self Registration) window. Based on the authentication type that is being used (such as service, role, user, organization), if the authentication module is configured as the default, there is no need to specify the module name in the URL.
NT AuthenticationIdentity Server can be configured to work with an NT /Windows 2000 server that is already installed. Identity Server provides the client portion of NT authentication. The NT Authentication service is only supported on the Solaris platform.
- Configure the NT server.
For detailed instructions, see the NT server documentation.
- Before you can register and enable the NT authentication service, you must obtain and install a Samba client to communicate with Identity Server on your Solaris system. For more information, see "NT Authentication Attributes".
- Register and enable the NT authentication service.
Registering and Enabling NT Authentication
You must log in to Identity Server as the Organization Administrator or Top-Level Administrator.
- Navigate to the Navigation frame of the Organization for which NT Authentication is to be registered.
- Choose Services from the View menu.
The Core service, if already registered, displays in the Navigation frame. If it is not already registered, it can be done concurrently with the NT Authentication service.
- Click Add in the Navigation frame.
A list of available services displays in the Data frame.
- Select the checkbox for NT Authentication and click Add.
The NT Authentication service will appear in the Navigation frame assuring the administrator that it has been registered.
- Click the NT Authentication Properties arrow.
The message A template does not currently exist for this service. Do you want to create one now? appears in the Data frame.
- Click Create.
The NT Authentication attributes appear in the Data frame. Modify the attributes as necessary. An explanation of these attributes can be found in Chapter 23, "NT Authentication Attributes" or by selecting the Help link in the upper right corner of the console.
- Click Save.
The NT Authentication service has been enabled.
Logging In Using NT Authentication
In order to log in using NT Authentication, the Core Authentication service attribute "Organization Authentication Modules" must be modified to define NT Authentication. This ensures that when the user logs in using http://hostname:port/deploy_URI/UI/Login?module=NT, the user will see the NT Authentication login window. Based on the authentication type that is being used (such as service, role, user, organization), if the authentication module is configured as the default, there is no need to specify the module name in the URL.
RADIUS Server AuthenticationIdentity Server can be configured to work with a RADIUS server that is already installed. This is useful if there is a legacy RADIUS server being used for authentication in your enterprise. Enabling the RADIUS authentication service is a two-step process.
Registering and Enabling RADIUS Authentication
You must log in to Identity Server as the Organization Administrator.
- Navigate to the Navigation frame of the Organization for which RADIUS Authentication is to be registered.
- Choose Services from the View menu.
The Core service, if already registered, displays in the Navigation frame. If it is not already registered, it can be done concurrently with the RADIUS Authentication service.
- Click Add in the Navigation frame.
A list of available services displays in the Data frame.
- Select the checkbox for RADIUS Authentication and click Add.
The RADIUS Authentication service will appear in the Navigation frame assuring the administrator that it has been registered.
- Click the RADIUS Authentication Properties arrow.
The message A template does not currently exist for this service. Do you want to create one now? appears in the Data frame.
- Click Create.
The RADIUS Authentication attributes appear in the Data frame. Modify the attributes as necessary. An explanation of these attributes can be found in Chapter 24, "RADIUS Authentication Attributes" or by selecting the Help link in the upper right corner of the console.
- Click Save.
The RADIUS Authentication service has been enabled.
Logging In Using RADIUS Authentication
In order to log in using RADIUS Authentication, the Core Authentication service attribute "Organization Authentication Modules" must be modified to define RADIUS Authentication. This ensures that when the user logs in using http://hostname:port/deploy_URI/UI/Login?module=RADIUS, the user will see the RADIUS Authentication login window. Based on the authentication type that is being used (such as service, role, user, organization), if the authentication module is configured as the default, there is no need to specify the module name in the URL.
Configuring RADUIS with Sun ONE Application Server
When the RADUIS client forms a socket connection to its server, by default, only the connect permission of the SocketPermissions is allowed in the Application Server’s server.policy file. In order for RADUIS authentication to work correctly, permissions need to be granted for the following actions:
To grant a permission for a socket connection, you must add an entry into Application Server’s server.policy file. A SocketPermission consists of a host specification and a set of actions specifying ways to connect to that host. The host is specified as the following:
host = (hostname | IPaddress)[:portrange] portrange = portnumber | -portnumberportnumber-[portnumber]
The host is expressed as a DNS name, as a numerical IP address, or as localhost (for the local machine). The wildcard “*” may be included once in a DNS name host specification. If it is included, it must be in the left-most position, as in *.example.com.
The port (or portrange) is optional. A port specification of the form N-, where N is a port number, signifies all ports numbered N and above. A specification of the form -N indicates all ports numbered N and below.
The listen action is only meaningful when used with a localhost. The resolve (resolve host/IP name service lookups) action is implied when any of the other actions are present.
For example, when creating SocketPermissions, note that if the following permission is granted to some code, it allows that code to connect to port 1645 on machine1.example.com, and to accept connections on that port:
permission java.net.SocketPermission machine1.example.com:1645, "connect,accept";
Similarly, if the following permission is granted to some code, it allows that code to accept connections on, connect to, or listen to any port between 1024 and 65535 on the local host:
permission java.net.SocketPermission "machine1.example.com:1645", "connect,accept";
permission java.net.SocketPermission "localhost:1024-", "accept,connect,listen";
SafeWord AuthenticationIdentity Server can be configured to handle SafeWord Authentication requests to Secure Computing’s SafeWord™ or SafeWord PremierAccess™ authentication servers. Identity Server provides the client portion of SafeWord authentication. The SafeWord server may exist on the system on which Identity Server is installed, or on a separate system.
Registering and Enabling SafeWord Authentication
You must log in to Identity Server as the Organization Administrator or Top-Level Administrator.
The SafeWord Authentication attributes appear in the Data frame. Modify the attributes as necessary. An explanation of these attributes can be found in Chapter 25, "SafeWord Authentication Attributes", or by clicking the Help link on the upper right corner of the console.
Logging In Using SafeWord Authentication
In order to log in using SafeWord Authentication, the Core Authentication service attribute "Organization Authentication Modules" must be modified to define SafeWord Authentication. This ensures that when the user logs in using http://hostname:port/deploy_URI/UI/Login?module=SAFEWORD, the user will see the SafeWord Authentication login window. Based on the authentication type that is being used (such as role, user, organization), if the authentication module is configured as the default, there is no need to specify the module name in the URL.
Configuring SafeWord with Sun ONE Application Server
When the SafeWord client forms a socket connection to its server, by default, only the connect permission of the SocketPermissions is allowed in the Application Server’s server.policy file. In order for SafeWord authentication to work correctly, permissions need to be granted for the following actions:
To grant a permission for a socket connection, you must add an entry into Application Server’s server.policy file. A SocketPermission consists of a host specification and a set of actions specifying ways to connect to that host. The host is specified as the following:
host = (hostname | IPaddress)[:portrange] portrange = portnumber | -portnumberportnumber-[portnumber]
The host is expressed as a DNS name, as a numerical IP address, or as localhost (for the local machine). The wildcard “*” may be included once in a DNS name host specification. If it is included, it must be in the left-most position, as in *.example.com.
The port (or portrange) is optional. A port specification of the form N-, where N is a port number, signifies all ports numbered N and above. A specification of the form -N indicates all ports numbered N and below.
The listen action is only meaningful when used with a localhost. The resolve (resolve host/IP name service lookups) action is implied when any of the other actions are present.
For example, when creating SocketPermissions, note that if the following permission is granted to some code, it allows that code to connect to port 1645 on machine1.example.com, and to accept connections on that port:
permission java.net.SocketPermission machine1.example.com:1645, "connect,accept";
Similarly, if the following permission is granted to some code, it allows that code to accept connections on, connect to, or listen to any port between 1024 and 65535 on the local host:
permission java.net.SocketPermission "machine1.example.com:1645", "connect,accept";
permission java.net.SocketPermission "localhost:1024-", "accept,connect,listen";
SecurID AuthenticationIdentity Server can be configured to handle SecureID Authentication requests to RSA’s ACE/Server authentication servers. Identity Server provides the client portion of SecurID authentication. The ACE/Server may exist on the system on which Identity Server is installed, or on a separate system. In order to authenticate locally-administered userids (see admintool (1M)), root access is required.
SecurID Authentication makes use of an authentication helper, amsecuridd, which is a separate process from the main Identity Server process. Upon startup, this helper listens on a port for configuration information. If Identity Server is installed to run as nobody, or a userid other than root, then the IdentityServer_base/SUNWam/share/bin/amsecuridd process must still execute as root. For more information on the amsecuridd helper, see “The amsecuridd Helper” on page 161.
Registering and Enabling SecurID Authentication
You must log in to Identity Server as the Organization Administrator or Top-Level Administrator.
The SecurID Authentication attributes appear in the Data frame. Modify the attributes as necessary. An explanation of these attributes can be found in Chapter 26, "SecurID Authentication Attributes", or by clicking the Help link on the upper right corner of the console.
Logging In Using SecurID Authentication
In order to log in using SecurID Authentication, the Core Authentication service attribute "Organization Authentication Modules" must be modified to define SecurID Authentication. This ensures that when the user logs in using http://hostname:port/deploy_URI/UI/Login?module=SecurID, the user will see the SecurID Authentication login window. Based on the authentication type that is being used (such as role, user, organization), if the authentication module is configured as the default, there is no need to specify the module name in the URL.
Unix AuthenticationIdentity Server can be configured to process authentication requests against Unix userids and passwords known to the Solaris system on which Identity Server is installed. While there is only one organizational attribute, and a few global attributes for Unix authentication, there are some system-oriented considerations. In order to authenticate locally-administered userids (see admintool (1M)), root access is required.
Unix Authentication makes use of an authentication helper, amunixd, which is a separate process from the main Identity Server process. Upon startup, this helper listens on a port for configuration information. There is only one Unix helper per Identity Server to serve all of its organizations.
If Identity Server is installed to run as nobody, or a userid other than root, then the IdentityServer_base/SUNWam/share/bin/amunixd process must still execute as root. The Unix authentication module invokes the amunixd daemon by opening a socket to localhost:58946 to listen for Unix authentication requests. To run the amunixd helper process on the default port, enter the following command:
./amunixd
To run amunixd on a non-default port, enter the following command:
./amunixd [-c portnm] [ipaddress]
The ipaddress and portnumber is located in the UnixHelper.ipadrs (in IPV4 format) and UnixHelper.port attributes in AMConfig.properties. You can run amunixd through the amserver command line utility (amserver runs the process automatically, retrieving the portnumber and ipaddress from AMConfig.properties).
The passwd entry in the /etc/nsswitch.conf file determines whether the /etc/passwd and /etc/shadow files, or NIS are consulted for authentication.
The Unix authentication service is not available on the Windows platform.
Registering and Enabling Unix Authentication
You must log in to the Identity Server as Top-Level Administrator for the following steps.
Several Global and one Organization attributes are displayed. Because one Unix helper serves all of the Identity Server server's organizations, most of the Unix attributes are global. An explanation of these attributes can be found in Chapter 27, "Unix Authentication Attributes", or by clicking the Help link in the upper right corner of the console.
- Click Save to save the new values for the attributes.
You may log in to Identity Server as the Organization Administrator to enable Unix Authentication for an organization.
- Navigate to the Navigation frame of the Organization for which Unix Authentication is to be registered.
- Choose Services from the View menu.
The Core service, if already registered, displays in the Navigation frame. If it is not already registered, it can be done concurrently with the Unix Authentication service.
- Click Add in the Navigation frame.
The Unix Authentication organization attribute appears in the Data frame. Modify the Authentication Level attribute as necessary. An explanation of this attribute can be found in Chapter 27, "Unix Authentication Attributes", or by clicking the Help link in the upper right corner of the console.
Logging In Using Unix Authentication
In order to log in using Unix Authentication, the Core Authentication service attribute "Organization Authentication Modules" must be modified to define Unix Authentication. This ensures that when the user logs in using http://hostname:port/deploy_URI/UI/Login?module=Unix, the user will see the Unix Authentication login window. Based on the authentication type that is being used (such as service, role, user, organization), if the authentication module is configured as the default, there is no need to specify the module name in the URL.
Authentication ConfigurationThe Authentication Configuration service is used to define authentication modules for any of the following authentication types:
Once an authentication module is defined for one of these authentication types, the module can be configured to supply redirect URLs, as well as a post-processing Java class specification, based on a successful or failed authentication process.
Before an authentication module can be configured, the Core authentication service attribute Organization Authentication Modules must be modified to include the specific authentication module name.
Authentication Configuration User Interface
The Authentication Configuration services allows you to define one or more authentication services (or modules) that a user must pass before being allowed access to the console or any secured resource within Identity Server. Organization, role, service, and user-based authentication use a common user interface to define the authentication modules. (Instructions for access the Authentication Configuration interface for specific object types are described in subsequent sections).
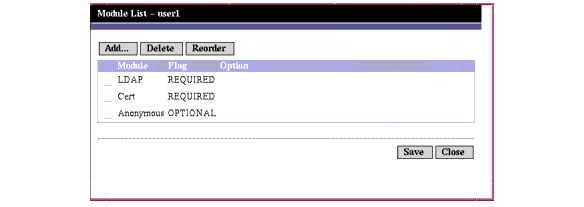
- Click on the Edit link next to the object’s Authentication Configuration attribute to display the Module List window.
- This window lists the authentication modules that have been assigned to the object. If no modules exist, click Add to display the Add Module window.
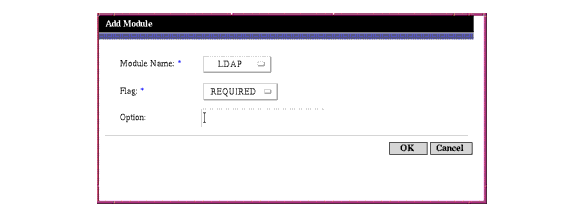
The Add Module Window contains three files to define:
Module Name. This pull-down list allows you to select the authentication modules (including custom modules that may be added) available to Identity Server. By default, the modules are:
Flag. This pull-down menu allows you specify the authentication module requirements. It can be one of:
- REQUIRED - The authentication module is required to succeed. If it succeeds or fails, authentication continues to proceed down the authentication module list.
- REQUISITE - The authentication module is required to succeed. If it succeeds, authentication continues down the authentication module list. If it fails, control returns to the application (authentication does not proceed down the authentication module list.)
- SUFFICIENT - The authentication module is not required to succeed. If it does succeed, control immediately returns to the application (authentication does not proceed down the authentication module list.). If it fails, authentication continues down the list.
- OPTIONAL - The authentication module is not required to succeed. If it succeeds or fails, authentication still continues to proceed down the list.
These flags establish an enforcement criteria for the authentication module for which they are defined. There is hierarchy for enforcement, with REQUIRED being the highest, and OPTION being the lowest.
For example, if an administrator defines an LDAP module with the REQUIRED flag, then the user’s credential must pass the LDAP authentication requirements to access a given resource.
If you add multiple authentication modules and for each module the Flag is set to REQUIRED, the user must pass all authentication requirements before being granted access.
For more information on the flag definitions, refer to the JAAS (Java Authentication and Authorization Service) located at:
http://java.sun.com/security/jaas/doc/module.html
Option. Allows for additional options for the for the module as a key=value pair. Multiple options are separated by a space.
Figure 7-1 Add Module List Window For A User
- Once the fields are selected, click OK to return to the Module List window. The authentication modules you have defined are listed in this window. Click Save.
You can add as many authentication modules to this list as you wish. Adding multiple authentication modules is called chaining. If you are chaining authentication modules, note that the order in which they are listed defines the order of hierarchy of enforcement.
To change the order of the authentication modules:
- To remove any authentication module from the list, select the checkbox next to the authentication module and click Delete.
Authentication Configuration for Organizations
Authentication modules are set for an organization by first registering the Core Authentication service to the organization.
To configure the organization’s authentication attributes:
- Navigate to the organization for which you will configure the authentication attributes.
- Select Services from the View menu.
- Click the Core Properties arrow in the service listing.
The Core authentication attributes are displayed in the Data frame.
- Click the edit link next to the Admin Authenticator attribute. This allows you to define the authentication services for administrators only. An administrator is a user who needs access to the Identity Server console. This attribute can be used if the authentication module for administrators needs to be different from the module for end users. The default authentication module is LDAP.
Once you have defined the authentication services, click Save to save the changes, and click Close to return to the Core Authentication attributes for organizations.
- Click the Edit link next to the Organization Authentication Configuration attribute. This allows you to define authentication modules for all users within the organization. The default authentication module is LDAP.
- Once you have defined the authentication services, click Save to save the changes, and click Close to return to the Core Authentication attributes for organizations.
Authentication Configuration for Roles
Authentication modules are set for roles after registering the Authentication Configuration service at the role level.
- Navigate to the organization for which you will configure the authentication attributes.
- Choose Roles from the View menu.
- Select the role for which to set the authentication configuration and click on the Properties arrow.
The role’s properties are displayed in the Data frame.
- Select Services from the View menu in the Data frame.
- Modify the Authentication Configuration attributes as necessary. An explanation of these attributes can be found in Chapter 28, "Authentication Configuration Service Attributes", or by clicking the Help link in the upper right corner of the console.
- Click Save.
.
Authentication Configuration for Services
Authentication modules are set for services after registering the Authentication Configuration service. To do so:
- Choose Services from the View menu in the Identity Management module.
The list of registered services are displayed. If the Authentication Configuration service is not registered, continue with the steps below. If the service is registered, skip to step Step 4.
- Click Add in the Navigation frame.
A list of available services is displayed in the Data frame.
- Select the checkbox for Authentication Configuration and click Add.
The Authentication Configuration service will appear in the Navigation frame assuring the administrator that it has been registered.
- Click the Authentication Configuration Properties arrow.
The Service Instance List is displayed in the in the Data frame.
- Click on the service instance for which to configure the authentication modules.
- Modify the authentication configuration attributes and click Save. An explanation of these attributes can be found in Chapter 28, "Authentication Configuration Service Attributes",” or by clicking the Help link in the upper right corner of the console.
Authentication Configuration for Users
- Choose Users from the View menu in the Identity Management module.
The list of users is displayed in the Navigation frame.
- Select the user you wish to modify and click the Properties arrow.
The User Profile is displayed in the data frame.
.
- To ensure that the Authentication Configuration service is assigned to the user, Select Services from the View menu. If assigned, the Authentication Configuration service will be listed as an assigned service.
- Select User from the View menu in the Data frame.
- Click on the Edit link next to the User Authentication Configuration attribute to define the authentication modules for the user.
- Click Save.
Authentication By Authentication LevelEach authentication module can be associated with an integer value for its authentication level. Authentication levels can be assigned by clicking the authentication module’s Properties arrow in Service Configuration, and changing the corresponding value for the module’s Authentication Level attribute. Higher authentication levels define a higher level of trust for the user once that user has authenticated to one or more authentication modules.
The authentication level will be set on a user's SSO token after the user has successfully authenticated to the module. If the user is required to authenticate to multiple authentication modules, and does so successfully, the highest authentication level value will be set in user's SSO token.
If a user attempts to access a service, the service can determine if the user is allowed access by checking the authentication level in user's SSO token. It then redirects the user to the go through the authentication modules with a set authentication level.
Users can also access authentication modules with specific authentication level. For example, a user performs a login with the following syntax:
http://hostname:port/deploy_URI/UI/Login?authlevel=auth_level_value
All modules whose authentication level is larger or equal to auth_level_value will displayed as an authentication menu for the user to choose. If only one matching module is found, then the login page for that authentication module will be directly displayed.
Authentication By ModuleUsers can access a specific authentication module using the following syntax:
http://hostname:port/deploy_URI/UI/Login?module=module_name
Before the authentication module can be accessed, the Core authentication service attribute Organization Authentication Modules must be modified to include the authentication module name. If the authentication module name is not included in this attribute, the “authentication module denied” page will be displayed when the user attempts to authenticate. For more information, see "Organization Authentication Modules".
URL RedirectionIn the Authentication Configuration service, you can assign URL redirection for successful or unsuccessful authentication. The URLs, themselves, are defined in the Login Success URL and Login Failure URL attributes in this service. In order to enable URL redirection, you must add the Authentication Configuration service to your organization to make it available to configure for a role, organization, or user. Make sure that you add an authentication module, such as LDAP - REQUIRED, when adding the Authentication Configuration service. For information on registering the Authentication Configuration service for identity objects, see "Authentication Configuration".