| C H A P T E R 4 |
|
Connecting Data Hosts |
This chapter explains how to cable data hosts to the system and how to install the host software for data and management host stations. It contains the following sections:
The method you use to connect data hosts depends on how you plan to use the system. The Sun StorEdge 6920 system supports both storage area network (SAN) and direct attached storage (DAS) configurations for host-side server connections.
The main factors in choosing between a SAN or DAS configuration are the number of host bus adapter ports required, the number of Sun StorEdge 6920 system ports required, and the bandwidth required. All host bus adapters and software supported in the SAN are also supported in DAS configurations. You need to first understand the requirements of your application to determine which method to use. For information about DAS and SAN configurations, see the Best Practices for the Sun StorEdge 6920 System for guidelines.
Redundant Fibre Channel (FC) ports located on the service panel are available for data host or external storage connections. FC ports in rows A and paired with FC ports in row C, and FC ports in rows B are paired with FC ports in row D.
To determine which ports are active on your system, open the service panel and check the cards installed in the DSP chassis. DSP slots 1, 2, 3, and 4 correspond to rows A, B, C, and D (respectively) on the service panel.
Your system can have one of the configurations listed in TABLE 4-1.
|
Row / Ports Available for Data Host/ External Storage Connections |
|||
|---|---|---|---|
|
16 SC[1] FC |
|||
FC Port connections are typically evenly allocated between SAN/server and internal storage. However, you can allocate additional ports for either host or internal storage connections, depending on the needs at your site. If you need additional ports for host connections, refer to Selecting Ports for Additional Host Connections for guidelines. If you need additional ports for internal storage connections, refer to Selecting Ports for Additional Storage Connections for guidelines.
The Sun StorEdge SIO-8 card has eight SC Fibre Channel (FC) ports. The FC ports are available for data host, internal storage, or external storage connectivity.
FIGURE 4-1 shows two SIO-8 cards installed in slots 3 and 4, and two MICs installed in slots 1 and 2 of the DSP.
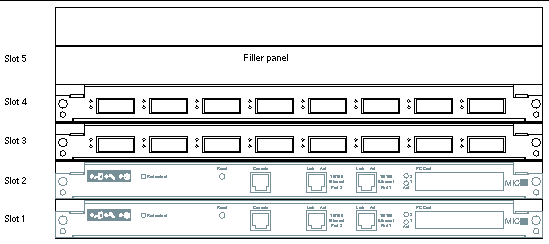
The SIO-8 card FC ports are standard connectors and required SC optical cables.
The Sun StorEdge SIO COMBO card has six LC Fibre Channel (FC) ports and one
RJ-45 Gigabit Ethernet port. The FC ports are available for data host, external storage, or FC-based remote replication connectivity. The Gigabit Ethernet port provides connectivity to a wide area network (WAN) for Ethernet-based remote replication. For information about remote replication, see the online help.
FIGURE 4-2 shows two SIO COMBO cards installed in slots 3 and 4, and two MICs installed in slots 1 and 2 of the DSP.
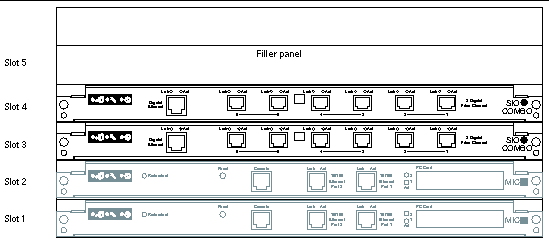
The SIO COMBO card FC ports are small form-factor pluggable (SFP) connectors and require LC optical cables.
FIGURE 4-3 shows four SIO COMBO cards installed in slots 3, 4, 5, and 6 of the DSP. Two MICs are installed in slots 1 and 2.
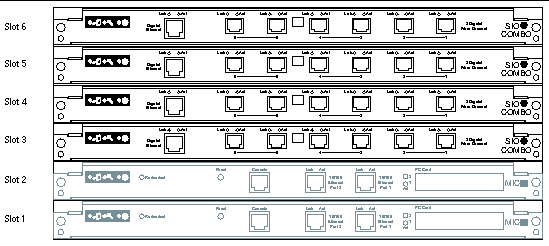
FIGURE 4-4 shows a sample configuration of data hosts connected to the system through redundant SAN FC switches.
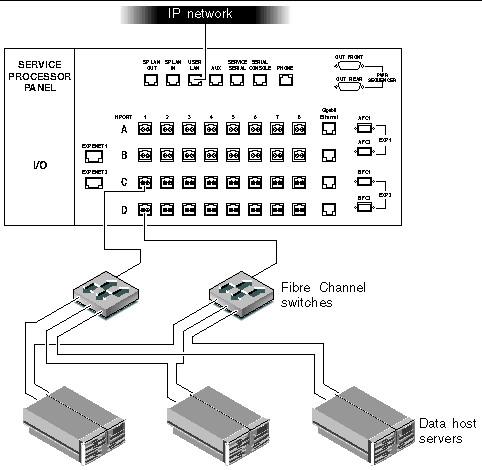
This example shows three data hosts connected to the system through redundant FC switches. Each host connects to a primary and alternate FC switch. The primary FC switch connects to port C/1. The secondary FC switch is connected to port D/1.
For more information about the allocation of I/O ports for SAN and DAS hosts, see the online help. For information about connecting external storage devices, see Chapter 6.
The Sun StorEdge 6920 system supports direct attached storage (DAS), allowing data hosts to connect directly to storage. FIGURE 4-5 shows an example of data hosts connected directly to the Sun StorEdge 6920 system.
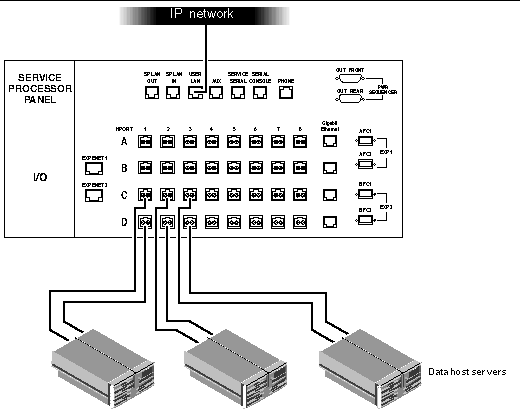
This example shows each data host connected directly to ports C/1 and D/1, C/2 and D/2, C/3 and D/3.
For information about connecting external storage devices, see Chapter 6.
Ports in the columns on the service panel marked 1, 2, 3, and 4 are reserved for host or external storage connections. If you want to allocate more ports for host attachment, take additional ports from left to right and top to bottom.
For example, once you have used all ports in columns 1 through 4 (rows C and D of a two SIO-8 card configuration), add the next host connections to column 5 (rows C and D). If your system has a four SIO-8 card configuration, add the next host connections to column 5 (rows A and B), and then add the next connections to column 5 (rows C and D).
|
Note - You cannot use ports in column 8 of the service panel for host connections. |
|
Note - If you allocate more ports to data hosts than to internal storage, you will need additional 1-meter LC-to-SC cables for each HBA port to physically connect the DSP to the service panel. |
Ports in the columns on the service panel marked 8, 7, 6, and 5 are reserved for internal storage connections. If you want to allocate more ports for internal storage, take additional ports from right to left and top to bottom.
For example, once you have used all ports in columns 8 through 5 (rows C and D of a two SIO-8 card configuration), add the next internal storage connections to column 4 (rows C and D). If your system has a four SIO-8 card configuration, add the next internal storage connections to column 4 (rows A and B), and then add the next connections to column 4 (rows C and D).
|
Note - You cannot use ports in column 1 of the service panel for internal storage connections. |
The Sun StorEdge 6920 System Host Installation Software CD contains software for Solaris data and management host stations. When you run the installation script, you select the functionality you want to install, and the script installs the required packages. You can choose from the following options:
Sun StorEdge SAN Foundation software incorporates kernel drivers and utilities that enable the data host to connect to, monitor, and transfer data on a SAN.
Storage Automated Diagnostic Environment Enterprise Edition is a distributed diagnostic monitoring tool for SAN devices, including data hosts and external storage devices connected to the Sun StorEdge 6920 system.You can configure the software to monitor on a 24-hour basis, collecting information that enhances the reliability, availability, and serviceability (RAS) of the storage devices.
The remote scripting CLI client provides access to the same configuration and monitoring tasks that you perform through the browser interface. You can also write scripts using the sscs commands to automate configuration and management tasks. You can install the remote scripting CLI client on a data host or an external management host. See the sscs(1M) man page for information about the remote scripting CLI commands.
The remote scripting CLI client is also available for Windows, Red Hat Linux, AIX, and HP-UX operating environments (see Installing the Remote Scripting CLI Client).
|
Note - See the Sun StorEdge 6920 System Release Notes for the operating system versions that are supported. |
TABLE 4-2 provides a summary of the tasks for installing the host software.
|
Starting the Storage Automated Diagnostic Environment Enterprise Edition |
|
|
Installing Host Software for Operating Systems Other Than Solaris OS |
TABLE 4-3 lists the hardware and software that must be set up and installed before you can install the data host software on a Solaris OS data host.
The installation script checks for the required versions of the following software packages and patches:
 SDK Environment version 1.4.2
If the installation script does not find the correct version of the required software, it either upgrades an existing version of the software, installs the required version of the software in a new location, or stops the installation process. Appropriate messages are provided at each step of the installation process informing you of the action being performed.
If the installation script finds an earlier version of SAN Foundation software, you must remove the current version of SAN software. The installation script installs the required version of SAN Foundation software and all required patches.
The SAN Foundation software and Java Web Console are embedded in the Solaris 10 OS. Therefore, when you install the data host software on a Solaris 10 platform, only the Storage Automated Environment Enterprise Edition software is installed.
If a data host is running Storage Automated Diagnostic Environment Enterprise Edition version 2.2 software or earlier, do the following before running the installation script:
If a data host is running Storage Automated Diagnostic Environment Enterprise Edition version 2.3 software or later, the installation script upgrades the currently installed version to version 2.4.
The installation script checks for the Java SDK version 1.4.2 software, which is required by the remote scripting CLI client. If the required version is not found, the installation script installs Java SDK version 1.4.2 in /opt/se6000/java.
Before you run the installation script, check the version of Java SDK that is installed on the management station. If a version earlier than Java SDK version 1.4.2 is installed, refer to the online compatibility documentation at the following site for information about incompatibilities:
http://java.sun.com/j2se/1.4.2/compatibility.html
You must install the software as superuser (root). If aliases exist in the superuser environment or profile, the software installation and configuration might have unexpected results. Remove any aliases created for the environment (for example, cp="cp -i") before you install or configure the software.
You can download the Sun StorEdge 6920 Host software for Solaris OS from the Sun Download Center or you can install it from the CD.
1. Log in to a Solaris data host as superuser (root).
2. Remove any defined aliases for this user.
3. Place the CD in the CD-ROM drive and start the Volume Manager daemon vold(1) (if needed).
If you downloaded the software from the Sun Download Center, and you uncompressed the tar file, go to the directory where you extracted the files, and then skip to step 5. If you are installing the software from the CD, continue with step 4.
4. Change to the root directory on the CD. For example:
5. Start the install.ksh script.
The installation menu is displayed.
7. To install the data host software, enter y at the prompt. When you are prompted to install the remote management software, enter n. Press Return after each choice.
Do you want to install .... Sun StorEdge 6920 Data Host Software [y/n] : y Sun StorEdge 6920 Remote Management Host Software [y/n] : n |
A confirmation displays the software package that will be installed.
8. Enter y to confirm your selection.
The script checks for installed versions of the required software components, as shown in the following example:
The script displays the software packages that will be installed on your system, as shown in the following example:
The script displays messages and status, as each software package and patch is installed.
When the script finishes, the following is displayed:
The script also displays the date and time that the installation finished and the path to the installation log.
10. Eject the CD from the drive.
If you encountered any problems during installation:
 Check the following files for messages related to the installation:
This log contains installation, removal, configuration, error, or informational messages.
This log contains general system error and informational messages.
To enable the multipathing software on the data host, do the following:
1. Open the /kernel/drv/scsi_vhci.conf file using a text editor.
2. Set mpxio-disable=no in the file to enable multipathing.
The remote management software for Solaris is delivered on the Host Installation Software CD. To install the software on a management station:
1. Log in to a Solaris station as superuser (root).
2. Remove any defined aliases for this user.
3. Place the CD in the CD-ROM drive and start the Volume Manager daemon vold(1) (if needed).
If you downloaded the software from the Sun Download Center, and you uncompressed tar file, go to the directory where you extracted the files, and then skip to step 5. If you are installing the software from the CD, continue with step 4.
4. Change to the root directory. For example,
5. Start the install.ksh script.
The installation menu is displayed. Enter y to continue.
6. To install only the remote management software, enter n and y as follows:
Do you want to install .... Sun StorEdge 6920 Data Host Software [y/n] : n Sun StorEdge 6920 Remote Management Host Software [y/n] : y |
A confirmation displays your selection, listing the packages that will be installed.
7. Enter y to confirm your selection.
You have chosen to install: Sun StorEdge 6920 Remote Management Host Software Is this correct? [y/n] : y |
The script checks for installed versions of the required software components, as shown in the following example:
Prechecks will be taking place Prechecking Sun StorEdge 6920 Configuration Service CLI... Prechecking Java 2 Standard Edition ... Prechecking disk space for root partition ... Precheck is completed. |
The script displays the software that will be installed on your system.
Following software will be installed on your system: - Sun StorEdge 6920 Configuration Service CLI 2.1 Do you want to continue? [y/n] : y |
The script displays messages and status, as each software package and patch is installed.
When the script finishes, the following is displayed:
You have installed the following components: Sun StorEdge 6920 Remote Management Host Software - Success |
The script also displays the date and time that the installation finished and the path to the installation log.
9. Eject the CD from the drive.
After you have successfully installed the software, refer to the Sun Automated Diagnostic Environment Enterprise Edition Release Notes Version 2.4 for information about how to set up the application. Complete the steps in the following two sections of the release notes:
After you download and install the remote scripting CLI client, you can access the system using any of the default user names (see About User Roles). This section explains how to log in to the system using the remote scripting CLI client.
Use the /opt/se6920/cli/bin/sscs command to perform the remote management operations. For further information about remote management operations, see the sscs(1M) man page.
 Enter the following command in a terminal window:
TABLE 4-4 describes the optional arguments associated with the sscs login command for the Sun StorEdge 6920 system.
|
Forces a login if another user with the same user name is already logged in. The duplicate user is then logged off. |
|
The following example shows how to log in to the Storage Service Processor named SP2.
To log out of the system using the CLI, enter the following command:
To enable multipathing functionality, you must install Sun StorEdge Traffic Manager software on each data host before it can reliably communicate with the system's storage. This software incorporates kernel drivers and utilities that enable data hosts running operating systems other than Solaris OS to automatically or manually connect to, monitor, and manage transfer data flow in a SAN.
The following Sun StorEdge Traffic Manager software packages are available for download from the Sun Download Center:
You can access the software from:
http://www.sun.com/software/download
To download the multipathing software from the Sun Download Center:
1. From the host on which you want to install the software, open a browser window and go to the download center by entering the following URL:
http://www.sun.com/software/download/index.jsp
2. Select the Sun StorEdge Traffic Manager software link for the platform on which you are installing the software.
If you have not already registered, do so and then log in.
5. Click Accept and Continue on the Legal/License Agreement page.
6. Click the package you want to download.
The web browser prompts you to download the file.
7. Save the package to a temporary working directory.
where /directory is a directory name in which to copy the package.
8. Download the release notes.
9. Log out of the Sun Download Center.
In addition to the Solaris OS, the Sun StorEdge remote scripting CLI client is available for the operating systems listed in TABLE 4-5.
To download the latest Sun StorEdge 6920 host CLI packages for AIX, HP-UX, Linux, and Windows platforms:
1. From the host on which you want to install the software, open a browser window and go to the Sun Download Center at:
http://www.sun.com/software/download/index.jsp
2. Click the link for the Sun StorEdge 6920 Host CLI Package for non-Solaris hosts.
If you have not already registered, do so and then log in.
5. Click Accept and Continue on the Legal/License Agreement page.
6. For the AIX, HP-UX, or Linux operating systems, follow these steps:
a. Click the package you want to download.
The web browser prompts you to download the file.
b. Download to any directory except /opt.
c. Save the tar file to a temporary working directory.
where /directory is a directory name in which to copy the package.
d. Change to the directory in which you saved the tar file.
e. Extract the contents of the tar file.
|
Note - If checksum errors occur when you use a platform-specific tar, use the GNU version of tar. |
7. To install the client, enter:
8. Add /opt/se6x20/bin to your path.
9. For the Windows 2000 or Windows 2003 operating system, follow these steps:
a. Click the file you want to download.
The web browser prompts you to download the file.
c. Save the unzipped folder to any directory.
d. Unzip Disk1.zip using any supported zip application.
e. Run the setup command to install the client.
If you need to remove a Solaris data host from the system, you can use the uninstall script provided on the host CD to remove the software.
To uninstall the software from a data host, perform the following procedure.
1. Log in to your machine as superuser (root).
2. Remove any defined aliases for this user as described in Installing Data Host Software for Solaris Hosts.
3. Run the uninstall.ksh script.
Follow any directions presented during the running of the script.
Copyright © 2005, Sun Microsystems, Inc. All Rights Reserved.