| C H A P T E R 5 |
|
Configuring Storage |
This chapter introduces you to Sun StorEdge 6920 system configuration concepts. It includes the following sections:
Your system is shipped with a default configuration that simplifies storage provisioning. The central point of configuration and management makes it easy to create volumes.
Before you begin to configure your system, you must have already planned your storage requirements and mapped out your configuration. The Best Practices for the Sun StorEdge 6920 System can help you plan and configure storage so that you avoid potential configuration problems.
You can use the default configuration that is shipped with the system, with only one storage domain, or divide the system into multiple smaller but fully functional private, secure storage domains.
The Sun StorEdge 6920 system consists of both physical and logical storage components.
Physical components include storage arrays, storage trays, disks, host/initiators, and optionally, external storage devices. TABLE 5-1 describes the physical components of the system.
FIGURE 5-1 shows the physical storage components of the system.

Logical components include storage domains, storage pools, virtual disks, volumes, and replication sets.
TABLE 5-2 describes the logical components of the system.
FIGURE 5-2 shows the relationships of the logical components.
As you review your options and determine how to allocate storage appropriately for your site, consider the following:
Your system has a default configuration which you can use as is or change. Even if you use the default configuration, you must create volumes. This section describes the default configuration options and tells you how to create volumes.
TABLE 5-3 describes the default configuration and provides options for configuring storage at your site.
If you decide not to use the system defaults, refer to Changing the Default Configuration.
If you decide to use the default configuration, you must create volumes within the Default storage pool and then assign each initiator in your environment to one of the volumes.
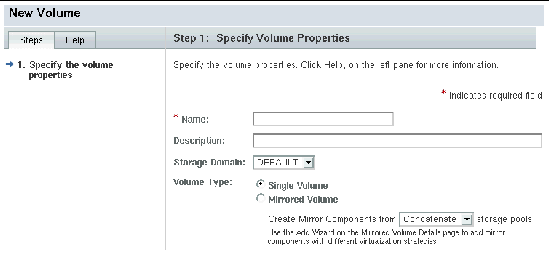
The New Volume wizard guides you through the steps to create and map a new volume. The New Volume wizard prompts you to:
If you decide not to map the volume to a host initiator now, you can map a volume later using the Map Volume wizard from the Volume Detail page. For more information about creating volumes and mapping them to hosts, see the online help.
Before you start to create volumes, be sure you understand the system storage concepts described in Storage Configuration Concepts.
1. Log in to the system as a storage administrator from the Java Web Console login page:
user name: storage password:!storage
2. Click Sun StorEdge 6920 Configuration Services.
The system displays the Volume Summary Page.
The system displays the New Volume wizard.

4. Specify a name and a description for the new volume.
Click the Help tab for a list of valid characters you can use when naming a new volume name and specifying a description.
5. Select the DEFAULT storage domain or another storage domain in which you want to place the volume.
6. Specify the type of volume you want to create, single or mirrored volume, and click Next.
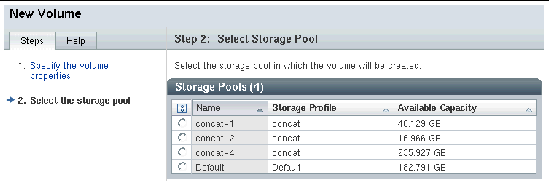
The wizard prompts you to select a storage pool.

7. Select a storage pool from which you want to create the volume, and click Next.
The storage profile of the pool you select determines the volume's storage characteristics.
The wizard prompts you to enter the capacity and striping configuration for this volume.

8. Specify the volume capacity, whether to enable striping, and click Next.
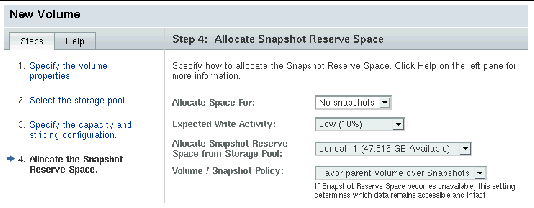
The wizard prompts you to allocate snapshot reserve space for this volume.

9. If needed, allocate space for snapshots for the new volume. Click Next.
The snapshot reserve space is determined by the number of snapshots and the write activity. Specify the number of snapshots (1 to 32) and the percentage of expected write activity (10%, 40%, 50%, 75%, or 100%). Specify the storage pool in which you want to reserve the space and the policy. For more information about allocating snapshot reserve space, see the online help and Best Practices for the Sun StorEdge 6920 System.
The Select Initiators page is displayed.
10. Select any initiators that you want to have mapped to the volume and select the LUN number and permissions for each mapping, and then click Next.
The system uses the LUN mapping storage management technique to selectively configure an area of storage so that it is available to a specific Fibre Channel (FC) device. LUN mapping matches FC targets or initiators inside the Sun StorEdge 6920 system to particular LUNs attached to the system, either directly attached or attached to a SAN. This technique makes a given LUN visible to a FC target or initiator while at the same time removing its visibility (or masking it) from another FC target or initiator.
11. Review your selections for the new volume and click Finish.
The system creates the new volume and adds it to the system configuration. The new volume is displayed in the list on the Volume Summary page.
For more information about creating volumes, go to the online help system by clicking the Help button. Click the Search tab and enter creating a volume.
If you decide the default configuration does not meet your storage needs, you can:
If you determine that one storage domain does not meet the needs of your site, you can create additional storage domains. Each system supports from 1 to 64 storage domains. These storage domains create separate private, secure domains that can support multiple clients within one system.
You create a storage domain using the New Storage Domain wizard. You can specify the initiators that you want to assign to the storage domain, or you can map initiators later using the Map Volume wizard on the Volume Detail page.
1. Log in to the system as a storage administrator from the Java Web Console login page:
user name: storage password:!storage
2. Click Sun StorEdge 6920 Configuration Service.
The system displays the Volume Summary page.
3. Click Logical Storage > Domains.
The Storage Domain Summary page is displayed.
The Create Storage Domain wizard is displayed.

5. Enter a name and description for the new domain, and click Next.
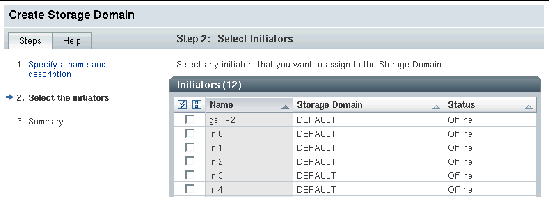
The wizard prompts you to select initiators that you want to assign to this storage domain.

6. Select the initiators that you want to assign to the storage domain, and click Next.
7. Review the summary and click Finish.
The system creates the new storage domain and adds it to the system configuration. The new storage domain is displayed on the Storage Domain Summary page.
The system provides several storage profiles that meet most storage configuration requirements. If the Default storage profile does not meet the performance needs of your application, you can select one of several other predefined profiles, or you can create a custom profile.
To view the predefined storage profiles:
1. Click Logical Storage > Profiles.
The Storage Profile Summary page is displayed.
TABLE 5-4 describes the characteristics of the predefined storage profiles.
The virtualization strategy is defined by the storage profile. For information about striped and concatenated virtualization strategies, see the online help.
2. Select a profile that matches your storage requirements.
If you select a RAID-1 profile, you must first delete one or both default RAID-5 virtual disks, as described in Deleting Virtual Disks.
You will need the name of the storage profile later, when you create a storage pool.
|
Note - If you want to create a custom profile, click New on the Storage Profile Summary page. The New Storage Profile wizard guides you through the steps to create a new storage profile. |
When you delete a virtual disk, its disk drives become available for the construction of new virtual disks within a new storage pool.
You can delete a virtual disk in one of two ways:
1. Click Logical Storage > Virtual Disks.
The Virtual Disk Summary page is displayed.
2. Select the virtual disks that you want to delete, and click Delete.
1. Click Logical Storage > Virtual Disks.
The Virtual Disk Summary page is displayed.
2. Click the virtual disk name that you want to delete.
The Virtual Disk Details page for the selected virtual disk is displayed.
To move the default RAID-5 virtual disk to a new storage pool:
1. Click Logical Storage > Virtual Disks.
The Virtual Disk Summary page is displayed.
2. Click the virtual disk you want to move.
The Virtual Disk Details page is displayed.
3. Select an alternate storage pool from the pull-down list.
Storage pool choices are limited to storage pools that have compatible profiles. For example, you cannot move a RAID-5 virtual disk to a storage pool that was created with a RAID-1 storage profile.
The Virtual Disk Summary page displays the name of the storage pool in which the virtual disk resides.
The default configuration uses the Default storage pool, which consists of all the disks in the system. When you create a new storage pool, you assign specific disks to it, and then you create volumes.
1. Click Logical Storage > Pools.
The Storage Pool Summary page is displayed.
The New Storage Pool wizard is displayed.

3. Select the storage domain with which you want to associate the storage pool, and click Next.
4. Specify a name and description for the storage pool and click Next.
5. Select a storage profile with which you want to associate the storage pool, and click Next.
6. Review the summary and click Finish.
The new storage pool is added to the Storage Pool Summary page.
Copyright © 2005, Sun Microsystems, Inc. All Rights Reserved.