| C H A P T E R 6 |
|
Connecting External Storage Devices |
This chapter provides instructions and guidelines for connecting external storage devices to the Sun StorEdge 6920 system. It includes the following sections:
In addition to the system's internal storage arrays, you can attach external storage devices to the system. An external storage device is a physical disk or storage array that is connected to the system's service panel, either directly or through a Fibre Channel (FC) switch, and is located outside the system base or expansion cabinet.
The Sun StorEdge 6920 system supports both Sun storage devices and storage devices from other vendors. The external storage devices that are currently supported include:
See the Sun StorEdge 6920 System Release Notes for the latest list of supported storage devices.
You can connect an external storage device to the system to allow host access to its data and to increase storage capacity of the system. Attaching an external storage device to the system enables you to:
External storage devices are located outside the management path and presented to the system as LUNs.
When you connect an external storage device to the system, follow these guidelines:
Direct connections with failover requires a dual-controller configuration on the external storage device. When cabling a direct connection to the system, connect the primary controller path to a primary FC port (row A or C) and the alternate controller path to an alternate FC port (row B or D) on the service panel.
Direct connections from the external storage device to the service panel require fiber optic interface cables.
1. Configure the external storage device to export at least one LUN, as described in the documentation provided with the external storage device.
2. Connect one controller to a primary FC port and one controller to an alternate FC port.
The following example connects Controller 1 to primary port C/4 and Controller 2 to alternate port D/4.
To determine which ports are available for connections, refer to Determining Your Configuration.
You can connect an external storage device to the system through a set of redundant FC switches to support failover. Create zones on the switch so that each controller on the external storage device has an exclusive path to the system. Refer to the FC switch documentation for information about zoning.
1. Configure the external storage device to export at least one LUN through dual controllers, as described in the documentation provided with the external storage device.
2. Connect one controller to ports on the primary FC switch that are in the same zone.
3. Connect the other controller to ports on the alternate FC switch that are in the same zone.
The following example shows Controller 1 on the external storage device connected to Zone A1 of the primary FC switch. Controller 2 is connected to Zone A2 of the alternate FC switch.
After the external device is physically connected to the system, you have three options for how to use the external storage device:

|
Caution - When you use a device as raw storage, all of the existing data is destroyed. If any of the data needs to be saved, back up the data before starting this process. |
This section introduces you to the Import External Storage wizard and guides you through the steps of creating a legacy volume. For more detailed information about managing external storage, see the online help.
A legacy volume is created from data that exists on a storage array that is external to the Sun StorEdge 6920 system. When you create a legacy volume, you can use it as if it were any other volume on the system.
A legacy volume consists of the external storage array's entire disk capacity and is presented to an application as a virtual storage volume.
Before creating a legacy volume, be sure the following requirements are met:
This section explains how to create a legacy volume from an external storage device using the Import External Storage wizard and how to map the legacy volume to a host.
1. Open a browser and connect to the system by entering:
User Name: storage Password: !storage
3. Click Sun StorEdge 6920 Configuration Service.
The External Storage Summary is displayed.

The LUNs that you exported from the external storage device are displayed as uninitialized virtual disks. An uninitialized virtual disk has four numbers as shown in this example: disk/3/4/129/0. The numbers identify the slot number of the I/O board in the DSP.
5. Select the virtual disks and click Import.
The Import External Storage wizard is displayed.
6. Select Yes to create a legacy volume, and click Next.

7. Enter a name for the legacy volume, and click Next.

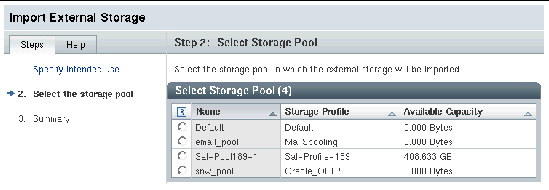
8. Select the storage pool to which the virtual disks will be added, and click Next.
You can select the Legacy storage pool (the default) or a pool that you previously created using the Legacy profile. In this case, two storage pools are available, Legacy (the default) and Legacy1-189.

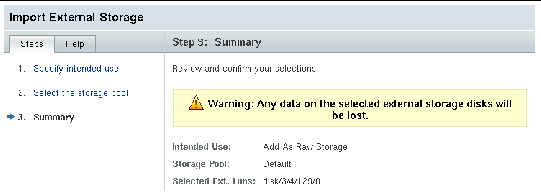
The wizard displays a summary of your selections.
9. Review your selections and click Finish.

The External Storage Summary page is displayed, and it confirms that the external storage LUN was successfully added to the Legacy storage pool.
10. Click Logical Storage > Volumes.
The system designates the entire LUN on the external storage device as a legacy volume. The Volume Summary page displays information about each LUN including its name, array name, vendor, and model. It also shows you the storage pool to which the LUN is added, the total capacity, and the WWN of the external storage LUN.
11. To map the legacy volume to one or more hosts, do the following:
a. Click the volume to go to the Volume Details page.
b. Click Map to open the Map Volume wizard.
c. Follow the instructions to map the volume to one or more host initiators.
After you create a legacy volume, it can be managed as any other volume in the system. In addition to mapping a legacy volume to hosts, you can:
For information about data mirroring, volume snapshots, and data replication, see the online help.
You can expand the system's storage capacity by adding an exported LUN from an external device as raw storage. If you decide to use the external storage device as raw storage, none of the data is preserved. If necessary, back up the data before connecting the external storage device to the system. The attributes of the LUNs on the external storage device must be compatible with the storage pools in which you place the raw storage.
Before you begin this procedure, you need to know the name of the storage pool to which the virtual disks will be added. The storage profile that defines the storage pool characteristics must be compatible with the external storage device.
To designate external storage as raw storage:
The External Storage Summary page is displayed.
2. Select the name of the virtual disk that you want to manage.

The Import External Storage wizard is displayed.
4. Select No, add to storage pool as raw storage, and click Next.

5. Select the raw storage pool to which the virtual disks will be added, and click Next.

The wizard displays a summary of your selections.
6. Review your selections and click Finish.

The capacity of the external storage device is added to the selected storage pool.
For more information about external storage and how to migrate data from external storage, see the online help.
Use the Storage Automated Diagnostic Environment Enterprise Edition software, installed on a data host or management station, to monitor the health of external storage devices.
Storage Automated Diagnostic Environment Enterprise Edition is delivered on the Host Installation Software CD. For information about installing the software, see Installing Host Software for Solaris OS Hosts.
Copyright © 2005, Sun Microsystems, Inc. All Rights Reserved.