Navigation Pane
Figure 2–2 Navigation Pane
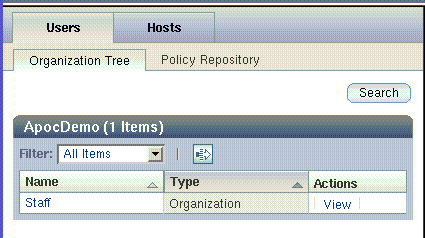
The Navigation pane allows the administrator, for both the user and host entity trees, to perform the following tasks:
-
Browse the entity trees.
-
Browse the policy repository.
-
Manage policy groups in policy repositories.
The Navigation pane contains two tab pages, Users and Hosts. These are discussed in more detail in the following sections.
Users Tab Page
The Users tab page provides the means to browse the organization tree and to manage policy groups for the organization tree. It has two sub-tabs: Organization Tree and Policy Repository.
Organization Tree Navigation
You can browse the organization tree using the parentage path or the Navigation table.
Parentage Path
At the top of the Users tab page is the parentage path, which is an area that shows the path to the current entity. Every path particle is a link that represents an entity, except for the last link, which is displayed as normal text and denotes the current entity.
To navigate using the parentage path, click on a link. This will refresh the Navigation pane so that the parentage path points to the clicked entity, and so that the navigation table contains the sub-entities of that entity. The Content pane with the configuration policy data associated with that entity is also refreshed.
Navigation Table
The navigation table is located below the parentage path, and lists the sub-entities of the current entity. The "Name" column contains the names of all sub-entities of the current entity. The "Type" column displays the type of the entity. The "Action" column contains a View link for every row.
If an entity is an organization or a role with sub-roles, you can click on the listed name, which results in the following actions:
-
Makes the selected sub-entity the current entity.
-
Refreshes the Navigation pane so that the parentage path points to the new current entity, and so that the navigation table contains the sub-entities of that entity.
-
Refreshes the Content pane with the configuration policy associated with that entity.
An entity can be either of type "Organization", "User" or "Role".
To view a listed entity's details without changing the current entity in the Navigation pane, click on the View link. This changes the background color of the selected row to blue and refreshes the Content pane with the data associated with the selected entity.
A row with blue background marks the entity whose data is currently visible in the Content pane.
The top of the navigation table contains the Filter drop-down
menu and the Advanced Filter icon. See Advanced Filter for more information. When the table contains more than ten
entries, the Page/Scroll Through All Data icon  appears,
which allows you to change the view of the table entries.
The Filter drop-down menu allows you to choose which type of entity to display in the navigation table. It contains the following choices:
-
"All Items" displays all types of entities in the navigation table.
-
"Organizations" displays only entities of type "Organization" in the navigation table.
-
"Users" displays only entities of type "User" in the navigation table.
-
"Roles" displays only entities of type "Role" in the navigation table.
Advanced Filter
Figure 2–3 Advanced Filter dialog
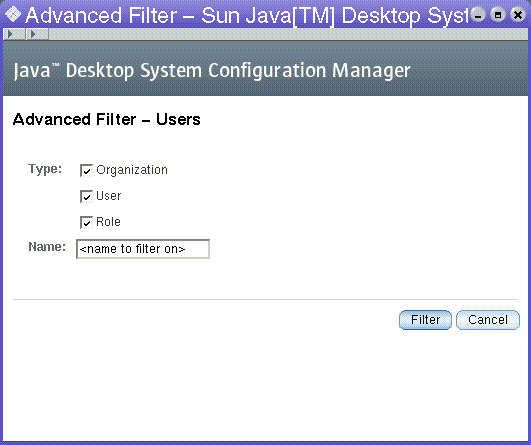
The Advanced Filter function enables the administrator to define the types of entities to be displayed.
 Using the Advanced Filter dialog
Steps
-
Click the Advanced Filter icon
 at
the top of the navigation table to open the dialog.
 -
In the Type section, select the type of entity that you want to filter. For a more specific filter, type a name in the Name text field.
Note –You can use an asterisk "*" in the Name text field as a wildcard.
-
Click the Filter button at the bottom of the dialog to run the filter.
Search
This function allows the administrator to search through the organization tree for certain entity types and entity names.
Figure 2–4 Search window
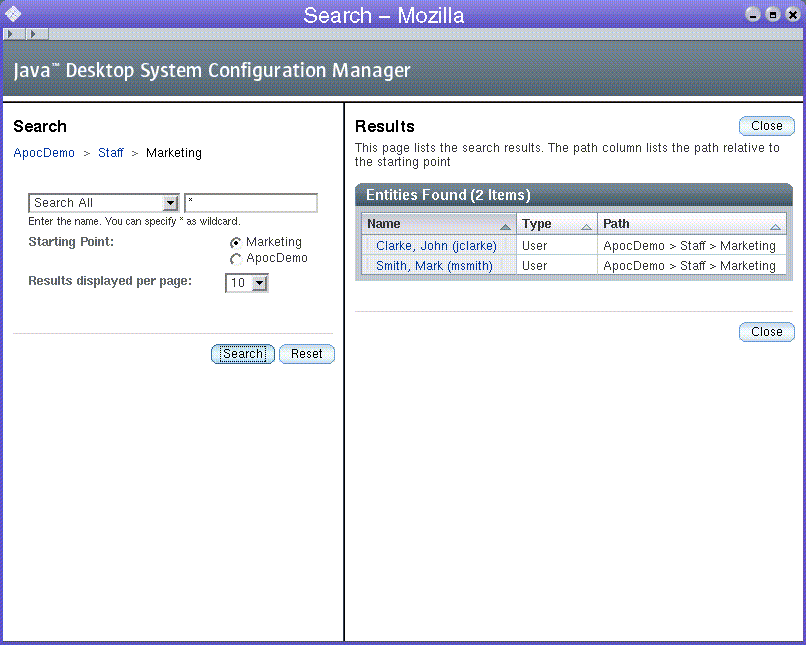
 Searching for an entity
Steps
-
Click the Search button in the Navigation pane.
The Search window opens. The window contains a masthead, a parameter area on the left, and a results area on the right. The parameter area displays the parentage path of the current entity at the top.
Note –If the Search button in the Navigation pane of the main window is clicked while the Search window is open in the background, the Search window becomes the topmost window. The current entity of the Search window, which is displayed by the parentage path in the parameter area of the Search window, is refreshed. All other parameters and the content of the result area are unchanged.
-
Select the desired entity type from the list box underneath the parentage path.
To search for a particular entity type, select that type from the drop-down list underneath the parentage path. The available selections are:
-
Search All
-
Search Organizations
-
Search Users
-
Search Roles
-
Search Domains
-
Search Hosts
-
-
To further refine category results, type a string into the search fields available for each category type.
The default value for the filter strings is *, indicating "all". The asterisk can be used within a string typed in a search field as a wildcard.
Note –The search function is not case-sensitive.
-
Select an option from the Starting Point section to determine the starting point of the search.
All selections begin a deep search of the organization tree. The difference lies in the starting point of the search. A search from the root begins at the top of the organization tree, a search from another location starts from that location in the tree.
Clicking on any path particle in the parentage path changes the current location for the search to the selected entity.
-
Select the number of results to be displayed from the Results to be displayed per page list box.
-
Click the Search button.
Once the search is complete, the results area displays a table containing the search results.
-
To start another search, or to clear current search parameters, click the Reset button in the parameter area.
Working with Search Results
Figure 2–5 Search results table
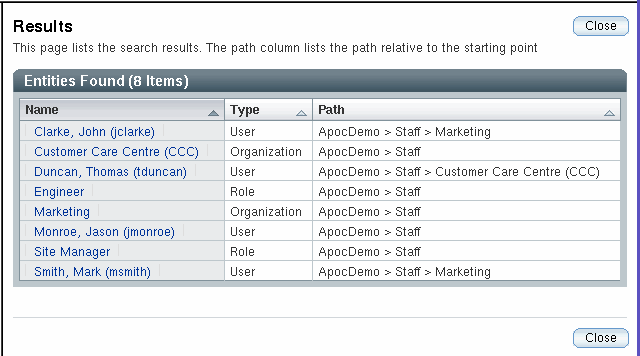
After performing a search, a result table appears in the results area of the Search window. The table contains three columns:
-
“Name” displays the name of the entity.
-
“Type” displays the type of the entity.
-
“Path” displays the path to the entity. The path is relative to the starting point of the search.
If the search was for an entity of type “User”, a fourth column, called “UserID” is visible on the result table.
Note –
You can sort results by clicking the arrow next to the appropriate column header. For instance, to sort by type, click the arrow next to the “Type” column.
To view a result, click on the corresponding name in the “Name” column. This brings the main Configuration Manager window to the foreground. The Content pane displays the configuration policy associated with that entity. The entity is also highlighted in blue in the Navigation pane.
Hosts Tab Page
Figure 2–6 Hosts tab page
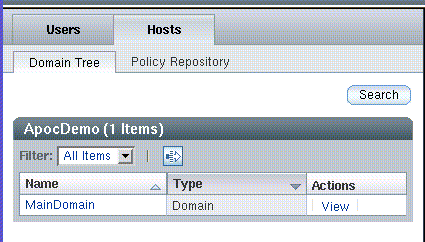
The configuration settings linked to the entities listed in the Hosts tab page are used for host-based configuration.
On the client side, the user-based configuration settings are fetched from the organization tree based on the username. The host-based configuration settings are fetched from the domain tree based on the IP or the host name of the host that the user is working on.
By offering configuration settings that are host-based, settings that depend on network environments can be easily configured. A typical scenario is the roaming user who has one user-based configuration but nevertheless can make use of the optimal proxy configuration depending on the host that the user is working is on.
The Hosts tab page contains two sub-tabs that are called Domain Tree and Policy Repository, respectively.
Domain Tree Tab Page
Figure 2–7 Domain Tree tab page
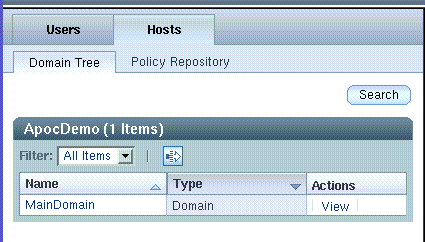
The domain tree displays the configuration settings for the host that the user is working on. It opens by default when the Hosts tab is clicked.
Navigation through the domain tree works in the same way as navigation through the organization tree. See Organization Tree Navigation for more information.
The action bar of the domain tree navigation table contains the Filter drop-down menu, with the following items:
-
“All Items” displays all types of entities.
-
“Domains” displays entities of type Domain.
-
“Hosts” displays entities of type Host.
The action bar also contains the Advanced Filter icon, described in Advanced Filter, Hosts Page.
Advanced Filter, Hosts Page
Figure 2–8 Advanced Filter window
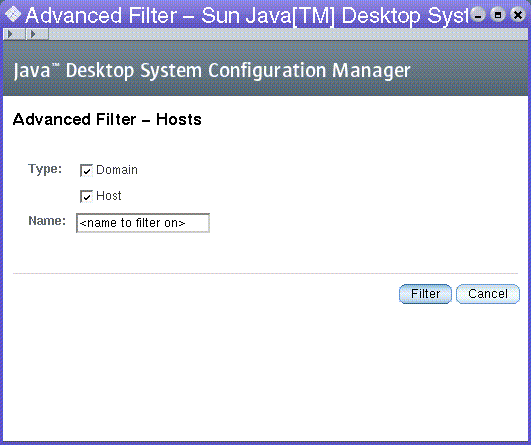
Clicking the Advanced Filter icon in the action bar of the domain tree navigation table opens the Advanced Filter window. It works in the same way as the advanced filter for the organization tree. See Advanced Filter. The advanced filter for the domain tree provides Domain and Host entity types to filter from.
Domain Tree Search
Figure 2–9 Domain Tree search window
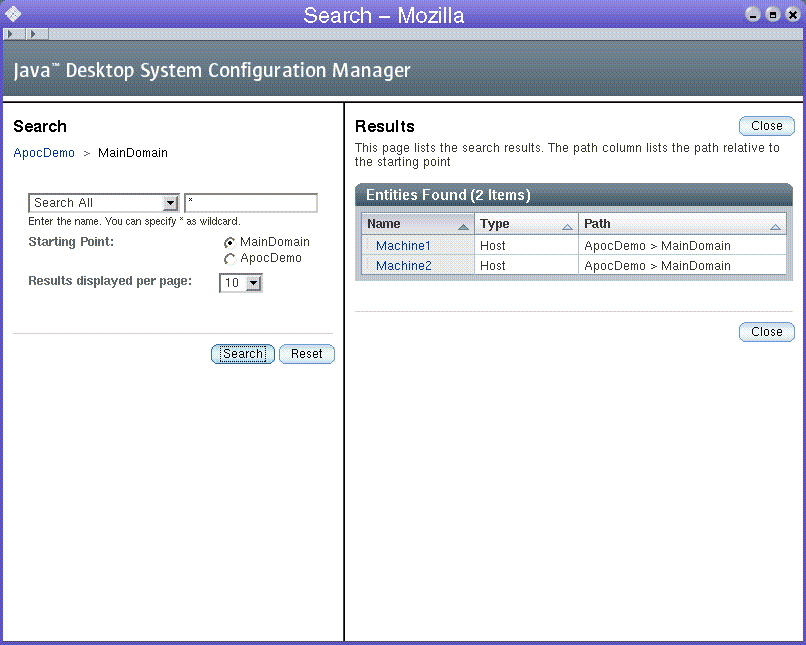
When you click on the Search button in the Domain Tree tab, the Domain Search window appears. The Domain Search operates in the same way as the search in the organization tree. See Search for more information.
Policy Repositories
Figure 2–10 Policy Repositories tab
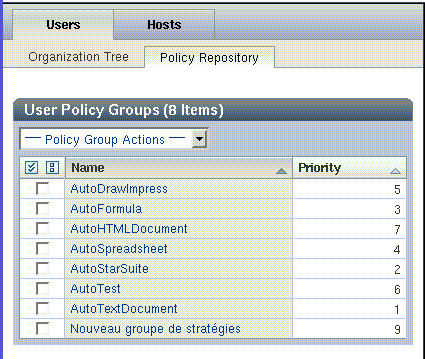
A Policy Repository tab exists under both the Users tab and under the Hosts tab.
A policy repository is a container for either user policy groups or host policy groups. The policy groups are organized in an ordered list. The sequence is defined by priorities.
Policy Group Table
The policy group table is located at the top of the page and lists the policy groups. The table contains three columns: a selection column, "Name", and "Priority". See Figure 2–10.
The selection column is used to mark the rows to which the actions listed in the Policy Group Action drop-down menu are applied.
Navigating Policy Groups
To navigate to a policy group, click on its name in the "Name" column. This will change the background color of the selected row to blue and refresh the Content pane with the data that is associated with the selected policy group.
The "Priority" column contains the priority of the policy group. The priority is used to define the merge order of the policy groups if an administrator has associated more than one policy group to an entity.
A row with blue background marks the policy group whose data is currently viewed in the Content pane .
Policy Group Action Bar
The Policy Group Actions drop-down menu contains the following actions:
Table 2–1 Policy Group actions|
Name |
Action |
|---|---|
|
New |
A dialog window opens, where the administrator enters the (unique) name of the policy group. After clicking OK, the policy group is added. The Navigation pane is refreshed to reflect the changes. |
|
Delete |
A pop-up window opens, with a warning message to confirm deletion of the policy group(s). If the administrator clicks OK, the policy group(s) are deleted. The Navigation pane is refreshed to reflect the changes. |
|
Rename |
A dialog window opens, the administrator enters the new (unique) name for the policy group, the policy group is renamed and the Navigation pane is refreshed to reflect the changes. |
|
Edit Priorities |
A dialog window opens, which contains a list box for changing the priorities. |
|
Export |
A dialog window opens. The administrator enters the destination path where the selected policy group(s) are exported to. |
|
Import |
A dialog window opens. The administrator selects the policy group(s) to be imported. After clicking OK, the policy group is added and the Navigation pane is refreshed to reflect the changes. |
Policy Group Priorities
The concept of policy group priorities allows you to define the order in which the layers are merged. The policy group priorities are used during merging if an entity has more than one policy group assigned. In this case, the hierarchy of entities is not sufficient to determine the sequence in which the policy groups are merged. This is solved by assigning priorities to policy groups.
To open the Policy Group Priorities dialog, select Edit Priorities from the Policy Group Actions drop-down menu.
Figure 2–11 Policy Group Priorities window
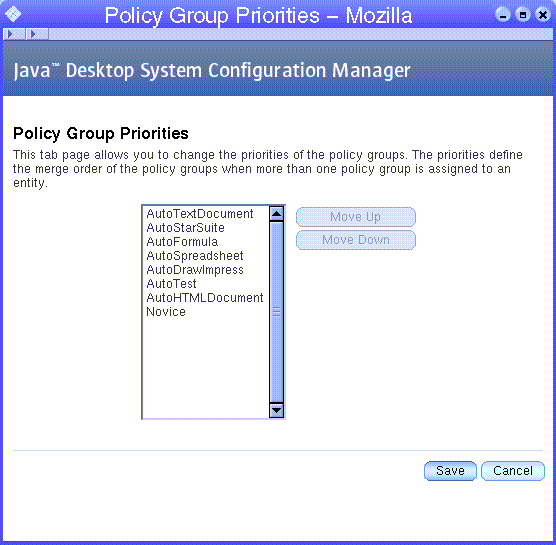
 To increase or decrease the priority of a policy group
Steps
- © 2010, Oracle Corporation and/or its affiliates
