| C H A P T E R 3 |
|
Powering On and Setting the Link Rate |
This chapter describes initial tray power-on procedures. It contains the following sections:
You can set up a Dynamic Host Configuration Protocol (DHCP) server to issue the IP address to each controller. If a DHCP server is not available, the controller tray defaults to internal static IP addresses. (See Configuring the IP Address of the Array Controllers for details.)
For instructions on how to set up the DHCP server, see Configuring a DHCP Server.
Use this procedure to turn power on for all trays installed in the cabinet.
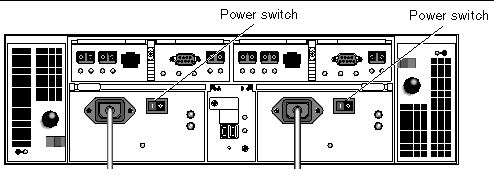
1. Turn off both power switches on each tray that you want to connect to the cabinet's main power (FIGURE 3-1).

2. Connect the power cable for each tray power supply to a separate power source in the cabinet.
3. Make sure the cabinet circuit breakers are turned off.
4. Connect the primary power cables from the cabinet to the external power source.
5. Turn on the cabinet circuit breakers.
6. Press the power switches at the back of each expansion tray to the On position.
7. Press each power switch at the back of the controller tray to the On position.
While the tray powers up, the green and amber LEDs on the front and back of the tray turn on and off intermittently. Depending on your configuration, it can take several minutes for the tray to power up.
8. Check the status of each tray.
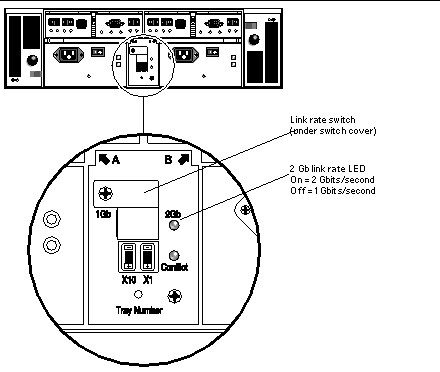
The link rate switch allows you to set the data transfer rate. The default setting is 2 gigabits (Gbits) per second.
1. Locate the link rate switch at the back of the array, between the two power supplies (FIGURE 3-2).

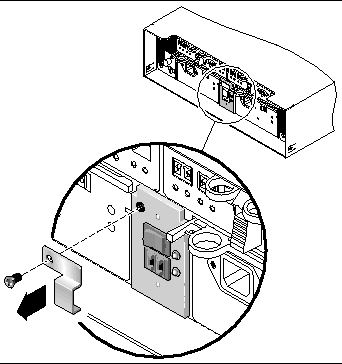
2. Remove the screw and the switch cover.

4. Replace the switch cover and tighten the screw to secure it.
The array rarely needs to be powered off. You remove power only when you plan to physically move the array to another location.
To power off the array, do the following:
1. Stop all I/O from the hosts to the storage system.
2. Wait approximately 2 minutes until all disk drive LEDs have stopped flashing.
After the 2-minute period, data residing in cache is written to disk and the battery mechanisms are disengaged.
3. Check the cache LED on the controller to determine if any outstanding cache needs to be written.
If the LED is flashing, there is still data that needs to be flushed and written to disk.
4. Ensure that the LED is no longer flashing before powering off the array.
5. Press each power switch at the back of the controller tray to the Off position.
6. Press the power switches at the back of each expansion tray to the Off position.
Now you are ready to connect the management host and data hosts, as described in Chapter 4.
Copyright © 2004, Sun Microsystems, Inc. All Rights Reserved.