To Remove the HBA
- Prepare
your operating system for HBA removal.
- Attach an antistatic wrist strap.
See Observing ESD and Handling Precautions.
- Turn off the power to the system,
all drives, enclosures, and system components.
- Disconnect the AC power cord
and all other cords from the system.
- Remove the cover from the chassis
of the system, as described in the system documentation, and disconnect
the system from any networks.
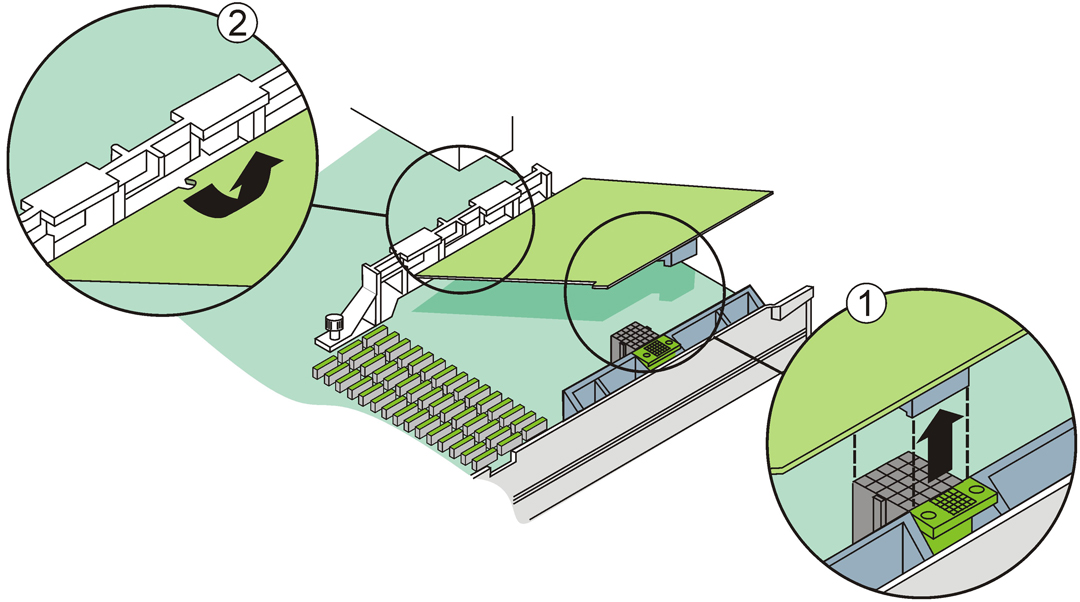
- Pull up gently and firmly to
unseat the 210-pin mezzazine plug on the HBA from the corresponding
plug on chassis of the system, as shown in Removal of Oracle's Sun Storage 6 Gb SAS REM RAID HBA.
Figure 2-3 Removal of Oracle's Sun Storage
6 Gb SAS REM RAID HBA

Figure Legend
1
Pull up to unseat the mezzanine plug.
2Remove the notch of
the HBA from the bracket.
- Remove the notch on the other
end of the HBA from the bracket.
- Lift the HBA up and pull it away
from the bracket.
- (Optional) If you need to replace
the battery on the HBA, do the following:
- Gently pull the battery
connector out of the 20-pin connector (J5C1) on the HBA (See Intelligent Battery Backup Unit 08 (LSIiBBU08) on the HBA).
- With a Phillips-head screwdriver,
loosen the three screws holding the battery to the HBA.
- Place the three screws aside
and remove the battery from the HBA.
- Insert the connector of the new
battery into the 20-pin connector (J5C1) on the HBA (See Intelligent Battery Backup Unit 08 (LSIiBBU08) on the HBA).
- Lign the new battery up to the
three holes in the HBA.
- Tighten the three screws into
the holes to attach the battery to the HBA.
- To reinstall the HBA into the
system chassis, follow the instructions in To Install the HBA.
- Reconnect the system to any networks
and reinstall the cover on the system.
- Reconnect the AC power cord and
all other cords to the system.
- Power on the system, all drives,
enclosures, and system components.


