Planning the Operating System Installation
|
This chapter identifies the information you need to properly plan the installation of an operating system onto a Sun Fire X2270 Server.
This chapter contains the following topics:
Supported Operating Systems
The Sun Fire X2270 Server supports the installation and use of the following operating systems, or a subsequent release of the operating systems.
TABLE 1-1 Supported Operating Systems
|
Operating System
|
Supported Version
|
For More Information, See
|
|
Windows
|
- Microsoft Windows Server 2003 Enterprise Edition (R2 with SP2, or SP2) (32-bit and 64-bit)
- Microsoft Windows Server 2003 Standard Edition (R2 with SP2, or SP2) (32-bit and 64-bit)
- Microsoft Windows Server 2008, Standard Edition (32-bit or 64-bit)
- Microsoft Windows Server 2008, Enterprise Edition (32-bit or 64-bit)
- Microsoft Windows Server 2008, Datacenter Edition (32-bit or 64-bit)
- Microsoft Windows Server 2008 R2, Standard Edition (32-bit or 64-bit)
- Microsoft Windows Server 2008 R2, Enterprise Edition (32-bit or 64-bit)
- Microsoft Windows Server 2008 R2, Datacenter Edition (32-bit or 64-bit)
|
|
|
Linux
|
- Red Hat Enterprise Linux (RHEL) 4.7 and 4.8 (32-bit and 64-bit)
- RHEL 5.3 (64-bit)
- SUSE Linux Enterprise Server (SLES) 10 SP2 (64-bit)
- SLES 11 (64-bit)
|
- Sun Fire X2270 Server Linux, VMware, OpenSolaris, and Solaris Operating Systems Installation Guide (820-5606)
|
|
Solaris
|
- Solaris 10 10/08 and later
|
|
OpenSolaris
|
- OpenSolaris 2009.06 and later
|
|
VMware
|
- VMware ESX 3.5 Update 4
- VMware ESXi 3.5 Update 4
- VMware ESX 4.0
- VMware ESXi 4.0
|
Preinstalled OpenSolaris or Solaris 10 Image
The OpenSolaris 2009.06 or Solaris 10 Operating System image, if ordered, is shipped preinstalled on the hard disk drive. If you need to install another operating system on this drive, you can choose to:
- Partition the local drive to remove the preinstalled OS image
or
- Partition the local drive to support a dual-boot operating system configuration
The Linux, OpenSolaris, and Solaris operating system installation procedures described later in this guide explain the appropriate point in the installation program where you can either partition the drive to remove the preinstalled OS image or to support a dual-boot operating system configuration.
| Note - To configure the preinstalled OpenSolaris 2009.06 or Solaris 10 OS image, see either the OpenSolaris 2009.06 or the Solaris 10 OS Preinstalled OS chapter in the Sun Fire X2270 Server Installation Guide for details.
|
Installation Prerequisites
The following requirements must be met prior to installing an operating system.
TABLE 1-2 Windows OS Installation Prerequisites
|
Requirement
|
Mandatory or Optional
|
For More Information, See:
|
|
The server is mounted and powered-on in a rack.
|
Mandatory
|
- Sun Fire X2270 Server Installation Guide
|
|
For systems equipped with an SP, the SP network management port on the server is configured with an IP address.
|
Mandatory
|
- Sun Fire X2270 Server Installation Guide
or
- Sun Integrated Lights Out Manager 2.0 User’s Guide
|
|
Select a console option and a media option for performing the installation, as well as an installation target.
|
Mandatory
|
|
|
Ensure that factory-default settings in the BIOS utility are set.
|
Recommended*
*For local disk drive OS installation targets.
|
|
|
Set up a RAID set on SATA disk drives and onboard Intel RAID controller.
|
Optional
|
|
|
Gather the applicable vendor operating system installation documentation.
Note - Use operating system vendor documentation in conjunction with the operating system instructions in this guide.
|
Recommended
|
|
|
Ensure that you have the Tools & Drivers CD that was provided with your server.
Note - If device drivers are required for your OS installation, the device drivers are provided on the Tools & Drivers CD.
|
Mandatory
|
- Sun Fire X2270 Server Tools & Drivers CD
or
|
|
Review the Sun Fire X2270 Server Product Notes for late-breaking news about supported operating system software and patches.
|
Recommended
|
- Sun Fire X2270 Server Product Notes
|
Installation Methods
To determine which installation method is best for your infrastructure, consider the options and requirements summarized in the following sections:
Console Outputs
TABLE 1-3 lists the consoles that you can use to capture the output and input of the operating system installation.
TABLE 1-3 Console Options for Performing an OS Installation
|
Console
|
Description
|
Setup Requirement
|
|
Local Console
|
You can install the OS and administer the server by attaching a local console directly to the server SP.
Note - An example of a local console is a serial console.
|
- Attach a local console to the server.
For details, see “Connecting the Cables” in the Sun Fire X2270 Server Installation Guide.
- For systems without an SP, the video output is automatically routed to the local console.
- For systems equipped with an SP, do the following:
a. At the ILOM prompt, type your ILOM user name and password.
b. For serial console connections only, establish a connection to the host serial port by typing start /SP/console.
The video output is automatically routed to the local console.
For further details about establishing a connection to the server SP, see the Sun Integrated Lights Out Manager 2.0 User’s Guide.
|
|
Remote Console*
*For servers equipped with an SP
|
You can install the OS and administer the server from a remote console by establishing a network connection to the server SP.
Examples of remote consoles include:
- Web-based client connection using the Sun ILOM Remote Console application
- SSH client connection using a serial console
|
- Establish an IP address for the server SP.
For details, see the Sun Integrated Lights Out Manager 2.0 User’s Guide.
- Establish a connection between a remote console and the server SP:
- For web-based client connection, perform these steps: 1) In a web browser, type the IP address for the server SP; 2) log in to the ILOM web interface; 3) redirect the video output from the server to the web client by launching the Sun ILOM Remote Console; then 4) enable device redirection (mouse, keyboard, etc.) in the Device menu.
- For SSH client connection, perform these steps:
1) From a serial console, establish an SSH connection to the server SP (ssh root@ipaddress); 2) log in to the ILOM command-line interface, then 3) redirect the serial output from the server to the SSH client by typing start /SP/console.
For additional information about establishing a remote connection to the ILOM SP or using the Sun ILOM Remote Console, see the Sun Integrated Lights Out Manager 2.0 User’s Guide.
|
Installation Boot Media
You can start the operating system installation to a server by booting a local or remote installation media source. TABLE 1-4 identifies the supported media sources and the setup requirements for each source.
TABLE 1-4 Boot Media Options for Performing the OS Installation
|
Installation Media
|
Description
|
Setup Requirement
|
|
Local Boot Media
|
Local boot media requires a built-in storage device on the server, or an external storage device attached to the server.
Supported OS local boot media sources can include:
- CD/DVD-ROM installation media, and, if applicable, floppy device driver media
|
- To perform this installation using local boot media, perform these steps:
- If your server does not contain a built-in storage device, attach the appropriate storage device to the the server using a USB connector.
- For more information about how to attach local devices to the server, see “Connecting the Cables” in the Sun Fire X2270 Server Installation Guide.
|
|
Remote Boot Media*
*For servers equipped with SP
|
Remote media requires you to boot the installation over the network. You can start the network installation from a redirected boot storage device or another networked system that exports the installation over the network using a Pre-Boot eXecution environment (PXE).
|
- To redirect the boot media from a remote storage device, perform these steps:
- Insert the boot media into the storage device, for example:
- For CD/DVD-ROM, insert media into the built-in or external CD/DVD-ROM drive.
- For CD/DVD-ROM ISO image, ensure that the ISO image(s) are readily available on a network shared location.
- For device driver floppy ISO image, ensure that the ISO image, if applicable, is readily available on a network shared location or on a USB drive.
- For device driver floppy media, if applicable, insert floppy media into the external floppy drive.
- Establish a web-based client connection to the ILOM server SP and launch the Sun ILOM Remote Console application.
For more details, see the Setup Requirements for web-based client connection in TABLE 1-3.
- In the Device menu of the Sun ILOM Remote Console application, specify the location of the boot media, for example:
- For CD/DVD-ROM boot media, select CD-ROM.
- For CD/DVD-ROM ISO image boot media, select CD-ROM Image.
- For floppy device driver boot media, if applicable, select Floppy.
- For floppy image device driver boot media, if applicable, select Floppy Image.
For more information about the Sun ILOM Remote Console, see the Sun Integrated Lights Out Manager 2.0 User’s Guide.
|
|
Supported OS remote media sources can include:
- CD/DVD-ROM installation media, and, if applicable, floppy device driver media
- CD/DVD-ROM ISO installation image and, if applicable, floppy ISO device driver media
- Automated installation image (requires PXE boot)
|
|
Remote Boot Media, continued
|
Note - An automated installation image enables you to perform the OS installation on multiple servers. By using an automated image, you can ensure configuration uniformity among many systems.
Automated installations use a Pre-boot eXecution Environment (PXE) technology to enable the clients without an operating system to boot remotely to the automated installation server that performs the installation of the operating system.
|
- To perform the installation using PXE, perform these steps:
- Configure the network server to export the installation using a PXE boot.
- Make the OS installation media available for PXE boot.
If you are using an automated OS installation image, you will need to create and provide the automated OS installation image, for example:
- Solaris JumpStart Image
- RHEL KickStart Image
- SLES AutoYaST Image
- Windows RIS or WDS Image
For detailed instructions for automating the installation setup process, consult the operating system vendor documentation.
- To boot the installation media, select the PXE boot interface card as the temporary boot device. For details, see the applicable PXE-based operating system installation procedure described later in this chapter.
|
Installation Targets
TABLE 1-5 identifies the supported installation targets that you can use to install an operating system.
TABLE 1-5 Installation Targets for OS Installations
|
Installation Target
|
Description
|
Setup Requirement
|
Supported OS
|
|
Local Hard Disk Drive (HDD)
or
Solid State Drive (SSD)
|
You can choose to install the operating system to any of the HDDs or SSDs installed in the server.
|
- Ensure that the HDD or SSD is properly installed and powered-on in the server.
For more information about installing and powering on an HDD or SDD, refer to the installation guide or the service manual provided with your server.
|
|
|
Mini DIMMs
Note - This option is not available on all servers.
|
If your system is equipped with optional Mini DIMMs, you can choose to install a supported operating system to the Mini DIMMs.
|
- Ensure that the Mini DIMM options are properly installed in the server.
For more information about installing this option, see the installation guide or the service manual supplied with your server.
|
|
Verifying BIOS Settings for New Installations
For all new operating system installations on a hard disk drive, you should verify that the following BIOS settings are properly configured before you perform the operating system installation:
- System time
- System date
- Boot order
In the BIOS Setup utility, you can set optimal defaults, as well as view and edit BIOS settings as needed. Note that all changes you make in the BIOS Setup utility (through F2) are permanent until the next time you change them.
| Note - If necessary, you can specify a temporary boot device by pressing F8 during the BIOS start-up. Note that a temporary boot device setting is only in effect for the current system boot. After the system boots from a temporary boot device, the permanent boot device setting specified through F2 (in the BIOS) will be in effect.
|
Before You Begin
Ensure that the following requirements are met prior to accessing the BIOS Setup utility:
- Server is mounted and powered on in a rack. For details, see the Sun Fire X2270 Server Installation Guide.
- Server is equipped with a hard disk drive (HDD) or solid state disk drive (SSD).
- HDD or SSD is properly installed in the server. For details, see the Sun Fire X2270 Server Service Manual.
- Console connection is established to the server. For details, see Console Outputs.
 View or Edit BIOS Settings for New Installations View or Edit BIOS Settings for New Installations
|
1. Reset the power on the server.
For example:
- From the ILOM web interface, select Remote Control --> Remote Power Control, then select the Power Cycle option from the Host action drop-down list box.
- From the local server, press the Power button on the front panel of the server module to turn the server module off, then press the Power button again to turn the server module on.
- From the ILOM CLI, type: reset /SYS
The BIOS screen appears.
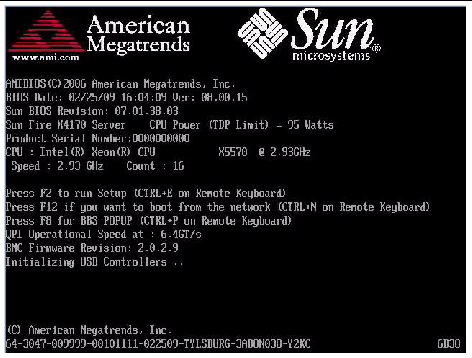
2. When prompted in the BIOS screen, press F2 to access the BIOS Setup utility.
After a few moments, the BIOS Setup utility appears.
3. To ensure that the factory defaults are set, do the following:
a. Press F9 to automatically load the optimal factory default settings.
A message appears prompting you to continue this operation by selecting OK or to cancel this operation by selecting CANCEL.
b. In the message, highlight OK, then press Enter.
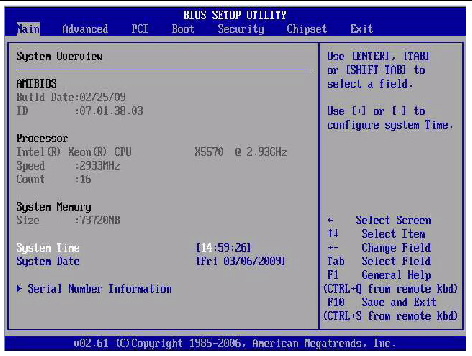
The BIOS Setup utility screen appears with the cursor highlighting the first value in the system time field.
4. In the BIOS Setup utility, do the following to edit the values associated with the system time or date.
a. Highlight the values you want to change.
Use the up or down arrow keys to change between the system time and date selection.
b. To change the values in the highlighted fields, use these keys:
- PLUS (+) to increment the current value shown
- MINUS (-) to decrement the current value shown
- ENTER to move the cursor to the next value field
5. To access the boot settings, select the Boot menu.
The Boot Settings menu appears.
6. In the Boot Settings menu, use the down arrow key to select Boot Device Priority, then press Enter.
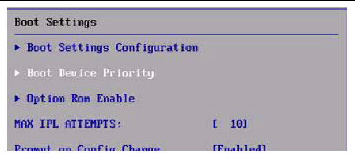
The Boot Device Priority menu appears listing the order of the known bootable devices.
Note that the boot device order listed on your screen might differ from the device order shown in the sample screen below.
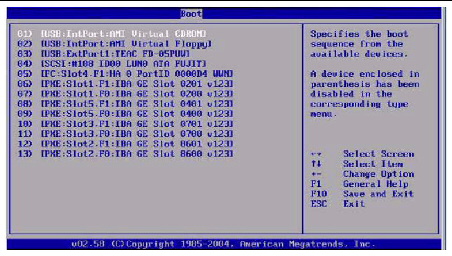
The first device in the list has the highest boot priority.
7. In the Boot Device Priority menu, do the following to edit the first boot device entry in the list:
a. Use the up and down arrow keys to select the first entry in the list, then press Enter.
b. In the Options screen, use the up and down arrow keys to select the default permanent boot device, then press Enter.
Note that the boot options listed on your screen might differ from the options shown in the sample screen below.
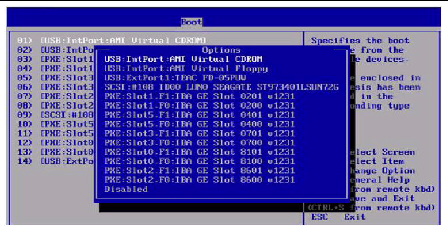
The device strings listed on the Boot menu and Options menu are in the format of: Device Type, Slot Indicator, and Product ID String.
| Note - You can change the boot order for other devices in the list by repeating Steps 7a and 7b for each device entry you want to change.
|
8. To save your changes and exit the BIOS Setup utility, press F10.
| Note - When using the Sun ILOM Remote Console, F10 is trapped by the local OS. You must use the F10 option listed in the Keyboard drop-down menu that is available at the top of the Remote Console.
|
Alternatively, you can save the changes and exit the BIOS Setup utility by selecting Save on the Exit menu.
A message appears prompting you to save changes and exit setup.
9. In the message dialog, select OK, then press Enter.
| Sun Fire X2270 Server Windows Operating System Installation Guide
|
820-7143-11
|
   
|
Copyright © 2009 Sun Microsystems, Inc. All rights reserved.