| C H A P T E R 2 |
|
Install Windows Server 2003 Operating System |
This chapter provides information about installing the Windows Server 2003 Operating System (OS).
| Note - If you want to create a RAID for your disk, the recommended procedure is to create a RAID before you install the OS. For more information and procedures, see Configure RAID Controller in the BIOS Setup Utility and Prepare RAID Drivers for Delivery. |
This chapter includes the following topics:
Use TABLE 2-1 to preview the installation process defined as a series of tasks. The table identifies the tasks required and provides pointers to the instructions for performing that task.
|
Verify that all applicable requirements are met for installing an operating system to a server. |
|||
|
Evaluate and select an installation method that meets the needs of your infrastructure. |
|||
|
Verify that the factory default settings in the BIOS are set prior to performing the operating system installation. |
|||
|
The Windows OS is shipped with the CD and DVD media and documentation that you will need to install the Windows OS. |
|
||
|
Download server-specific drivers or obtain drivers from Tools and Drivers CD |
Depending on your system, some device drivers are required to be installed at boot time. You can obtain these drivers from the Tools & Drivers CD or from the Sun download site. |
||
|
Follow the instructions to implement RAID using the BIOS Setup utility. |
|||
|
Produce the RAID drivers floppy required for the Windows 2003 installation. |
|||
|
Follow the instructions in this chapter to install the Windows 2003 operating system. |
|||
|
Install driver(s) and post supplemental software, post installation, if necessary |
If the Windows operating system does not include the necessary device drivers to support your system, you may need to install additional device drivers. If your system includes RAID controllers, you may need to install supplemental software to support these controllers. |
| Note - The complete Microsoft Windows operating system installation process is not documented in this section. This section walks you through the steps for booting the Windows Server 2003 media, installing drivers (if necessary) at boot, and partitioning the drive. For additional information, consult the Microsoft Windows Server 2003 product documentation at http://www.microsoft.com/windowsserver2003/proddoc/default.mspx |
TABLE 2-2 identifies the device drivers that you may need to install at boot time while performing the Windows Server 2003 installation.
The boot-time device drivers listed in TABLE 2-2 are included on the Tools & Drivers CD that ships with the server. However, if you do not have the Tools & Drivers CD, you can download these same drivers from the Sun download site. For instructions on downloading the server-specific drivers package, which includes the boot-time device drivers, see Installing Server-Specific Device Drivers.
The Sun-supplied hard disk drives for the X2270 are shipped without a RAID configuration. If a RAID configuration is required, you will need to (1) configure the RAID Controller in the BIOS Setup utility, (2) create a RAID driver floppy diskette, then (3) load the RAID driver into the system memory during the Windows Server 2003 installation.
If you are performing a Windows Server 2003 RIS image installation, you will need to add the RAID driver to the RIS image. For more information, see Add Drivers to a RIS Image.
|
This section provides steps for creating a floppy diskette that contains the RAID driver required during the Windows Server 2003 installation. To prepare the RAID/AHCI driver for installation, you will need to copy the RAID/AHCI driver from the Sun Fire X2270 Tools & Drivers CD to a floppy diskette.
Prior to performing the following procedure to create a floppy disk, ensure that the following requirements have been met:
To create the floppy diskette, perform the following steps:
1. On a Windows system, do the following:
a. Insert the Sun Fire X2270 Server Tools & Drivers CD into a CD/DVD-ROM drive.
b. Insert a formatted floppy diskette into an attached floppy diskette drive.
2. Depending on your version of Windows, browse to one of the following directories in the Sun Fire X2270 Server Tools & Drivers CD:
drivers/windows/boot/AHCI/flpy/32bit
drivers/windows/boot/AHCI/flpy/64bit
3. Depending on your version of Windows, copy either the 32-bit or 64-bit files to the root directory of the floppy diskette.
4. Proceed to Install Windows Server 2003 Using Local or Remote Media.
|
This section provides steps for creating floppy image media that contains the RAID driver required during the Windows Server 2003 installation. To prepare the RAID/AHCI driver for installation, you will need to copy the RAID/AHCI image file from the Sun Fire X2270 Tools & Drivers CD to an image file located on a local network shared directory location.
Prior to performing the following procedure to prepare the floppy image for device driver installation, ensure that the following requirements have been met:
To create the floppy image, perform the following steps:
1. On a Windows system, insert the Sun Fire X2270 Tools & Drivers CD into a CD/DVD-ROM drive.
2. Depending on your version of Windows, browse to one of the following directories in the Sun Fire X2270 Server Tools & Drivers CD:
drivers/windows/boot/AHCI/flp_image/32bit/ahcixx.img
drivers/windows/boot/AHCI/flp_image/64bit/ahcixx.img
3. Depending on your version of Windows, copy the either the 32-bit or 64-bit image file to a local or network shared location where the Sun ILOM Remote Console system can access it during the Windows installation.
For instructions for enabling image file media redirection in the Sun ILOM Remote Console, see the Sun Integrated Lights Out Manager 2.0 User’s Guide.
4. Proceed to Install Windows Server 2003 Using Local or Remote Media.
The following procedure describes how to boot the Windows Server 2003 operating system from local or remote media. It assumes you are booting the Windows installation media from one of the following sources:
| Note - If you are booting the installation media from a PXE environment, refer to Install Windows Server 2003 Using PXE Network Environment for instructions. |
Prior to performing the installation, the following requirements must be met:
After completing this procedure, you will need to perform the post installation tasks as described in Post Installation.
|
1. Ensure that the installation media is available to boot.
For additional information about how to set up the install media, see TABLE 1-4 Installation Boot Media.
2. Reset the power on the server.
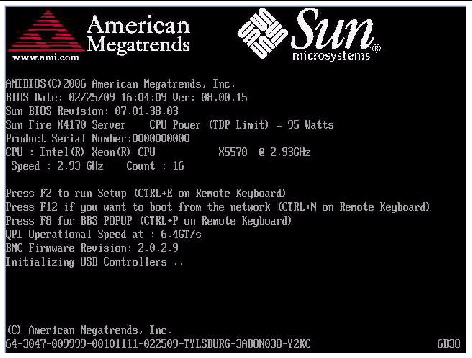
3. When the Press F8 for BBS POPUP prompt appears on the BIOS POST screen, press F8.
The BBS POPUP menu allows you to select a boot device.
4. Once the BIOS POST process is complete, the Boot Device menu appears.
| Note - The screen that appears in your installation may be different depending on the type of disk controller installed in your server. |
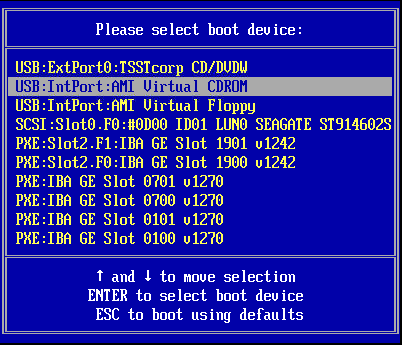
5. In the Boot Device menu, select a boot device based on the Windows media installation method you elected to use and press Enter.
6. When prompted with Press any key to boot from CD, quickly press any key.
The Windows Setup process begins.
7. When you see the following prompt at the bottom of the Windows Setup dialog, quickly press F6:
Press F6 if you need to install a third party SCSI or RAID driver.
| Note - The above prompt lasts for approximately five seconds and is easy to miss. If you do not press F6 while the prompt is displayed, the dialog allowing you to specify additional drivers is not displayed and the installation will fail. If this happens, restart the server on which you are performing the installation and go back to Step 3. |
After pressing F6, the setup process continues and the following dialog appears. This dialog gives you the option of specifying additional mass storage devices.
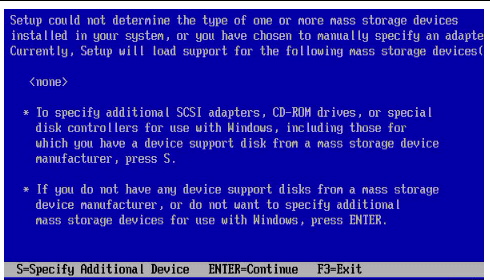
8. Make sure that the mass storage drivers are accessible according to the mass storage driver installation method that you have selected.
9. Press S to specify additional devices.
A Select Adapter dialog appears listing the available drivers.
10. In the Select Adapter dialog, select the appropriate mass storage controller driver version (Windows 32-bit or 64-bit) that you are installing, then press Enter.
For example, for the X2270 which contains an Intel-based integrated disk controller, select:
Intel(R) ICH10R SATA AHCI Controller (32-bit or 64-bit)
A dialog similar to the following appears stating that the setup will load support for the specified mass storage device.
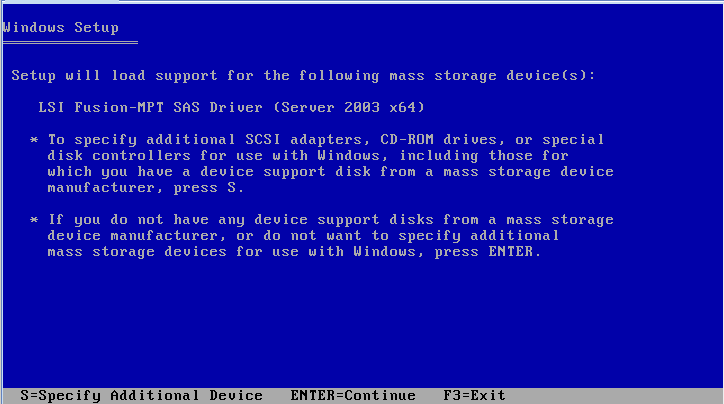
The Windows setup process continues and a Setup Notification dialog appears.
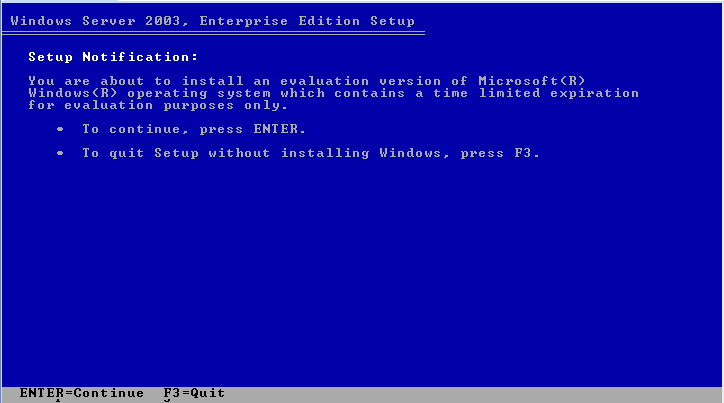
12. At the Setup Notification dialog, press Enter to continue.
The Welcome to Setup dialog appears.
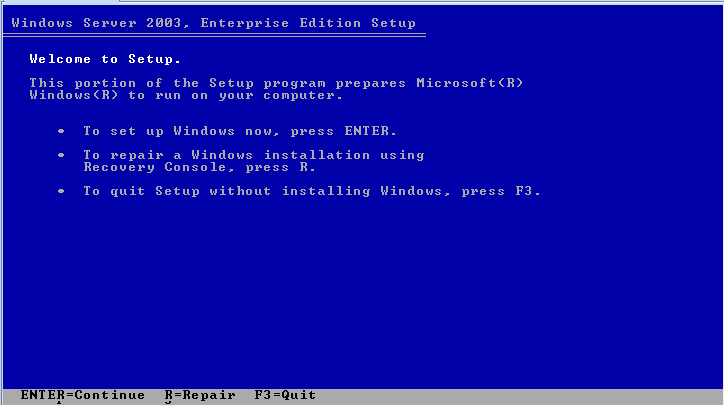
13. At the Welcome to Setup dialog, press Enter to continue.
The Windows Licensing Agreement dialog appears.
14. To accept the license agreement, press F8.
A dialog appears that shows the existing partitions on the server and the unpartitioned space.
| Note - Any previous installations on the server’s boot disk will cause the partitioning dialog to appear. |
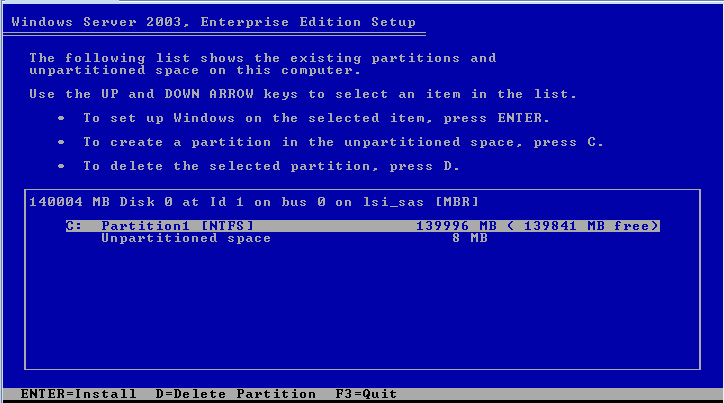
15. To delete the existing partition, press D.
A confirmation dialog appears to verify that you really want to delete the partition.
A confirmation dialog with a caution notice appears and describes the partition that you are about to delete.
17. Press L to delete the partition.
The partition is deleted and the a dialog appears that shows the unpartitioned space on the server’s disk.
18. To create a partition in the unpartitioned space, press C.
A dialog appears that allows you to specify the size of the new partition.
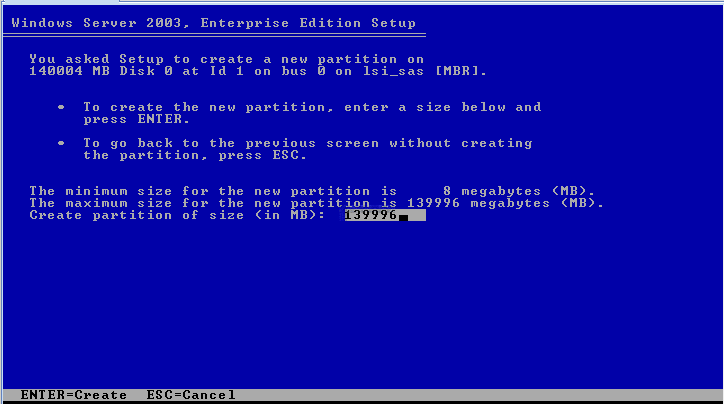
19. Either accept the default size of the partition to be created or use the Back Space key to delete the size specified and enter a new size and press Enter.
A recommended size of 40,000 megabytes is usually sufficient for a Windows installation. This will leave adequate space on the disk for installations of other media.
A partition confirmation windows appears.
20. Press Enter to accept the partition.
A partition formatting dialog appears.
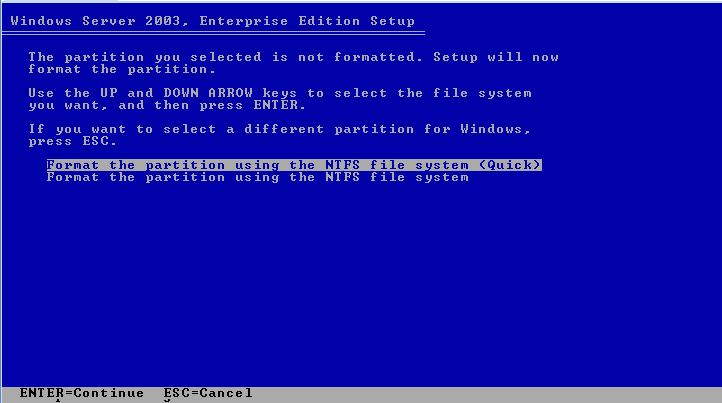
21. Use the up and down arrow keys to select the <Quick> menu option and press Enter to format the partition.
The setup process formats the partition and copies the files to the Windows installation folders. This process might take several minutes
22. Follow the on-screen instructions to complete the initial setup of Windows Server 2003 until you are prompted with the following message:
Remove disks or other media. Press any key to restart.
When this message appears you will need to complete one of the following steps, depending on which driver delivery method you have chosen, to complete the installation:
Then, press any key to restart the system and complete the Windows Server 2003 Installation.
23. Proceed to Post Installation.
This section explains the initial information you will need to install the Windows Server 2003 operating system software over an established PXE-based network via a customer-provided Windows 2003 Remote Installation Services (RIS) image.
| Note - As an alternative, you can install the Windows 2003 operating system over an established PXE-based network via a customer-provided Windows Deployment Services (WDS) image. |
After completing this procedure, you will need to perform the post installation tasks as described in Post Installation.
The following requirements must be met prior to performing the Windows Server 2003 installation from a RIS image.
Follow the RIS installation instructions in the Windows Server 2003 documentation.
For instructions, see Appendix A Incorporate Sun Fire Drivers Into a WIM or RIS Image.
|
1. Ensure that the PXE network environment is properly set up and the Windows Server 2003 installation media is available for PXE boot.
2. Reset or power on the server.
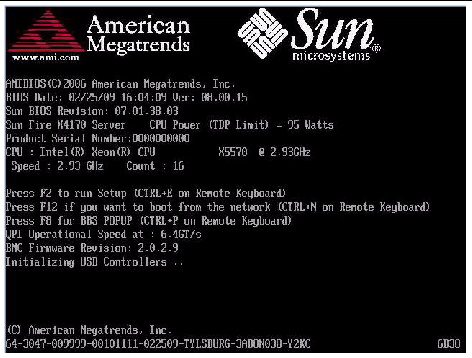
3. Press F8 to specify a temporary boot device.
The Please Select Boot Device menu appears.
4. In the Please Select Boot Device menu, select the appropriate PXE installation boot device and press Enter.
The PXE installation boot device is the physical network port configured to communicate with your network installation server.
| Note - The boot device options shown on the following Select Boot Device dialog may be different from the options listed on your screen. |
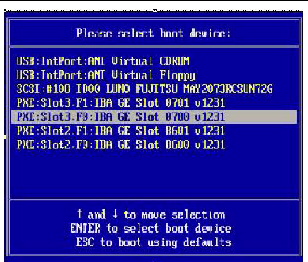
The Boot Agent dialog appears.
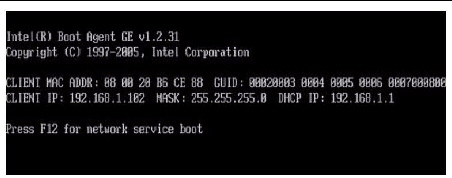
5. In the Boot Agent dialog, press F12 for a network service boot.
The Welcome to Client Installation wizard appears.
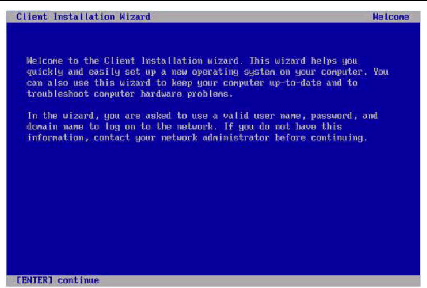
6. In the Welcome to Client Installation wizard, press Enter to continue.
The next dialog prompts you for a user name, password, and domain name.
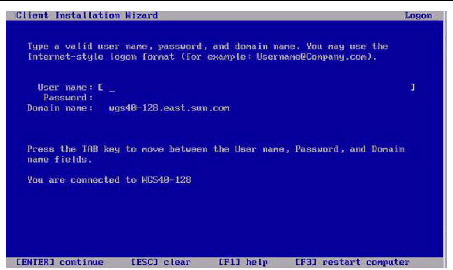
7. In the user name and password dialog, type your user name and password, then press Enter.
Use the Tab key to move between fields. The Windows Server 2003 version dialog appears.
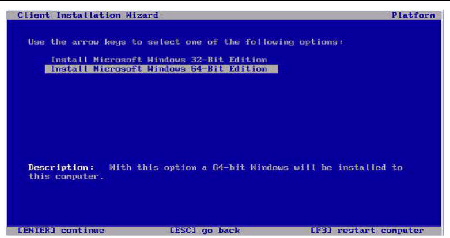
8. In the Windows Server 2003 version dialog, select the version (32-bit or 64-bit) you are installing, then press Enter.
The Windows Server 2003 operating system choice dialog appears.
9. In the OS choice dialog, select the OS option you are installing, then press Enter.
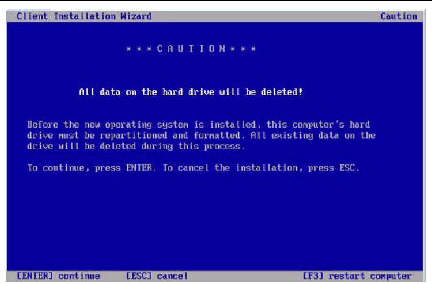
10. In the Caution dialog, press Enter to continue.
The Installation Information dialog appears.
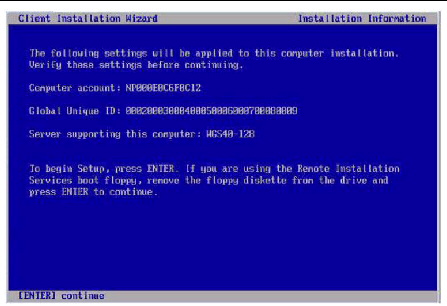
11. In the Installation Information dialog, press Enter to continue.
The Administrator Password dialog appears.
12. In the Administrator Password dialog, specify an OS Administrator password and press Enter.
Note that this password is assigned to the OS installation target.
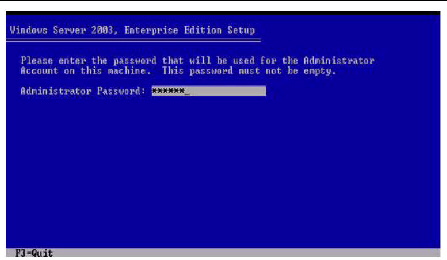
You will be asked to confirm the password.
13. In the Administrator Password Confirmation dialog, retype the password and press Enter.
The Windows Setup starts and a message appears that the setup is formatting the partition.
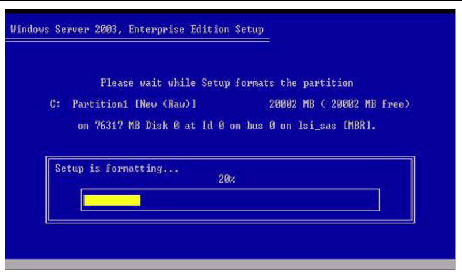
14. Proceed to Post Installation.
Copyright © 2009 Sun Microsystems, Inc. All rights reserved.