Chapter 3 Text Editor
The Text Editor is an interactive ASCII text editor. It allows you to create new files and modify existing files.
This chapter describes how to use the Text Editor. You do not need to know any special editing commands because the editing commands are available from the base window. The editing functions provided in this DeskSet application are also available in the text editing panes of the Console and the Command Tool, and in the View and Compose windows of the Mail Tool.
To open the Text Editor window, choose Workspace->Programs->Text Editor.
Text Editor Icon
The Text Editor icon shows you as much as it can of the beginning of the file name. When the file has been edited and you have not saved the changes, the file name is preceded by a right-angle bracket (>). When there is no file or when you have created a new file but have not saved it, the icon displays the words NO FILE. "Text Editor Icons " shows an example of three Text Editor icons. The one on the left contains a file named example. The one in the middle contains a file named example that has been edited but not saved. The one on the right contains either no file at all or a file that has never been saved.
Text Editor Icons
Text Editor Base Window
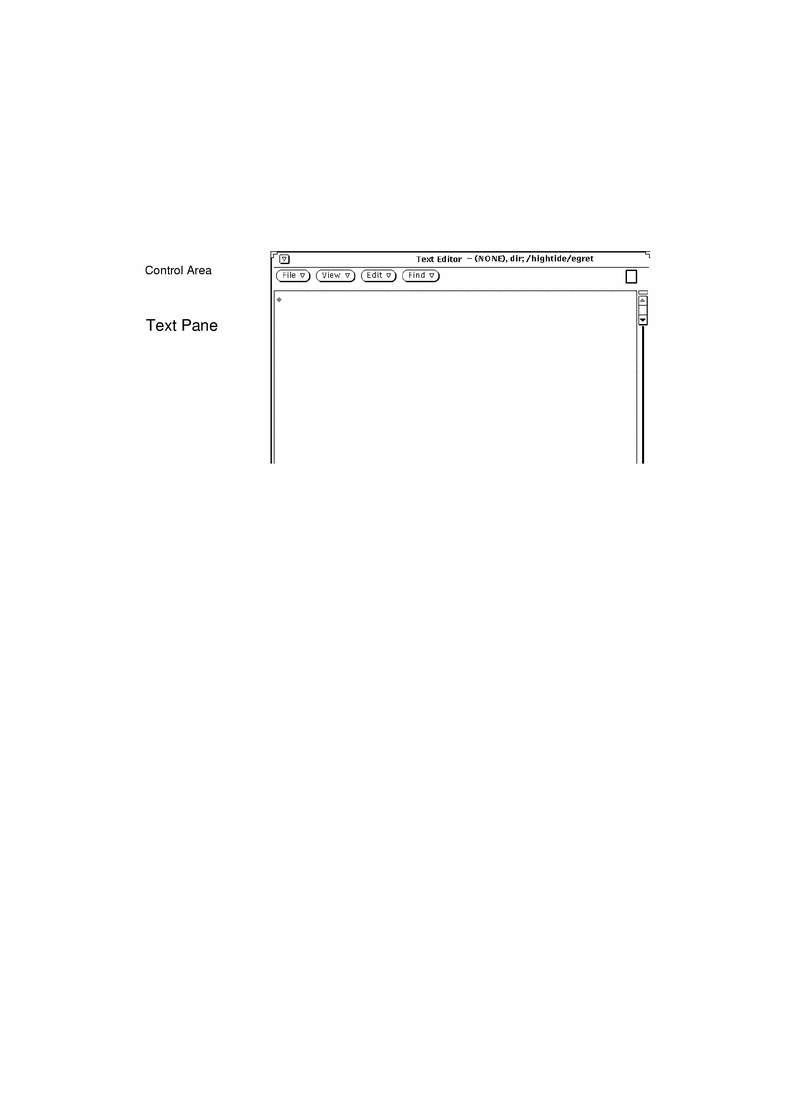
The Text Editor base window, shown in Figure 3-1, has a control area and a text pane that you use to compose and edit your text message. The header of the Text Editor window displays the name of the file you are editing (or the word NONE when you have not assigned a name to the file), and shows you the directory where the file is located. When you have made editing changes, the word "edited" is displayed in parentheses following the file name.
Use the text pane to compose and edit your text. To begin, click SELECT in the text pane and begin typing. For information on adding, modifying, or deleting text, see the section "Working with Text" in Chapter 1, Introduction to the Solaris User Environment. To copy and move text, use the Cut/Copy/Paste functions from the Edit menu or from the keyboard.
Note -
Solaris supports SPARC and IA-based machines. Command functions and their corresponding keyboard equivalents may differ on each machine. For a full table of these equivalents, see Chapter 1, Introduction to the Solaris User Environment.
Figure 3-1 Text Editor Base Window
Text Editor Menus
The control area of the Text Editor has File, View, Edit, and Find buttons. These menu buttons are included as menu items in the Text pane pop-up menu.
Text Pane Pop-Up Menu
You display the Text Pane pop-up menu by moving the pointer anywhere onto the Text pane and pressing MENU. (The Text Pane pop-up menu is also provided in the text editing panes of the Console, Command Tool, and Mail Tool applications.)
The commands for each of the items in Text Pane pop-up menu operate in the same way as the controls in the Text Editor window, described in the following sections. An additional item on the Text Pane pop-up menu, called Extras, is also described later in this chapter.
File Menu
The File menu contains items that you can use to open, save, save as, include and empty the document for your text files. For complete information on opening and saving files, refer to "Opening, Saving, Including and Attaching Files" in Chapter 1, Introduction to the Solaris User Environment.
Include File
Use the include file to include an existing file into a new text file.
-
Use the Include File item of the File menu to display the Text: Include window.
-
Locate and include your file.
Include your file in the same manner you would open or save a file. For detailed information on choosing a file to open or save, refer to Chapter 1, Introduction to the Solaris User Environment.
Empty Document
Use the Empty Document item of the File menu to clear the contents of the text pane. If you have made editing changes and have not saved them, a Notice is displayed asking you to confirm or cancel the operation.
View Menu
Use the View menu item to control the position of the cursor and the way the line wrap is used.
Select Line at Number
Use the Select Line at Number item to display the Text: Line Number window, shown in Figure 3-2. Type the number of the line that you want selected, and click SELECT on the Select Line at Number button. The text on the specified line is selected, and the insert point is moved to the end of the selected text.
Figure 3-2 Text: Line Number Pop-up Window

What Line Number?
Use the What Line Number? item of the View menu to locate the line number where the selected text begins. The line number is displayed in a Notice. When there is no current selection in the Text Editor window, the Notice displays an error message instead of a line number.
Show Caret at Top
Use the Show Caret at Top item of the View menu to scroll the document so the line currently containing the caret is the third line from the top of the text pane.
Change Line Wrap
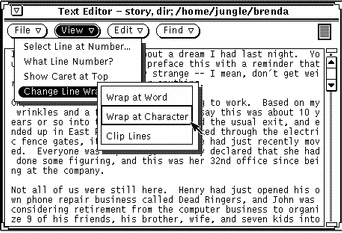
The Change Line Wrap submenu provides three choices for line wrapping: word, character, and clip lines. The text shown in Figure 3-3 is wrapped at a character, so words are broken at the end of lines.
Figure 3-3 Lines Wrapped at a Character
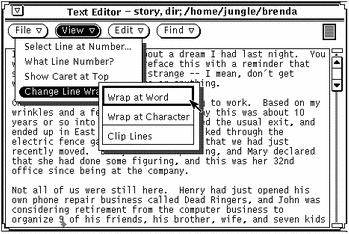
The most commonly used wrapping method is to wrap at the end of words. The text shown in Figure 3-4 is wrapped at the end of words.
Figure 3-4 Lines Wrapped at a Word
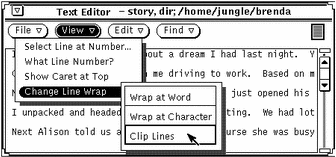
If you choose Clip Lines, the beginning of each line that ends with a Return is displayed. In Figure 3-5 each line represents a paragraph because there are no carriage returns embedded in the lines. Only carriage returns are at the end of each paragraph. That is,
Figure 3-5 Clipped Lines
Edit Menu
The Edit menu provides standard editing functions, as follows:
-
Undo undoes the last editing action or all editing actions, depending on which item you choose from the Undo submenu.
-
Copy stores a copy of the selected text on the clipboard. Only one selection at a time can be stored on the clipboard. If something is already on the clipboard and you do a Copy or Cut, the contents of the clipboard are overwritten with the new information.
-
Paste inserts the contents of the clipboard at the insertion point.
-
Cut removes the selected text and stores it on the clipboard. Only one selection can be stored on the clipboard at a time.
Find Menu
The Find menu items help you to search for specific text strings, special characters, and delimiters to find a text string and replace it with another.
Text: Find and Replace
Use Find and Replace to find specific text and replace it through the Text: Find and Replace window. If you have a current selection, it is automatically displayed in the Find text field, as shown in the example in Figure 3-6.
Figure 3-6 Text: Find and Replace Pop-up Window

To find a text string and select it, type the text in the Find field and click SELECT on the Find button. Click SELECT on the Find button again to find and select the next occurrence of the text string.
To replace the current selection with a text string, type the text in the Replace field and click SELECT on the Replace button. You can use the Replace button together with the Find button to find a string and then replace it with another, or separately to replace highlighted text. You can replace a string with nothing by leaving the Replace text field blank.
If you want to find a text string that contains tabs or carriage returns, select the text containing tabs or carriage returns in the text pane before you display the Text: Find and Replace window. You cannot type carriage returns or tabs directly in the Find or Replace text fields.
The buttons at the bottom of the Find and Replace window combine the find and replace operations, allowing you to quickly do any of these combinations:
-
Use the Find then Replace button to find the text string in the Find text field, and then immediately replace it with the text string in the Replace text field.
-
Use the Replace then Find button to replace the currently selected text with the text string in the Replace text field, and then immediately find the next occurrence of the Find text string.
-
Use the Replace All button to replace all occurrences of the Find text string with the Replace text string.
You can specify whether you want the find and replace operations to apply to all of the text, or to restrict the operation to the text between the insert point and the end of the document. Use the abbreviated menu button at the lower right corner of the window to select either All Text or To End. The current setting is listed to the right of the abbreviated menu button, as shown in Figure 3-6.
Find Selection
Use Find Selection on the Find menu to search the file for another occurrence of the text string that is highlighted as the current selection. You can search forward or backward from the insert point by choosing Forward or Backward from the Find Selection submenu.
Find Marked Text
Use Find Marked Text on the Find menu to highlight text between a matched set of delimiters provided as options in the Text: Find Marked Text window, shown in Figure 3-7.
Figure 3-7 Text: Find Marked Text Pop-up Window

You can search and highlight text for any of the matched delimiters provided as choices in the Text:Find Marked Text pop-up window. Click SELECT on one of the sets of delimiters, and then click SELECT on the Find Pair button. Use the Backward or Forward choice to direct the search either backward or forward from the current insertion point. If you have nested delimiters, such as matched parentheses in a program's code, you can use the Expand choice to select text outward from the current insertion point to the next outer pair of specified delimiters.
To surround the selected text with the selected delimiters, click SELECT on the Insert Pair button. To delete a matched pair of delimiters from the selected text, click SELECT on the Remove Pair button.
Replace Field
The Text Editor pane recognizes any text between the characters |> and <| as a text field. You can search forward through the text from the insert point to find and select each field using the Replace |>field<| item of the Find menu. The Replace |>field<| submenu provides three options: Expand, Next, and Previous:
-
When the caret in the Text Editor pane is between field delimiters, choose Expand to search in both directions and select the entire field and its delimiters.
-
Use Next to search forward from the insert point and select the next field.
-
Use Previous to search backward from the insert point and select the previous field.
Extras Menu
There is an additional item on the Text Pane pop-up menu, called Extras, that is not a button in the Control area (as File, View, Edit, and Find are). This menu contains some useful filters to format the selected text. You can customize the Extras menu and define your own set of filters available from the Extras menu. See "Customizing Your Text Editor" for information about how to define your own set of filters. This section describes the default Extras menu.
Format
Choose Format to reformat selected long lines of text into physical lines of no more than 72 characters. This is useful, for example, when reading mail with lines longer than the width of the window. Formatting text before printing is also useful to make sure the lines will not be truncated by the printer.
Format uses the UNIX fmt command. It does not split words between lines, and it preserves blank lines and the spacing between words.
Note -
Format (and fmt) work only on lines of no more than 1024 characters.
Capitalize
Use Capitalize on the Extras menu to capitalize selected text.
-
The first item on the Capitalize submenu, abcd->ABCD, capitalizes every letter of the selected text.
-
The second item on the Capitalize submenu, ABCD->abcd, turns all the letters of the selected text into lower case.
-
The last item of the Capitalize submenu, abcd->Abcd, capitalizes the first letter of every selected word. Uppercase letters within a word are not changed.
Shift Lines
Choose the Shift Lines item to insert or remove a Tab character at the beginning of each line in the selected text. Use the Shift Lines submenu to specify whether to shift right or left. Shift right inserts a Tab character, and shift left removes a Tab character.
Pretty-print C
This item uses the UNIX indent command to format C program listings. It formats the selection according to standard specifications, or to the specifications of the .indent.pro file if you have one.
Insert Brackets
You can use the Insert Brackets item to quickly insert any of the following type of brackets around the selected text, depending on which item you choose from the Insert Brackets submenu: ( ), [ ], { }, or " ".
Remove Brackets
Choose the Remove Brackets item to remove any of the following types of brackets around the selected text, depending on what item you choose from the Remove Brackets submenu: ( ), [ ], { }, or " ".
Creating a New File
To create a new file with Text Editor:
-
Choose Workspace -> Programs -> Text Editor and type a line in the Text Editor window field, such as:
This is a test file.
-
Press MENU on the File menu button, and select Save.
You see the Text:Save window.
-
Save the file.
For complete information on saving a file, refer to Chapter 1, Introduction to the Solaris User Environment.
Working with an Existing File
You can open (load) any standard ASCII text file into the Text Editor and then modify the current file, or change the name of the file to create a new file, which leaves the original file intact. To load a file from your file system into Text Editor:
-
Select and open the file.
The file you have specified is displayed in the Text Editor window. For complete information on opening a file, refer to Chapter 1, Introduction to the Solaris User Environment.
Saving the Existing File
You can now edit the existing file and either save your changes in that file, or save it as a new file. To modify the file, see "Editing Files". To save the changes to the existing file, do the following:
Choose File -> Save from the Text Editor control area.
The file is automatically saved.
Because UNIX does not allow two documents with the same name in one directory, when you make a copy of a document in the same directory the original file is automatically saved to a backup file and renamed with a % suffix. For instance, a file named messages would automatically be renamed messages%. The next save overwrites the existing backup file rather than creating a second backup. Figure 3-8 shows the two files displayed as icons in File Manager.
Figure 3-8 Edited File and Backup File with a % Suffix

Note -
If you do not want to retain the original, delete the file with the % suffix by pressing SELECT on the icon in File Manager and dragging it to the Wastebasket.
Saving the Modified File as a New File
To keep the original file intact and create a new file with the modifications, do the following:
-
Choose File -> Save As.
You see the Text:Save As window.
-
Name and save the new file.
The file is stored in the designated directory and file. For complete information on saving a file, refer to Chapter 1, Introduction to the Solaris User Environment.
Editing Files
Using Text Editor, you can add and delete text from a file, copy text from one location to be pasted in another, and search for text strings in a file.
Adding and Deleting Text
You can add new text to a file by placing the insert point anywhere in the file (click SELECT in the desired location) and typing the new text there. Likewise, you can delete characters by placing the text caret at the end of the character string you want to delete, and backspacing over those characters.
Another way to delete a character string is to cut it. This places the text string in a system clipboard, and if you want you can paste it elsewhere. To cut and paste a text string, do the following:
-
Click SELECT to the left of the first character in the string that you would like to cut.
-
Click ADJUST to the right of the last character in the string.
The text string is highlighted.
-
Press MENU to display the window pane's pop-up menu, drag the pointer down to highlight Edit, and to the right to highlight Cut.
The text string is placed in the system clipboard. (Alternatively you can use the Cut button on the keyboard, if there is one, or Meta-x.)
-
Move the pointer to the destination where you would like to paste the text string and click SELECT to position the caret there.
-
Press MENU to display the window pane's pop-up menu, drag the pointer down to highlight Edit, and to the right to highlight Paste.
The text string appears in the new location. (Alternatively, you can use the Paste button on the keyboard, if there is one, or Meta-v.)
Copying and Moving Text
To copy a section of text, you highlight the line of text using SELECT and ADJUST, as follows:
-
Click SELECT to the left of the first character in the string that you would like to copy.
-
Click ADJUST to the right of the last character in the string.
The text string is highlighted.
-
Press MENU to display the window pane's pop-up menu, drag the pointer down to highlight Edit, and to the right to highlight Copy.
The text string is placed in the system clipboard. Figure 3-9 shows the Edit menu. (Alternatively, you can use the Copy button on the keyboard, if there is one, or Meta-c.)
Figure 3-9 Edit Menu

-
Move the pointer to the place where you want to insert the text and click SELECT to set the insert point.
-
Choose Paste from the Edit menu or press the Paste key on the keyboard.
To move text, the steps are similar, except that you choose Cut instead of Copy, and the selected text is removed from its original location.
Paste the text in a new location by clicking SELECT once on the destination point, and then choosing Paste from the Edit submenu in the Text Pane menu. (Alternatively, you can press the Paste button on the keyboard, if there is one, or Meta-v.)
Tips on Cutting and Pasting
-
For some it is more convenient to use the Cut and Paste buttons on the keyboard rather than the Edit menu.
Note -IA keyboards do not have Cut, Copy, and Paste keys. Use Ctrl-Alt-x, Ctrl-Alt-c, and Ctrl-Alt-v respectively.
-
Clicking SELECT twice on a word highlights that word for cutting or copying.
-
Clicking SELECT three times on a text line highlights the whole line for cutting or copying.
-
Clicking SELECT four times anywhere in the file highlights the entire contents of the document.
Printing Text Editor Files
Before printing a Text Editor file, you may need to choose Format from the Extras menu to reformat selected long lines of text into physical lines of no more than 72 characters. A line of text is defined as ending with a carriage return. The Text Editor wraps a long line into several displayed lines, so what looks like several lines on your screen may actually just be one long line.
You print Text Editor files by dragging and dropping the file onto the Print Tool application. To drag the entire Text Editor file, press SELECT on the text glyph inside the drag and drop target, drag the pointer to the Print Tool icon or drag and drop target, and release SELECT. The drag and drop target is the small shaded box in the upper right corner of the Text Editor or the upper left corner of the Print Tool.
You can also print Text Editor files the same way you print any file with the File Manager. Save your Text Editor file using one of the methods described in the section "File Menu". Then select the file in the File Manager, and drag and drop it onto the Print Tool or choose Print File from the File Manager's File menu. See "Printing Files" for more information about printing files from the File Manager.
Splitting Panes
The Text Editor pane can be split into two or more panes so that you can view and edit different parts of the document at the same time. The document itself is not split, so any editing changes you make in one view are reflected in other views as well. To split the Text Editor pane:
-
Move the pointer to the top cable anchor of the vertical scrollbar and press SELECT.
-
Drag the pointer downward into the pane.
A horizontal line is displayed from the left edge of the pane to the center of the cable anchor to show where the split will occur.
-
Release SELECT.
The pane is now split into two panes, as shown in Figure 3-10.
Figure 3-10 A Split Text Editor Pane
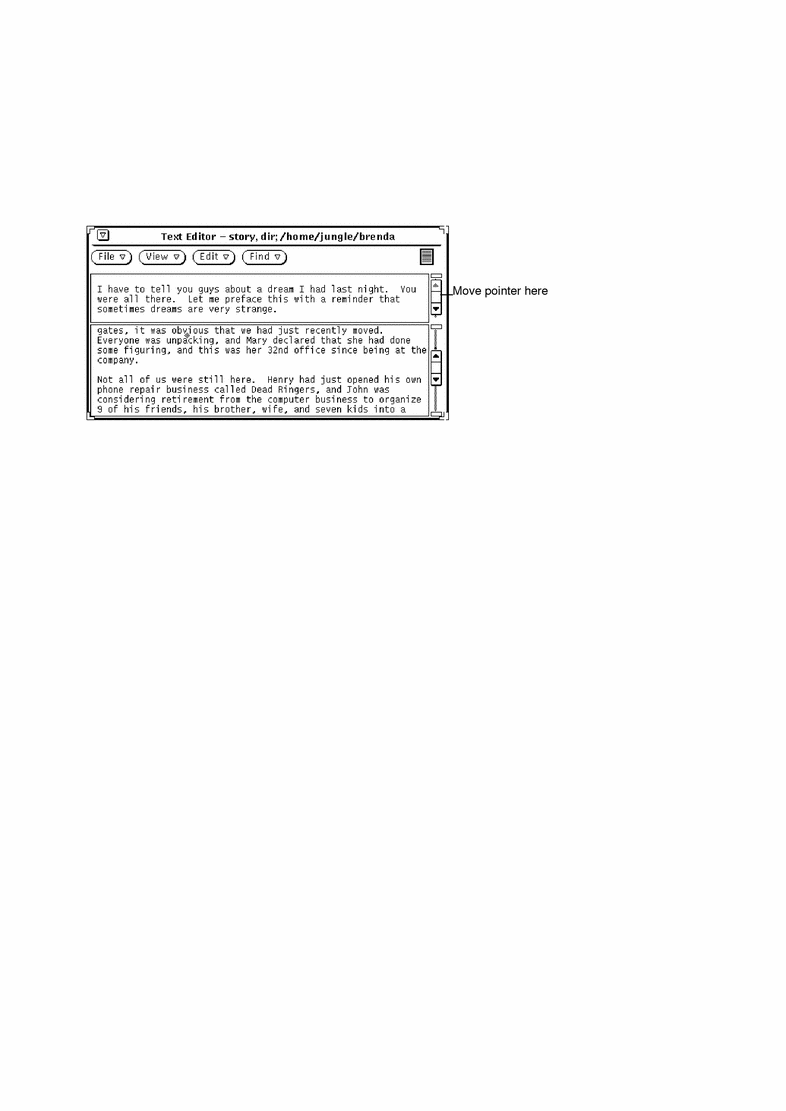
Alternatively, you can move the pointer into the scrollbar at the place you want to split the views, press MENU to display the scrollbar menu, and choose Split View.
One way to remove a split pane is to move the pointer to the top cable anchor in the pane you want to remove and press SELECT. Then drag the pointer down until the top and bottom cable anchors overlap, and release SELECT. Another method is to move the pointer to the place in the scrollbar where the views are split, press MENU to display the Scrollbar menu, and choose Join Views.
Drag and Drop Feature
Drag and drop is a method of moving files or selected text into and out of the Text Editor using only your mouse. Refer to Chapter 1, Introduction to the Solaris User Environment, for an overview of the drag and drop feature.
To load a file (overwriting any existing text), you can drag and drop a text file onto the Text Editor drag and drop target or icon.
To insert text within a Text Editor file, you can drag and drop a file or selected text to the spot in the text pane where you want the text inserted.
You can drag and drop either selected text or the entire Text Editor file to any location in the DeskSet environment that accepts ASCII text. The following sections describe two different ways to drag and drop from the Text Editor application.
Dragging Selected Text from the Text Editor
To drag a copy of selected text from the Text Editor:
-
Select the text to be copied.
If you want to copy the entire file, quadruple-click SELECT, or drag from the drag and drop target as described in the next section.
-
Press the Control key on the keyboard and click SELECT.
Once you have clicked SELECT you can release the Control key. Pressing the Control key assures that the text is copied instead of moved. If you don't press the Control key first, the text being dragged will be cut from the original text.
-
Drag the pointer a short distance.
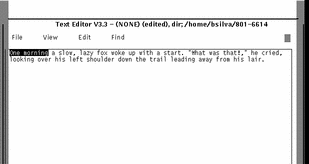
A text duplicate pointer is displayed, as shown in Figure 3-11, with the first few characters of the selected text displayed inside the rectangle.
Figure 3-11 Dragging a Copy of Text Editor Text

-
Drag the pointer to the destination or the text and release SELECT.
Dragging Complete Text Editor Files
Text Editor files can be dragged and dropped onto any place in the DeskSet environment that accepts ASCII files. This operation is always done as a copy. To drag a complete Text Editor file:
-
Press SELECT on the text glyph inside the drag and drop target.
The text glyph is the figure inside the drag and drop target that represents the entire text file.
-
Drag the pointer a short distance.
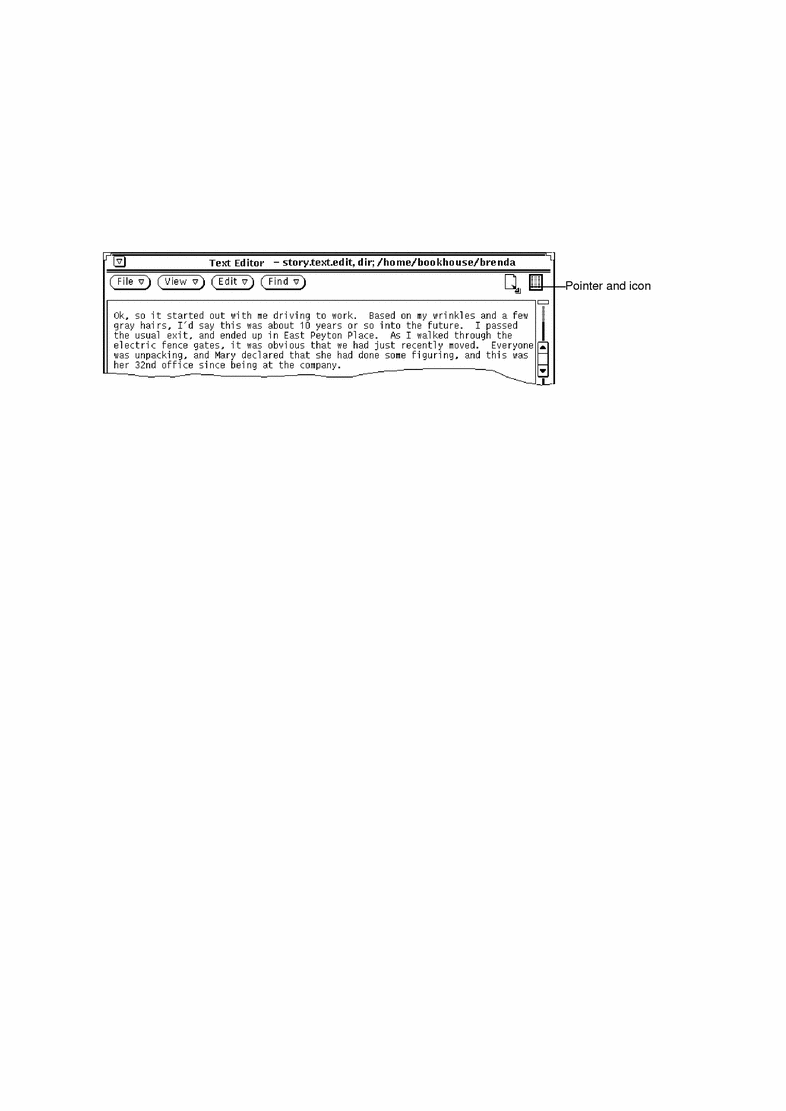
A text file move pointer is displayed, as shown in Figure 3-12.
Figure 3-12 Dragging a Text Editor File
-
Drag the pointer to the destination of the text and release SELECT.
Customizing Your Text Editor
There are two files used by the Text Editor that you can modify to customize the Extras submenu of the Text Pane pop-up menu and to specify function key mappings. This section describes these two files.
The .text_extras_menu File
You can customize the Extras menu to include your own commands by modifying the file .text_extras_menu. By default (and depending on how your system is configured), the Text Editor uses the information found in the file /usr/openwin/lib/locale/<locale>xview/.text_extras_menu. <locale> is a subdirectory that contains locale specific text files. The default is "C", but may vary depending on the country locale. You can create your own copy of this file and tell the Text Editor to use it instead of the default in either of the following two ways:
-
Change the value of the .Xdefaults parameter text.extrasMenuFilename or Text.ExtrasMenuFilename to the path and file name of your customized file. See the manual page for XView for information about the .Xdefaults file.
-
Set the environment variable EXTRASMENU to the desired file name.
If you specify both options, the .Xdefaults parameter will be used.
The standard Extras menu file is /usr/openwin/lib/locale/C/xview/.text_extras_menu and is shown in Figure 3-13. It will give you ideas about how to implement your own extras menu file. Once you've created a custom file and indicated where to find it using one of the previous methods, you can make changes to the file and see them immediately implemented in the Extras menu. These changes also affect other text panes in DeskSet applications, such as the Mail Tool Compose window.
Figure 3-13 Extras Menu File in /usr/lib/.text_extras_menu
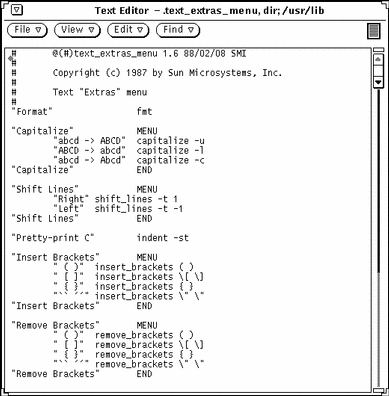
The name of each Extras menu item is surrounded by double quotation marks. Each submenu begins with a MENU statement and ends with an END statement.
To include a backslash (\) character in the .text_extras_menu file--as in the troff inline font specifications \fB and \fP--you need to use four backslash characters; for example:
insert_brackets \\\\fB \\\\fP |
Alternatively, you can use quotes in place of one pair of brackets; for example:
insert_brackets "\\fB" "\\fP" |
The .textswrc File
You can associate filters (programs or routines) with unused function keys by modifying your own copy of the file .textswrc. When a text selection has been made and a function key pressed, the selected text is piped through the filter assigned to that key. The output is then piped back into the text at the caret, replacing the text that was selected.
If you want to specify your own set of bindings of filter keys to function keys, you must copy the file /usr/lib/.textswrc to a file called .textswrc in your home directory. The Text Editor reads the file .textswrc from your home directory, if the file exists.
Format of the .textswrc File
List the sample file /usr/lib/.textswrc to see an example of filters used with a right-handed keyboard. You can copy this file into your home directory, then modify it by adding filter bindings to unused function keys.
Here is the basic format of each .textswrc file entry:
key-name FILTER |
command-line
A function is assigned to one of the function keys by including a statement like the following in your .textswrc file:
/* * Note that: * insert_brackets /* */ does NOT work * double quotes are needed */ KEY_TOP(10) FILTER insert_brackets "/* " " */" |
This example shows how to include C language comment markers around a piece of text. You could enter this example into your .textswrc file, and save the file. Then, to use this added function, start up a new Text Editor application. Changes to your .textswrc file are only effective when you bring up a new Text Editor. Then select the text and press the key. The text will be replaced with a copy of itself surrounded with "/*" and "*/". Note the C-like syntax of comments in the .textswrc file.
When defining a filter in the .textswrc file, remember that the filter must appear in a directory accessible by your search path. If the command is not found, or if there is some other failure in the invocation of the filter, no change occurs in the document.
- © 2010, Oracle Corporation and/or its affiliates
