Chapter 16 Binder
The Binder application allows you to bind icons, colors, applications, open methods and print methods to files. A binding is a connection between file types and elements such as applications to be started when a file is opened, print scripts, or icons that the File Manager, Print Tool, Mail Tool, and other DeskSet applications use to display and operate on files. Audio Tool sound files are also bound.
Because the DeskSet applications come with a default set of bindings, most DeskSet users will not need to use the Binder application. You may want to use the Binder, however, to customize your DeskSet applications. For example, you use the Binder if you want to change the way particular files are displayed in the File Manager or other DeskSet applications, or if you want to change the application used to open or print a file.
Programmers who want to integrate applications into the DeskSet should see the Desktop Integration Guide for programmer information about the Binder database.
If you are not a programmer working on the integration of applications into the DeskSet, this chapter provides all the information you need to know about the Binder and the underlying Binder database.
To open the Binder application, choose Workspace -> Programs -> Binder.
Binder Icon and Window
The Binder icon and base window are shown in Figure 16-1.
Figure 16-1 Binder Icon and Base Window
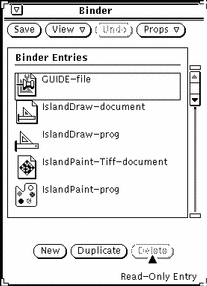
Binder Control Area
Use the buttons in the Binder control area as follows:
-
Save saves your changes to the Binder database. Save replaces the standard File menu button because it is the only file operation used by the Binder.
-
View determines which Binder entries you want to display. See the following section, "Binder Databases" for more information.
-
Undo undoes the last operation. The operations that are undoable are the buttons at the bottom of the base window: New, Duplicate, and Delete. If no editing operations have been made since the Binder was started or since the last Save, the Undo button is dimmed and unavailable. Undo replaces the standard Edit menu button because it is the only Edit function used by the Binder.
-
Props displays the properties of a Binder entry. There are two components for each Binder entry: the Icon properties that determine how a file is displayed and operated on by the DeskSet applications, and the File Type properties that determine which files are bound to the Icon properties. See the section "Binder Properties" for more information.
Binder Databases
The scrolling list in the Binder base window displays the bindings stored in three different databases: a network database, a system database, and a private user database. These are the Binder databases used by all applications in the DeskSet environment to determine how to display, print, and open any file.
The network database consists of the Binder entries shared by many workstations across a network. The system database consists of the Binder entries shared by multiple users on one workstation. Your private database consists of the Binder entries that apply only to you.
Updating and Viewing Private Binder Entries
If you start Binder from the Workspace menu, or from the command line without any command-line options, you can save only the changes to your private user database. Most users will run the Binder application this way.
The first time you run the Binder application, all your bindings will be system or network entries. If you want to customize a system or network entry, you can copy it to your user database, and then modify the user entry. When you add a new binding, it will be added as a private entry.
A message in the footer of the Binder window tells you whether the currently selected entry is a Read-Only Entry. These are the system and network entries that you normally cannot modify. These entries can be duplicated into your private database and then modified. Refer to "Updating and Viewing System and Network Binder Entries" for more information.
Use the items on the View menu to determine the Binder entries displayed in the base window scrolling list, as follows:
-
Choose All Entries to display a merged list of all the private, system, and network entries. If you copy a system or network entry to your private user database, only your private version of the entry is displayed in the merged list.
-
Choose Shared Entries to display all the system and network entries.
-
Choose Personal Entries to display only your private user entries.
Updating and Viewing System and Network Binder Entries
If you want to modify your system bindings, you must become root and start Binder by typing binder -system in a Shell Tool or Command Tool.
In order to modify the network bindings, you need to have root access on your OpenWindows server workstation, and you need to start Binder by typing binder -network in a Shell Tool or Command Tool.
If you cannot start the Binder as root, you probably need to restart OpenWindows with the noauth option. To do this, exit the window system and type openwin -noauth at the console.
The entries on the View menu have a different meaning if you are running the Binder with the command-line options listed previously.
If you run the Binder with the -system option, all new entries are added to your system database. In this case you use the View menu as follows:
-
Choose All Entries to display a merged list of all the system and network entries. If you copy a network entry to the system database, only the system version of the entry is displayed in the merged list.
If you run the Binder with the -network option, all new entries are added to the network database. In this case the View menu is dimmed and unavailable. Only the network entries are displayed.
To modify entries for local use on your machine, you need to copy them from the system and network databases into your private database. To copy an entry to your database, first scroll through the list of Binder entries in the Binder base window until you see the one you want to modify.
-
Click SELECT on the Binder entry you want to modify.
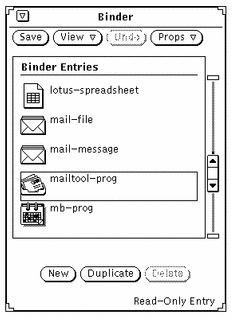
A rectangle appears around the chosen entry. The example in Figure 16-2 is the icon for the Mail Tool application.
Figure 16-2 Choosing the Mail Tool Icon Entry
-
Click SELECT on the Duplicate button.
The entry is copied into your private database.
-
Choose View -> Personal Entries.
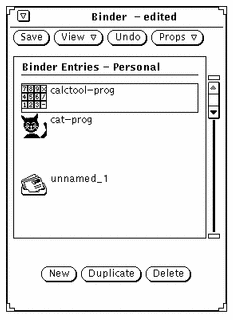
The view changes to your personal database, listing the newly copied entry and any others that you may have. The copied entry has the temporary name unnamed_1.
Figure 16-3 shows a private Binder database with the newly copied entry.
Figure 16-3 Private Binder Database
Note -If you run Binder as root without the -system or -network command-line options listed above, you will only be able to modify the personal Binder entries for user "root." Make sure to use the command-line options if you want to modify the system or network entries.
Binder Properties
When you want to modify or add new bindings, use the Props menu or the Props keyboard key to display the Properties window. You fill in or change the information on these properties windows to specify your bindings.
There are two categories of Binder properties: Icon properties and File Type properties. These categories are described in the following sections.
The Apply and Reset buttons at the bottom of the Properties window apply or reset the changes made to both categories, Icon and File Type, at the same time. If you want to make both Icon and File Type changes, you only need to click SELECT on Apply once, after you have finished making both sets of changes.
Icon Properties
The Icon Properties window displays all the information used by DeskSet applications to display and operate on files. The icon properties determine how files of a particular type are displayed by DeskSet applications (such as File Manager), and what happens when files of that type are opened or printed.
You display the Icon Properties window by selecting an entry in the base window scrolling list and choosing Icon from the Props menu. The default Icon Properties window shows only the information needed to display a type of files, as shown in Figure 16-4.
Figure 16-4 Default Icon Properties Window
You can click SELECT on the plus sign (+) button at the lower right of the window to expand the window to display the full set of properties, including information needed to open and print a class of files, as shown in Figure 16-5.
Figure 16-5 Expanded Icon Properties Window
You can shrink the window back down to the smaller size by clicking SELECT on the minus sign (-) button at the bottom of the expanded window.
This section describes the fields in the expanded Icon Properties window.
Icon and Binder Entry Name
The Icon field shows the current icon and Binder database entry name. Use the text field to modify the entry name, and use the following fields to modify the appearance of the icon. Double-click SELECT on the temporary unique name to the right of the icon to modify the icon.
Image File
The Image File text field displays the path of the 32 by 32 pixel (XView format) icon that is bound to the current Binder entry. The icon is displayed in the base window scrolling list and the Icon field. This is the same icon displayed by the File Manager, Mail Tool, and other applications in the DeskSet environment.
Mask File
The Mask File text field displays the path of an icon color mask. A color mask defines the region of the icon to which the background color is applied. You can think of this as a stencil cut out overlaid on top of your icon before the background color is applied to the icon. If no icon mask file is specified, the entire icon is colored with the background color.
The icon mask does not have to be a 32 by 32 (XView format) pixel icon. If it is larger, only the first 32 by 32 (XView format) pixels in the top left corner of the icon are used.
For example, Figure 16-6shows the icon and the icon mask for the printtool-prog Binder entry. The image on the left is the icon image, and determines what is outlined in the foreground color. The image on the right is the icon mask, and determines the area of the icon colored with the background color.
Figure 16-6 The printtool-prog Icon and printtool-prog Icon Mask

Image File and Mask File Line
These text lines specify the path (directory location) to the icon and the icon's mask--a stencil of the image that determines the area of the icon colored with the background color. To modify the current icon in its appearance on the workspace, do not modify these paths.
Foregr (Foreground) Color
The foreground color is the color that the icon itself is drawn (icon outline) within the File Manager and other DeskSet applications. If no value is given for this field, the foreground color is black.
If you want to pick a new foreground color, click SELECT on the window button to the right of the Foregr Color text field to invoke the Color Chooser application. See "Using the Color Chooser Palette with Binder " for more information.
Alternatively, you can type three numbers in the Foregr Color text field to indicate the amount each of red, green, and blue in the foreground color. Color saturation values range from 0 through 255. For example, 255 0 0 represents a bright, solid red color.
Backgr (Background) Color
The background color is the color the icon is colored within (the lines of the icon) the File Manager and other DeskSet applications. If no value is given for this field, the background color is white.
If you want to pick a new background color, click SELECT on the button to the right of the Backgr Color text field to invoke the Color Chooser. See the section "Using the Color Chooser Palette with Binder " for more information.
Alternatively, you can type three numbers in the Backgr Color text field to indicate the amount of red, green, and blue, respectively, of the background color. Color saturation values range from 0 through 255. For example, 0 255 0 represents a bright, solid green color.
Application
The Application text field defines the application that is invoked whenever any file defined by the current binding is opened in File Manager or other applications in the DeskSet environment. This text field is on the expanded portion of the Icon Properties window.
Note -
If there is a ToolTalk method available, applications do not use this field. Refer to the Desktop Integration Guide.
Print Method
The Print Method defines how a file is printed in the DeskSet environment. If no Print Method is specified, the default print method of the application the file is being printed from is used. This field is on the expanded portion of the Icon Properties window.
Note -
DeskSet applications such as File Manager and Print Tool expect print methods to be in this format: cat $FILE | (pipe1) | (pipe2) ... Defining a print method of another type may produce unexpected results with the deskset tools. See also Chapter 10, Print Tool, for information on overriding a default Print Method.
File Type Properties
You use the File Type Properties window to define the set of files that are bound to the icon, colors, and applications defined in the Icon Properties window.
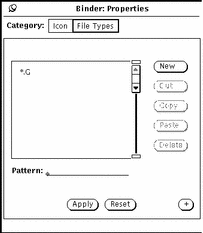
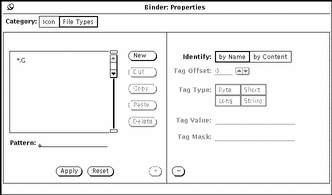
You display the File Type properties by choosing File Types from the Props menu or the Category choice on the Properties window. The default File Type Properties window is shown in Figure 16-7.
Figure 16-7 Default File Type Properties window
You can click SELECT on the plus sign (+) button to expand the window to display the full set of properties, including information needed to identify a class of files, as shown in Figure 16-8.
Figure 16-8 Expanded File Type Properties window
You can shrink the window back down to the smaller size by clicking SELECT on the minus sign (-) button at the bottom of the expanded window.
This section describes the fields in the File Type Properties window.
File Type Scrolling List
Each entry in the File Type scrolling list defines how a file, or a group of files, is recognized by DeskSet applications. You can think of each entry in the File Type scrolling list as a class of files, which may consist of one file or many files. Each class of files in this scrolling list (each File Type entry) is bound to the Icon properties of the current Binder entry.
Note -
If you have two identical File Type entries in your Binder database, only the first one that the Binder reads is used. The first Binder entry to use the File Type entry is not necessarily the first Binder entry in the Binder base window scrolling list.
Pattern Text Field
Use the Pattern text field beneath the scrolling list to modify the name of a File Type entry. If the files are to be identified by a pattern, this pattern must be the name of the Binding entry. If the currently selected File Type is identified by Content, the Pattern text field is dimmed and unavailable.
When there are no items selected on the scrolling list, you can type a pattern into the Pattern text field and press Return to create a new File Type entry.
File Type Properties Window Buttons
You SELECT the buttons to the right of the File Type scrolling list to create and delete File Type entries, and to move them to and from a clipboard, as follows:
-
New creates a new File Type entry. The name of the first new entry is unnamed_1. If you create another new entry without renaming the first, it is called unnamed_2, etc.
To change the name of a File Type entry, type a new name in the Pattern text field and press Return. If you want to identify a set of files by a pattern, you must type the actual pattern in the Pattern text field. If you want to identify a set of files by content, the name of the File Type entry can be anything.
-
Cut removes the currently selected File Type entry from the current Binder entry (the entry selected in the base window scrolling list), and to move it to the clipboard. If the current Binder entry is a read-only entry, the Cut button is inactive.
-
Copy copies the currently selected File Type entry to the clipboard.
-
Paste adds the File Type entry that is on the clipboard to the current Binder entry. The Paste button is inactive if there is nothing on the clipboard.
-
Delete removes the File Type entry from the current Binder entry. The Delete button is inactive if the current Binder entry is a read-only entry. Note that deleting a Binder entry does not delete its File Type entry.
You use the Apply and Reset buttons at the bottom of the File Type Properties window to apply your File Type and Icon Properties changes to the current Binder entry, or to reset all the changes you've made since the last Apply.
Identify Choice Item
TheIdentify choice item determines how the current class of files (the selected File Type entry) is recognized by DeskSet applications, such as the File Manager. A class of files is recognized either by Name or by Content, as defined in the following sections:
Identify By Name
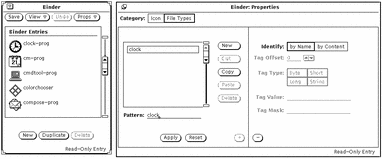
If the Identify choice is by Name, files are recognized by the pattern in the Pattern text field. In this case, the Pattern is often the name of an application. For example, Figure 16-9 shows the clock File Type entry that is bound to the clock-prog Binder entry. Any file called clock will be displayed by the File Manager with the clock icon and colors displayed in the base window scrolling list. (The icon and colors are defined by the clock-prog Icon properties.)
Figure 16-9 Clock File Type Entry
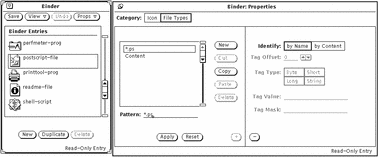
When the Identify choice is "by Name" and the Pattern text field contains an asterisk (*), the asterisk in the Pattern means "match any file name here." For example, the File Type Entry *.ps, shown in Figure 16-10, matches all files that end with.ps. These files are PostScript files, and are displayed in the DeskSet with the postscript-file icon displayed in the Binder base window scrolling list.
Figure 16-10 The *.ps File Type Entry
An exception to the rule about matching the pattern with the file name occurs with the Binder entries default-app, default-dir, and default-doc. The File Manager application uses these entries to determine the bindings for its default application files, directories (folders), and documents. The File Type patterns for these bindings are default|app, default|dir, and default|doc. You will never, however, actually find a file called default|app, default|dir, or default|doc. See "Changing a Binding" for information about how to change these default File Manager bindings.
Identify by Content
If the Identify choice is by Content, files are recognized by matching file contents instead of the file name. When you choose by Content, the four fields underneath the Identify setting become active. These fields define what the file contents should be to define files of the current File Type, as follows:
-
Tag Offset determines the starting position in the file (counting from 0) where the contents should be matched. The default value is 0, meaning "match the contents starting at the very first character of the file." A Byte Offset of 1 would start matching the contents at the second character of the file, and so on.
-
Tag Type determines the type of value that is to be matched in the file contents: Byte, Short, Long, or String. Most files are ASCII files consisting of the String data type (that is, words and characters that you can type). A Byte type is a one-byte numerical value, a Short is a two-byte numerical value, and a Long is a four-byte numerical value.
-
Tag Value determines what to look for in the file contents. This value must be of the type defined in the Tag Type setting.
-
Tag Mask is an optional field that you can use to define a mask value for Byte, Short, or Long data types. If a mask value is defined, a logical AND operation is performed on the Tag Type in the file being bound and the Tag Mask to determine the match value (the contents to be matched). If that value matches the Tag Value, then the file is bound. This field is primarily intended for programmers developing applications to be integrated into the DeskSet environment.
See the magic manual page for advanced information about the Tag Type, Tag Mask, and Tag Value fields.
Figure 16-11 shows that PostScript files can be recognized by the string "%!" at the beginning of the file (Tag Offset = 0, Tag Type = String, Tag Value =%!). Note that PostScript files can also be recognized by files ending with.ps, as described previously in the section "Identify By Name".
Figure 16-11 The postscript-file Content File Type Entry
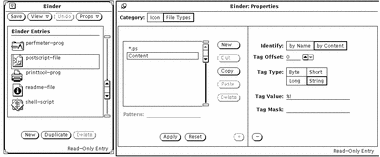
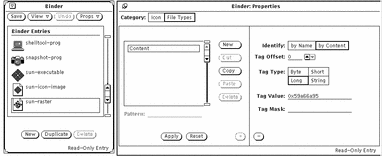
Figure 16-12 shows the sun-raster File Type entry. This class of files is defined as all files starting with the Long value 0x59a66a95.
Figure 16-12 The sun-raster File Type Entry
Creating a New Binding
The following steps explain how to create a new binding. The example binds the cat icon described in Chapter 15, Icon Editor to the cat program file in your /bin directory.
-
If an icon does not exist for the new binding, use the Icon Editor to create a 32 by 32 (XView format) pixel icon.
See Chapter 15, Icon Editor for instructions.
The icon for the binding is the icon displayed by the File Manager, Mail Tool, and other applications in the DeskSet environment
If you want to color only part of the icon when it is displayed in the File Manager or other DeskSet applications, use the Icon Editor to create a 32 by 32 (XView format) pixel icon mask, which defines the area of the icon to be colored. See "Mask File" for information about icon masks.
-
Click SELECT on the New button at the bottom of the base window.
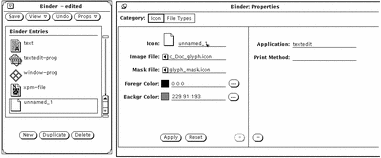
A new entry is automatically created called unnamed_1, and the Binder Properties window is displayed showing the Icon category, as shown in Figure 16-13. If an entry called unnamed_1 already exists, the new entry is called unnamed_2, and so forth.
Figure 16-13 A New Binder Entry
-
Replace the name in the Icon text field of the Properties window with the name you want for the new Binder entry.
In this example, type cat_prog in the Icon text field.
-
Type the path and file name of a 32 by 32 (XView format) pixel icon in the Image File text field.
In this example, type the path and name of the cat icon created in Step 1.
-
If you want to specify a color mask for the icon, type the path and file name of the icon mask in the Mask File text field.
An icon mask defines the area of the icon to be colored when the icon is displayed in the File Manager or other DeskSet applications. See the section "Mask File" for more information.
If you don't specify an icon mask file, the entire icon image will be colored with the background color.
-
Specify the foreground and background colors for the icon by typing RGB (red/green/blue) values in the text fields, or by using the Color Chooser.
The foreground color is the color the icon is drawn with when it is displayed by the File Manager or other DeskSet applications. See the section "Foregr (Foreground) Color" for more information.
The background color is the color the icon is filled with when it is displayed by the File Manager or other DeskSet applications. If you have specified an icon mask file, the background color is only filled in the mask area. See the section "Backgr (Background) Color" for more information.
You use the Color Chooser to specify colors by clicking SELECT on the Foreground Color or Background Color menu buttons, located to the right of the Foregr and Backgr text fields. See "Using the Color Chooser Palette with Binder " for information about using the Color Chooser.
-
If desired, type an Application or Print Method, or both, in the text fields of the expanded Properties window.
If your Properties window is not expanded, click SELECT on the plus sign (+) button at the bottom right corner of the Properties window to display the Application and Print Method text fields.
The Application defines the application that is invoked whenever any file bound to this set of properties is opened in File Manager, Mail Tool, or other applications in the DeskSet environment. The default application is textedit.
The Print Method defines how a file bound to this set of properties is printed in the DeskSet environment. If you do not specify a Print Method, the print method of the application the file is being printed from is used.
-
Choose File Types on the Properties window Category choice item to display the File Type properties.
The File Type properties determine the set of files that are bound to the Icon properties that you just specified.
-
Type the new File Type entry name in the Pattern text field and press Return.
In this example, type cat in the Pattern text field.
If you are going to recognize files by Pattern, the Pattern text field must contain the pattern to be matched, such as cat in this example. If you are going to recognize files by Content, the Pattern text field can be anything that distinguishes this type of file.
-
Move the pointer to the Identify choice item on the expanded properties window, and click SELECT on "by Name" or "by Content" to specify how you want to recognize files.
In this example, click SELECT on "by Name" to match the file named cat.
If you select "by Content," the last four Type Information fields become active. You then need to specify the Tag Offset, Tag Type, and Tag Value to be used to recognize files by content. You can also specify a Tag Mask, if desired. See the section "Identify by Content" for more information about the Content fields.
-
If you want to specify more files to be bound to the Icon properties, repeat steps 9 and 10.
-
Click SELECT on the Apply button to apply the Icon and File Type properties to your new Binder entry.
-
Click SELECT on the Save button at the top of the Binder base window to save the new Binder entry in your personal database.
If you are running the Binder as root with the special options to update the system or network entries, the new entry is added to the appropriate database. See the section "Binder Databases" for information about the three different Binder databases.
Note -The DeskSet applications will not recognize the new binding until you have saved it by clicking SELECT on the Save button. You must also restart the application.
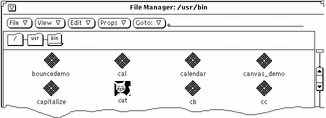
Figure 16-14 shows the new bound image after quitting File Manager and starting it again.
Figure 16-14 The New Image in the File Manager
Deleting a Binder Entry
To delete a Binder entry, select the entry in the Binder base window scrolling list, and click SELECT on the Delete button. Then click SELECT on the Save button. The Delete button is dimmed and inactive if the currently selected entry is a read-only entry.
Note -
When you delete a Binder entry, the File Type entry associated with it is not deleted. If you want to delete the File Type entry, make sure to delete it from the File Type scrolling list before you delete the Binder entry.
To delete the File Type entry, select the Binder entry in the base window scrolling list, display the File Type Properties window, select the File Type in the File Types scrolling list, and click SELECT on the Properties window Delete button.
Changing a Binding
-
Select the entry in the Binder base window scrolling list.
-
Modify the Icon and File Type properties fields that you want to change.
Make sure to click SELECT on the Apply and Save buttons to apply your Properties changes and then save them to the Binder database.
If the binding that you want to change is a read-only entry, you can select the entry and then click SELECT on the Duplicate button to make a private copy of the entry. You can then modify your private copy of the Binder entry.
For example, suppose you want to change the color that File Manager uses to display folders. Follow these steps:
-
Select the entry default-dir in the Binder base window scrolling list.
The footer message in the bottom right corner of the Binder indicates that this is a read-only entry.
-
Click SELECT on the Duplicate button to copy the entry to your user database.
A new Binder entry is created called unnamed_1, with all the same Icon properties as the original default-dir Binder entry. You can modify this new user entry.
-
Rename the new Binder entry default-dir.
This will put an entry called default-dir in your personal user Binder database. This personal entry will override the System or Network entry of the same name.
Note -If you later create a second user entry called default-dir, only the entry created first will be recognized.
-
Change the background color to the new desired color.
You can either type in new RGB (red/green/blue) values in the Backgr Color text field, or click SELECT on the Backgr Color window button to display the Color Chooser. See the sections "Backgr (Background) Color" and "Using the Color Chooser Palette with Binder " for more information.
-
Click SELECT on the Apply button.
This updates the Icon name and color in the new Binder entry.
-
Click SELECT on the Save button.
This updates your database to include the new Binder entry.
Now when you view the merged Binder databases (the All option of the View menu), your user entry will replace the System or Network entry of the same name. If you want to use the System or Network entry again, simply delete the User entry. The next time you start a new File Manager application, the color specified in your new user Entry will be used to display folders.
Using the Color Chooser Palette with Binder
You can use the Color Chooser with the Binder to specify foreground and background colors for the icons displayed by the File Manager or other DeskSet applications.
To use the Color Chooser to select Foreground or Background icon colors, click SELECT on the Foregr Color or Backgr Color menu button. (These are the buttons to the right of the text fields.) The Color Chooser is then displayed, as shown in Figure 16-15.
Figure 16-15 Color Chooser for Binder's Foreground Color
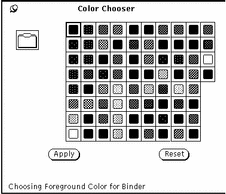
The icon image with the current Foreground and Background colors is displayed in the upper left corner of the palette shown in Figure 16-15 above.
To use a color displayed in the Color Chooser palette:
- © 2010, Oracle Corporation and/or its affiliates
