Chapter 17 Customizing the Solaris Environment
You can customize many aspects of the Workspace environment to suit your needs. For instance, you can use the Workspace Properties window to change the colors of the Workspace and windows, and modify the location of the window scrollbars and how the mouse buttons and pointer behave. This chapter discusses these and other methods of customizing your OpenWindows environment.
Viewing Information About Your Workstation
As things change within your operating environment, or if changes are made to your system, you may be asked for certain basic information about your system. This information can also be helpful to a system administrator if you are having system problems.
Some basic information about your workstation can be found on the Workstation Information window, shown in Figure 17-1.
To open the Workspace Information window, choose Workspace -> Workstation Info.
Figure 17-1 Workstation Information Window
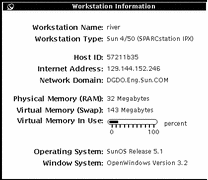
Basic information available to you from the Workstation Information window is as follows:
Your Workstation Information
The following information tells you the name and type of workstation you have or are using.
Workstation Name
This is also known as the machine name or host name. It is the unique name you or your system administrator gave to the machine you are using. This is usually not the same name as your user name or login name. This is the machine name that other users see over the network, such as from electronic mail.
Workstation Type
This is usually the product name (or type) for your workstation. It may reflect the model number of the workstation.
Networking Information
These three items provide some networking information.
HostID
A unique CPU number assigned to your machine. This is sometimes used for licensing software.
Internet Address
Your unique machine address that allows other machines to talk to your machine over the network.
Network Domain
Name of the (NIS) domain to which your machine belongs. Contains password information and other network machine addresses.
System Memory Information
These three items provide some simple information on how the system is using memory.
Physical Memory (RAM)
This tells you how much Random Access Memory (RAM) is installed.
Virtual Memory (Swap)
The amount of swap space on the hard disk.
Virtual Memory In Use
If the number on the slide bar gets close to 100%, contact a System Administrator for adjustment.
Solaris Information
These two items tell you version and release numbers with the Solaris 2.4 release.
Operating System
The version and release number of the operating system your workstation is running.
Window System
The name and version number of the window system that your workstation is running.
Using the Workspace Properties Window
Here is an overview of the Workspace Properties window categories. They are discussed in detail in this chapter. Depending on the hardware capabilities of your display, the Workspace Properties window categories may have different choices available to you.
-
Color allows you to change the foreground and background color of windows, data areas, and the Workspace.
-
Font allows you to choose the style and scale (size) of text in window titles, menus, buttons, and other system elements.
-
Keyboard allows you to turn on or off the clicking of keys, repetition of a character when its key remains pressed, and keyboard equivalents of mouse actions.
-
Mouse allows you to control mouse behavior in relation to pointer speed, movement, and placement; multiple click intervals; and button order for right- and left-handed users.
-
Menu allows you to specify how quickly a submenu is displayed based on how far the mouse is dragged to the right. Some menu characteristics are determined by mouse actions. You can also choose whether to display the menu when you click SELECT on a menu button or to carry out the default command without displaying the menu.
-
Programs menu allows you to rearrange items on the Programs menu (displayed by choosing Programs from the Workspace menu). You can also add and delete items.
-
Miscellaneous category has several settings:
-
Screen saver protects your screen life when the computer is not in use. You can turn it on or off, and set the timeout.
-
Beeping alerts you to various conditions. You can turn it on or off, or turn it on for notices only.
-
Set Active window selection allows you to activate a window either by moving the pointer into the window or by clicking in the desired window. Only one window can be active at a time.
-
Icon and scrollbar allow you to choose where to place icons and scrollbars.
-
-
Locale allows you to select settings appropriate for your language and cultural notation.
All of these items can be set through the Workspace Properties window.
-
To open the Workspace Properties window, choose Workspace -> Properties.
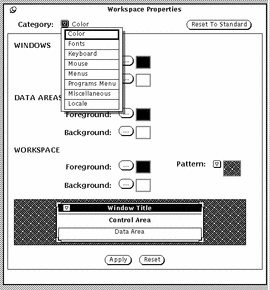
Depending on the hardware capabilities of your display, the Workspace Properties window categories may have different choices available to you. You choose the category you want to change from the Category menu.
-
To view the Category menu, position the pointer on the Category menu button and press MENU.
Figure 17-2 shows the Category menu.
Figure 17-2 Category Menu
Change Bars
As you change settings, a vertical change bar is displayed to the left of the setting you have altered since the last time changes were implemented. This visual cue helps you track your changes.
Workspace Properties Window Buttons
The Workspace Properties window has three buttons:
-
Reset to Standard displays (but does not implement) the system default settings--that is, the settings determined by your system administrator. Change bars mark your previously-applied nonstandard settings.
-
Reset ignores any changes and immediately reverts to previously-applied settings.
-
Apply implements changes. Most changes take place immediately, while others do not take place until you open a new application or restart the OpenWindows software.
Note -
To change settings in more than one category, be sure to select Apply before continuing to the next category. Unlike previous versions, this version of OpenWindows software treats changes to each category separately.
Setting Colors
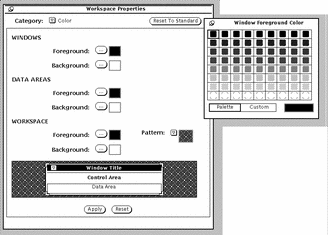
Depending on the hardware capabilities of your display, the Workspace Properties window categories may have different choices available to you. When you open the Workspace Properties window, color appears as the first property you can customize. Figure 17-3 shows the Color category in the Workspace Properties window.
Figure 17-3 Workspace Color Category
To modify colors:
-
Click SELECT on the button for the item you want to change.
Each button (Windows Foreground, Windows Background, Data Areas Foreground, and so on) has a corresponding pop-up window that displays a color palette for that item. Figure 17-3shows a color palette. (Note that for the purpose of this document, the color choices have been replaced with patterns.)
-
Point to a new color on the palette and click SELECT.
The preview area at the bottom of the Workspace Properties window, as shown in Figure 17-4, shows a sample of your color choices.
Figure 17-4 Color Preview Area

-
If you are not satisfied with the new color, select another color from the palette, or create a custom color.
To create a custom color:
-
Click SELECT on Custom on the palette.
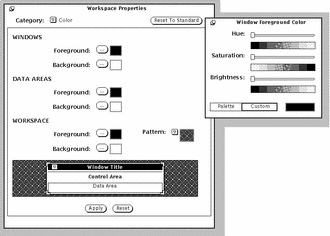
The palette is replaced with sliders for Hue, Saturation, and Brightness, as shown in Figure 17-5. (Note that for the purpose of this document, the color choices have been replaced with patterns.)
Figure 17-5 Using the Custom Color Palette
-
Move the sliders as you watch the preview area.
The sliders let you control three characteristics:
-
-
To change additional foreground or background colors, repeat the previous three steps.
A palette for each foreground and background color is pinned to the Workspace.
-
When the colors suit you, click SELECT on Apply.
The changes occur immediately on the Workspace, in the Workspace menu, and in the window frames of any applications open on the Workspace. Depending on your system configuration, application control areas in open windows use the previous color until you quit and restart the application(s).
Customizing Fonts
OpenWindows DeskSet applications are set up with default fonts that appear on all items, such as icons, menus, and windows. Normally, you do not need to customize the style or point size of these fonts. However, if you would like to increase or decrease the size of the default, or if you are partial to a particular font, it is possible to change the default font style and size for the system font from the Fonts category.
The following sections on fonts describe two methods of customizing fonts: a basic method of changing the scale of the font (which also affects the window scale), and a method of changing the font style, The first method simply increases or decreases the font size (to small, large, or extra large) and its window size, while the second provides greater flexibility in defining the style.
Choosing a Font Scale
The scale allows you to choose from four font sizes for windows. You can change the default so that all applications subsequently open in the size you specify. Note that when you scale the font, the window scales with it.
You can choose from these four sizes:
-
small
-
medium (the default)
-
large
-
extra large
Note -
Not all fonts styles and sizes appear on the screen satisfactorily. If the size is too large, some items, such as menu buttons, may be obscured.
Specifying the Font Style
Default fonts include:
-
Windows: Lucida Sans in 12 point (medium)
-
Window headers: Lucida Sans Bold
-
Text subwindows: Lucida Sans Typewriter
If you prefer, you can specify another font style and size.
To select a different typeface:
-
Select a typeface from the scrolling list.
A sample of the typeface is displayed in the preview area. If you are not satisfied, select another typeface.
-
Click SELECT on Apply.
Listing the Available Fonts
When the Standard selection is chosen, you can scroll through all of the typefaces installed with OPEN LOOK style, the Custom Selection refers to all fonts available on your system.
Note -
The list generated from xlsfonts is very long; there are over 400 fonts available. If the listing on your screen does not contain the expected number of fonts, check with your system administrator. It is possible that a subset of the available fonts was installed.
Previewing Selected Font Settings
You can look at the selected typeface and scale settings in the Preview box. This shows you how text appears in:
-
Control settings--places like buttons and text fields (scrolling lists) in your window system.
-
Control labels--places like captions.
-
Data areas--places like text in the Text Editor window.
Keyboard Menu Equivalents
You can turn on or turn off the keyboard accelerator keys. This means that the keyboard character of the acceleration shows up in the following:
-
Application + Window -- means in all applications that use them and in Open Windows menus
-
Application Only -- means only OPEN LOOK applications that use them
-
None -- means will not show up in any OPEN LOOK application
This is a standard set of tasks (within a DeskSet application) that can be "accelerated" from the keyboard by using keyboard shortcuts. These will be visible from the pull-down menus, and can be configured on or off from the Workspace Properties menu. Keyboard accelerators are active for only the windows that are active. If you need to turn these off, you can select None from Keyboard Menu Equivalents from the Keyboard Properties. The following table outlines the keyboard shortcuts and their functions.
Note -
The Meta key is the <> key on SPARC keyboards; on IA keyboards Meta is obtained by pressing Ctrl-Alt.
Table Legend
The following table uses these abbreviations:
-
FM = File Manager
-
CM = Calendar Manager
-
MT = Mail Tool
-
TE = Text Editor
-
SS = Snapshot
-
IE = Icon Editor
-
B = Binder
-
PT = Print Tool
-
IT = Image Tool
-
AT = Audio Tool
-
X = Accelerated Menu Item
-
- = no relevant menu item
-
btn = relevant item is a button (no accelerator)
-
Meta = use the Meta key (<> or Ctrl-Alt) on your keyboard
-
Accel = Keys to press in this order to invoke the accelerator
|
|
Accel |
FM |
CM |
MT |
TE |
SS |
IE |
B |
PT |
IT |
AT |
|---|---|---|---|---|---|---|---|---|---|---|---|
|
Copy |
Meta - c |
X |
- |
X |
X |
- |
X |
- |
- |
- |
X |
|
Cut |
Meta - x |
X |
- |
X |
X |
- |
X |
- |
- |
- |
X |
|
Find |
Meta - f |
X |
X |
X |
X |
- |
- |
- |
- |
- |
- |
|
New |
Meta - n |
X |
- |
X |
- |
- |
- |
- |
- |
- |
X |
|
Open |
Meta - o |
X |
X |
X |
X |
btn |
X |
- |
- |
X |
X |
|
Paste |
Meta - v |
X |
- |
- |
X |
- |
X |
- |
- |
- |
X |
|
|
Meta - p |
X |
X |
X |
- |
X |
X |
- |
- |
X |
- |
|
Props |
Meta - i |
X |
X |
X |
- |
- |
- |
X |
X |
X |
X |
|
Redo |
Shift- Meta - p |
- |
- |
- |
- |
- |
X |
- |
- |
- |
X |
|
Save |
Meta - s |
- |
- |
X |
X |
btn |
X |
btn |
- |
X |
X |
|
Sel.All |
Meta - a |
- |
- |
- |
- |
- |
- |
- |
- |
- |
- |
|
Undo |
Meta - u |
- |
- |
- |
X |
- |
X |
- |
- |
X |
X |
|
Typeface |
Meta - t |
- |
- |
- |
- |
- |
- |
- |
- |
- |
- |
|
Normal |
Shift- Meta - n |
- |
- |
- |
- |
- |
- |
- |
- |
- |
- |
|
Bold |
Shift- Meta - b |
- |
- |
- |
- |
- |
- |
- |
- |
- |
- |
|
Italic |
Shift- Meta - i |
- |
- |
- |
- |
- |
- |
- |
- |
- |
- |
Other Keyboard Options
Other keyboard options you can control are:
-
Key Click sounds a click with each depression of a key.
-
Key Repeat means when a key is depressed and held, the key will type multiple characters until released. With this setting turned on, a single character is typed, when it is off, multiple characters are displayed.
Modified Use of the Keyboard and Mouse
This section lists accelerator key commands that you can substitute for mouse and menu operations. Accelerator keys help you use the interface efficiently by performing operations that normally require several mouse actions. This is especially useful to those who prefer the use of the keyboard over the use of the mouse, but can be helpful to anyone who wants to increase efficiency through fewer hand movements away from the keyboard.
Keyboard Accelerators
The following sections describe basic editing operations, navigating your way through files and windows, and opening menus without using the mouse buttons.
For a list of commands, such as Cut and Paste, and their keyboard equivalents, see Chapter 1, Introduction to the Solaris User Environment. For instructions on remapping a SPARC or IA keyboard, see the OpenWindows Advanced User's Guide.
Note -
The commands for navigating in text files pertain to the Text Editor application window.
Erase Functions
Table 17-2 Commands that Erase Characters, Words, or Lines|
Sequence |
Action |
|---|---|
|
Backspace |
Erases character to the left of the insert point |
|
Shift-Backspace |
Erases character to the right of the insert point |
|
Control-w |
Erases word to the left of the insert point |
|
Control-Shift-w |
Erases word to the right of the insert point |
|
Control-u |
Erases to the beginning of the line |
|
Control-Shift-u |
Erases to the end of the line |
Move Caret Functions
Table 17-3 Commands that Move the Caret Within Text|
Sequence |
Action |
|---|---|
|
Control-b or Left Arrow |
Moves the caret one character to the left |
|
Control-f or Right Arrow |
Moves the caret one character to the right |
|
Control-Shift-b |
Moves the caret one word to the right |
|
Control-, |
Moves the caret one word to the left |
|
Control-. |
Moves the caret to the end of the word |
|
Control-a |
Moves the caret to the start of line |
|
Control-e |
Moves the caret to the end of the line |
|
Control-p or Up Arrow |
Moves the caret up one line, maintaining column position |
|
Control-n or Down Arrow |
Moves the caret down one line, maintaining column position |
|
Control-Return, End |
Moves the caret to the end of text |
|
Control-Shift-Return or Home |
Moves the caret to beginning of text |
|
Page Up |
Moves caret up one pane |
|
Page Down |
Moves caret down one pane |
Keyboard Mouse Equivalents
The following keyboard accelerators require that you use mouseless mode. You can set this from the Properties menu:
Global Navigation Functions
Table 17-4 Commands for Navigating About the Workspace|
Sequence |
Action |
|---|---|
|
Alt-w |
Moves focus to the next window within the current application |
|
Shift-Alt-w |
Moves focus to the previous window within the current application |
|
Alt-n |
Moves focus to the next application |
|
Shift-Alt-n |
Moves focus to the previous application |
|
Shift-Alt-m |
Displays Workspace menu |
Local Navigation Commands
Table 17-5 Commands that Manipulate Base Windows or Pop-Up Windows|
Sequence |
Action |
|---|---|
|
Alt-m |
Displays window menu |
|
Alt-F5 |
Moves window to back |
|
Alt-F6 |
Enables you to move window with arrow keys |
|
Alt-F7 |
Enables you to resize window with arrow keys |
|
Alt-F8 |
Refreshes window |
Table 17-6 Commands that Manipulate Base Windows Only
|
Sequence |
Action |
|---|---|
|
Alt-F2 |
Opens the icon at the pointer location or closes the window at the pointer location |
|
Alt-F3 |
Resizes window to full size or reduces it to default size |
|
Alt-F9 |
Quits application |
Table 17-7 Commands that Manipulate Pop-Up Window Menus
|
Sequence |
Action |
|---|---|
|
Alt-F2 |
Dismisses or cancels pop-up menu |
|
Alt-F10 |
Indicates owner of pop-up menu |
Mouse
You may want to change the way your mouse behaves within the Workspace.
Figure 17-6 Mouse Properties
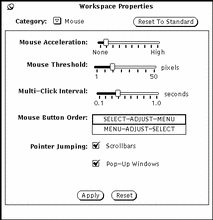
You can change the following settings from the Mouse Properties:
-
Mouse Acceleration is the speed at which the mouse moves.
-
Mouse Threshold defines how far (measured in pixels) does the mouse move before acceleration begins.
-
Multi-Click Interval specifies the time, in tenths of a second, that differentiates a double-click from two single clicks.
-
Mouse Button Order changes the order of the mouse button functions.
-
Pointer Jumping defines a specific way in which the pointer can move in relation to scrolling a window or a pop-up menu.
Multi-Click Interval
Use the Multi-click Interval setting to specify how many tenths of a second can elapse between successive clicks on a mouse button before the first click is ignored. This affects how quickly you must double-click the SELECT button, for instance, when you want to open an application window from an icon.
To set the multi-click interval, drag the slider with the pointer. After you make your changes in the mouse settings window, click SELECT on the Apply button to store the new settings.
Depending upon your system configuration, changes to the Scrollbar Pointer Jumping and Pop-up Pointer Jumping options do not take place in existing application windows, but in those that you open from the Workspace menu after the change was applied. The Multi-Click Interval option takes effect immediately in all applications.
Mouse Button Order
The default positions of the buttons on both the two and three button mouse are labeled from left to right. Often left-handed user prefers to reconfigure the buttons so they are more suited for left-handed use. Figure 17-7 shows the default functions of the buttons for both mice.
Figure 17-7 Default Functions of the Mouse Buttons for Right-hand Use

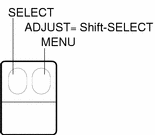
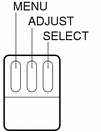
Figure 17-8 shows the functions of the mouse buttons after changing the order for left-handed use. Now when the right mouse button is pressed, SELECT is activated, and when the left button is pressed, MENU is activated.
Figure 17-8 Functions of the Mouse Buttons for Left-hand Use
After you have made these changes in the mouse settings window, click SELECT on the Apply button to store the new settings.
Mouse Pointer Jumping
The Mouse Property contains Pointer Jumping controls for scrollbars and pop-up windows. Each of these defines a specific way in which the pointer can move in relation to scrolling in a window or a pop-up menu.
Customizing Scrollbar Pointer Jumping
Use the Pointer Jumping Scrollbar check box to specify whether or not you want the pointer to move along with the scrollbar elevator during scrolling actions. When the box is checked, as in Figure 17-6, pointer jumping is enabled.
When the box is not checked, pointer jumping is disabled, and the pointer remains in a fixed position as the scrollbar elevator moves. Note that if you position the pointer above or below the elevator and click SELECT several times, the elevator catches up with the pointer, and you must move the pointer to continue scrolling in the same direction.
Customizing Pop-up Pointer Jumping
Use the Pointer Jumping Pop-up check box to specify whether or not you want the pointer to jump into a pop-up window automatically when it comes up.
If this setting is checked, when a pop-up window with a notice is displayed, the pointer jumps to the default button (that is, your anticipated choice). For example, when you choose Exit from the Workspace menu, a notice asks your to confirm that you want to leave the window system. The notice has two buttons: Exit and Cancel. The pointer jumps to Cancel when the notice window is displayed. (The pointer "jumps" so quickly that you see no movement.) In Figure 17-6, this option is on.
When the box is not checked, the pointer does not jump to the default button in the pop-up window but remains where it was when the pop-up window appeared. Move the pointer onto the appropriate button and click SELECT.
To turn off the pop-up pointer jumping, click SELECT on the check mark. The check mark disappears and the option is turned off.
Menu
Setting the Drag-Right Distance of Menus
The "drag-right distance" is the distance that you must move the pointer to the right before a menu is displayed. This distance is measured on the screen in pixels, or "picture elements," whose number corresponds to the resolution of the monitor. To modify the drag-right distance, follow these steps:
-
In the Workspace Properties window, press MENU on the Category menu button and choose Menus.
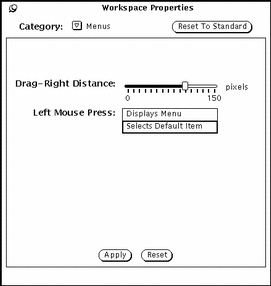
Figure 17-9 shows the Menus category defaults.
Figure 17-9 Menus Category
-
Move the slider to the desired distance.
The distance from the left of the slider is the actual drag-right distance that will take effect on your screen.
-
Click SELECT on Apply to make the change take effect.
Customizing Menu Operation
Use the Menus category of the Workspace Properties window to change how you operate menus. It determines whether the default menu item is chosen automatically when you click SELECT on a menu button or the menu is presented for you to make a choice. In previous versions of the Deskset, the default behavior was equivalent to the Selects Default Item setting. This meant that the default menu item is automatically chosen when you click SELECT on the menu.
The alternate choice, Displays Menu, sets the SELECT button just to display the menu. You then need to click the SELECT button again to choose a menu item.
Programs Menu
You can add items to your Programs menu, remove items, or change their order. Follow these steps:
-
SELECT an item in the list that is adjacent to desired location of the new item.
This highlights the approximate location of the new item.
-
Type a name for the item in the Label: field.
-
Type the full path name to the command or program to be executed in the Command: field.
-
SELECT Paste Before or Paste After.
-
Paste Before places the new item above the highlighted item.
-
Paste After places the new item below the highlighted item.
-
If no item is highlighted, the new item is added at the top or bottom of the list.
-
-
SELECT Apply.
The new label for the command is now displayed in the list.
The button functionality is as follows:
-
Change allows you to change the command or label to associate with label shown.
-
Add allows you to add new label/command.
-
Cut/Copy allows you to cut or copy an item.
-
Paste Before/Paste After allows you to paste a label/command before or after a selected label.
-
Delete allows you to delete label/command.
-
Make Default allows you to make currently selected item the default item on the Programs menu.
-
Miscellaneous
The following Workspace items can be customized from Miscellaneous:
-
Screensaver on/off
-
Screensaver timeout
-
When to beep
-
Beep duration
-
Focus policy
-
Icon location
-
Scrollbar placement
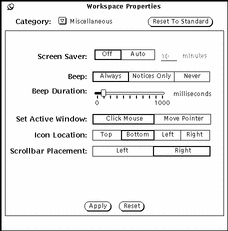
To customize these settings, choose the Miscellaneous category from the Workspace Properties menu. Figure 17-10 shows the Miscellaneous category.
Figure 17-10 Miscellaneous Category of Workspace Properties
Setting the Screensaver Feature
The screensaver feature makes the screen go blank after a period of no use. This option is turned off by default, but you can enable it.
To turn on the screensaver:
-
Press SELECT on Auto.
-
Type the number of minutes before it is enabled. The default is five minutes.
-
Press SELECT on Apply.
Your changes now apply.
Returning to the Desktop
If you have set the screensaver option and your screen turns blank, you can restore your desktop by moving the mouse in any direction. Although input from any keyboard key or mouse button will restore your screen, it is advised that you move the mouse instead. This is because pressing a key creates system input. This means, as an example, that if the pointer is positioned in a text file, you may insert a character in the text.
Setting the System Beep
Use the Beep setting to specify whether your system beeps for all application-generated beep actions (errors, messages in your Console, and so on), only when a notice is displayed, or never. Figure 17-10 shows the beep settings. To customize the system beeps, click SELECT on the chosen beep setting in the Miscellaneous category of the Workspace Properties.
You can move the slider from Beep Duration to increase the length of time the system beeps.
Setting the Active Window
Use the Set Active Window setting to specify whether you must click SELECT on the window to change input focus, or whether you simply move the pointer into the window to specify that window as the active input area. The active input area is where you enter text, whether in a text pane of a base window or a text field of a window control area. The two choices, Click Mouse and Move Pointer, are also called Click-to-Type and Focus-Follow-Pointer. In Figure 17-10, the Click Mouse choice is selected.
The default is Click Mouse. The Click Mouse option requires that when you move the pointer from one window to another, you must click SELECT before you can type any text into the window.
If you choose the Move Pointer option, you don't need to click in the window to make it active and ready for input. The presence of the pointer within the boundaries of the window tells the current window that now it is the focus of the user's attention.
To change the setting, click SELECT on the setting you prefer.
Setting the Default Locations for Icons
You can change the default location where icons appear in the Workspace when they are closed from windows. The OpenWindows default location for icons is on the bottom edge of the Workspace.
To change the default locations of icons:
-
In the Workspace Properties window, press MENU on the Category menu button and choose Miscellaneous.
-
Click Select on the appropriate button.
You can specify any of the four edges of the Workspace as the default location for icons.
-
Click SELECT on Apply.
Changes to the Icons setting take effect immediately. That is, icons for applications that are on the Workspace or are subsequently opened are located in the newly specified location. Icons for applications started from the command line with an explicit icon location appear in the specified location.
Changing Scrollbar Placement
Use the Scrollbar Placement setting to specify whether scrollbars are displayed at the right or the left side of the pane. This setting applies to all scrollable application windows on the Workspace. In Figure 17-10 the default option, Right, is selected.
To set the location of the scrollbars on the left side, click SELECT on the Left button.
Note -
Scrollbar changes do not affect applications that are already on the Workspace.
After you make your choices for system beep, input area, and scrollbar placement, click SELECT on Apply to store the changes. Changes made to the Miscellaneous category take place immediately after you apply them.
Locale
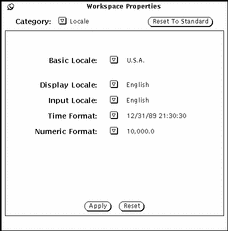
The Locale category of the Workspace Properties window provides users with a mechanism for specifying an input language and display language, as well as time, date, and numeric formats for a specific locale. Figure 17-11 shows the Locale category in the Workspace Properties window.
Figure 17-11 Locale Category in the Workspace Properties Window
If your system has a Solaris localization installed, such as Japanese Solaris, German Solaris, or French Solaris, you have access to locales in addition to the basic U.S.A. locale. If you do not have a Solaris localization installed, U.S.A. (English) is the only available locale. The following is a description of each of the choices in the Properties window:
-
Basic Locale is the name of the country or native language of the user interface. Specific setting choices vary depending on the basic locale setting.
-
The following settings help define characteristics of a particular locale or cultural area.
-
Display Locale specifies the language in which messages, menu labels, button labels, help files, and so forth are displayed.
-
Input Locale specifies the language to be input.
-
Time Format specifies the format for the time and date.
-
Numeric Format defines the numeric format or placement of the comma or decimal point.
Note -For systems that allow locale specifications, changes apply when you start a new application. The changes do not affect applications already running.
-
- © 2010, Oracle Corporation and/or its affiliates
