Organizing Your Mail Messages
A convenient way to organize your mail is to group related messages together in a mail file. A mail file is a file that can contain multiple mail messages. If you view a mail file outside of Mail Tool, it looks like a single file with multiple mail messages appended to one another. When you view a mail file using Mail Tool, each separate message header is displayed in the header pane, and you can view, edit, delete, and respond to each message individually.
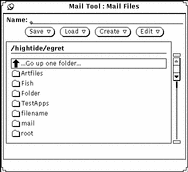
You can use the Mail Files pop-up window to create, delete, and rename mail files and subdirectories of mail files, to add messages to mail files, or to view mail files. To display the Mail Files window, shown in Figure 4-26, choose Mail Files from the File Menu.
Figure 4-26 Mail Files Window

The Mail Files popup window contains a scrolling list of all your mail files (or mailfolders). There are three groups of entries listed in the mailfolder scrolling list, as follows:
-
Double-click SELECT on that entry to display the mail files up one directory level.
-
The next entries in the mailfolder scrolling list are your subdirectories (or folders) of mail files. You can double-click SELECT on these entries to display the mail files of each subdirectory.
-
The last entries in the mailfolder scrolling list are the regular mail files that you can load or save messages to.
You specify the directory where the mail files reside in your file structure using the Mail Filing category in the Properties window. See "Mail Filing Properties" for more information. Any mail files that you create in this directory are displayed as items in the Mail File menu on the Header window control area (described in the section "Mail File Menus"). The default mail file directory is your home directory. If you want to specify a different directory, it's a good idea to do so before you create new mail files.
In addition to using the Mail Files window, you can also create new mail files, add messages to mail files, or view a mail file using the Mail File menu and the Move, Copy, and Load menus on the Mail Tool Header window control area. These menus are described in the next section.
Mail File Menus
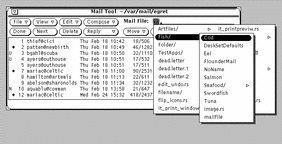
The Mail File menu of the Header window contains a list of files and subdirectories in your mail file directory, as shown in Figure 4-27. Use this menu as an easy way to fill in the name of a mail file in the Mail File text field.
Figure 4-27 Mail File Menu Showing Mail Files and Subdirectories of Mail Files

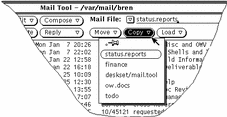
As you access a mail file, it is added to the Move, Copy, and Load menus of the Header window. Each of these three menus contains an identical list of recently accessed mail files. The first item on each menu is the entry in the Mail File text field. If no entry is in the text field, the first item is called Entry, and is dimmed. Figure 4-28 shows a Copy menu after several mail files have been accessed, and when there is an entry in the Mail File text field.
Figure 4-28 Copy Menu with the Most Recently Accessed Mail Files

If you have a set of mail files that you want to always appear on the Move, Copy, and Load menus, you can specify these files in the Mail Filing category of the Properties window. You can also control the maximum height of these menus. See "Mail Filing Properties" for information.
Creating a New Mail File
You can create a new mail file using only the controls on the Header window, or using the Mail Files popup window.
Creating a New Mail File Using the Header Window Controls
Follow these steps to create a mail file using only the Header window controls:
-
Select one or more messages to move or copy to the new mail file.
-
Type the name of the new mail file in the Mail File text field on the Header window, and then click SELECT on the Move or Copy button.
When you just type a file name, such as projectreports, Mail Tool puts the mail file in the Mail File directory that you specify from the Mail Filing Properties window. Alternatively, you can type a complete path name, such as /home/username/projects/projectreports, to put the mail file somewhere else in your file structure, or you can type a relative path name, such as projects/projectreports, to put the mail file in a subdirectory of your Mail File directory.
The new mail file becomes the first and default item of the Move, Copy, and Load menus.
-
Click SELECT on the Move or Copy button.
The new mail file is created, the selected messages are moved to the new file, and a message is displayed in the footer of the Header window.
Creating a New Mail File Using the Mail Files Popup Window
Follow these steps to create a new mail file using the Mail Files popup window:
-
Choose Mail Files from the File menu to display the Mail Files popup window.
-
Type the name of the new mail file in the Name text field.
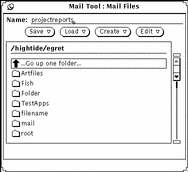
For example, type projectreports to create a project report mail file, as shown in Figure 4-29.
Figure 4-29 New Mail File Typed in the Mail Files Name Field

You can also type the name of a new mail file subdirectory if you'd like to create a subdirectory of mail files.
If you already have a subdirectory where you want to put the new mail file, you can type a relative path name in the Name field, starting with the subdirectory. For example, type projects/projectreports to create a mail file in the subdirectory called projects.Alternatively, you can double-click SELECT on the projects subdirectory in the scrolling list to display that mail directory, and then type the name of the new mail file in the Name field.
-
Choose Mail File or Directory from the Create menu to create the new mail file or subdirectory.
Adding Messages to an Existing Mail File
You can add messages to an existing mail file using only the controls on the Header window, or using the Mail Files pop-up window. Both of these methods are described in the following sections.
Adding Messages to a Mail File Using the Header Window Controls
Follow these steps to add messages to a mail file using only the controls on the Header window:
-
Select the mail headers that you want to move or copy to the mail file.
-
Move or copy the selected messages to an existing or new mail file as follows:
-
If the desired mail file already exists and is listed in the Move and Copy menus, simply choose the mail file from the Move or Copy menu.
-
If the desired mail file already exists but is not listed on the Move and Copy menus, choose the desired mail file from the Mail File menu, and then click SELECT on the Move or Copy button.
The new mail file becomes the first and default item of the Move, Copy, and Load menus.
-
Adding Messages to a Mail File Using the Mail Files Popup Window
Follow these steps to add messages to a mail file using the Mail Files window:
-
Select the headers of the mail messages that you want to move or copy.
-
Choose Mail Files from the File menu to display the Mail Files window.
-
Select a mail file in the Mail Files window scrolling list.
If the desired mail file is in a subdirectory, double-click SELECT on the subdirectory to display its contents in the scrolling list.
-
Choose Move Message into Mail File or Copy Message into Mail File from the Save menu.
The selected messages are moved or copied to the selected mail file.
- © 2010, Oracle Corporation and/or its affiliates
