Sun Adapter for Batch Tutorial
All Sun Java CAPS Adapters provide a communication bridge between the Sun Java CAPS environment and one or more external systems. The Sun Adapter for Batch performs a variety of FTP and FTP-related operations (depending on your specific needs, network environment, record-processing, file transfer, and external system requirements). The Sun Adapter for Batch enables Sun Java CAPS to use an FTP connection to exchange data with other network hosts for the purpose of receiving and delivering objects stored in files.
The Sun Adapter for Batch Tutorial describes:
-
How to use the Sun Adapter for Batch with the Sun Business Process Manager Web Services interface.
Note –You must have the eInsight.sar file installed to use the Web Services interface.
-
How to use the Sun Adapter for Batch with Java Collaboration Definition (JCD)-based projects.
It is assumed that you are already familiar with Sun Enterprise Service Bus Suite terminology and concepts.
Note –
You can download the Sample Project files from http://dscpreview.sfbay.sun.com/docs/javacaps/tutorials/index.jsp
What You Need to Know
The following topics contain introductory and conceptual information for the Sun Adapter for Batch Tutorial.
What You Need to Do
The following topics contain the step-by-step instructions for importing and building the Sun Adapter for Batch sample projects.
More Information
The following topics contain reference information for the Sun Adapter for Batch.
Importing Non-JBI Based Sample Projects
Sample projects are available for implementation and product training. You can import the sample project files from the Sun Java Caps Documentation web site at: http://dscpreview.sfbay.sun.com/docs/javacaps/tutorials/index.jsp.
 To Import a Non-JBI Based Sample Project
Before You Begin
Make sure that the repository is running and that all necessary SAR files and components have been loaded. Save all unsaved work before proceeding.
-
Open your browser and point it at the Sun Java CAPS Documentation web site.
-
Under the Documentation tab, click the Tutorials link.
-
Under Java CAPS Tutorials and Sample Projects, expand a tutorial list to expose the Sample Project Zip File link.
-
Click the Sample Project Zip File link and save the archive file on your local machine.
Remember where you saved the file.
-
Start Netbeans IDE and connect to the running repository:
-
Open or create a Java CAPS repository-based project.
-
Right-click the Java CAPS project and, on the context menu, click Import⇒Project.
-
In the Import Manager dialog box, browse to the location of the sample project archive file.
-
Select the sample project archive file (for example, prjBatch_Inbound_LocalFileIn_FTPOut.zip), and then click Import.
-
When the sample project has successfully imported, clickClose.
About the Sun Business Process Manager Sample Project
You can deploy an Sun Enterprise Service Bus component as an Activity in a Sun Business Process Manager Business Process. Once you associate the desired component with an Activity, Sun Business Process Manager invokes it using a Web Services interface. Sun Enterprise Service Bus components that can interface with Sun Business Process Manager include the following:
-
Java Messaging Service (JMS)
-
Object Type Definitions (OTDs)
-
Adapters
-
Collaborations
Using the NetBeans IDE and Sun Business Process Manager, you can add an Activity to a Business Process, then associate that Activity with Sun Enterprise Service Bus component, for example, an Adapter. Then, when Sun Business Process Manager runs the Business Process, it automatically invokes that component via its Web Services interface.
The prjBatch_Inbound_LocalFileIn_FTPOut Project demonstrates how Sun Business Process Manager Business Processes are used with the Sun Adapter for Batch.
The prjBatch_Inbound_LocalFileIn_FTPOut Project demonstrates the following:
-
The BatchInbound Adapter subscribes to a local directory and periodically checks for a specific file. If the file is present, it renames the file with a GUID, and triggers the Business Process.
-
The BatchLocalFile gets the GUID file name from the BatchInbound Adapter, gets the associated file from a local directory and writes the file to the BatchFTP payload.
-
The BatchFTP Adapter publishes the file to an external directory.
Sample data files for the Sun Adapter for Batch Projects are included with the samples.
Associating BPM Operators
You can associate an Sun Business Process Manager Business Process Activity with Sun Adapter for Batch during the system design phase. To make this association, select the desired operator under the Adapter in the Enterprise Explorer and drag it onto the Business Process canvas.
For Business Process operations, the Sun Adapter for Batch has the following operators available under the for Batch configuration nodes:
BatchFTP
-
get invokes the get operation using the current property values in the configuration
-
getIfExists is the same as get, but if no file is found that matches the name pattern given in "Target Directory Name" and "Target File Name" the return is silent
-
put invokes the put operation using the current property values in the configuration
BatchFTPOverSSL
-
get invokes the get operation using the current property values in the configuration
-
put invokes the put operation using the current property values in the configuration
-
GET functions the same way as get but applies pre— and post— transfer operations
-
PUT functions the same way as put but applies pre— and post— transfer operations
BatchInbound
-
receive
BatchSFTP
-
get invokes the get operation using the current property values in the configuration
-
put invokes the put operation using the current property values in the configuration
-
GET functions the same way as get but applies pre- and post-transfer operations.
-
PUT functions the same way as put but applies pre- and post-transfer operations
BatchSCP
-
get invokes the get operation using the current property values in the configuration
-
put invokes the put operation using the current property values in the configuration
BatchLocalFile
-
read
-
readIfExists
-
write
BatchInbound
-
receive
BatchRecord
Not Applicable
The operator automatically changes to an Activity with an icon identifying the component that is the basis for the Activity.
At run time, the Sun Business Process Manager engine invokes each step in the order defined in the Business Process. Using the engine’s Web Services interface, the Activity invokes the Sun Adapter for Batch.
Considerations for BPM Projects
The following items must be considered when implementing a Sun Adapter for Batch Project for BPM:
-
When using FTP with an AS400 UNIX (USF) system, the following FTP configuration settings are required:
-
FTP - Use PASV: No
-
FTP Raw Commands - Pre Transfer Raw Commands: site namefmt
-
Creating the bpBatch_Inbound_LocalFileIn_FTPOutProject
These following topics provide step-by-step instructions for manually creating the bpBatch_Inbound_LocalFileIn_FTPOut Project.
This topic describes how manually create the Batch_FTPIn_LFOut_Sample Project.
 To Create a Project
The first step is to create a new Project in the NetBeans IDE
-
Start the NetBeans IDE
-
Click the New Project icon, or select File ⇒ New Project to initiate the New Project wizard.
-
In Step 1 of the Wizard, select CAPS ⇒ ESB from the Categories column and CAPS Repository-Based Projectfrom the Projects column, and click Next.
-
In Step 2 of the Wizard, change Project Name to prjBatch_Inbound_LocalFileIn_FTPOutProject, and click Finish.
Creating the bpBatch_Inbound_LocalFileIn_FTPOut Business Process
 To Create the Business Process
The first step in the sample process is to add a Business Process (BP) to the Project.
-
From the Project Explorer panel, right-click brjBatch_Inbound_LocalFileIn_FTPOut.
-
Select New⇒Business Process from the context menu.
-
Rename the Business Process to bpBatch_Inbound_LocalFileIn_FTPOut, and click Save.
-
In the Project Explorer tree, expand the CAPS Components Library, expand Adapters, and then expand Batch eWay.
-
Expand the BatchInbound, and BatchLocalFileBatchFTP nodes to expose the Business Process elements.
-
Populate the design canvas with the following elements from the Project Explorer.
-
Under BatchInbound, add receive
-
Under BatchLocalFile, add read
-
Under BatchFTP, addput
-
-
To link the modeling elements, click the element’s connector and drag it to the next element’s connector, as follows:
-
Start⇒BatchInbound.receive
-
BatchInbound.receive⇒BatchLocalFile.read
-
BatchLocalFile.read⇒BatchFTP.put
-
BatchFTP.put⇒End

-
Adding Business Rules to the Design Elements
Business Rules define the relationship between the input and output Attributes of the elements.
 To Add Business Rules
-
Right-click the link between BatchInbound.receive and BatchLocalFile.read Activities and select Add Business Rule from the context menu.

-
From the Business Process Designer toolbar, click the Display Business Rules Designer icon.
The Business Rule Designer opens in the lower half of the Business Process Designer window.
-
Click the Business Rule icon between the BatchInbound.receive and BatchLocalFile.read Activities.
The Business Rule Attributes appear in the Business Rule Designer.
-
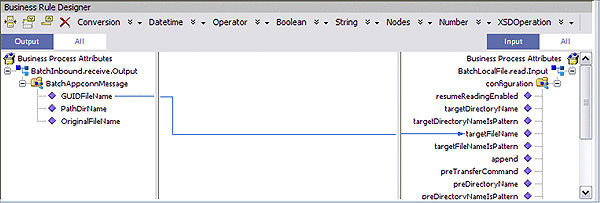
To create the BatchInbound.receive⇒BatchLocalFile.read Business Rule, in the Business Rules Designer, click GUIDFileName and drag it to targetFileName.
A link appears between the two nodes.
-
Right-click the link between the BatchLocalFile.read and BatchFTP.put Activities, and select Add Business Rule from the context menu.
-
Double-click the new Business Rule.
-
From the Business Rule Designer, under BatchLocalFile.read.Output, map payload in the Output pane to payload under BatchFTP.put.Input in the Input pane.

-
From the Business Process Designer toolbar, click the Synchronize Graphical Model and Business Process Code icon.
This synchronizes the graphical interface to the Business Process code.
-
Click Save All.
 To Create a Connectivity Map
The Connectivity Map provides a canvas for assembling and configuring a Project’s components.
-
In the Project Explorer, right-click the prjBatch_Inbound_LocalFileIn_FTPOut Project and select New⇒Connectivity Map from the context menu.
The New Connectivity Map appears and a node for the Connectivity Map is added to the Project Explorer tree labeled CMap1.
-
Rename the CMap1 Connectivity Map to cmBatch_Inbound_LocalFileIn_FTPOut.
 To Generate the Connectivity Map
Once your BPEL process is completed you can use it to generate your Connectivity Map.
-
Drag and drop the bpBatch_Inbound_LocalFileIn_FTPOut bpel process from the Project window to the Connectivity Map canvas.
The cmBatch_Inbound_FTPIn_LocalFileOut_bpBatch_Inbound_LocalFileIn_FTPOut1 service is added to the canvas.
-
Click the Connectivity Map Generator icon. The Connectivity Map Generator dialog box appears listing the necessary components and bindings to generate the Connectivity Map. Click OK.
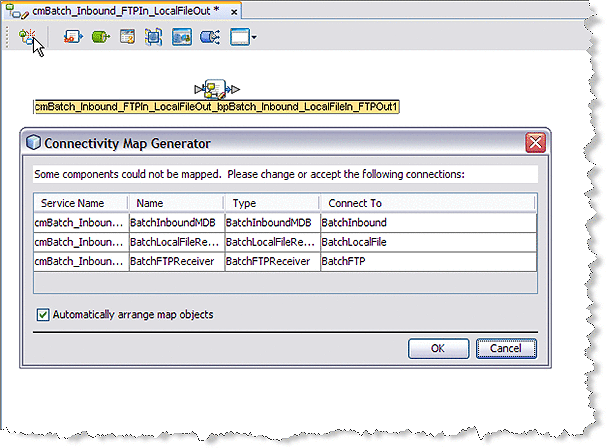
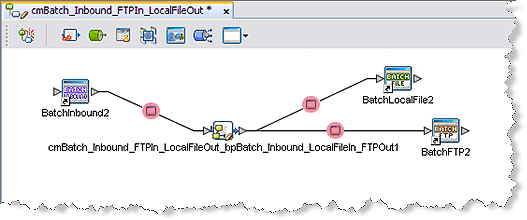
The External applications are added to the Connectivity Map and the Bindings are created. The red squares in the bindings represent the Batch Adapters. The red color indicates that the adapter properties have not been configured.
-
Save your current work.
Creating an Environment
Environments include the External Systems, Logical Hosts, Application Servers, and Message Servers used by the Project and contain the configuration information for these components.
 To Create an Environment
-
Click the Services tab.
-
In the Services tree, right-click CAPS Environments, and click New Environment.
A new Environment is added to the Services tree.
-
Rename the new Environment to envBatch_Inbound_LocalFileIn_FTPOut.
-
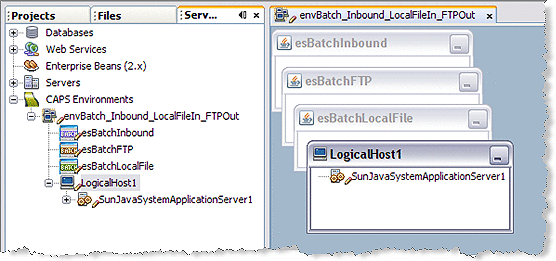
Right-click envBatch_Inbound_LocalFileIn_FTPOut and select New ⇒ BatchInbound External System.
-
Name the External System esBatchInbound and click OK.
The esBatchInbound box is added to the Environment Editor.
-
Right-click envBatch_Inbound_FTPIn_LocalFileOut and select New ⇒ BatchFTP External System.
-
Name the External System esBatchFTP and click OK.
The esBatchFTP box is added to the Environment Editor.
-
Right-click envBatch_Inbound_FTPIn_LocalFileOut and select New ⇒ BatchLocalFile External System.
-
Name the External System esBatchLocalFile and click OK.
The esBatchLocalFile box is added to the Environment Editor.
-
Right-click envBatch_Inbound_FTPIn_LocalFileOut and select New ⇒ Logical Host.
The LogicalHost icon is added to the Environment and LogicalHost1 is added to the tree.
-
Right-click LogicalHost1 and select New ⇒ Sun Java System Application Server.
A new Application Service is added to the tree under LogicalHost1.
-
Save the Project.
Configuring the Adapters' Properties
The prjBatch_Inbound_LocalFileIn_FTPOut sample project contains three Adapters, each represented in the Connectivity Map as a node between an External Application and a Collaboration. The Adapters facilitate communication and movement of data between the external applications and the Sun Enterprise Service Bus.
The Adapter properties must be set from both the Project Explorer’s Connectivity Map and the Services tree.
 To Configure the BatchInbound Adapter Properties
-
From the Connectivity Map, double-click the BatchInbound Adapter.
The Adapter Properties Editor appears.
-
Modify the properties for your system, including the settings for the BatchInbound Adapter in the following table, and click OK.
BatchInbound Adapter Connectivity Map Properties
Settings - Set as directed, otherwise use the default settings
Directory Name
Your input directory (full address)
File Name
BatchInbound.txt
The BatchInbound Adapter Environment properties can keep the default settings for this sample.
 To Configure the BatchLocalFile Adapter Properties
-
From the Connectivity Map, double-click the BatchLocalFile Adapter.
The Adapter Properties Editor appears.
-
Modify the properties for your system, including the settings in the following table, and click OK.
BatchLocalFile Adapter Properties
Target Location - Set as directed, otherwise use the default settings
Append
Yes
Target File Name
BatchLocalFileOut.txt
Target File Name is Pattern
No
Target Directory Name
The directory on the system where files are sent.
Target Directory Name is Pattern
No
-
To refresh and save your default BatchLocalFile Adapter properties, double-click the BatchLocalFile External System in the Services tree to open the Properties Editor.
-
Click OK to save the default settings.
Configuring the BatchFTP Adapter Properties
 To Modify the BatchFTP Adapter Connectivity Map Properties
-
From the Connectivity Map, double-click the BatchFTP Adapter.
The Adapter Properties Editor appears.
-
Modify the BatchFTP Adapter Connectivity Map properties for your system, including the settings in the following table, and click OK.
BatchLocalFile Adapter Properties
Target location - Set as directed, otherwise use the default settings
Target Directory Name
The directory on the external system (absolute path) from which files are retrieved or sent
Target File Name
The FTP remote file name which is retrieved or sent
 To Modify the BatchFTP Adapter Properties
-
From the Services tree, right-click the BatchFTP External System (esBatchFTP in this sample), and select Properties.
The Properties Editor opens to the BatchFTP Adapter Environment properties.
-
Modify the BatchFTP Adapter Environment properties for your system, including the settings in the following table, and click OK.
BatchFTP Adapter Environment-Configuration Parameters
Target location - Set as directed, otherwise use the default settings
FTP
Set as directed, otherwise use the default settings.
Host Name
The name of the external system to which the Adapter connects
Password
Password required to log into the
external system
Server Port
Port number to use to connect to the FTP server
User Name
User ID used to login to the external system
Creating the Deployment Profile
A Deployment Profile is used to assign Collaborations and message destinations to the Sun Java System Application Server and message server.
 To Create the Deployment Profile
-
Select the Projects tab, right-click the Project (prjBatch_Inbound_LocalFileIn_FTPOut) and select New⇒Deployment Profile.
-
Enter a name for the Deployment Profile.
For this Project, use dpBatch_Inbound_LocalFileIn_FTPOut . Make sure that the selected Environment is envBatch_Inbound_LocalFileIn_FTPOut.
-
Click OK.
-
The Project’s components are automatically mapped to their respective system windows.
Note –If any of your Project components did not successfully map to an external system, open each of your Adapter’s configuration properties (Connectivity Map and Environment) and click OK to close and save the current configuration, then click Automap again.
-
Save the Project.
Creating and Starting the Domain
A domain is an instance of a Logical Host. After the domain is created, the Project is built and then deployed.
 To Create and Start the Domain
-
Navigate to your JavaCAPS6\logicalhost directory, where JavaCAPS6 is the location of your Sun Java Composite Application Platform Suite installation.
-
Double-click the domainmgr.bat file.
The Domain Manager appears.
-
Do one of the following:
-
If you have already created a domain, select your domain in the Domain Manager and click Start an Existing Domain.
-
If there are no existing domains, click Yes.
The Create Domain dialog box appears.
-
Make any necessary changes to the Create Domain dialog box and click Create.
-
Select the domain and click the Start an Existing Domain button
The new domain is added to the Domain Manager.
-
-
Once your domain is started, a green check mark indicates that the domain is running.
-
Building and Deploying the Project
The Build process compiles and validates the Project’s Java files and creates the Project EAR file.
 To Build the Project
-
From the Deployment Editor toolbar, click the Build icon.
If there are any validation errors, a Validation Errors pane will appear at the bottom of the Deployment Editor and displays information regarding the errors.
-
Make any necessary corrections and click Build again.
 To Deploy the Project
-
From the Deployment Editor toolbar, click the Deploy icon.
The Deploy prompt appears.
-
Click Yes.
A message appears when the project is successfully deployed.
 To Run the Sample
-
From your configured input directory, paste (or rename) the sample input file to trigger the Adapter.
-
From your output directory, verify the output data.
Note –For UNIX, be sure to upload the appropriate LogicalHost.
About the JCD Sample Projects
These topics provide an overview of the Sun Adapter for Batch Projects that use Java Collaboration Definitions.
Sample data files for the Sun Adapter for Batch projects are included with the samples. See Input_Files_Readme.txt included with the sample data files for more information.
prjBatch_Inbound_FTPIn_LocalFileOut
The prjBatch_Inbound_FTPIn_LocalFileOut Project demonstrates the following:
-
The BatchInbound Adapter subscribes to a local directory and periodically checks for a specific file. If the file is present, it renames the file with a GUID, and triggers the Java Collaboration.
-
The BatchFTP Adapter gets the associated target file from the FTP external system and writes the file content to the BatchLocalFile Adapter payload.
-
The BatchLocalFile Adapter gets the GUID file name from the BatchInbound Adapter, and publishes its payload to a file in a local directory.
prjBatch_Streaming
Stream allows you to read large files by streaming the data. Three of the Batch OTDs are able to receive streamed data: BatchFTP, BatchLocalFile, and BatchRecord. The prjBatch_Streaming project demonstrates the following:
-
The File Adapter polls the input directory periodically. When it sees a specified file, it triggers the Collaboration.
-
The BatchFTP Adapter streams data to the BatchLocalFileAdapter.
-
The BatchLocalFile Adapter renames the resulting data file and moves the output data to a new location.
-
The BatchLocalFile streams the new created file to the BatchRecord Adapter.
-
The BatchRecord Adapter parses the file in the output file and publishes the parsed records to the File Adapter.
-
The FileAdapter publishes the files to a local directory.
This sample works with an input file of any size. but to see the streaming feature in action, use a larger file.
prjBatch_Record
The prjBatch_Recordproject demonstrates the following:
-
TheFile Adapter polls the input directory periodically. When it sees a specified file, it triggers the Collaboration.
-
When triggered, the BatchRecord_Create Adapter creates a record with an incrementing number (string), and puts the record into the payload along with the specified record delimiter.
-
When the payload contains ten records, the payload out using the File Adapter. The payload is published to the BatchRecord_Parse Adapter.
-
The BatchRecord_Parse Adapter parses the ten records and publishes each record to the File Adapter.
-
The FileOut Adapter writes the files to a local directory.
prjBatch_Secure
The prjBatch_Secure project contains three scenarios to demonstrate the SSL and SSH secure file transfer functions of the BatchFTPOverSSL, BatchSFTP, and BatchSCP OTDs.
The project uses inbound File Adapters to poll an external directory for a specific input file. When the file is present, the appropriate File Adapter triggers a Collaboration to do the following:
Scenario 1 - FTP Over SSL
-
Gets a file from a remote directory and publishes it to a local directory.
-
Publishes a file from local directory to a remote directory.
-
Downloads a file from a remote directory to a local directory.
-
Uploads a file from a local directory to remote directory.
-
Creates remote directories and lists them.
-
Deletes remote directories and lists the results.
Scenario 2 - SFTP
-
Gets a file from remote directory and publishes it to a local directory.
-
Creates a new remote directory
-
Changes directories to the newly created remote directory, and publishes a file there.
-
Renames the published file.
-
Deletes an unwanted file from remote directory.
Scenario 3 - SCP
-
Recursively gets a file from a remote directory and publishes it to a local directory.
-
Recursively puts a file from a local directory to a remote directory.
-
Gets a file (non-recursive) from a remote directory and publishes it to a local directory.
-
Puts a file (non-recursive) from a local directory to a remote directory.
JCD Components
Adapter components that are unique to the Sun Adapter for Batch include Object Type Definitions (OTDs). OTDs map input and output message segments at the field level. The Sun Adapter for Batch has the following OTDs:
-
The BatchFTP OTD supports connections to external FTP servers.
-
The BatchFTPOverSSL OTD supports secure data transfer using Secure Sockets Layer (SSL) protocol.
-
The BatchSCP OTD supports secure data transfer using Secure Copy Protocol with Secure Shell (SSH) as an underlying protocol.
-
The BatchSFTP OTD supports SSH File Transfer Protocol (SFTP protocol). SFTP protocol. SFTP provides a range of operations on remote files, such as resuming interrupted transfers, directory listings, and remote file removal.
-
The BatchLocalFile OTD supports data file publish and subscribe functions for local file systems.
-
The BatchRecord OTD provides functions for extracting records out of files, parsing files into specific records, and defining the content of files as records.
-
The BatchInbound OTD provides functionality for receiving files, renaming files with GUID file names, and triggering a Business Process or Collaboration.
Considerations for JCD Projects
The following items must be considered when implementing a Sun Adapter for Batch Project:
When using FTP with an AS400 UNIX (USF) system, the following FTP configuration settings are required:
-
FTP - Use PASV: No
-
FTP Raw Commands - Pre Transfer Raw Commands: site namefmt 1
The Sun Adapter for Batch JCD Sample Projects
The following topics provide step-by-step instructions for creating the Sun Adapter for Batch Sample Projects that use Java Collaboration Definitions.
-
Sample data files for the Sun Adapter for Batch Projects are included with the samples. See the Input_Files_Readme.txt file included with the sample data files for more information.
The prjBatch_Inbound_FTPIn_LocalFileOut Sample Project
This topic describes how to create the Batch_FTPIn_LFOut_Sample Project.
 To Create a Project
First, you create a new Project in the NetBeans IDE
-
Start the NetBeans IDE
-
Click the New Project icon, or select File⇒New Project to initiate the New Project wizard.
-
In Step 1 of the Wizard, select CAPS⇒ESB from the Categories column, CAPS Repository-Based Project from the Projects column, and click Next.
-
In Step 2 of the Wizard, specify your Project Name (for this Project, use prjBatch_Inbound_FTPIn_LocalFileOut), and click Finish.
Creating the Java Collaboration Definitions
Next, you create the jcdBatch_Inbound_FTPIn_LocalFileOut Collaboration Definition. A Java Collaboration Definition contains Business Rules that define the processing and transport of data between the Sun Enterprise Service Bus components. The Java Collaboration Definition Wizard is used to create the Java Collaboration Definitions. Once a Collaboration is created, the Collaboration Editor is used to create the Business Rules of the Collaboration.
Creating the jcdBatch_Inbound_FTPIn_LocalFileOut Collaboration
The jcdBatch_Inbound_FTPIn_LocalFileOut Collaboration defines how data is transferred between the BatchInbound application, the BatchFTP application, and Outbound BatchLocalFile.
 To Create the jcdBatch_Inbound_FTPIn_LocalFileOut
Collaboration
-
From the Project Explorer, right-click prjBatch_Inbound_FTPIn_LocalFileOut and Select New⇒Collaboration Definition (Java) from the context menu.
The Collaboration Definition Wizard (Java) appears.
-
Enter a Collaboration Definition name (for this Project, use jcdBatch_Inbound_FTPIn_LocalFileOut) .
-
Under Web Service Type, select Existing: Implement an existing Web Service operation.
-
Click Next.
-
For Step 2 of the Wizard, select the Web Service operation to implement. From the select Web Service operation selection window, double-click CAPS Components Library⇒Adapters⇒BatcheWay⇒BatchLocalFile⇒receive.
-
Click Next.
-
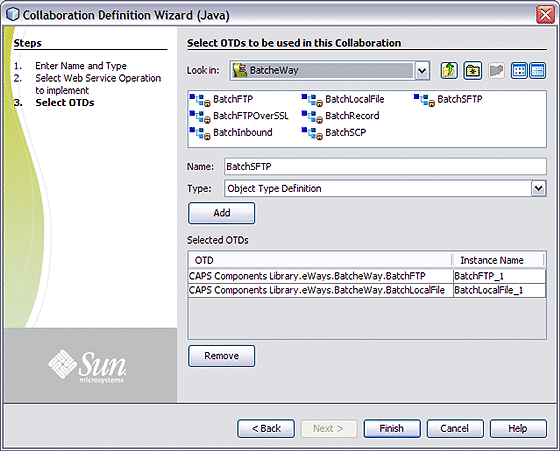
For Step 3 of the Wizard, from the Select OTDs selection window, double-click CAPS Components Library⇒Adapters⇒BatcheWay⇒BatchFTP.
The BatchFTP OTD is added to the Selected OTDs field.
-
From the Select OTDs selection window, double-click CAPS Components Library⇒Adapters⇒BatcheWay⇒BatchLocalFile.
The BatchLocalFile OTD is added to the Selected OTDs field.
-
Click Finish.
The new jcdBatch_Inbound_FTPIn_LocalFileOut Collaboration appears in the Project Explorer tree.
Using the Java Collaboration Editor
The prjBatch_Inbound_FTPIn_LocalFileOut Project uses the jcdBatch_Inbound_FTPIn_LocalFileOut Collaboration you created in the previous topic. To complete the Collaboration, use the Java Collaboration Editor to create the Business Rules.
 To Create the jcdBatch_Inbound_FTPIn_LocalFileOut
Collaboration Business Rules
Be careful to open all nodes specified in the directions to connect the correct items.
-
From the Project Explorer tree, double-click jcdBatch_Inbound_FTPIn_LocalFileOut.
The Java Collaboration Editor opens to the jcdBatch_Inbound_FTPIn_LocalFileOut Collaboration.
-
To create comments for the Business Rules, from the Business Rules toolbar, click the Comment icon.
The Enter a Comment dialog box appears. The comment is placed on the Business Rules tree under the last selected item.
-
Enter the comment and click OK.
Once the comment is created, you can move it by clicking the comment and dragging it up or down the Business Rules tree to a new location.
-
Create the BatchFTP_1.Client.get rule:
The BatchFTP_1.Client.get rule gets the file from the FTP Client.
-
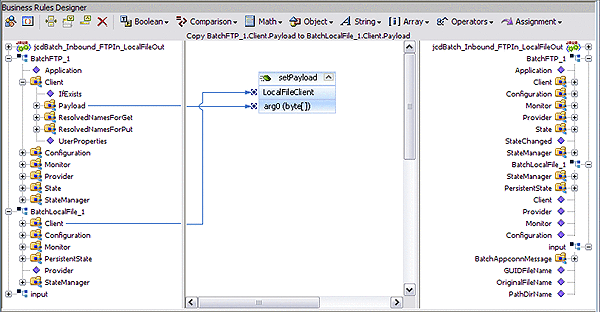
Create the Copy BatchFTP_1.Client.Payload to BatchLocalFile_1.Client.Payload rule:
The Copy BatchFTP_1.Client.Payload to BatchLocalFile_1.Client.Payload rule writes the contents of the retrieved file to the payload of the BatchLocalFile.
-
Click rule on the Business Rules toolbar to add a new rule in the Business Rules pane.
-
Right-click Client under BatchLocalFile_1 in the left pane of the Business Rules Designer and choose Select Method to Call from the popup menu, and select setPayload(byte[] arg0)from the select method box.
The setPaylod method box appears.
-
Map Payload under BatchFTP_1 ⇒ Client in the left pane of the Business Rules Designer, to the arg0 (byte[]) input node of the setPayload method box. To do this, click Payload under BatchFTP_1 ⇒ Client in the left pane of the Business Rules Designer, and drag your cursor to the arg0 (byte[]) input node of the setPayload method box.
-
-
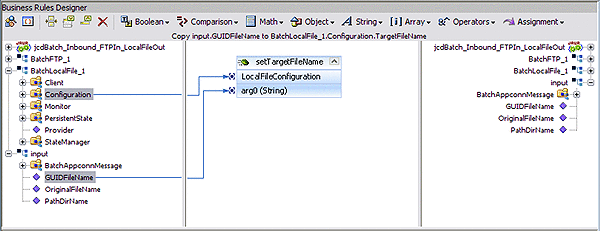
Create the Copy input.GUIDFileName to BatchFTP_1.Configuration.TargetFileName rule:
The Copy input.GUIDFileName to BatchLocalFile_1.Configuration.TargetFileName rule gives a GUID to the target file, BatchLocalFile Adapter.
-
Click rule on the Business Rules toolbar to add a new rule in the Business Rules pane.
-
Right-click Configuration under BatchLocalFile_1 in the left pane of the Business Rules Designer and choose Select Method to Call from the popup menu.
-
Double-click setTargetFileName(String arg0)from the select method box.
The setTargetFileName method box appears.
-
Map GUIDFileName under input in the left pane of the Business Rules Designer, to the String arg0 input node of the setTargetFileName method box.
-
-
Create the BatchLocalFile_1.Client.put rule:
The BatchLocalFile_1.Client.put rule publishes the file to a local directory.
-
Click rule on the Business Rules toolbar to add a new rule in the Business Rules pane.
-
Under the BatchLocalFile_1 node in the left pane of the Business Rules Designer, right-click Client, and choose Select method to call from the context menu.
The method selection window appears.
-
Select put() from the method selection window.
The put method box appears in the Business Rules Designer canvas.
-
-
From the editor’s toolbar, click Validate to check the Collaboration for errors.
-
Save the Project.
Creating a Connectivity Map
A Connectivity Map provides a canvas for assembling and configuring a Project’s components.
 To Create a Connectivity Map
-
In the Project Explorer, right-click prjBatch_Inbound_FTPIn_LocalFileOut and select New ⇒ Connectivity Mapfrom the context menu.
The new Connectivity Map appears and adds a node on the Project Explorer tree labeled CMap1.
-
Rename the CMap1 Connectivity Map to cmBatch_Inbound_FTPIn_LocalFileOut.
 To Generate the Connectivity Map
Once your Java Collaboration Definition is completed you can use it to generate your Connectivity Map. Generating the Connectivity Map will automatically populate the canvas with the correct components and bind the components according to the information provided by the Java Collaboration Definition.
-
Drag and drop the jcdBatch_Inbound_FTPIn_LocalFileOut Java Collaboration Definition from the Project window to the Connectivity Map canvas.
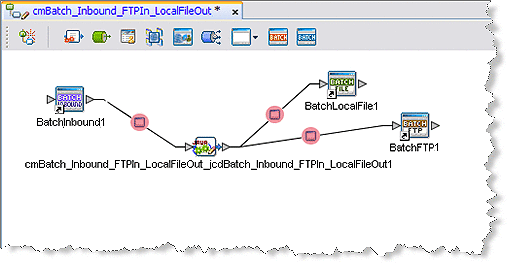
The cmBatch_Inbound_FTPIn_LocalFileOut_jcdBatch_Inbound_FTPIn_LocalFileOut1 service is added to the canvas.
-
Click the Connectivity Map Generator icon. The Connectivity Map Generator dialog box appears listing the necessary components and bindings to generate the Connectivity Map. Click OK.
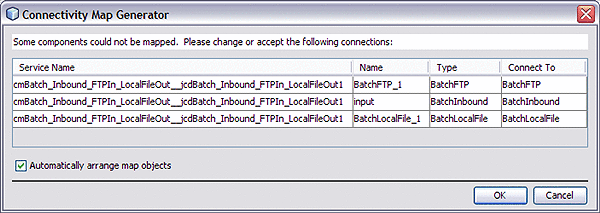
The External applications are added to the Connectivity Map and the Bindings are created. The red squares in the bindings represent the Batch Adapters. The red color indicates that the adapter properties have not been configured.
-
Save your current work.
Creating an Environment
Environments include the External Systems, Logical Hosts, Application Servers, and Message Servers used by the Project and contain the configuration information for these components.
 To Create an Environment
-
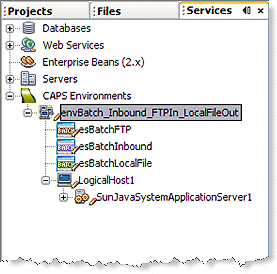
In the Project Explorer, click the Services tab.
-
In the Services tree, right-click CAPS Environments and select New Environment.
A new Environment is added to the Services tree.
-
Rename the new Environment to envBatch_Inbound_FTPIn_LocalFileOut.
-
Right-click envBatch_Inbound_FTPIn_LocalFileOut and select New⇒BatchInbound External System.
-
Name the External System esBatchInbound and click OK.
The esBatchInbound box is added to the Environment Editor.
-
Right-click envBatch_Inbound_FTPIn_LocalFileOut and select New⇒BatchFTP External System.
-
Name the External System esBatchFTP and click OK.
The esBatchFTP box is added to the Environment Editor.
-
Right-click envBatch_Inbound_FTPIn_LocalFileOut and select New⇒BatchLocalFile External System.
-
Name the External System esBatchLocalFile and click OK .
The esBatchLocalFile box is added to the Environment Editor.
-
Right-click envBatch_Inbound_FTPIn_LocalFileOut and select New⇒Logical Host.
The LogicalHost1 icon is added to the Environment and LogicalHost1 is added to the tree.
-
Right-click LogicalHost1 and select New⇒Sun Java System Application Server.
A new Application Service is added to the tree under LogicalHost1 .
-
Save the Project.
Configuring the Adapters Properties
The prjBatch_Inbound_FTPIn_LocalFileOut Project contains three Adapters, each represented in the Connectivity Map as a node between an External Application and a Collaboration. The Adapters facilitate communication and movement of data between the external applications and the Sun Enterprise Service Bus system.
 To Configure the BatchInbound Adapter Properties
-
From the Connectivity Map, double-click the BatchInbound Adapter.
The Adapter Properties Editor appears.
-
Modify the properties for your system, including the settings for the BatchInbound Adapter in the following table, and click OK.
BatchInbound Adapter Connectivity Map Properties
Settings - Set as directed, otherwise use the default settings
Directory Name
Your input directory (full address)
File Name
BatchInbound.txt
The BatchInbound Adapter Environment properties can keep the default settings for this Project.
Configuring the BatchFTP Adapter Properties
 To Modify the BatchFTP Adapter Connectivity Map Properties
-
From the Connectivity Map, double-click the BatchFTP Adapter.
The Adapter Properties Editor appears.
-
Modify the BatchFTP Adapter Connectivity Map properties for your system, including the settings in the following table, and click OK.
BatchFTP Adapter Connectivity Map Properties
Target Location - Set as directed, otherwise use the default settings
Target Directory Name
Batch51
Target File Name
BatchFTPIn.txt
 To Modify the BatchFTP Adapter Properties
-
From the Services tree, right-click the BatchFTP External System (In this Project, esBatchFTP ), and select Properties.
The Properties Editor opens to the BatchFTP Adapter Environment properties.
-
Modify the BatchFTP Adapter Environment properties for your system, including the settings in the following table, and click OK.
BatchFTP Adapter Environment Properties
FTP - Set as directed, otherwise use the default settings.
Host Name
The name of the external system to which the Adapter connects
Password
Password required to log into the external system
Server Port
Port number to use to connect to the FTP server
User Name
User ID used to login to the external system
 To Configure the BatchLocalFile Adapter Properties
-
Double-click the BatchLocalFile Adapter.
The Adapter Properties Editor appears.
-
Modify the properties for your system, including the settings in the following table, and click OK.
BatchLocalFile Adapter Properties
Target Location - Set as directed, otherwise use the default settings
Target File Name
dummy (this name is overwritten with the GUID file name in the Java Collaboration)
Target Directory Name
X:/Batch51 (where X is your target drive)
 To Create the Deployment Profile
A Deployment Profile is used to assign Collaborations and message destinations to the Sun Java System Application Server and message server. Deployment Profiles are created using the Deployment Editor.
-
From the Enterprise Explorer’s Project Explorer, right-click the Project (prjBatch_Inbound_FTPIn_LocalFileOut) and select New⇒Deployment Profile.
-
Enter a name for the Deployment Profile (for this Project, use dpBatch_Inbound_FTPIn_LocalFileOut).
Make sure that the selected Environment is envBatch_Inbound_FTPIn_LocalFileOut.
-
Click OK.
-
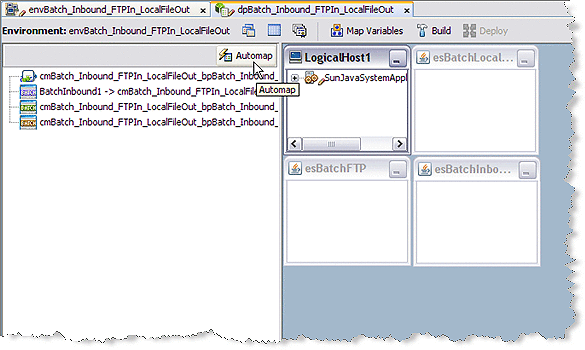
The Project’s components are automatically mapped to their respective system windows.
Note –If any of your Project components do not successfully map to an external system, open each of your Adapter’s configuration properties (Connectivity Map and Environment) and click OK to close and save the current configuration, then click Automap again.
-
Save the Project.
Creating and Starting the Domain
A domain is an instance of a Logical Host. After the domain is created, the Project is built and then deployed.
 To Create and Start the Domain
-
Navigate to your JavaCAPS6\logicalhost directory, where JavaCAPS6 is the location of your Java CAPS installation.
-
Double-click the domainmgr.bat file.
The Domain Manager appears.
-
Do one of the following:
-
If you have already created a domain, select your domain in the Domain Manager and click Start an Existing Domain.
-
If there are no existing domains, click Yes.
The Create Domain dialog box appears.
-
Make any necessary changes to the Create Domain dialog box and click Create.
-
Select the domain and click the Start an Existing Domain button.
The new domain is added to the Domain Manager.
-
-
Once your domain is started, a green check mark indicates that the domain is running.
-
Building and Deploying the Project
The Build process compiles and validates the Project’s Java files and creates the Project EAR file.
 To Build the Project
-
From the Deployment Editor toolbar, click the Build icon.
If there are any validation errors, a Validation Errors pane will appear at the bottom of the Deployment Editor and displays information regarding the errors.
-
Make any necessary corrections and click Build again.
 To Deploy the Project
-
From the Deployment Editor toolbar, click the Deploy icon.
The Deploy prompt appears.
-
Click Yes.
A message appears when the project is successfully deployed.
 To Run the Sample
To run your deployed sample Project do the following
-
From your configured input directory, paste (or rename) the sample input file to trigger the Adapter.
-
From your output directory, verify the output data.
Note –For UNIX, be sure to upload the appropriate LogicalHost.
The prjBatch_Streaming Sample Project
This topic describes how the components of the prjBatch_Streaming sample Project are created. To create the Project manually, do the following:
 To Create a Project
The first step is to create a new Project in the NetBeans IDE
.
-
Start the NetBeans IDE
-
Click the New Project icon, or select File⇒New Projectto initiate the New Project wizard.
-
In Step 1 of the Wizard, select CAPS⇒ESB from the Categories column and CAPS Repository-Based Project from the Projects column, and click Next.
-
In Step 2 of the Wizard, specify your Project Name (for this Project , use prjBatch_Streaming), and click Finish.
Creating a Java Collaboration Definition
In this task, you create a Java Collaboration using the Collaboration Definition Wizard (Java). Once a Collaboration Definition has been created, the Business Rules of the Collaboration are written using the Collaboration Editor.
 To Create the jcdBatch_Streaming Collaboration
-
From the Project Explorer, right-click the prjBatch_Streaming Project and select New⇒Collaboration Definition (Java) from the context menu.
The Collaboration Definition Wizard (Java) appears.
-
Enter a Collaboration Definition name (for this Project, use jcdBatch_Streaming) and click Next.
-
For Step 2 of the Wizard, from the Web Services Interfaces selection window, double-click CAPS Components Library⇒Adapters⇒BatchAdapter⇒BatchInbound⇒receive.
The File Name field now displays receive.
-
Click Next.
-
For Step 3 of the Wizard, from the Select OTDs selection window, double-click CAPS Components Library⇒Adapters⇒BatchAdapter, and select the following three OTDs:
-
BatchFTP
-
BatchLocalFile
-
BatchRecord
-
-
From the Select OTDs selection window, double-click CAPS Components Library⇒Adapters⇒File, and select the FileClient OTD.
The Selected OTDs field now displays the four OTDs.
-
Click Finish.
The Java Collaboration Editor opens to the new Collaboration in the right pane of the NetBeans IDE.
Using the Java Collaboration Editor
The prjBatch_Streaming Project uses the jcdBatch_Streaming Collaboration created in the Creating a Java Collaboration Definition. To complete the Collaboration, use the Collaboration Editor to create the Business Rules.
 To Create the jcdBatch_Streaming Collaboration Business Rules
-
From the Project Explorer tree, double-click jcdBatch_Streaming.
The Java Collaboration Editor opens to the jcdBatch_Streaming Collaboration.
-
To create comments for the Business Rules, from the Business Rules toolbar, click the comment icon.
The Enter a Comment dialog box appears.
-
Enter the comment and click OK.
The comment is placed on the Business Rules tree under the last selected item. Click the comment to drag it up or down the Business Rules tree to a new location.
-
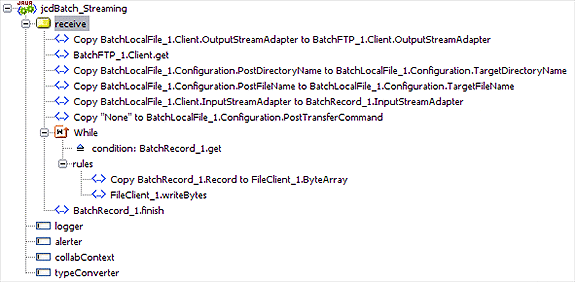
Create the CopyBatchLocalFile_1.Client.OutputStreamAdapter to BatchFTP_1.Client.OutputStreamAdapter rule:
The CopyBatchLocalFile_1.Client.OutputStreamAdapter to BatchFTP_1.Client.OutputStreamAdapter rule configures the BatchFTP and BatchLocalFile stream adapters so that the BatchFTP Adapter does a stream get, and the BatchLocalFile Adapter receives the stream.
-
Click rule on the Business Rules toolbar to add a new rule.
-
Map OutputStreamAdapter under BatchLocalFile_1 ⇒ Client in the left pane of the Business Rules Designer, under to OutputStreamAdapter under BatchFTP_1 ⇒ Client in the right pane of the Business Rules Designer. To do this, Click on OutputStreamAdapter under BatchLocalFile_1 ⇒ Client in the left pane of the Business Rules Designer, and drag your cursor to OutputStreamAdapter under BatchFTP_1 ⇒ Client in the right pane of the Business Rules Designer. A link now connects the two nodes.
-
-
Create the BatchFTP_1.Client.get rule:
The BatchFTP_1.Client.get rule gets the file.
-
Click rule on the Business Rules toolbar to add a new rule.
-
Under BatchFTP_1 in the left pane of the Business Rules Designer, right-click Client, and click Select method to call from the context menu.
The method selection window appears.
-
Select get() from the method selection window.
The get method box appears in the Business Rules Designer canvas.
-
-
Create the Copy BatchLocalFile_1.Configuration.PostDirectoryName to BatchLocalFile_1.Configuration.TargetDirectoryName rule:
The Copy BatchLocalFile_1.Configuration.PostDirectoryName to BatchLocalFile_1.Configuration.TargetDirectoryName rule dynamically configures the name of the target directory to the post directory name.
-
Create the Copy BatchLocalFile_1.Configuration.PostFileName to BatchLocalFile_1.Configuration.TargetFileName rule:
The Copy BatchLocalFile_1.Configuration.PostFileName to BatchLocalFile_1.Configuration.TargetFileName rule dynamically configures the name of the target file to the post file name.
-
Create the Copy "None" to BatchLocalFile_1.Configuration.PostTransferCommand rule:
The Copy "None" to BatchLocalFile_1.Configuration.PostTransferCommand rule dynamically configures the post transfer command to None so that no post transfer will take place.
-
From the Business Rules Designer’s String menu, select Literal String.
The String literal box appears.
-
Double-click the value field of the String literal box and enter None as the value.
-
Map the None output node of the String literal box to PostTransferCommand under BatchLocalFile_1⇒Configuration in the right pane of the Business Rules Designer
-
-
Create the Copy BatchLocalFile_1.Client.InputStreamAdapter to BatchRecord_1.InputStreamAdapter rule:
The Copy BatchLocalFile_1.Client.InputStreamAdapter to BatchRecord_1.InputStreamAdapter rule configures the BatchLocalFile and BatchRecord stream adapters so that the BatchLocalFile Adapter does a stream get, and the BatchRecord Adapter receives the stream.
-
Create the While statement:
The While statement’s rules get the record, publish it to the outbound File Adapter, and the File Adapter writes the file to a local directory.
-
Click While on the Business Rules toolbar to add a new while statement in the Business Rules pane.
-
From the Business Rules tree, expand the While statement and select the condition.
-
From the Business Rules Designer, right-click BatchRecord_1 in the left pane of the Business Rules Designer, and click Select method to call from the context menu.
The method selection window appears.
-
Select get() from the method selection window.
The get method box appears in the Business Rules Designer canvas.
-
Map the output node of the get method box to result (boolean) condition in the right pane of the Business Rules Designer.

-
-
Create the Copy BatchRecord_1.Record to FileClient_1.ByteArray rule under the while statement:
-
To create the FileClient_1.write rule under the while statement do the following:
-
Click rule on the Business Rules toolbar to add a new rule under the While statement.
-
Right-click FileClient_1 in the left pane of the Business Rules Designer, and click Select method to callfrom the context menu.
The method selection window appears.
-
Select write() from the method selection window.
The write method box appears in the Business Rules Designer canvas.
-
-
Create the BatchRecord_1.finish rule:
-
Select the while statement on the Business Rules tree and click rule on the Business Rules toolbar.
A new rule is added to the Business Rules tree.
-
Right-click BatchRecord_1 in the left pane of the Business Rules Designer, and click Select method to call from the context menu.
The method selection window appears.
-
Select finish() from the method selection window.
The finish method box appears.
-
-
From the editor’s toolbar, click Validate to check the Collaboration for errors.
-
Save the Project.
 To Create a Connectivity Map
The Connectivity Map provides a canvas for configuring a Project’s components.
-
In Enterprise Explorer’s Project Explorer, right-click the new Project (prjBatch_Streaming) and select New ⇒ Connectivity Map from the context menu.
The new Connectivity Map appears and a node for the new Connectivity Map is added under the Project on the Project Explorer tree labeled CMAP1.
-
Rename the Connectivity Map to cmBatch_Streaming.
 To Generate the Connectivity Map
Once your Java Collaboration Definition is completed you can use it to generate your Connectivity Map. Generating the Connectivity Map will automatically populate the canvas with the correct components and bind the components according to the information provided by the Java Collaboration Definition.
-
Drag and drop the jcdBatch_Streaming Java Collaboration Definition from the Project window to the Connectivity Map canvas.
The cmBatch_Streaming_jcdBatch_Streaming1 service is added to the canvas.
-
Click the Connectivity Map Generator icon. The Connectivity Map Generator dialog box appears listing the necessary components and bindings to generate the Connectivity Map. Click OK.
The External applications are added to the Connectivity Map and the Bindings are created. The red squares in the bindings represent the Batch Adapters. The red color indicates that the adapter properties have not been configured.
-
Save your current work.
 To Create an Environment
Environments include the External Systems, Logical Hosts, Sun Java System Application Servers and Message Servers used by a Project and contain the configuration information for these components.
-
From the NetBeans IDE, click the Services tab.
-
Right-click the Repository and select New Environment.
-
Rename the new Environment envBatch_Streaming.
-
Right-click the envBatch_Streaming Environment and select New⇒BatchInbound External System.
-
Name this External System esBatchInbound.
The esBatchInbound window is added to the Environment Editor.
-
Right-click envBatch_Streaming and select New⇒BatchFTP External System.
-
Name this External System esBatchFTP.
-
Right-click envBatch_Streaming and select New⇒BatchLocalFile External System.
-
Name the External System esBatchLocalFile.
-
Right-click envBatch_Streaming and select New⇒BatchRecord External System.
-
Name the External System esBatchRecord.
-
Right-click envBatch_Streaming and select New⇒File External System.
-
Name this External System esFile.
-
Right-click envBatch_Streaming and select New Logical Host.
The LogicalHost1 box is added to the Environment and LogicalHost1 is added to the Environment Editor tree.
-
From the Services tree, right-click LogicalHost1 and select New Sun Java System Application Server.
A new Sun Java System Application Server is added to the Services tree under LogicalHost1.
-
Save the Project.
Configuring the Adapter Properties
The prjBatch_Streaming Project uses five Adapters, each represented in the Connectivity Map as a node between an External Application and a Service.
 To Configure the BatchInbound Adapter Properties
-
From the Connectivity Map, double-click the BatchInbound Adapter.
The Adapter Properties Editor appears.
-
Modify the properties for your system, including the settings for the BatchInbound Adapter in the following table, and click OK.
BatchInbound Adapter Connectivity Map Properties
Settings - Set as directed, otherwise use the default settings
Directory Name
Your input directory
File Name
BatchInbound.txt
Note –The BatchInbound Adapter Environment properties can keep the default settings for this sample.
Configuring the BatchFTP Adapter Properties
 To Modify the BatchFTP Adapter Connectivity Map Properties
-
From the Connectivity Map, double-click the BatchFTP Adapter.
The Adapter Properties Editor appears.
-
Modify the BatchFTP Adapter Connectivity Map properties for your system, including the settings in the following table, and click OK.
BatchFTP Adapter Connectivity Map Properties
Target Location - Set as directed, otherwise use the default settings
Target Directory Name
The directory (absolute path) from which files are retrieved
Target File Name
BatchFTPIn.txt
 To Modify the BatchFTP Adapter Properties
-
From the Services tree, right-click the BatchFTP External System (esBatchFTP in this sample), and select Properties.
The Properties Editor opens to the BatchFTP Adapter Environment properties.
-
Modify the BatchFTP Adapter Environment properties for your system, including the settings in the following table, and click OK.
BatchFTP Adapter Environment Properties
FTP - Set as directed, otherwise use the default settings.
Host Name
localhost
Server Port
Port number to use to connect to the FTP server
User Name
User ID used to log into the system
Password
Password required to log into the system
 To Configure the BatchLocalFile Adapter Properties
The BatchLocalFile Adapter’s specific properties are set from the Connectivity Map. Environment properties can use the default settings.
-
Double-click the BatchLocalFile Adapter.
The Adapter Properties Editor appears.
-
Modify the properties for your system, including the settings in the following table, and click OK.
BatchLocalFile Adapter Properties
Post Transfer - Set as directed, otherwise use the default settings
Post Directory Name
X:/Batch51/ready
Post File Name
BatchLocalFileReady.txt
Target Location - Set as directed, otherwise use the default settings
Target File Name
The name of the file to be sent.
Target Directory Name
The directory on the system where files are sent.
 To Configure the BatchRecord Adapter Properties
The BatchRecord Adapter’s specific properties are set from the Connectivity Map. Environment properties can use the default settings.
-
From the Connectivity Map, double-click the BatchRecord Adapter.
The Properties Sheet opens to the Adapter Connectivity Map properties.
-
Modify the configuration for your system, including the settings in the following table.
BatchRecord Adapter Connectivity Map Properties
General Settings - Set as directed, otherwise use the default settings
Parse or Create Mode
Parse
Record - Set as directed, otherwise use the default settings
Delimiter on Last Record
Yes
Record Delimiter
\n
Record Type
Delimited
Configuring the File Adapter Properties
 To Modify the outbound File Adapter Connectivity Map properties
-
From the Connectivity Map, double-click the outbound File1 Adapter.
The Properties Editor opens to the outbound File Adapter properties.
-
Modify the configuration for your system, including the settings in the following table.
Outbound File Adapter Connectivity Map Properties
Parameter Settings - Set as directed, otherwise use the default settings
Output File Name
FileOutput%d.txt
 To Modify the File Adapter Environment properties
-
From the Services tree, right-click the esFile External System, and select Properties.
The Properties Editor opens to the File Adapter Environment properties.
-
Modify the File Adapter Environment properties for your system, including the settings in the following table, and click OK.
File Adapter Environment Properties
Parameter Settings - Set as directed, otherwise use the default settings.
Directory
The directory on the system where files are sent.
 To Create the Deployment Profile
A Deployment Profile is used to assign Collaborations and message destinations to the Sun Java System Application Server and message server. Deployment Profiles are created using the Deployment Editor.
-
From the Enterprise Explorer’s Project Explorer, right-click the Project (prjBatch_Inbound_FTPIn_LocalFileOut) and select New ⇒ Deployment Profile.
-
Enter a name for the Deployment Profile (for this Project, use dpBatch_Inbound_FTPIn_LocalFileOut).
Make sure that the selected Environment is envBatch_Inbound_FTPIn_LocalFileOut.
-
Click OK.
-
The Project’s components are automatically mapped to their respective system windows.
Note –If any of your Project components did not successfully map to an external system, open each of your Adapter’s configuration properties (Connectivity Map and Environment) and click OK to close and save the current configuration, then click Automap again.
-
Save the Project.
Creating and Starting the Domain
A domain is an instance of a Logical Host. After the domain is created, the Project is built and then deployed.
 To Create and Start the Domain
-
Navigate to your JavaCAPS6\logicalhost directory, where JavaCAPS6 is the location of your Java CAPS installation.
-
Double-click the domainmgr.bat file.
The Domain Manager appears.
-
Do one of the following:
-
If you have already created a domain, select your domain in the Domain Manager and click Start an Existing Domain.
-
If there are no existing domains, click Yes.
The Create Domain dialog box appears.
-
Make any necessary changes to the Create Domain dialog box and click Create.
-
Select the domain and click the Start an Existing Domain button.
The new domain is added to the Domain Manager.
-
-
Once your domain is started, a green check mark indicates that the domain is running.
-
Building and Deploying the Project
The Build process compiles and validates the Project’s Java files and creates the Project EAR file.
 To Build the Project
-
From the Deployment Editor toolbar, click the Build icon.
If there are any validation errors, a Validation Errors pane will appear at the bottom of the Deployment Editor and displays information regarding the errors.
-
Make any necessary corrections and click Build again.
 To Deploy the Project
-
From the Deployment Editor toolbar, click the Deploy icon.
The Deploy prompt appears.
-
Click Yes.
A message appears when the project is successfully deployed.
 To Run the Sample
To run your deployed sample Project do the following
-
From your configured input directory, paste (or rename) the sample input file to trigger the Adapter.
-
From your output directory, verify the output data.
Note –For UNIX, be sure to upload the appropriate LogicalHost
The prjBatch_Record Sample Project
The prjBatch_Record Project demonstrates the following:
-
The inbound FileIn Adapter polls the input directory periodically. When it sees the specified file, it renames the file by adding .~in to the end, and triggers the Java Collaboration.
-
The Collaboration generates a string. This string is converted into a record using BatchRecordCreate. The record is appended to the payload of BatchRecordCreate.
-
The operation in Step 2 is repeated 10 times, resulting in 10 records in the BatchRecordCreate payload.
-
The BatchRecordCreatepayload is copied to the FileOut payload.
-
The outbound FileOut Adapter writes the payload to an output file.
-
The Collaboration takes the BatchRecordCreate payload, and uses BatchRecordParse to parse the records.
-
Each parsed record is copied to the FileOut payload, and the FileOut Adapter writes the payload to the output file.
-
The operation in Step 7 is repeated until all 10 records are retrieved.
 To Create a Project
The first step is to create a new Project in the NetBeans IDE.
-
Start the NetBeans IDE
-
Click the New Project icon, or select File ⇒ New Project to initiate the New Project wizard.
-
In Step 1 of the Wizard, select CAPS ⇒ ESB from the Categories column and CAPS Repository-Based Project from the Projects column, and click Next.
-
In Step 2 of the Wizard, specify your Project Name (for this Project, use prjBatch_Record), and click Finish.
Creating a Java Collaboration Definition
The next step in the sample is to create a Java Collaboration using the Java Collaboration Definition Wizard. Once a Collaboration Definition has been created, the Business Rules of the Collaboration are written using the Collaboration Editor.
 To Create the jcdBatch_Record Collaboration
-
From the Project Explorer, right-click the prjBatch_Record Project and select New ⇒ Collaboration Definition (Java) from the context menu.
The Collaboration Definition Wizard (Java) appears.
-
Enter a Collaboration Definition name (for this Project, use jcdBatch_Record) and click Next.
-
For Step 2 of the Wizard, from the Web Services Interfaces selection window, double-click CAPS Components Library⇒Adapters⇒File⇒FileClient⇒receive.
The Name field now displays receive.
-
Click Next.
-
For Step 3 of the Wizard, from the Select OTDs selection window, double-click CAPS Components Library⇒Adapters⇒BatchAdapter⇒BatchRecord.
The BatchAdapter.BatchRecord OTD is added to the Selected OTDs field.
-
Double-click the BatchRecord_1 Instance Name and rename the instance to BatchRecord_Create.
-
From the Select OTDs selection window, double-click CAPS Components Library⇒Adapters⇒BatchAdapter⇒BatchRecord again.
Another BatchAdapter.BatchRecord OTD is added to the Selected OTDs field.
-
Double-click the BatchRecord_2 Instance Name and rename the instance to BatchRecord_Parse.
-
Click the Up One Level button to return to the Repository directory.
-
Double-click CAPS Components Library⇒Adapters⇒File⇒FileClient.
The FileClient OTD is added to the Selected OTDs field.
-
Click Finish.
The Java Collaboration Editor opens to the new Collaboration in the right pane of the NetBeans IDE.
Using the Java Collaboration Editor
The prjBatch_Record Project uses the jcdBatch_Record Collaboration created in To Create the jcdBatch_Record Collaboration. To complete the Collaboration, use the Collaboration Editor to create the Business Rules.
 To Create the jcdBatch_Record Collaboration Business Rules
Be careful to open all nodes specified in the directions to connect the correct items. The completed business appears as follows in the Java Collaboration Definition Editor's Business Rules Designer.
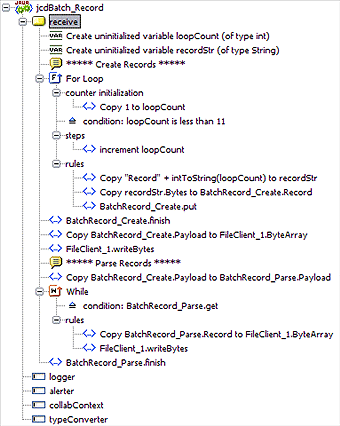
-
From the Project Explorer tree, double-click jcdBatch_Record.
The Java Collaboration Editor opens to the jcdBatch_Record Collaboration.
-
To create commentsfor the Business Rules, from the Business Rules toolbar, click the comment icon.
The Enter a Comment dialog box appears. The comment is placed on the Business Rules tree under the last selected item.
-
Enter the comment and click OK.
Once the Comment is created, it can be moved by clicking the comment and dragging it up or down the Business Rules tree to a new location.
-
Create the Create uninitialized variable loopCount (of type int) variable:
The Create uninitialized variable loopCount (of type int) rule defines a loop count integer variable
-
Create the Create uninitialized variable recordStr (of type String) variable:
The Create uninitialized variable recordStr (of type String) rule defines String called recordStr .
-
From the Business Rules toolbar, click the Local Variable icon.
The Create Variable dialog box appears.
-
Enter recordStr as the name of the variable.
-
From the Create Variable dialog box Type field, select Class and click the ellipsis (...) button.
The Class Browser dialog box appears.
-
From the Class Browser dialog box, select String in the All Classes field, and select String in the String field.
-
Click Select to close the Class Browser dialog box and click OK to close the Create Variable dialog box.
The new variable is added to the Business Rules tree.
-
-
Create the For Loop:
The For Loop and its Business Rules create ten records, each incremented by 1 (as a String). It does a put for each incremented record until the payload contains ten records.
-
From the Business Rules toolbar, click the For Loop icon.
A For Loop is added to the Business Rules tree.
-
From the Business Rules tree, select counter initialization under the For Loop.
-
From the Business Rules Designer’s Math menu, select Literal Number.
The Number literal box appears.
-
Double-click the value field of the Number literal box and enter 1 as the Literal Number value.
-
Map the 1 output node of the Number literal box to the loopCount variable in the right pane of the Business Rules Designer.
-
-
Under the For Loop, create the condition, loopCount is less than 11:
-
From the Business Rules tree, select the condition under the For Loop.
-
From the Business Rules Designer’s Comparison menu, select Less Than.
The Less Than method box appears.
-
Double-click the number2 value field of the Less Than method box and enter 11 as the value.
-
Map the loopCount variable in the left pane of the Business Rules Designer, to the number1 input node of the Less Than method box.
-
Map the result(boolean) output node of the Less Than method box, to condition variable in the right pane of the Business Rules Designer.
-
-
Under For Loop steps, create the increment loopCount rule:
-
Under For Loop rules, create the Copy "Record" + intToString(loopCount) to recordStr rule:
-
From the Business Rules tree, select rules under the For Loop.
-
Map the loopCount variable in the left pane of the Business Rules Designer, to the recordStr variable in the right pane of the Business Rules Designer.
The Number to String Conversion dialog box appears.
-
Click OK to accept the default values.
The intToString method box appears.
-
From the Business Rules Designer canvas, click the link between the result(String) output node of the intToString method box and the recordStr variable in the right pane of the Business Rules Designer.
-
With the link selected, press the Delete key to break the link.
-
From the Business Rules Designer’s String menu, select Add.
The Add method box appears.
-
Double-click the value1 value field of the Add method box and enter Record as the value.
-
Map the result(String) output node of the intToString method box, to the value2 input node of the Add method box.
-
Map the result output node of the Add method box, to the recordStr variable in the right pane of the Business Rules Designer.
-
-
Create the Copy recordStr.Bytes to BatchRecord_Create.Record rule under For loop rules:
-
Right-click the recordStr variable in the left pane of the Business Rules Designer and select Browse this type from the context menu.
The Class Browser dialog box appears.
-
From the Class Browser dialog box, select String in the All Classes field and getBytes() in the String field.
-
Click Select.
The getBytes method box appears.
-
Map the result(byte[]) output node of the getBytes method box, to Record under BatchRecord_Create in the right pane of the Business Rules Designer.
-
-
Create the BatchRecord_Create.put rule under FOR Loop rules:
-
Create the BatchRecord_Create.finish rule:
-
From the Business Rules tree, select the For Loop, and from the Business Rules toolbar click the rule icon to create a new rule.
-
Right-click BatchRecord_Create in the left pane of the Business Rules Designer, and choose Select method to call from the context menu.
The method selection window appears.
-
Select finish() from the method selection window.
The finish method box appears in the Business Rules Designer canvas.
-
-
Create the Copy BatchRecord_Create.Payload to FileClient_1.ByteArray rule:
The Copy BatchRecord_Create.Payload to FileClient_1.ByteArray sets the ByteArray of the File Adapter to the payload.
-
Create the FileClient_1.writeBytes rule:
-
Click rule on the Business Rules toolbar to add a new rule in the Business Rules pane.
-
Right-click FileClient_1 in the left pane of the Business Rules Designer, and click Select method to call from the context menu.
The method selection window appears.
-
Select writeBytes() from the method selection window.
The writeBytes method box appears.
-
-
Create the Copy BatchRecord_Create.Payload to BatchRecord_Parse.Payload rule:
The Copy BatchRecord_Create.Payload to BatchRecord_Parse.Payload rule copies the payload to the BatchRecord_Parse Adapter.
-
Create the While statement:
The While statement and its Business Rules parse the ten records and publishes each record to the File Adapter.
-
From the Business Rules toolbar, click the While icon.
A While statement is added to the Business Rules tree.
-
From the Business Rules tree, select condition under the While statement.
-
Right-click BatchRecord_Parse in the left pane of the Business Rules Designer, and click Select method to call from the context menu.
The method selection window appears.
-
Select get() from the method selection window.
The get method box appears.
-
Map the result(boolean) output node of the get method box to condition in the right pane of the Business Rules Designer.
-
-
Create the Copy BatchRecord_Parse.Record to FileClient_1.ByteArray rule under the While statement rules:
-
Create the FileClient_1.writeBytes rule under the While statement rules:
-
Click rule on the Business Rules toolbar to add a new rule in the Business Rules pane.
-
Right-click FileClient_1 in the left pane of the Business Rules Designer, and click Select method to call from the context menu.
The method selection window appears.
-
Select writeBytes() from the method selection window.
The writeBytes method box appears.
-
-
Create the BatchRecord_Parse.finish rule
-
From the Business Rules tree, select the While statement, and from the Business Rules toolbar click the rule icon to create a new rule.
-
Right-click BatchRecord_Parse in the left pane of the Business Rules Designer, and choose Select method to call from the context menu.
The method selection window appears.
-
Select finish() from the method selection window.
The finish method box appears.
-
-
From the editor’s toolbar, click Validate to check the Collaboration for errors.
-
Save the Project.
 To Create a Connectivity Map
The Connectivity Map provides a canvas for configuring a Project’s components.
-
In Enterprise Explorer’s Project Explorer, right-click the new Project (prjBatch_Record) and select New⇒Connectivity Map from the context menu.
The New Connectivity Map appears and a node for the Connectivity Map is added under the Project, on the Project Explorer tree, labeled CMap1.
-
Rename the Connectivity Map to cmBatch_Record.
 To Generate the Connectivity Map
Once your Java Collaboration Definition is completed you can use it to generate your Connectivity Map. Generating the Connectivity Map will automatically populate the canvas with the correct components and bind the components according to the information provided by the Java Collaboration Definition.
-
Drag and drop the jcdBatch_Record Java Collaboration Definition from the Project window to the Connectivity Map canvas.
The cmBatch_Record_jcdBatch_Record service is added to the canvas.
-
Click the Connectivity Map Generator icon. The Connectivity Map Generator dialog box appears listing the necessary components and bindings to generate the Connectivity Map. Click OK.
The External applications are added to the Connectivity Map and the Bindings are created. The red squares in the bindings represent the Batch Adapters. The red color indicates that the adapter properties have not been configured.
-
Save your current work.
 To Create an Environment
Environments include the External Systems, Logical Hosts, Sun Java System Application Servers and Message Servers used by a Project and contain the configuration information for these components.
-
From the NetBeans IDE, click the Services tab.
-
Right-click the Repository and select New Environment.
-
Rename the new Environment envBatch_Record.
-
Right-click the envBatch_Record Environment and select New ⇒File External System.
-
Name this External System esFile.
The esFile window is added to the Environment Editor.
-
Right-click envBatch_Record and select New⇒BatchRecord External System.
-
Name this External System esBatchRecord.
-
Right-click envBatch_Record and select New Logical Host.
The LogicalHost1 box is added to the Environment and LogicalHost1 is added to the Environment Editor tree.
-
From the Services tree, right-click LogicalHost1 and select New⇒Sun Java System Application Server.
A new Sun Java System Application Server is added to the Services tree under LogicalHost1.
-
Save the Project.
Configuring the Adapter Properties
The prjBatch_Record Project uses four Adapters, each represented in the Connectivity Map as a node between an External Application and a Service.
 To Configure File Adapter Connectivity Map Properties
The inbound File Adapter properties are set from the Project Explorer’s Connectivity Map.
-
Double-click the inbound FileIn1 Adapter, located between the FileIn1 External Application and the jcdBatch_Record1 service.
The Properties Editor opens to the inbound File Adapter properties.
-
Modify the configuration for your system, including the settings in the following table.
Inbound File Adapter Connectivity Map Properties
Parameter Settings - Set as directed, otherwise use the default settings
Input File Name
FileInput.txt
-
From the Connectivity Map, modify the outbound FileOut1 Adapter configuration for your system, including the settings in the following table.
Outbound File Adapter Connectivity Map Properties
Parameter Settings - Set as directed, otherwise use the default settings
Output File Name
FileOutput.txt
 To Modify the File Adapter Environment properties
-
From the Services tree, right-click the esFile External System, and select Properties.
The Properties Editor opens to the File Adapter Environment properties.
-
Modify the File Adapter Environment properties for your system, including the settings in the following table, and click OK.
File Adapter Environment Properties
Inbound File⇒Parameter Settings - Set as directed, otherwise use the default settings.
Directory
An input directory on your system that the inbound File Adapters poll and pick up any specified input files.
Outbound File Adapter⇒Parameter Settings - Set as directed, otherwise use the default settings.
Directory
An output directory to which the outbound File Adapter publishes (writes) the output messages.
 To Configure the BatchRecord Adapter Properties
The BatchRecord_Create Adapter’s specific properties are set from the Connectivity Map.
-
Modify the BatchRecordCreate Adapter Connectivity Map properties.
-
From the Connectivity Map, double-click the Adapter.
The Properties Sheet opens to the Adapter’s Connectivity Map properties.
-
Modify the configuration for your system, including the settings in the following table.
BatchRecordCreate Adapter Connectivity Map Properties
General Settings - Set as directed, otherwise use the default settings
Parse or Create Mode
Create
Record - Set as directed, otherwise use the default settings
Delimiter on Last Record
No
Record Delimiter
~
Record Type
Delimited
-
 To Modify the BatchRecordParse Adapter Connectivity Map properties
-
From the Connectivity Map, double-click the BatchRecordParse Adapter.
The Properties Editor opens to the Adapter’s Connectivity Map properties.
-
Modify the configuration for your system, including the settings in the following table.
BatchRecordParse Connectivity Map Properties
General Settings - Set as directed, otherwise use the default settings
Parse or Create Mode
Parse
Record - Set as directed, otherwise use the default settings
Delimiter on Last Record
No
Record Delimiter
~
Record Type
Delimited
 To Modify the BatchRecord Adapter Environment properties
The BatchRecordCreate and BatchRecordParse Adapters share the same Environment Properties. The default BatchRecord Adapter Environment property settings can be used for this Project, but they must be accepted.
-
From the Services tree, right-click the esBatchRecord External System, and select Properties.
The Properties Editor opens to the BatchRecord Adapter Environment properties.
-
Click OK to accept the default settings and close the Properties Editor.
-
Save the current changes to your Repository.
 To Create the Deployment Profile
A Deployment Profile is used to assign Collaborations and message destinations to the Sun Java System Application Server and message server. Deployment Profiles are created using the Deployment Editor.
-
From the Enterprise Explorer’s Project Explorer, right-click the Project (prjBatch_Record) and select New ⇒ Deployment Profile.
-
Enter a name for the Deployment Profile (for this sample dpBatch_Record).
Make sure that the selected Environment is envBatch_Record .
-
Click OK.
-
Click Automap.
The Project’s components are automatically mapped to their respective system windows.
Note –If any of your Project components did not successfully map to an external system, open each of your Adapter’s configuration properties (Connectivity Map and Environment) and click OK to close and save the current configuration, then click Automap again.
-
Save the Project.
Creating and Starting the Domain
A domain is an instance of a Logical Host. After the domain is created, the Project is built and then deployed.
 To Create and Start the Domain
-
Navigate to your JavaCAPS6\logicalhost directory, where JavaCAPS6 is the location of your Java CAPS installation.
-
Double-click the domainmgr.bat file.
The Domain Manager appears.
-
Do one of the following:
-
If you have already created a domain, select your domain in the Domain Manager and click Start an Existing Domain.
-
If there are no existing domains, click Yes.
The Create Domain dialog box appears.
-
Make any necessary changes to the Create Domain dialog box and click Create.
-
Select the domain and click the Start an Existing Domain button
The new domain is added to the Domain Manager.
-
-
Once your domain is started, a green check mark indicates that the domain is running.
-
Building and Deploying the Project
The Build process compiles and validates the Project’s Java files and creates the Project EAR file.
 To Build the Project
-
From the Deployment Editor toolbar, click the Build icon.
If there are any validation errors, a Validation Errors pane will appear at the bottom of the Deployment Editor and displays information regarding the errors.
-
Make any necessary corrections and click Build again.
 To Deploy the Project
-
From the Deployment Editor toolbar, click the Deploy icon.
The Deploy prompt appears.
-
Click Yes.
A message appears when the project is successfully deployed.
 To Run the Sample
To run your deployed sample Project do the following
-
From your configured input directory, paste (or rename) the sample input file to trigger the Adapter.
-
From your output directory, verify the output data.
Note –For UNIX, be sure to upload the appropriate LogicalHost.
The prjBatch_Secure Project
This topic provides an overview of the prjBatch_Secure Project, and describes how to run the imported sample.
The prjBatch_Secure Project contains three scenarios that employ three Batch OTDS to enable SSL or SSH secure file transfers.
The prjBatch_Secure Project Components
TheprjBatch_Secure Project uses four External Applications, seven component Adapters, and three Java Collaborations.
The Sun Adapter for Batch performs the following functions
-
The inbound File Adapters, FileIn_BatchFTPOverSSL, FileIn_BatchSFTP, and FileIn_BatchSCP, act as triggers for the Project. The File Adapters poll an external directory for a specific input file. When the input file is present, the File Adapter triggers the Collaboration.
-
BatchFTPOverSSL is used by the Collaboration to:
-
get files from a remote directory and publish them to a local directory
-
get files from a local directory and publish them to the remote directory
-
download files from the remote directory to a local directory
-
upload files from a local directory to a remote directory
-
create and list remote directories
-
delete remote directories and list the results
These functions can be seen in the jcdBatchFTPOverSSL Java Collaboration Definition.
-
-
BatchSFTP is used by the Collaboration to:
-
get files from a remote directory and publish them to a local directory
-
create a new remote directory
-
change directories to the new directory and publish a file to that directory
-
rename the published file
-
delete an unwanted file from the remote directory
These functions can be seen in the jcdBatchSFTP Java Collaboration Definition.
-
-
BatchSCP is used by the Collaboration to:
-
recursively get a file from the remote directory and publish the file to a local directory
-
recursively put a file from the local directory to a remote directory
These functions can be seen in the jcdBatchSCP Java Collaboration Definition.
-
The prjBatch_Secure Project Collaboration Definitions
The prjBatch_Secure Project includes three Java Collaborations, one for each of the three scenarios provided in the cmBatch_Secure Connectivity Map. The jcdBatchFTPOverSSL, jcdBatchSCP, and jcdBatchSFTP Java Collaboration Definitions are each created using the Collaboration Definition Wizard (Java).
 To Create the jcdBatchFTPOverSSL
Java Collaboration
-
From the Project Explorer, right-click the prjBatch_Secure Project and select New⇒Collaboration Definition (Java) from the context menu.
The Java Collaboration Definition Wizard appears.
-
Enter a Collaboration Definition name (for this Project, use jcdBatchFTPOverSSL) and click Next.
-
For Step 2 of the Wizard, from the Web Services Interfaces selection window, double-click CAPS Components Library⇒Adapters⇒File⇒FileClient⇒receive.
The Name field now displays receive.
-
Click Next.
-
For Step 3 of the Wizard, from the Select OTDs selection window, double-click CAPS Components Library⇒Adapters⇒BatchAdapter⇒BatchFTPOverSSL.
The jcdBatchFTPOverSSL OTD is added to the Selected OTDs field.
-
Click the Up One Level button to return to the Repository directory.
-
Double-click CAPS Components Library ⇒ Adapters ⇒ File ⇒ FileClient.
The FileClient OTD is added to the Selected OTDs field.
-
Click Finish.
The Java Collaboration Editor opens to the new Collaboration in the right pane of the NetBeans IDE.
 To Create the jcdBatchSCP Java Collaboration
-
To create the jcdBatchSCP Collaboration, follow the procedures in the To Create the jcdBatchFTPOverSSL Java Collaboration, replacing the Collaboration name with jcdBatchSCP, and selecting only the BatchSCP OTD for Step 4 of the Wizard.
 To Create the jcdBatchSFTP Java Collaboration
-
To create the jcdBatchSFTP Collaboration, follow the procedures in the To Create the jcdBatchFTPOverSSL Java Collaboration, replacing the Collaboration name with jcdBatchSFTP, and selecting only the BatchSFTP OTD for Step 4 of the Wizard.
Collaboration Business Rules
The Java Collaboration Business Rules for the Project are separated into three Java Collaborations as seen from the Java Collaboration Editor: jcdBatchFTPOverSSL, jcdBatchSCP, and jcdBatchSFTP. The following images display the business rules for each of the Java Collaboration Definitions along with the Java source code.
jcdBatchFTPOverSSL Business Rules
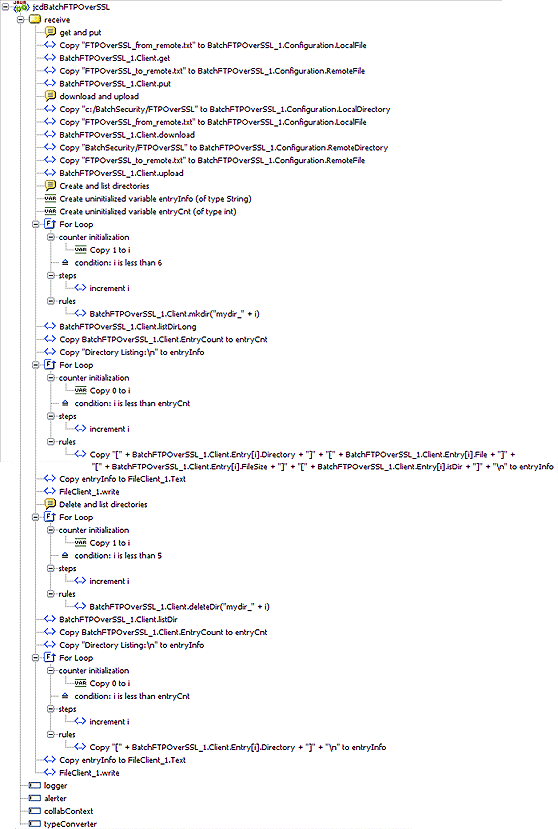
jcdBatchFTPOverSSL Java Source File
package prBatch_Secure;


public class jcdBatchFTPOverSSL
{

    public com.stc.codegen.logger.Logger logger;

    public com.stc.codegen.alerter.Alerter alerter;

    public com.stc.codegen.util.CollaborationContext collabContext;

    public com.stc.codegen.util.TypeConverter typeConverter;

    public void receive( com.stc.connector.appconn.file.FileTextMessage
input, com.stc.connector.batchadapter.appconn.ftps.FTPOverSSL
BatchFTPOverSSL_1,com.stc.connector.appconn.file.FileApplication FileClient_1 )
        throws Throwable
    {
        // get and put
        BatchFTPOverSSL_1.getConfiguration().setLocalFile(
"FTPOverSSL_from_remote.txt" );
        BatchFTPOverSSL_1.getClient().get();
        BatchFTPOverSSL_1.getConfiguration().setRemoteFile(
"FTPOverSSL_to_remote.txt" );
        BatchFTPOverSSL_1.getClient().put();
        // download and upload
        BatchFTPOverSSL_1.getConfiguration().setLocalDirectory(
"c:/BatchSecurity/FTPOverSSL" );
        BatchFTPOverSSL_1.getConfiguration().setLocalFile(
"FTPOverSSL_from_remote.txt" );
        BatchFTPOverSSL_1.getClient().download();
        BatchFTPOverSSL_1.getConfiguration().setRemoteDirectory(
"BatchSecurity/FTPOverSSL" );
        BatchFTPOverSSL_1.getConfiguration().setRemoteFile(
"FTPOverSSL_to_remote.txt" );
        BatchFTPOverSSL_1.getClient().upload();
        // Create and list directories
        String entryInfo;
        int entryCnt;
        for (int i = 1; i < 6; i++) {
            BatchFTPOverSSL_1.getClient().mkdir( "mydir_" + i );
        }
        BatchFTPOverSSL_1.getClient().listDirLong();
        entryCnt = BatchFTPOverSSL_1.getClient().getEntryCount();
        entryInfo = "Directory Listing:\n";
        for (int i = 0; i < entryCnt; i++) {
            entryInfo = "[" + BatchFTPOverSSL_1.getClient().getEntry(
i ).getDirectory() + "]" + "[" + BatchFTPOverSSL_1.getClient().getEntry(
i ).getFile() + "]" + "[" + BatchFTPOverSSL_1.getClient().getEntry( i ).
getFileSize() + "]" + "[" + BatchFTPOverSSL_1.getClient().getEntry(
i ).isDir() + "]" + "\n";
        }
        FileClient_1.setText( entryInfo );
        FileClient_1.write();
        // Delete and list directories
        for (int i = 1; i < 5; i++) {
            BatchFTPOverSSL_1.getClient().deleteDir( "mydir_" + i );
        }
        BatchFTPOverSSL_1.getClient().listDir();
        entryCnt = BatchFTPOverSSL_1.getClient().getEntryCount();
        entryInfo = "Directory Listing:\n";
        for (int i = 0; i < entryCnt; i++) {
            entryInfo = "[" + BatchFTPOverSSL_1.getClient().getEntry(
i ).getDirectory() + "]" + "\n";
        }
        FileClient_1.setText( entryInfo );
        FileClient_1.write();
    }

}
|
jcdBatchSCP Business Rules

jcdBatchSCP Java Source File
package prBatch_Secure;


public class jcdBatchSCP
{

    public com.stc.codegen.logger.Logger logger;

    public com.stc.codegen.alerter.Alerter alerter;

    public com.stc.codegen.util.CollaborationContext collabContext;

    public com.stc.codegen.util.TypeConverter typeConverter;

    public void receive( com.stc.connector.appconn.file.FileTextMessage input,
com.stc.connector.batchadapter.appconn.scp.SCP BatchSCP_1 )
        throws Throwable
    {
        // recursive get and put
        BatchSCP_1.getConfiguration().setLocalDirectory( "C:/BatchSecurity/SCP" );
        BatchSCP_1.getConfiguration().setLocalFile( "recursive" );
        BatchSCP_1.getClient().getRecursive();
        BatchSCP_1.getConfiguration().setRemoteDirectory( "BatchSecurity/SCP" );
        BatchSCP_1.getConfiguration().setRemoteFile( "recursive" );
        BatchSCP_1.getClient().putRecursive();
    }

}
|
jcdBatchSFTP Business Rules
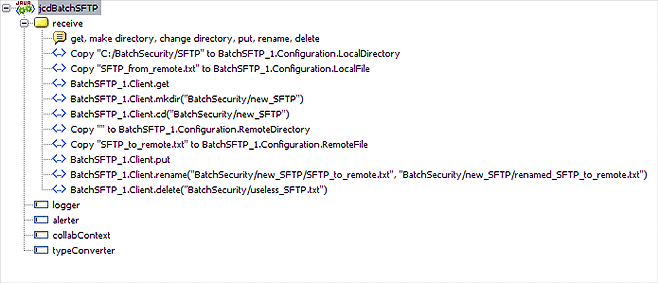
jcdBatchSFTP Java Source File
package prBatch_Secure;


public class jcdBatchSFTP
{

    public com.stc.codegen.logger.Logger logger;

    public com.stc.codegen.alerter.Alerter alerter;

    public com.stc.codegen.util.CollaborationContext collabContext;

    public com.stc.codegen.util.TypeConverter typeConverter;

    public void receive( com.stc.connector.appconn.file.FileTextMessage input,
com.stc.connector.batchadapter.appconn.sftp.SFTP BatchSFTP_1 )
        throws Throwable
    {
        // get, make directory, change directory, put, rename, delete
        BatchSFTP_1.getConfiguration().setLocalDirectory( "C:/BatchSecurity/SFTP" );
        BatchSFTP_1.getConfiguration().setLocalFile( "SFTP_from_remote.txt" );
        BatchSFTP_1.getClient().get();
        BatchSFTP_1.getClient().mkdir( "BatchSecurity/new_SFTP" );
        BatchSFTP_1.getClient().cd( "BatchSecurity/new_SFTP" );
        BatchSFTP_1.getConfiguration().setRemoteDirectory( "" );
        BatchSFTP_1.getConfiguration().setRemoteFile( "SFTP_to_remote.txt" );
        BatchSFTP_1.getClient().put();
        BatchSFTP_1.getClient().rename( "BatchSecurity/new_SFTP/SFTP_to_remote.txt",
"BatchSecurity/new_SFTP/renamed_SFTP_to_remote.txt" );
        BatchSFTP_1.getClient().delete( "BatchSecurity/useless_SFTP.txt" );
    }

}
|
Completing the prjBatch_Secure Project
Import the prjBatch_Secure Project described in To Import a Non-JBI Based Sample Project. After the sample Project has been imported and appears in your Project Explorer tree, create the Project’s Environment.
 To Create an Environment
Environments include the External Systems, Logical Hosts, Sun Java System Application Servers and Message Servers used by a Project and contain the configuration information for these components.
-
From the NetBeans IDE click the Services tab.
-
Right-click the Repository and select New Environment.
A new Environment is added to the Services tree.
-
Rename the new Environment to envBatch_Secure.
-
Right-click envBatch_Secure and select New⇒BatchFTPOverSSL External System.
-
Name this External System esBatchFTPOverSSL.
The esBatchFTPOverSSL window is added to the Environment Editor.
-
Right-click envBatch_Secure and select New⇒BatchSCP External System.
-
Name this External System esBatchSCP.
The esBatchSCP window is added to the Environment Editor.
-
Right-click envBatch_Secure and select New⇒BatchSFTP External System.
-
Name this External System esBatchSFTP.
The esBatchSFTP window is added to the Environment Editor.
-
Right-click envBatch_Secure and select New⇒File External System.
-
Name the External System esFile and click OK.
The esFile window is added to the Environment Editor.
-
Right-click envBatch_Secure and select New⇒Logical Host.
The LogicalHost1 box is added to the Environment and LogicalHost1 is added to the Environment Editor tree.
-
From the Services tree, right-click LogicalHost1 and select New⇒Sun Java System Application Server.
A new Sun Java System Application Server is added to the Services tree under Localhost1.
-
Save the Project.
Configuring the Adapter Properties
The prjBatch_Secure Project uses seven component Adapters, each represented in the Connectivity Map as a node between an External Application and the Service.
 To Configure the File Adapter Connectivity Map properties
-
From the Connectivity Map, double-click the inbound FileIn_BatchFTPOverSSL Adapter between the FileIn_BatchFTPOverSSL External Application and the jcolBatchFTPOverSSL1 service.
The Properties Editor opens to the inbound File Adapter properties.
-
Modify the configuration for your system, including the settings in the following table.
Inbound File Adapter Connectivity Map Properties
Parameter Settings - Set as directed, otherwise use the default settings
Input File Name
FileIn_BatchFTPOverSSL.txt
-
From the Connectivity Map, modify the inbound FileIn_BatchSFTP Adapter between the FileIn_BatchSFTP External Application and the jcolBatchSFTP1 service.
See the following table.
Inbound File Adapter Connectivity Map Properties
Parameter Settings - Set as directed, otherwise use the default settings
Input File Name
FileIn_BatchSFTP.txt
-
From the Connectivity Map, modify the inbound FileIn_BatchSCP Adapter between the FileIn_BatchSCP External Application and the jcolBatchSCP1 service.
See the following table.
Inbound File Adapter Connectivity Map Properties
Parameter Settings - Set as directed, otherwise use the default settings
Input File Name
FileIn_BatchSCP.txt
-
From the Connectivity Map, modify the Outbound FileOut_BatchFTPOverSSL Adapter between the FileOut_BatchFTPOverSSL External Application and the jcolBatchFTPOverSSL1 service.
See the following table.
Outbound File Adapter Connectivity Map Properties
Parameter Settings - Set as directed, otherwise use the default settings
Output File Name
FileOut_BatchFTPOverSSL.dat
 To Modify the File Adapter Environment properties
-
From the Services tree, right-click the esFile External System, and select Properties.
The Properties Editor opens to the File Adapter Environment properties.
-
Modify the File Adapter Environment properties for your system, including the settings in the following table, and click OK.
File Adapter Environment Properties
Inbound File Adapter ⇒ Parameter Settings - Set as directed, otherwise use the default settings.
Directory
An input directory on your system that the inbound File Adapters poll and pick up any specified input files.
Outbound File Adapter ⇒ Parameter Settings - Set as directed, otherwise use the default settings.
Directory
An output directory to which the outbound File Adapter publishes (writes) the output messages.
 To Modify the Batch/FTP Adapter Connectivity Map Properties
-
From the Connectivity Map, double-click the BatchFTPoverSSL1 Adapter, located between the BatchFTPOverSSL1 External Application and the jcolBatchFTPOverSSL1 service.
The Adapter Properties Editor appears.
-
Modify the BatchFTPoverSSL Adapter Connectivity Map properties for your system, including the settings in the following table, and click OK.
BatchFTPoverSSL Adapter Connectivity Map Properties
FTP and SSL Settings - Set as directed, otherwise use the default settings
Local Directory
The local directory name and path for files that are sent to or received from a remote system. The default is X:/Batch51
Target File Name
The name of the remote file.
 To Modify the BatchFTPoverSSL Adapter Environment Properties
-
From the Services tree, right-click the BatchFTPoverSSL External System (in this Project, esBatchFTPoverSSL ), and select Properties.
The Properties Editor opens to the BatchFTPoverSSL Adapter Environment properties.
-
Modify the BatchFTPoverSSL Adapter Environment properties for your system, including the settings in the following table, and click OK.
BatchFTPoverSSL Adapter Environment Properties
FTP and SSL Settings - Set as directed, otherwise use the default settings.
Host Name
Host name or IP of the FTP server
Server Port
Port number to use to connect to the FTP server
User Name
User ID used to log into the system
Password
Password required to log into the system
Configure the Adapter properties for your system.
 To Create the Sample Directories
The prjBatch_Secure sample Project uses a number of directories.
-
Create the directories associated with Adapter configuration properties:
-
Target Directory (Inbound File Adapter Environment Properties):
Select a name for your target directory.
-
Output Directory (Outbound File Adapter Environment Properties):
Select a name for your output directory.
Create these directories on your system, or change the properties to reference your existing directories.
-
 To Create the Deployment Profile
A Deployment Profile is used to assign Collaborations and message destinations to the Sun Java System Application Server and message server. Deployment profiles are created using the Deployment Editor.
-
From the Enterprise Explorer’s Project Explorer, right-click the Project (prjBatch_Secure) and select New⇒Deployment Profile.
-
Enter a name for the Deployment Profile (for this sample dpBatch_Secure).
-
Make sure that the selected Environment is envBatch_Secure and click OK.
-
Click Automap.
The Project’s components are automatically mapped to their respective system windows.
Note –If any of your Project components did not successfully map to an external system, open each of your Adapter’s configuration properties (Connectivity Map and Environment) and click OK to close and save the current configuration, then click Automap again.
-
Save the Project.
Creating and Starting the Domain
A domain is an instance of a Logical Host. After the domain is created, the Project is built and then deployed.
 To Create and Start the Domain
-
Navigate to your JavaCAPS6\logicalhost directory, where JavaCAPS6 is the location of your Java CAPS installation.
-
Double-click the domainmgr.bat file.
The Domain Manager appears.
-
Do one of the following:
-
If you have already created a domain, select your domain in the Domain Manager and click Start an Existing Domain.
-
If there are no existing domains, click Yes.
The Create Domain dialog box appears.
-
Make any necessary changes to the Create Domain dialog box and click Create.
-
Select the domain and click the Start an Existing Domain button
The new domain is added to the Domain Manager.
-
-
Once your domain is started, a green check mark indicates that the domain is running.
-
Building and Deploying the Project
The Build process compiles and validates the Project’s Java files and creates the Project EAR file.
 To Build the Project
-
From the Deployment Editor toolbar, click the Build icon.
If there are any validation errors, a Validation Errors pane will appear at the bottom of the Deployment Editor and displays information regarding the errors.
-
Make any necessary corrections and click Build again.
 To Deploy the Project
-
From the Deployment Editor toolbar, click the Deploy icon.
The Deploy prompt appears.
-
Click Yes.
A message appears when the project is successfully deployed.
 To Run the Sample
To run your deployed sample Project do the following
- © 2010, Oracle Corporation and/or its affiliates
