| Sun ONE Identity Synchronization for Windows Installation and Configuration Guide |
Chapter 4
Resource ConfigurationThis chapter provides procedures for configuring the Identity Synchronization for Windows core server using the console. Perform these procedures immediately after installing the Identity Synchronization for Windows core as described in Chapter 3, "Core Installation". Use these procedures to add or modify resources within your network.
Note
Core configuration may also be accomplished by using the idsync importcnf command. For information on creating XML configuration files and importing configurations see the "Using importcnf".
Upon completion of initial core configuration, use the setup program to install Identity Synchronization for Windows connectors following procedures found in the Chapter 5, "Connector and Subcomponent Installation".
The procedures in this section presume that the administrator is knowledgeable about Sun ONE Directory Server and Active Directory configuration and operation.
This chapter contains the following sections:
Initial Core ConfigurationAll initial configuration steps use the Identity Synchronization for Windows console. Perform these steps to initially configure the Identity Synchronization for Windows core:
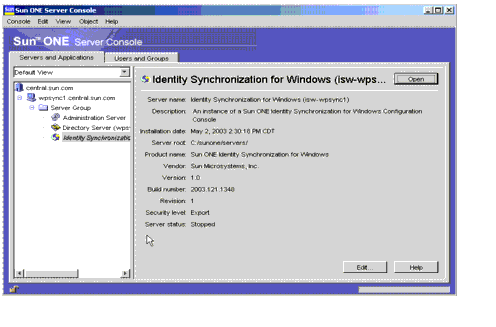
Open the Appropriate Identity Synchronization for Windows Console
Access the Identity Synchronization for Windows Console following these procedures:
- Open the Sun ONE Console application by using the appropriate option:
- Authenticate yourself to the configuration directory.
- User ID. Type the administrator ID you specified when you installed Administration Server on your machine. You installed Administration Server when you installed your first Sun ONE server or as a part of Identity Synchronization for Windows installation.
- Password. Type the administrator password that you specified when you installed Administration Server on your computer.
- Administration URL. This field should show the URL of the Administration Server. If it doesn’t or if it doesn’t have the URL of Administration Server that you want, type the URL in this field. The URL is based on the computer host name and the Administration Server port number you chose when you installed Administration Server. Use this format:
http://hostname.your_domain.domain:port_number
For example, if your domain name is example.com and you installed Administration Server on a host machine called myHost and specified port number 390, the URL would look like this: http://myHost.example.com:390
- Click OK.
The Sun ONE Console appears with a list of all the servers and resources under your control.
- Expand the hostname that contains the server group to which the Identity Synchronization for Windows instance belongs.
- Expand the Server Group node, select the entry that corresponds to the desired Identity Synchronization for Windows instance, and click Open.
- Enter the configuration password that was specified during core installation. (See Core Installation).
The Identity Synchronization for Windows Console opens.
- Press the Configuration tab.
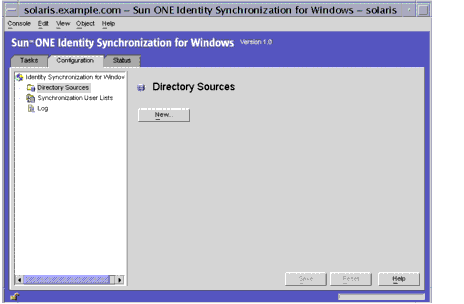
Creating Directory Sources
Sun ONE Directory Source
- If you would like to create a new Sun ONE directory source press the top New button and select Sun Directory source from the drop-down list.
- This invokes the directory sources creation wizard.
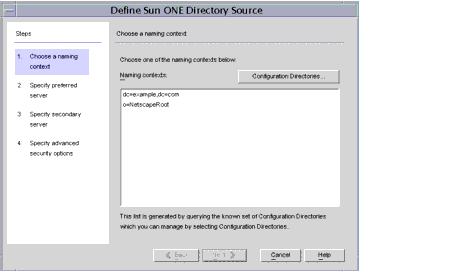
This queries the list of configuration directory sources to find out what other directories exist and displays them. You may also select Configuration Directories to in order to specify additional references to configuration directories in your enterprise. This wizard queries the specified configuration directories in the discovery of naming contexts and directory servers in an enterprise.
- Select the naming context (fully qualified distinguished name) of the desired Sun directory source and press Next.
If you do not see the naming context where identity entries which you are interested in synchronizing identities exist, select Configuration Directories as noted in the previous step.
Sun ONE Directory Server creates a naming context whose prefix corresponds to the components of the machine’s DNS domain entry. It uses the following suffix:
dc=your_machine’s_DNS_domain_name.
That is, if your machine domain is example.com, then you should configure the suffix dc=example, dc=com for your server. The entry named by the chosen suffix must already exist in the directory.
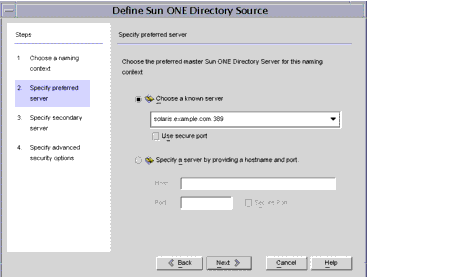
- Designate a preferred Directory Server from the drop-down list or specify the desired preferred server by hostname and port. Press Next.
Check the Use Secure Port box if you want secure SSL communication. If SSL is enabled, then there are additional setup requirements. See Configuring Security for more information. Press Next.
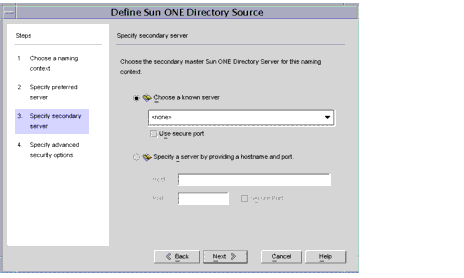
- If desired, designate a secondary Directory Server from the drop-down list or specify the desired master server by hostname and port. Press Next.
Note
You should not use the same hostname and port for both the preferred and the secondary server in a Sun Directory Source.
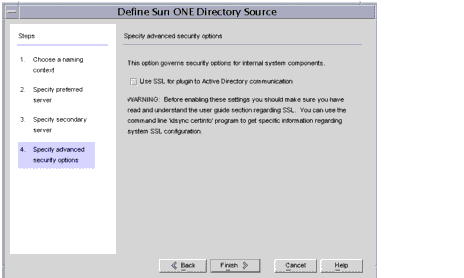
- Specify any advanced security options. Check the appropriate box if you want secure SSL communication for plugin to Active Directory communication.
Note
If SSL is enabled, then there are additional setup requirements. See Configuring Security for more information.
If your primary and secondary Directory Servers are part of a Multi-Master Replication (MMR) deployment, refer to Installation Notes for Replicated Environments for more instructions.
- Press Finish.
Your selection is added to the topology tree under Directory Sources and a summary window of configuration information appears. Review your choices, and, if necessary, press Edit Servers to make any changes.
- Repeat these procedures to add all Sun ONE directory sources in your network.
Active Directory Source
Perform the following steps if there are Windows Active Directory servers in you network:
- Select the Directory Sources node in the navigation tree.
- Press the top New button and select Active Directory source from the drop-down list.
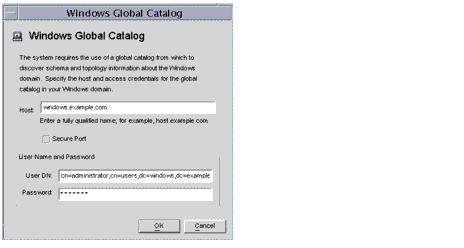
The Windows Global Catalog window appears if a Global catalog has not been already configured.
- Enter the Host name of the system containing the Windows Global Catalog.
- Enter the complete User distinguished name of the administrator; for example:
cn=administrator,cn=users,dc=example,dc=com
- Enter the administrator password and press OK.
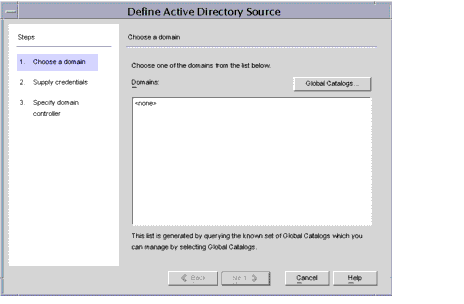
- The Define Active Directory Source wizard appears.
This wizard queries the Active Directory global catalog to find out what other domains exist and displays them. You may also select Global Catalogs to specify or create a different domain and credentials.
- Select the desired domain controller and press Next.
Note
You cannot use the same hostname and port for an Active Directory Source’s domain controller and for a preferred or secondary server in a Sun Directory Source.
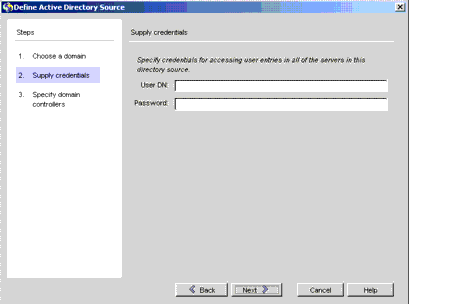
- Enter the complete User distinguished name of the administrator; for example:
cn=administrator,cn=users,dc=example,dc=com
- Enter the administrator password and press Next.
When configuring an Active Directory source, the administrator must provide a user name and password for the Active Directory user that the connector will use to connect to Active Directory. The user’s minimum rights will depend on the direction of synchronization, as follows:
- If you are configuring synchronization flow from Active Directory to Directory Server only, then the user provided for the Active Directory connector does not require many special privileges. A normal user with the extra privilege to “Read All Properties” in the domain being synchronized will suffice.
- If you are configuring synchronization flow from Directory Server to Active Directory, then the connector user must have more privileges because synchronization changes user entries in Active Directory. In this setup, the connector user must have either the “Full Control” privilege or be a member of the Administrators group.
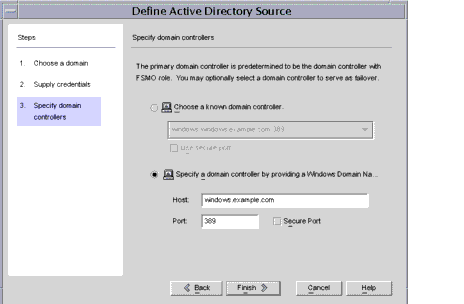
- Select the desired domain controller from the drop-down list or press the radio button, Specify a domain controller by providing a Window Domain name and port. Specify a host and port number.
- Check the Use secure port box if you want secure SSL communication. Press Finish.
Note
The installer automatically installs the CA certificate in the Active Directory connector if you are using Microsoft certificate server. If you are not then you must manually add the CA certificate in the Active Directory connector (see Enabling SSL in the Active Directory Connector). If you change your flow settings after initial configuration these procedures apply as well.
Your selection is added to the navigation tree under Directory Sources and a summary window of configuration information appears. Review your choices, and if necessary, press Edit Controller to make changes.
- Add an Active Directory source for each Windows domain in your network.
NT SAM Directory Source
If deploying Identity Synchronization for Windows on NT platforms designate the NT SAM Directory source as follows:
- Select the Directory Sources node in the navigation tree.
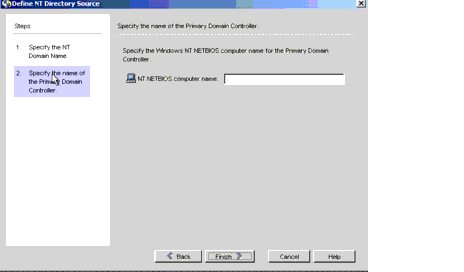
- Press the top New button and select NT SAM Directory source from the drop-down list. The Define NT Directory Source wizard appears.
- Enter the unique NT domain name for the NT directory source. Press Next.
This information can be determined from your NT host by right-clicking Network Neighborhood>Properties>Identification.
- Enter the NT NETBIOS computer name for the preferred NT directory source. Press Finish.
This information can be determined from your NT host by right-clicking Network Neighborhood>Properties>Identification.
Your selection is added to the navigation tree under Directory Sources and a configuration window appears. Review your choices, press Edit to make changes.
- Add an NT directory source for each Windows NT machine in your network.
Deleting Directory Sources
If you must delete a directory source, use the following steps:
- Before you can delete the directory source, you must first delete all of the Synchronized User Lists associated with that source.
- Right-click on the directory source name listed under the Directory Sources node in the topology tree.
- When the pop-up menu displays, select Delete to remove the directory source.
Setting Attribute Modification Flow
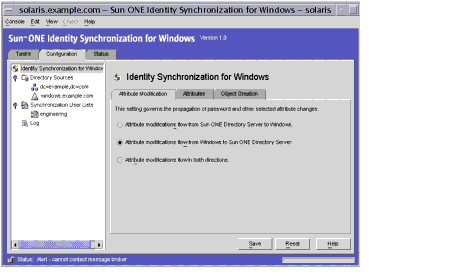
- Select Identity Synchronization for Windows at the highest level in the topology tree. Press the Attribute Modification tab.
There are three choices for how password and other specified user attributes flow between systems changes flow between systems:
- Attribute Modifications flow from the Sun ONE Directory Server to Windows. Select this if you wish user password changes made in the Sun ONE Directory Server environment to propagate to Windows servers.
- Attribute Modifications flow from Windows to Sun ONE Directory Server. (Default) Select this if you wish user password changes made in the Windows environment to propagate to Sun ONE Directory Servers.
- Attribute Modifications flow in both directions. Select this if you wish user password changes made in either environment to propagate to the other.
- Select the desired modification flow.
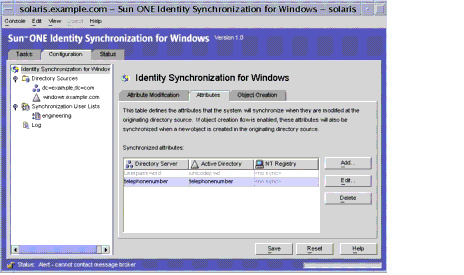
Setting the Modification Attribute Mapping
Based on the chosen object class, a series of attributes are available for both Directory Server and Active Directory. These chosen attributes will be synchronized. Using procedures in this section, select the desired properties under Active Directory and an equivalent attribute will display under Directory Server.
The user selects one-to-one mappings of the user entry attributes that ought to be synchronized between the Sun ONE Directory Server and the Windows Active Directory and NT environments. There is a default list of attributes provided (minimum set required to sync password).
- Select Identity Synchronization for Windows at the top of the topology tree.
- Press the Attributes tab.
- Press Add.
The Sun ONE User Object Class dialog box appears.
- From the drop-down menu, choose the desired user object class that will be used in the Sun ONE scheme. Click OK.
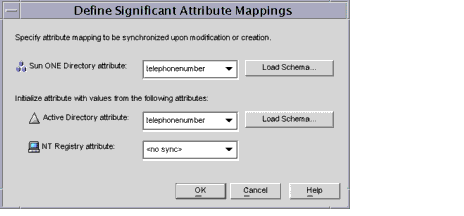
The Define Significant Attribute Mapping window appears.
Note
Note that the drop-down lists show <no sync> and are inactive. The attribute lists are disabled until the schema has been loaded.
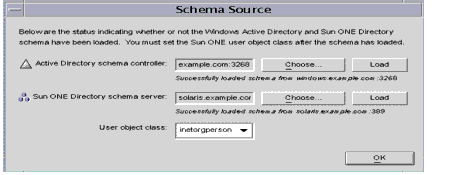
- Press Load Schema.
The Schema Source window appears.
- If necessary, press the Choose button next to the missing directory schema controller.
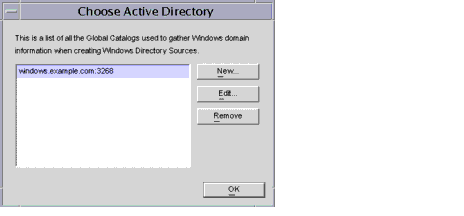
If you press the choose button for the Active Directory schema controller, the Choose Active Directory Schema Host window appears.
If you press the choose button for the sun ONE schema controller, the Choose Sun ONE Directory Schema Host window appears. Step 7 through Step 9 are the same for both Active Directory and Sun ONE Schema.
- Select the desired Active Directory instance and press OK.
- At Schema Source window select the desired User object class from the drop-down list. Press OK.
- At the Define Significant Attributes Mappings window select the desired value from the Sun ONE Directory attribute drop-down list.
- Select the desired value from the Active Directory or NT SAM Registry attribute drop-down list.
- Press OK.
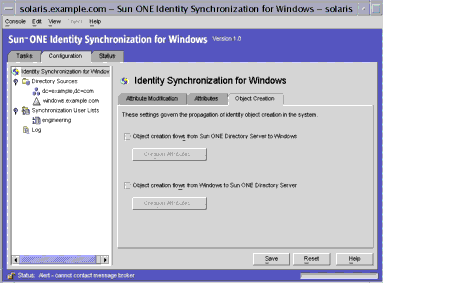
Setting Object Creation Flow and Attribute Mapping
- Press the Object Creation tab.
There are two choices for how newly created users can propagate between systems:
- Object creation flows from Sun ONE Directory Server to Windows. Select this if you wish users created in the Sun ONE Directory Server environment and have them propagate to Windows Active Directory servers.
- Object creation flows from Windows to Sun ONE Directory Server. Select this if you wish users created in the Windows Active Directory environment and have them propagate to the Sun ONE Directory Server.
- Select the desired creation flow.
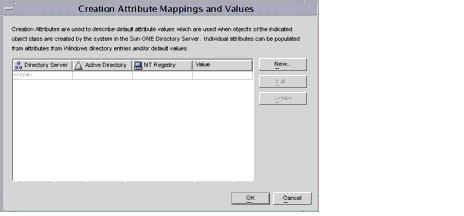
- Press the Creation Attributes under the selected creation flow.
The Creation Attribute Mappings and Values window appears. The following procedure is for object creation flows from Windows to Sun ONE Directory Server. Creation flow from Sun ONE Directory Server to Windows is done in a similar manner.
Note
In order to satisfy schema constraints regarding required attributes for user object classes, it may be necessary to specify additional attributes to flow through the system during a user creation. Note that this is not necessary if the required attributes have been specified as modification attributes as described in the section Setting the Modification Attribute Mapping.
Note that one of the drop-down lists shows <no sync> and is inactive.
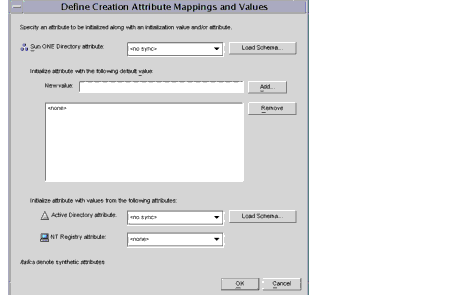
- Press New.
The Define Creation Attribute Mappings and Values window appears.
- Select the desired value from the Sun ONE Directory attribute drop-down list.
- If you want to initialize with a default value, enter that value in New value and press add. It is added to the value listing field.
To remove a value from the listing select the desired value and press Remove.
- If necessary, select the desired value from the Active Directory or NT SAM Registry attribute drop-down list.
- Press OK.
Repeat Step 4 through Step 8 to select cn and sn at this time.
Creating Synchronization User Lists
A Synchronization User List (SUL) specifies the domain of users in two directory sources to be synchronized. This section contains the following:
Overview
Every Synchronized User List contains two definitions that identify which users in a directory to synchronize, which users to exclude from synchronization, and where to create new users. One definition identifies which Sun ONE Directory Server users to synchronize and the other identifies the Windows users to synchronize.
Note
To synchronize users in a Sun ONE Directory Server with multiple Active Directory domains, you must define one SUL for each Active Directory domain.
For more information about SULs, including components of a definition, how to define multiple SULs, how multiple SULs are processed, and how to configure multiple Windows domain support refer to Appendix D, "Synchronization User List Definitions and Configuration".
The following procedure uses the console to identify and link user types between servers.
Note
When there are existing users, you must run the idsync resync script after running idsync linkusers. If you do not resynchronize existing users, the resynchronization behavior remains undefined.
For more information about the idsync resync script, see "User Resynchronization".
For additional information on linking existing users after connectors have been installed using the idsync linkusers script see "Linking Users" of this document.
Defining Synchronization User Lists
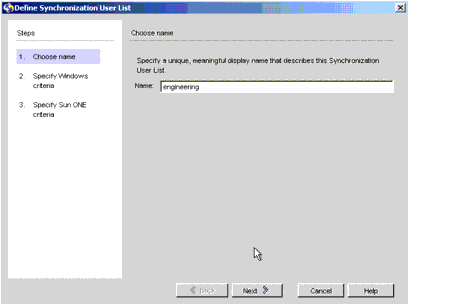
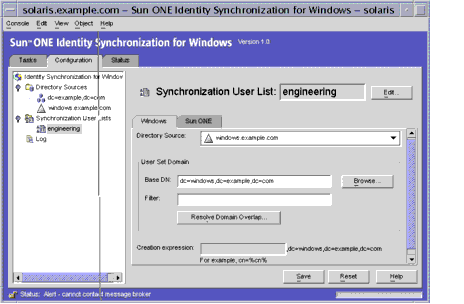
- Select the Synchronization User Lists node in the topology tree.
- Press New Synchronization User List.
The Define Synchronization User List wizard appears.
- Enter an appropriate name for the new list and press Next.
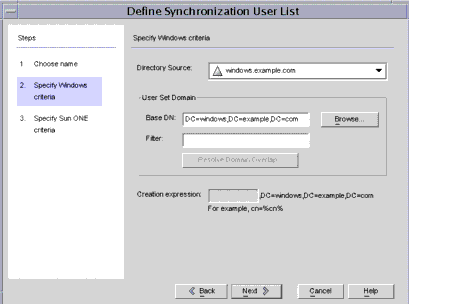
- Select a Windows Directory Source from the drop-down list.
- Enter the User Set Domain's Base DN setting, either by typing into the text field directly or by pressing the Browse button, which invokes a directory browser. For example:
DC=example,DC=com
- If desired, enter a Filter to specify which users under this base DN are synchronized or not.
If you have the same base DN for multiple synchronization user lists, you may want to use a filter to distinguish between them. The filter follows LDAP query syntax except that it allows only exact matches; for example (&(o=sales)(st=CA)) could be used to select users in the California sales organization.
- If necessary, press Resolve Domain Overlap if users exist on multiple domains.
Use Resolve Domain Overlap to define a preference for the synchronization user list in case a user matches multiple lists. (For more information, see Understanding Synchronized User List Definitions.)
- If allowed enter a creation expression for all Windows Active Directory synchronized user lists; for example:
cn=%cn%,cn=hostname ou=Domain Controllers,dc=example,dc=com
Note
A creation express defines the parent DN and naming attribute used when new entries are propagated from Active to Sun Directory. A Sun creation expression is only allowed if object creation has been configured to flow from Active to Sun Directory (See Setting Object Creation Flow and Attribute Mapping).
- Press Next.
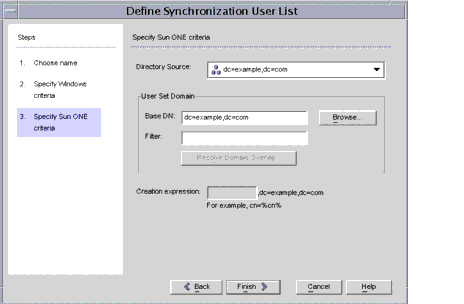
- Select a Sun ONE Directory Source from the drop-down list.
- Enter the User Set Domain's Base DN setting, either by typing into the text field directly or by pressing the Browse button, which invokes a directory browser. For example:
CN=hostname,OU=Domain Controllers,DC=example,DC=com
- If desired, enter a Filter to specify which users under this base DN are synchronized or not.
- Press Resolve Domain Overlap if users exist on multiple domains.
- If allowed enter a creation expression for all Sun ONE Directory Server synchronized user lists; for example:
uid=%uid%,ou=people,dc=example,dc=com
Note
A creation express defines the parent DN and naming attribute used when new entries are propagated from Active to Sun Directory. A Sun creation expression is only allowed if object creation has been configured to flow from Active to Sun Directory (See Setting Object Creation Flow and Attribute Mapping).
- Press Finish.
- The new synchronization user list is added to the navigation tree and the Configuration > Synchronization User List menu appears.
- Create a Synchronization User List that includes every directory source in your network except for the Directory Server.
Saving a Configuration
- Press Save to store your settings at this point.
- The Configuration Validity Status window appears stating that the configuration is valid. Press continue to save the configuration.
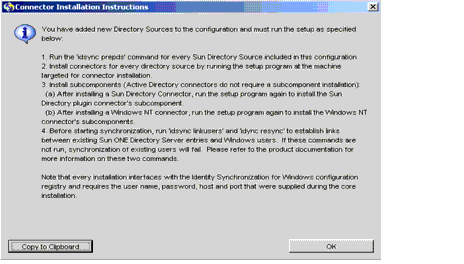
- A dialog box appears giving instructions on how to proceed in installing connectors and subcomponents. Read carefully and press OK.
Prepare Directory Serveridsync prepds is a command-line program that prepares a Sun ONE Directory Server source for use by Identity Synchronization for Windows. Run the prepds program after planning for a Identity Synchronization for Windows configuration because prepds requires the administrator to know which hosts and suffixes will be used.
Change directory to:
cd /sunone/servers/isw-hostname/bin
The following is a command-line example:
/sunone/servers/isw-hostname/bin/idsync prepds -h hostname -p 33827 -D “cn=Directory Manager” -w password -s dc=example,dc=sun,dc=com
Table 4-1 lists the idsync prepds arguments for preparing the Sun ONE Directory Server and their definitions.
Table 4-1 idsync prepds Arguments
Accessing the Directory Server Via SSL
idsync prepds lists the following options that provide information about securely accessing the Directory Server via SSL:
[-Z] [-P <cert db path>] [-m <secmod db path>]
idsync prepds Results
Upon successful execution you should see the following message:
The preferred host is running a supported version of Sun ONE Directory Server.
Application is using the Directory Manager credentials at the preferred host.
The Retro Changelog database is available at the preferred host.
The required schema elements are already present.
The Connector user has been created on the preferred host.
The Retro Changelog access control instance is already present on the preferred host.
The Connector user access control instance is already present on the preferred host.
The equality index is already present on the preferred host.
SUCCESS: Sun Directory Source is ready for synchronization. Please install the Directory Server Connector.
SUCCESS
If this message is not seen re-execute the script.
Continuing the InstallationUpon completion of initial core configuration, use the setup program to install Identity Synchronization for Windows connectors following procedures found in the Chapter 5, "Connector and Subcomponent Installation".