| Sun ONE Identity Synchronization for Windows Installation and Configuration Guide |
Chapter 5
Connector and Subcomponent InstallationThis section contains Identity Synchronization for Windows connector and subcomponent installation procedures including:
Install connectors by running the setup program on the chosen machine.
The following connectors require a follow-up subcomponent installation:
After installing a Directory Server connector, run the setup program again to install the Directory Server plugin subcomponent. The Directory Server plugin must be installed in each Directory Server master and consumer that stores users being synchronized. After installing a Windows NT connector, run setup again on that machine to install the NT subcomponent. Active Directory connectors do not have subcomponents.
Directory Server Connector and Plugin SubcomponentUse the setup program to install Directory Server connectors. After installing a Directory Server connector, run the setup program again to install the Directory Server plugin subcomponent.
Connectors can be installed in the same system as core or another system. the plugin must be installed on the system where Directory Server is installed.
Directory Server Connectors
- At the Welcome screen press Next.
- At the Software License Agreement screen read the license and press Yes (Accept License) to accept the license terms. Press No to exit setup.
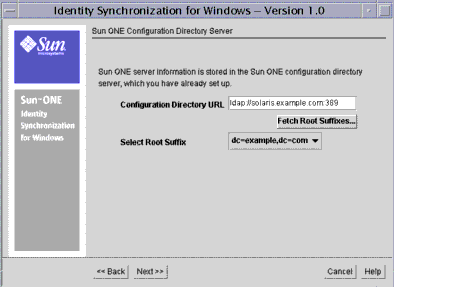
- When prompted, enter the Configuration Directory URL.
The configuration directory is the Directory Server instance where Identity Synchronization for Windows stores the core configuration information. Enter the following:
ldap://Directory Server name:port number
- Select the root suffix for the configuration directory. Press Fetch Root Suffixes and a drop-down list will populate with choices. Select the desired root suffix.
The root suffix that is chosen is the root suffix where the configuration is stored, which may be different than the rootsuffix being synchronized.
- Press Next.
- Enter the Configuration Directory Server administrator name and password. Press Next.
Note
The credentials provided will be sent without encryption. Consider changing them in the Directory Server after installation if network traffic confidentiality may be compromised.
- Enter the configuration password. Press Next.
If installing the connector on the same Solaris or Windows system as the core a message appears stating that setup has detected that core or connectors have already been installed on the system. All additional components will be installed under c:\Program Files\Sun\MPS\isw-hostname\. Press OK.
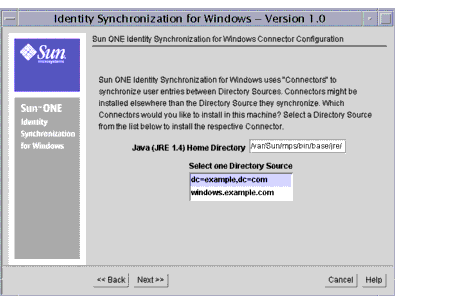
- Enter the Java home directory. Note that at a minimum this directory must contain a Java 1.4.1_03 installation and should be the Java 2 Platform Standard Edition SDK (JDK) and not the Java Runtime Environment (JRE) for best performance.
For example on Windows platforms:
C:\j2sdk1.4.1_04
On UNIX platforms:
/usr/j2sdk1.4.1_04/j2se
- Select the appropriate directory sources from the drop-down list.
Identity Synchronization for Windows uses connectors to synchronize user passwords between directory sources. Example directory sources are:
Directory Source
Example Entry
Sun ONE Directory Server
dc=example,dc=com
Windows Active Directory
example.com
Windows NT
EXAMPLE
Choose the directory source from a Sun ONE Directory Server with which you wish to connect. Press Next.
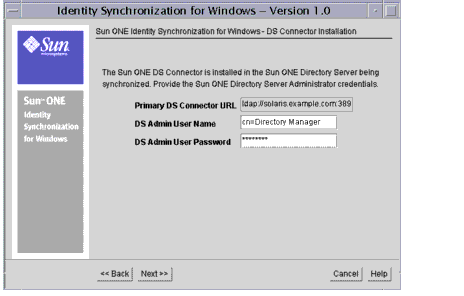
The Directory Server Connector Installation window appears.
- Select the Primary Directory Server Connector URL shown in the window.
This URL contains the LDAP port for the Directory Server being synchronized.
- Enter the Directory Server administrator name and password. Press Next.
Note
The credentials provided will be sent without encryption. Consider changing them in the Directory Server after installation if network traffic confidentiality may be compromised.
The Directory Port configuration window appears.
- Enter the fully qualified Localhost Name with domain.
- Enter the Port Number of the connector.
Choose an available server port, which the connector will use to securely pass configuration information to the Directory Server plugin.Press next.
Note
Use a non-SSL, non-secure LDAP port number for the Directory Server(s) while installing connectors.
- The setup program checks for available disk space and an installation summary menu appears.
Ensure that the following component appears in the summary menu.
DSConnector
- When ready, click Install Now.
An installation status bar and the Register Configuration Data window appears.
- When prompted, press Next to register with the selected Directory Server. This may take several minutes.
- An Installation Summary appears. Press Details if you wish to view the installation log. Press Close to exit setup.
Directory Server Subcomponent
- Run the setup program again from each machine where a directory server is installed.
Note
Only install a subcomponent from the machine which has the Directory Source for which the plugin is intended.
- At the Welcome screen press Next.
- At the Software License Agreement screen read the license and press Yes (Accept License) to accept terms of license. Press No to exit setup.
- When prompted enter the Configuration Directory URL.
The configuration directory is the Directory Server instance where Identity Synchronization for Windows configuration information is stored. Enter the following:
ldap://Directory Server name:port number
- Select the root suffix for the configuration directory. Press Fetch Root Suffixes and a drop-down list will populate with choices. Select the desired root suffix.
The root suffix that is chosen is the root suffix where the configuration is stored, which may be different than the rootsuffix being synchronized.
- Press Next.
- Enter the Configuration Directory Server administrator name (cn=Directory Manager) and password. Press Next.
Note
The credentials provided will be sent without encryption. Consider changing them in the Directory Server after installation if network traffic confidentiality may be compromised.
- Enter the configuration password. Press Next
If installing the subcomponent or connector on the same system as the core a message appears stating that setup has detected that core or connectors have already been installed on the system. All additional components will be installed under the installation directory. Press OK.
- Select Subcomponents and press Next.
- Select the directory source for this subcomponent installation. Press Next.
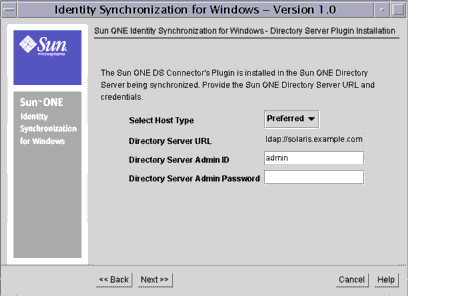
- Select the appropriate Host Type from the drop-down menu.
- Enter the Directory Server administrator’s name and password. Press Next.
Note
The credentials provided will be sent without encryption. Consider changing them in the Directory Server after installation if network traffic confidentiality may be compromised.
- The setup program checks for available disk space and an installation summary screen appears.
Ensure that the following subcomponent appears in the summary menu.
DSSubcomponents
- When ready, press Install Now.
An installation status bar and the Register Configuration Data window appears.
- When prompted, press Next to register with the selected Directory Server. This may take several minutes.
A window appears stating that you must restart the Directory Server where the plugin has been installed. Press OK.
- An Installation Summary appears. Press Details if you wish to view the installation log. Press close to exit setup.
- Restart the Directory Server where the plugin has been installed.
Windows Active Directory Connector
Note
Verify network functionality before proceeding. Specifically, determine whether servers in your network can communicate with the Configuration Directory Server.
- Download Identity Synchronization for Windows to each system on which you wish to install a connector. Refer to "Starting the Installer".
- Run the setup program on the desired server. Find it in the directory where you untarred binary files. On Windows machines, execute the setup executable in the installer directory:
cd installer
setup.exe
Execute the installer on UNIX machines:
cd installer
./runInstaller.sh
- At the Welcome screen press Next.
- At the Software License Agreement screen read the license and press Yes (Accept License) to accept terms of license. Press No to exit setup.
- When prompted, enter the Configuration Directory URL.
The configuration directory is the Directory Server instance where Identity Synchronization for Windows configuration information is stored. Enter the following:
ldap://Directory Server name:port number
Press Fetch Root Suffixes and a drop-down list will populate with choices. Select the desired root suffix. Press Next.
The root suffix that is chosen is the root suffix where the configuration is stored, which may be different than the rootsuffix being synchronized.
- Enter the Configuration Directory Server administrator name and password. Press Next.
Note
The credentials provided will be sent without encryption. Consider changing them in the Directory Server after installation if network traffic confidentiality may be compromised.
- Enter the configuration password. Press Next.
If installing the connector on the same Windows system as core, a message appears stating that setup has detected that core or connectors have already been installed on the system. All additional components will be installed under the installation directory. Press OK.
- Select Connector and press Next.
- Enter the Java home directory. Note that at a minimum this directory must contain a Java 1.4.1_03 installation and should be the Java 2 Platform Standard Edition SDK (JDK) and not the Java Runtime Environment (JRE) for best performance.
- Select the appropriate directory source from the list.
Identity Synchronization for Windows uses connectors to synchronize user passwords between directory sources. Example directory sources are:
Table 5-1
Directory Source Examples
Directory Source
Example Entry
Sun ONE Directory Server
dc=example,dc=com
Windows Active Directory
example.com
Choose the directory source from a Windows Active Directory with which you wish to connect.
- Press Next.
- If the connector is configured to use LDAP over SSL to communicate with Active Directory, enter the Administrator’s password.
Note
The credentials provided will be sent without encryption. Consider changing them in the Directory Server after installation if network traffic confidentiality may be compromised.
- Press Get Certificate Authorities. Select the Certificate Authority from the drop-down menu. Press Next
- The setup program checks for available disk space and an installation summary menu appears.
Ensure that the following component appears in the summary menu.
ADConnector
- When ready press Install Now.
An installation status bar and the Register Configuration Data window appears.
- When prompted, press next to register with the selected Directory Server. This may take several minutes.
- An Installation Summary appears. Press Details if you wish to view the installation log. Press Close to exit setup.
Windows NT Connector and SubcomponentUse the setup program to install Windows NT connectors. After installing a Windows NT connector, run the setup program again to install the Windows NT subcomponents.
Windows NT Connector
- Download Identity Synchronization for Windows to the primary domain controller of each Windows NT domain to be synchronized. Refer to "Starting the Installer".
- Run the setup program on the desired server. Find it in the directory where you untarred binary files. Execute the setup executable in the installer directory:
cd installer
- At the Welcome screen press Next.
- At the Software License Agreement screen read the license and press Yes (Accept License) to accept terms of license. Press No to exit setup.
- When prompted enter the Configuration Directory URL.
The configuration directory is the Directory Server instance where Identity Synchronization for Windows configuration information is to be stored. Enter the following:
ldap://Directory Server name:port number
Press Fetch Root Suffixes and a drop-down list will populate with choices. select the desired root suffix. Press Next. The root suffix that is chosen is the root suffix where the configuration is stored, which may be different than the rootsuffix being synchronized.
- Enter the Configuration Directory Server administrator name and password. Press Next.
Note
The credentials provided will be sent without encryption. Consider changing them in the Directory Server after installation if network traffic confidentiality may be compromised.
- Enter the configuration password. Press Next.
- Enter the directory in which to install the connector. Press Next.
A message appears if the directory does not exist. Press Yes to create a new directory.
- Select Connectors and press Next.
- Enter the Java home directory. Note that at a minimum this directory must contain a Java 1.4 installation and should be the Java 2 Platform Standard Edition SDK (JDK) and not the Java Runtime Environment (JRE) for best performance.
- Select the appropriate directory source from the drop-down list.
Identity Synchronization for Windows uses connectors to synchronize user passwords between directory sources. Example directory sources are:
Table 5-2 Directory Source Examples
Choose the directory source from a Windows NT directory with which you wish to connect.
- Press Next.
- Enter the fully qualified Localhost Name.
- Enter the Port Number of the connector. Press next.
Choose an available server port, which the connector will use to securely pass configuration information to the Windows NT subcomponent.
- The setup program checks for available disk space and an installation summary menu appears.
Ensure that the following component appears in the summary menu.
NTConnector
- When ready, press Install Now.
An installation status bar and the Register Configuration Data window appears.
- When prompted, press next to register with the selected Directory Server. This may take several minutes.
- An Installation Summary appears. Click Details if you wish to view the installation log. Press Close to exit setup.
Windows NT Subcomponent
- Run the setup program again from the primary domain controller.
- At the Welcome screen press Next.
- At the Software License Agreement screen read the license and press Yes (Accept License) to accept the license terms. Press No to exit setup.
- When prompted enter the Configuration Directory URL.
The configuration directory is the Directory Server instance where Identity Synchronization for Windows configuration information is stored. Enter the following:
ldap://Directory Server name:port number
- Select the root suffix for the configuration directory. Press Fetch Root Suffixes and a drop-down list will populate with choices. Select the desired root suffix.
The root suffix that is chosen is the root suffix where the configuration is stored, which may be different than the rootsuffix being synchronized.
- Press Next.
- Enter the Configuration Directory Server administrator name and password. Press Next.
Note
The credentials provided will be sent without encryption. Consider changing them in the Directory Server after installation if network traffic confidentiality may be compromised.
- Enter the configuration password. Press Next.
A message appears stating that setup has detected that core or connectors have already been installed on the system. All additional components will be installed under the installation directory. Press OK.
- If a window appears that gives you a choice between connectors and subcomponents, select Subcomponents and press Next.
- Select the directory source for this subcomponent installation. Press Next.
- The setup program checks for available disk space and an installation summary menu appears.
Ensure that the following component appears in the summary.
NTSubcomponents
- When ready, click Install Now.
An installation status bar and the Register Configuration Data window appears.
- When prompted, press Next to register with the selected Directory Server. This may take several minutes.
A message appears stating that the Windows subcomponents have been installed. Please reboot the machine. Click Next.
- An Installation Summary appears. Click Details if you wish to view the installation log. Press Close to exit setup.
- Reboot the NT Server where the subcomponent has been installed.
- Perform the procedures in "Windows NT Connector" and "Windows NT Subcomponent" for each additional NT domain where you wish to install a connector.