Chapter 4 Using the OpenSSO Add-On
This chapter explains how to use the OpenSSO Add-On, using as a basis a sample Web Space Server with the OpenSSO Add-On and a sample OpenSSO server.
About the Examples in This Chapter
The examples used in this chapter are based on the sample site and user sets bundled with the evaluation versions of Web Space Server 10.0 software. In most cases, in actual production environments, this sample site and these user sets will not be available to you. The examples presented here are for illustration purposes only.
Refer to Getting Sun GlassFish Web Space Server Software in Sun GlassFish Web Space Server 10.0 Getting Started Guide for more information about the OpenSSO evaluation bundles.
Sample Servers Used in This Chapter
The examples in this chapter are based on a pair of sample Sun GlassFish Enterprise 2.1 server instances:
|
Web Space Server |
Web Space Server10.0 instance running the Web Space Server sample site with the OpenSSO Add-On using a GlassFish domain named domain1 |
|
OpenSSO Server |
OpenSSO Enterprise 8.0 authentication server using a GlassFish domain named reasonsso |
Note –
For security reasons, all URLs and domain names in screenshots in this guide have been blanked out. Similarly, none of the URLs or domain names used in the examples in this guide point to real servers.
Preparing the Web Space Server Administrator Account
One of the primary concepts to remember when working with the OpenSSO Add-On is that for a user to be able to log in to an OpenSSO-enabled Web Space Server site, he or she must have a corresponding user account on the OpenSSO server that is providing authentication services for the Web Space Server site.
With this in mind, before using the Community Mapper Portlet provided by the OpenSSO Add-On with the sample Web Space Server site used in these examples, an account corresponding to the Web Space Server sample administrator account must be created on the OpenSSO server.
 To Create a Web Space Server Administrator
Account in OpenSSO
This task will likely be unnecessary in most Web Space Server production environments. It is only necessary in cases where the Web Space Server site administrator does not have an OpenSSO account with correspondingly sufficient privileges to perform administrative tasks on the Web Space Server site.
This example demonstrates how to create an OpenSSO account corresponding to the Web Space Server administrative account, admin@example.com.
-
Gather the credentials for the Web Space Server administrator for whom you want to create a corresponding account on the OpenSSO server.
In particular, make note of the user name, password, and email address.
-
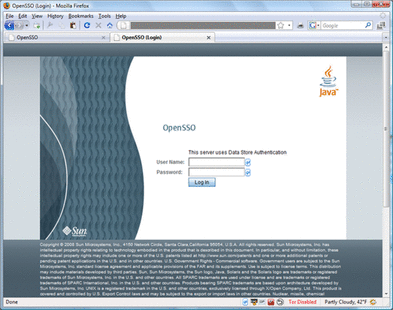
Go to the URL for the your OpenSSO server and log in as the OpenSSO adminstrator.
For example:
http://ssofoo.bar.com:7080/opensso
-
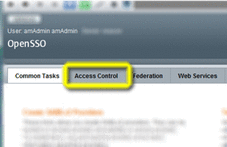
In the OpenSSO Administration Console main screen, choose the Access Control tab.
-
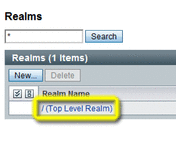
Choose the name of the realm in which you want to create the Web Space Server admin user.
In this example, the / (Top Level Realm) is chosen.
-
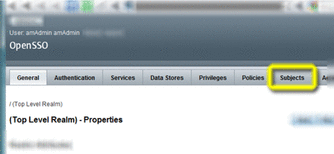
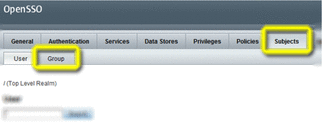
On the Realm Properties page, choose the Subjects tab.
-
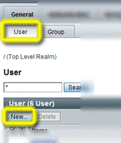
Make sure the User tab is selected, and then choose New.
-
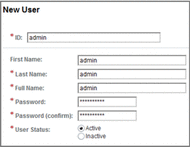
Enter the information for the Web Space Server admin user, as appropriate, and then click OK.
Note –Do not use the same password here as is defined for the admin user in Web Space Server.
-
Back on the Subjects->User page, click the name of the new admin user.
The Edit User — admin page is displayed.
-
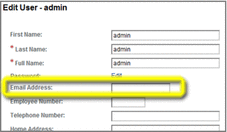
Enter additional information for the admin user, and then click Save and Back to Subjects.
In this, in order to work with the Web Space Server sample site, the email address for the admin user, admin@example.com, is entered here.
-
Back on the Subjects page, choose the Group tab.
-
Choose New to create a new group.
-
Enter an ID for the new group, and then click OK.
In this example, the group name webminadmin is used.
-
Back on the Subjects->Group page, click the name of the new webminadmin group.
-
On the Edit Group — webminadmin page choose the User tab.
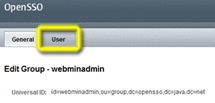
-
Select the new admin user from the Available list, and then click Save and Back to Subjects.
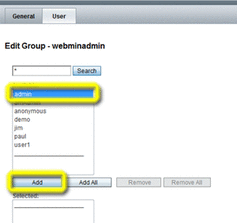
-
Choose the Privileges tab to display the realm Privileges page.

-
Choose the name of the new group, webminadmin, to display the group Properties page.
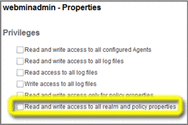
-
Enable the bottom checkbox, “Read and write access to all realm and policy properties,” and then choose Save and Back to Privileges.
-
Log out of the OpenSSO administration console, and log in as admin to the Web Space Server site using the account information you defined on the OpenSSO server.
The admin user will now be logged in and have full administrative privileges on the Web Space Server site.
Using the Community Mapper Portlet
The Community Mapper portlet provided by the OpenSSO Add-On for Web Space Server software enables Web Space Server site administrators to:
-
Map OpenSSO realm-based user roles, filtered roles, and groups to Web Space Server users and communities
-
Map OpenSSO realms to Web Space Server organizations
This section explains the following procedures:
 To Launch the Community Mapper Portlet
Before You Begin
The OpenSSO Community Mapper portlet is only available when logged in using a Web Space Server administrator account. The portlet is not available when logged in as a regular user.
-
Log in to the Web Space Server site administrator account.
The Web Space Server site administrator Home page is displayed.
-
Open the Web Space Server Control Panel from the Web Space Server Welcome menu.
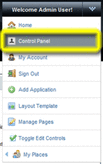
The administrator Control Panel page is displayed.
-
Choose Community Mapper from the Portal section of the Control Panel menu.
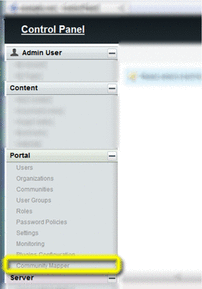
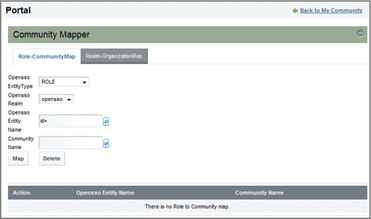
The OpenSSO Community Mapper portlet is displayed.
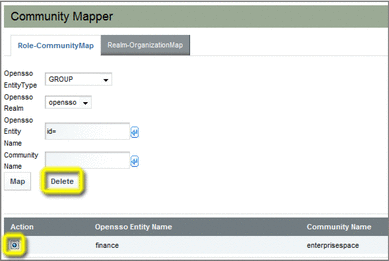
Figure 4–1 Community Mapper portlet
 To Map an OpenSSO Group to a Web Space Server Community
This procedure demonstrates how to map an OpenSSO group to a Web Space Server community. Note that, when using Access Manager or SunDS as the authentication provider, the general steps described in this procedure apply equally to mapping user roles and filtered roles to a Web Space Server community.
After mapping, any changes to the OpenSSO group or Web Space Server community will automatically be reflected in the mapped entity on the corresponding server.
-
Launch the Community Mapper portlet, as described in To Launch the Community Mapper Portlet.
-
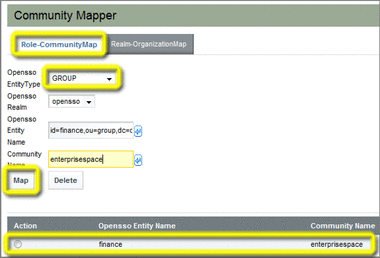
Make sure the Role-CommunityMap tab is selected, and then choose GROUP as the OpenSSO Entity Type.
-
Specify the mapping parameters you want to use.
-
OpenSSO Realm – Name of an existing OpenSSO realm; in this example, a realm named opensso is used.
-
OpenSSO Entity – Name of an existing OpenSSO group; in this example, a group named finance is used. Note that a list of available groups pops up when you pause at the id= prefix. Note that the autocomplete feature adds the fully qualified group ID parameters; in this example, id=finance,ou=group,dc=opensso,dc=java,dc=net.
-
Community Name – Name of an existing Web Space Server community; in this example, a community named enterprisespace is used.
-
-
Click Map to perform the mapping.
The mapping definition is displayed in the list at the bottom of the Community Mapper portlet.
 To Map an OpenSSO Realm to a Web Space Server Organization
This procedure demonstrates how to map an OpenSSO realm to a Web Space Server organization.
After mapping, any changes to the OpenSSO realm or Web Space Server organization will automatically be reflected in the mapped entity on the corresponding server.
-
Launch the Community Mapper portlet, as described in To Launch the Community Mapper Portlet.
-
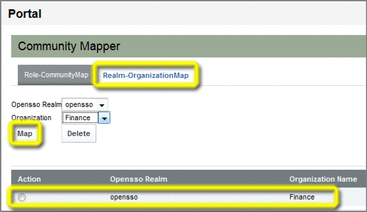
Make sure the Realm-OrganizationMap tab is selected.
-
Specify the mapping parameters you want to use.
-
OpenSSO Realm – Name of an existing OpenSSO realm; in this example, a realm named opensso is used.
-
Organization Name – Name of an existing Web Space Server organization; in this example, an organization named Finance is used.
-
-
Click Map to perform the mapping.
The mapping definition is displayed in the list at the bottom of the Community Mapper portlet.
 To Delete a Mapping Definition
This procedure describes how to delete a Role↔Community map or a Realm↔Organization map.
-
Launch the Community Mapper portlet, as described in To Launch the Community Mapper Portlet.
-
Choose the tab for the type of mapping you want to delete.
-
Select the button next to the map you want to delete in the list at the bottom of the Community Mapper pane, and then click Delete.
Performing Bulk Imports of OpenSSO User Accounts
By default, the OpenSSO Add-On automatically creates a corresponding Web Space Server user account when a user logs in to Web Space Server for the first time using OpenSSO—based credentials. This one-time process can sometimes, depending on the status of the authentication server, cause an unacceptably long delay.
An alternative to this per-user import process is to perform a bulk import of user credentials. In this scenario, all user OpenSSO user accounts with parameters corresponding to an OpenSSO Add-On map in Web Space Server are automatically imported at once, before a user even attempts to log in to Web Space Server, thereby avoiding the one-time delay.
 To Perform a Bulk Import of OpenSSO User Accounts
This procedure uses LDAP mechanisms for the bulk import process. This procedure is typically performed only one time or infrequently, and does not related directly to OpenSSO authentication mechanisms.
Bulk imports can be performed in either of two ways:
-
By directly modifying the portal-ext.properties file
-
By using the Web Space Server Control Panel GUI
Of the two methods, using the Web Space Server Control Panel is GUI is recommended because it is simpler and less subject to error. With this in mind, this procedure describes performing a bulk import using the Web Space Server Control Panel GUI.
-
Log in to the Web Space Server site administrator account.
-
Open the Web Space Server Control Panel from the Web Space Server Welcome menu.
-
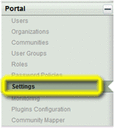
Choose Settings from the Portal section in the Control Panel menu on the left.
-
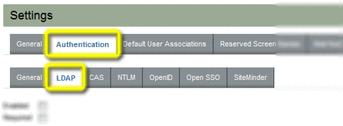
Navigate to the Authentication tab, and then choose the LDAP tab.
-
Select OpenLDAP or Other Directory Server if you are using Sun Java System Directory Server.
-
Provide valid values for Base Provider URL, Base DN, and Principal Credentials, and then click Test LDAP Connection.
For anonymous users, leave the Principal and Credentials fields blank.
Proceed to the next step after you get a “Connection successful” message.
-
Scroll down to the Users section and change the Screen Name from cn to uid.
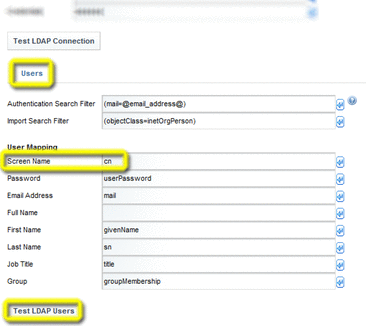
A pop-up listing all users available through LDAP should be displayed. If no users are shown, then one or more of you input parameters is incorrect. If so, correct your settings and try again. Do not proceed to the next step until a list of available users is successfully returned.
-
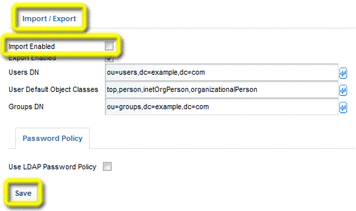
Scroll down to the Import/Export section, select Import Enabled, then click Save.
-
Log out of Web Space Server and restart the Web Space Server domain.
The user accounts will be imported when the Web Space Server domain is restarted.
Synchronizing Account Information Between OpenSSO and Web Space Server
By default, the OpenSSO Add-On enables automatic, one-way synchronization of user accounts on an OpenSSO server and a Web Space Server. For example, if a user account is deleted on the OpenSSO server, the corresponding user account is deleted in Web Space Server.
This automatic synchronization, which is enabled by default, can be disabled or enabled by means of the access.manager.sync.enabled property in the portal-ext.properties for the Web Space Server domain.
 To Disable or Enable Automatic Synchronization
-
Change to the webspace_dir/var/webspace/war-workspace/customs/webspace/WEB-INF/classes directory.
-
Edit the portal-ext.properties file, modifying the access.manager.sync.enabled as follows.
-
access.manager.sync.enabled=true – Automatic synchronization is enabled (default)
-
access.manager.sync.enabled=false – Automatic synchronization is disabled
-
-
Stop the Web Space Server domain.
-
Change to the webspace_dir/var/webspace/war-workspace directory.
-
Run the synchronize.xml Ant script.
ant -f synchronize.xml
-
Restart the Web Space Server.
Customizing the OpenSSO Add-On
Customizing the OpenSSO Add-On involves modifying the portal-ext.properties and AMConfig.properties files and then rebuilding the Web Space Server WAR files.
 To Customize the OpenSSO Add-On
Before You Begin
After the OpenSSO Add-On has been installed, any additional customizations you want to make must only be made to the portal-ext.properties and AMConfig.properties files that are located in the webspace_dir/var/webspace/war-workspace/customs/webspace/WEB-INF/classes directory. Note that this post-installation location is different than the location of the portal-ext.properties and AMConfig.properties that you should modify prior to installing the OpenSSO Add-On.
-
Change to the webspace_dir/var/webspace/war-workspace/customs/webspace/WEB-INF/classes directory.
-
Edit the portal-ext.properties and/or AMConfig.properties file(s) as desired.
Refer to Default Configuration Files for listings of the properties in the portal-ext.properties and AMConfig.properties files.
-
Stop the Web Space Server domain.
-
Change to the webspace_dir/var/webspace/war-workspace directory.
-
Run the synchronize.xml Ant script.
ant -f synchronize.xml
-
Restart the Web Space Server.
- © 2010, Oracle Corporation and/or its affiliates
