|
|
| Sun ONE Integration Server, Secure Trading Agent 1.0 User's Guide |
Chapter 7 Secure Trading Agent Administration
A Secure Trading Agent administrator has configuration and administrative privileges not available to regular Secure Trading Agent users, as described in "Secure Trading Agent Administration". This chapter discusses the following Secure Trading Agent administration tasks, which are available only to users with Secure Trading Agent administration privileges:
- "Installing Secure Trading Agent"
- "Configuring Secure Trading Agent"
- "Managing Secure Trading Agent Services"
- "Managing Agreements"
- "Managing Security Certificates and Keystores"
- "Using the Command Line Utility, ebScript"
Secure Trading Agent regular users should skip this chapter.
Installing Secure Trading Agent
Only persons who are system administrators or have administrator privileges on their system can successfully install Secure Trading Agent. For information on how to install (and uninstall) Secure Trading Agent, refer to the Secure Trading Agent Installation Guide.
After installation, an administrator (or a system user with root privileges) can use the Secure Trading Agent Control Panel to modify the default Secure Trading Agent settings.
SUNWebXML Package on Solaris Platforms
Secure Trading Agent is installed on Solaris platforms as the SUNWebXML package. You can use the standard Solaris package commands to uninstall and install Secure Trading Agent as a package.
To uninstall Secure Trading Agent as a Solaris package
- Login as root.
You must be root to add or remove packages.
- From a command line, issue the following command:
pkgrm SUNWebXML
You are prompted to confirm removal of the package. After responding with yes to continue with the removal of the package, the SUNWebXML package is removed from the system.
This procedure does not remove the Sun Management Center from your system. You can later use the pkgadd command to install the SUNWebXML package. However, the Sun Management Center must be installed for the pkgadd
The following procedure shows how to use pkgadd to install the SUNWebXML package. This procedure assumes you have obtained the SUNWebXML.pkg file from where you downloaded the Secure Trading Agent distribution. Also, the Sun Management Center must be installed on your system for process to succeed.
To install Secure Trading Agent as a Solaris package
- Login as root.
You must be root to add or remove packages.
- Navigate to the directory containing the SUNWebXML.pkg.
- Issue the following command:
pkgadd -d ./SUNWebXML.pkg SUNWebXML
Information about the package is displayed, and then you are prompted to accept the following configuration information:
- default location for installation
- automatically start Secure Trading Agent services
- default Secure Trading Agent administrator user Id
You can accept the defaults or specify a custom configuration. After responding to these prompts, the SUNWebXML package is installed on your system.
If you want to change the configuration of Secure Trading Agent, run the Secure Trading Agent Control Panel. Refer to "Configuring Secure Trading Agent" for information on running the Control Panel.
Full Installation, Command Line Version
The Secure Trading Agent Installation Guide provides procedures on how to install both the Sun Management Center and Secure Trading Agent. These procedure use a graphical dialog to guide you through the installation.
However, on Solaris platforms, you can perform a full installation (Sun Management Center and Secure Trading Agent) completely from the command line without a graphical dialog to guide you through the installation.
The following procedure shows how to perform a full installation. This procedure assumes you have obtained the Secure Trading Agent distribution and placed it in a local directory.
To install the Sun Management Center and Secure Trading Agent from the command line
- Login as root.
You must have root privileges to perform this procedure.
- From the Secure Trading Agent distribution you downloaded, execute the following command:
./setup.sh --nogui
The setup program first installs the Sun Management Center and then begins the Secure Trading Agent installation. During the Secure Trading Agent installation, you are prompted to accept the following configuration information:
- default location for installation
- automatically start Secure Trading Agent services
- default Secure Trading Agent administrator user Id
You can accept the defaults or specify a custom configuration. After responding to these prompts, Secure Trading Agent is installed on your system.
If you want to change the configuration of Secure Trading Agent, run the Secure Trading Agent Control Panel. Refer to "Configuring Secure Trading Agent" for information on running the Control Panel.
Configuring Secure Trading Agent
The installer configures Secure Trading Agent according to the default values listed in Table 7-1. At installation, you can specify the Administrator User Id and whether to automatically start Secure Trading Agent services. All other values can only be specified by running the Secure Trading Agent Control Panel utility.
Secure Trading Agent Control Panel
Use the Secure Trading Agent Control Panel utility to modify your Secure Trading Agent configuration. The Control Panel utility must be run from a system command window. You can view a read only version of the Control Panel from the Secure Trading Agent Communications Center.
The following procedures show how to run the Control Panel utility to modify Secure Trading Agent system settings. You must have Secure Trading Agent administrator privileges (or root privileges on your system) to save changes made using the Secure Trading Agent Control Panel.
To run the Secure Trading Agent Control Panel utility
- Open a command window on your system.
- As Secure Trading Agent administrator, run the following program:
<InstallationDirectory>/bin/ebctl
InstallationDirectory is the location where you installed Secure Trading Agent.
The Control Panel utility executes, displaying the following commands:
- Enter the setting number you want to change and specify the new value.
For example, to change the setting for the SSL endpoint you first enter m4 and then enter the new value at the prompt.
Code Example 7-2 Changing a Control Panel setting
Your selection: m4
[Currently 18441]
SSL port (CPA Secure Endpoint): 8043
The display refreshes with the new value.
- Continue making changes as needed, then save (or abandon) your changes as described below:
s1: To save changes and quit the Control Panel.
q: To abandon changes and quit the Control Panel.Control Panel from the Communications Center
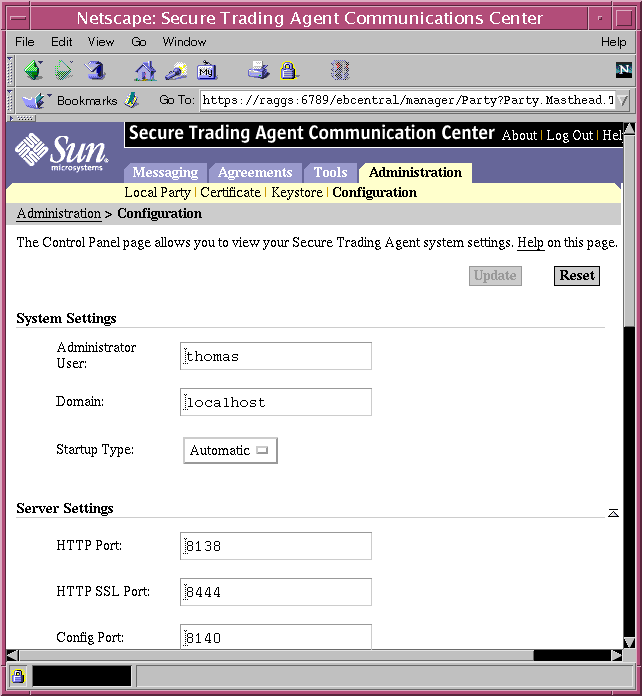
You can view the configuration settings from the Control Panel using the Secure Trading Agent Communications Center. However, the Control Panel in the Communications Center is read only. You must run the command line utility to make any configuration changes.
To open the Secure Trading Agent Control Panel from the Communications Center
- Start the Communications Center, as described in Chapter 2, "Secure Trading Agent Communications Center".
- Select the Administration tab.
- Select Configuration
The Control Panel page displays.
Figure 7-1 Communications Center, Control Panel
Accessing Secure Trading Agent Inside a Firewall
If you installed Secure Trading Agent inside of a firewall you can configure proxies to provide access to the Secure Trading Agent message handler. Run the Secure Trading Agent Control Panel and specify the options to configure the host and port for HTTP and HTTPS proxy servers.
Refer to "Secure Trading Agent Control Panel" for information on running the Secure Trading Agent Control Panel utility.
Specifying a Database Service
This release of Secure Trading Agent allows you to specify either the HSQL database service or the Oracle database service to use for the system repository.
The Secure Trading Agent installers installs the HSQL database service and configures Secure Trading Agent to use this database service. After installation, you can configure Secure Trading Agent to use an existing Oracle database service.
To configure Secure Trading Agent to use an Oracle database service
- Open a command window on your system.
- As Secure Trading Agent administrator, run the following program:
<InstallationDirectory>/bin/ebctl
InstallationDirectory is the location where you installed Secure Trading Agent.
The Control Panel utility executes, displaying a list of commands:
- From the Control Panel, select r6 to set the database type to Oracle.
The Control Panel prompts you for the URL to connect to your database service:
Your selection: r6
Specify the Database Connection URL.
For example, jdbc:oracle:thin:@MYHOST:1521:MYSID
- Specify the connection URL to your existing Oracle database service.
- From the Control Panel, select r1 to set the database user.
- From the Control Panel, select r2 to set the database password.
- From the Control Panel, select s1.
Selecting s1 save your changes and then exits the Control Panel utility.
Specifying Windows Domains
If you installed Secure Trading Agent on a Windows platform and typically log into a Windows domain, you must use the Secure Trading Agent Control Panel to specify the Windows domain name before you can log into Secure Trading Agent. The Windows domain setting in the Control Panel is ignored by Secure Trading Agent installations on Solaris platforms.
Refer to "Secure Trading Agent Control Panel" for information on running the Secure Trading Agent Control Panel utility.
Managing Secure Trading Agent Services
Secure Trading Agent provides the following services:
- Message Handler
The Secure Trading Agent message handler manages three services. It is responsible for sending and receiving messages between you and your trading partners. It also starts the Configuration Server, which manages users and passwords for Secure Trading Agent, and the HSQL database, which is the default database installed with Secure Trading Agent.
- Sun Management Center service.
The Sun Management Center service manages the web server that runs the Secure Trading Agent Communications Center web application. This service is not necessary to run the ebScript utility, which is the command line equivalent of the Communications Center.
Message Handler Service
You can manage the message handler service from the command line or by using the Secure Trading Agent Control Panel. On Windows platforms, you can also manage services using options available from the Windows Start Menu. Refer to "Managing Services on Windows Platforms" for more information.
You should be logged in as the Secure Trading Agent administrator when managing the message handler service.
To manage the message handler service from a command line:
- Login as Secure Trading Agent administrator.
You should be the Secure Trading Agent administrator when managing services.
- Navigate to the ebmsh utility.
The ebmsh utility is at the following location:
<InstallationDirectory>/S1ISSTA/bin/ebmsh
InstallationDirectory is the location where you installed Secure Trading Agent. The default location for installation is:
/opt/SUNWebXML (Solaris platforms)
C:\Sun\ (Windows platforms)
- Run ebmsh service with one of the options listed in Table 7-2.
ebmsh <option>
To manage the message handler service from the Secure Trading Agent Control Panel:
- Login as Secure Trading Agent administrator.
You should be the Secure Trading Agent administrator when managing services.
- Navigate to the Control Panel utility.
The Control Panel utility is at the following location:
<InstallationDirectory>/S1ISSTA/bin/ebctl
InstallationDirectory is the location where you installed Secure Trading Agent. The default location for installation is:
/opt/SUNWebXML (Solaris platforms)
C:\Sun\ (Windows platforms)
- Run ebctl, specify c3 to enable or disable automatic start of the message handler service at boot time, and then specify s1 to save your changes, as illustrated in Code Example 7-3.
Sun Management Center
The Sun Management Center service is available from the command line on Solaris platforms. On Windows platforms, you manage the Sun Management Center using options available from the Windows Start Menu.
As explained in the previous section, ebmsh command options can automatically start and stop the Sun Management Center web server. However, you can start and stop the Sun Management Center independent of the Secure Trading Agent message handler service.
To manage the Sun Management Center on Solaris platforms:
- Login as root.
You must have root access to manage the Sun Management Center.
- Navigate to the smcwebserver utility.
The smcwebserver utility, by default, is at the following locations:
/usr/sadm/bin/smcwebserver
Your location may differ.
- Run the smcwebserver service with one of the options listed in Table 7-3.
smcwebserver <option>
For managing the Sun Management Center on Windows platforms, refer to the following section, "Managing Services on Windows Platforms."
Managing Services on Windows Platforms
This section contains information on managing the Secure Trading Agent message handler and Sun Management Center services on Windows platforms.
Message Handler (Menu Options)
Secure Trading Agent provides Start menu options for the Message Handler service on Windows. From the Start menu you can start, stop, and restart the Message Handler service.
To start the Message Handler service
- From the Start > Programs > Sun Microsystems menu, select: Secure Trading Agent > Services > Start Message Handler.
To stop the Message Handler service
- From the Start > Programs > Sun Microsystems menu, select: Secure Trading Agent > Services > Stop Message Handler.
To restart the Message Handler service
- From the Start > Programs > Sun Microsystems menu, select: Secure Trading Agent > Services > Restart Message Handler.
Sun Management Center (Menu Options)
Secure Trading Agent provides Start menu options for the Sun Management Center service on Windows. From the Start menu you can start, and stop the Sun Management Center service.
To start the Sun Management Center service
- From the Start > Programs > Sun Microsystems menu, select: Secure Trading Agent > Services > Start Web Server.
To stop the Sun Management Center service
- From the Start > Programs > Sun Microsystems menu, select: Secure Trading Agent > Services > Stop Web Server.
Administering Services from a Command Window
You can also administer the message handler service and Sun Management Center service directly from a command window. The default location for the message handler is:
C:\Sun\ebXML\bin\ebmsh.exe
The default location for the Sun Management Center service is:
C:\Sun\ebXML\smc\webconsole\smcwebserver.exe
When running the services from a command window, specify the options for the services listed in Table 7-2 and Table 7-3.
Administering Services from the Control Panel
You can also start and stop services using the Windows Control Panel program for services. However, it is recommended that you start and stop services using either the menu options or command line options to guarantee that services start and stop in the correct sequence.
Managing Agreements
You must be a Secure Trading Agent administrator to create, edit, deploy, undeploy, and delete agreements. Deploying an agreement puts an agreement into service, allowing trading partners to exchange messages and business documents. Undeploying an agreement takes the agreement out of service. Deleting an agreement removes the agreement from the system.
For information on managing agreements, including procedures for creating, deploying, undeploying, and deleting agreements, refer to Chapter 5, "ebXML Agreements".
For information on editing agreements, refer to Chapter 6, "Editing ebXML Agreements".
Managing Security Certificates and Keystores
An ebXML agreement can specify that messages be sent over a secure transport such as SSL. It can also specify that ebXML messages be signed to guarantee who sent the message. Secure Trading Agent supports the following models for SSL transport and signing of ebXML messages:
- Direct Trust
- Certificate Authority (CA) Trust
Direct Trust Model
The Direct Trust model is based upon self-signed certificates. One party creates a self-signed certificate and provides it to the other party as its identity and public key. Because the certificate is self-signed, it is important that the other party knows who is providing the certificate—there is no verification by a trusted third party as to the owner of the certificate.
When using self-signed certificates, you must find a secure way to provide the other party with a certificate that avoids tampering with the certificate. One option is to use encrypted email, which requires that you have a certificate (most likely a CA Trust certificate) that the other party can trust.
CA Trust Model
In the CA Trust model, you acquire certificates from a third party certificate authority. The certificate authority issues TrustAnchor certificates to guarantee the identity associated with the certificates issued to individuals. Both parties to the agreement agree to use and trust certificates acquired from the certificate authority.
This model does not involve the extra layer of encryption required for the Direct Trust Model to exchange self-signed certificates.
To implement the CA Trust model, you must first acquire a certificate from a third party certificate authority, such as Verisign or Thawte.
Creating Keystores and Certificates
Refer to Appendix A, "Creating Certificates for Use with Secure Trading Agent" for information on how to create keystore and certificate files that can be used with Secure Trading Agent.
Specifying Certificate Information in the Agreement Editor
This section contains a procedure for specifying certificate information in the Agreement Editor. You can specify the following types of certificates:
- Server Certificate
The certificate you use to implement SSL transport of ebXML messages. This certificate contains your public key. The server certificate identifies the server name for the messaging endpoint by comparing it with the CN name specified in the certificate. Typically, the CN name is an IP address that identifies the server.
- Message Certificate
The certificate you use to implement signing of ebXML messages. This certificate contains your public key. The keyname specified in the agreement for a message certificate must match the alias name contained in your private key (keystore) file.
- TrustAnchor Certificates
Additional certificates that validate a server certificate or message certificate. These certificates are typically a chain of parent certificates for a server or message certificate. Use TrustAnchor certificates when implementing the CA Trust model.
Note Secure Trading Agent requires certificates to be in X.509 format (base64 or binary encoded)
To specify certificate information in the Agreement Editor
- Launch the Agreement Editor for an agreement by selecting Edit from the Agreements tab of the Communications Center.
The Communications Center displays a list of agreements in the system.
Figure 7-2 Communications Center, Agreement List
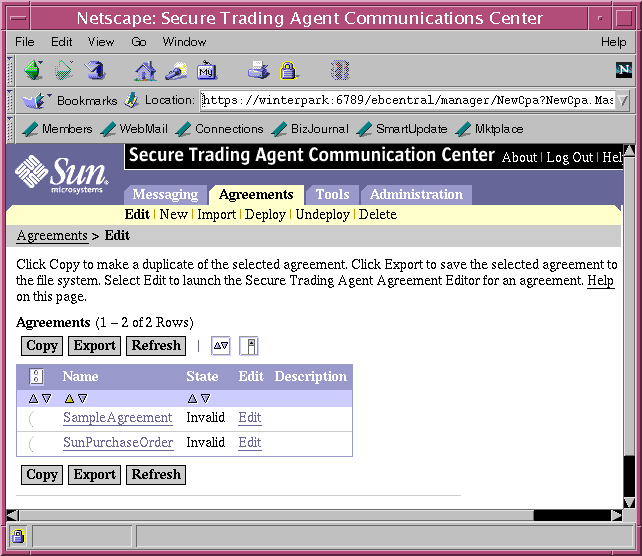
- Select the Edit link in the list of agreements for the agreement you want to edit.
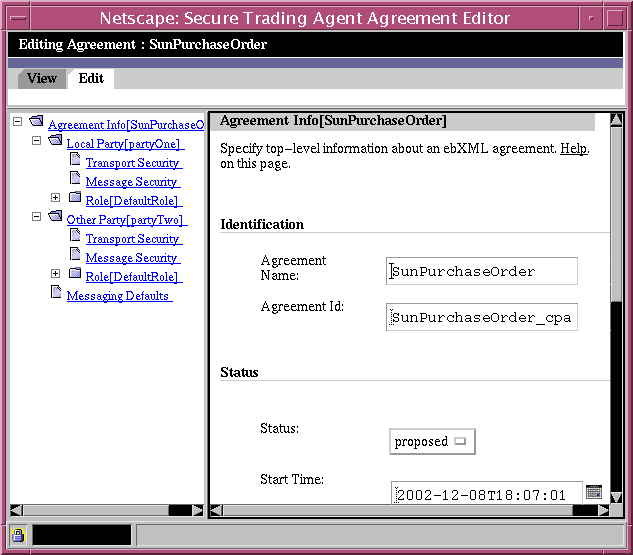
The Secure Trading Agent Agreement Editor opens, displaying the Agreement Information page for the agreement.
Figure 7-3 Agreement Editor, Agreement Information Page
- Navigate to the Transport Security page, available under the Local Party node of the Agreement Editor.
Figure 7-4 Agreement Editor, Transport Security Page
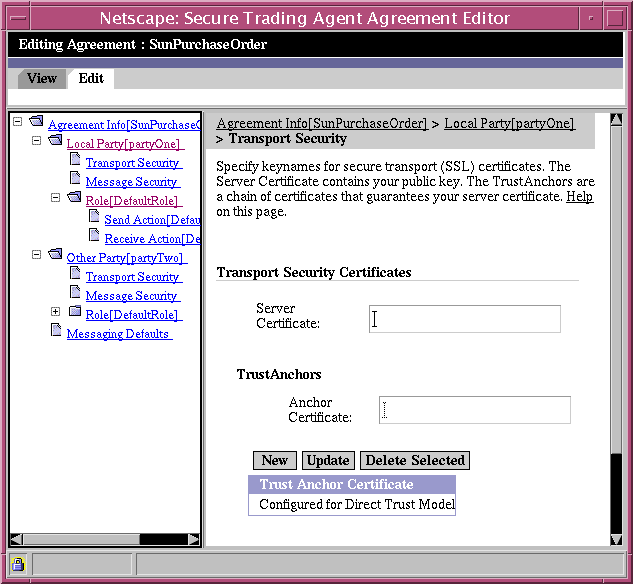
- In the Server Certificate field specify a keyname for the certificate you want to use for transport security.
This certificate contains your public key and is used for secure transport of ebXML messages over SSL. The keyname is a reference to the actual certificate file. You can specify any keyname you like as a reference to the server certificate. However, you must use the same keyname in the Communications Center to resolve the keyname to the certificate file, as explained in the following section, "Resolving Certificate Keynames".
You must also provide the actual certificate file to the other party during the negotiation of the agreement, as explained in "Negotiating Agreements".
Note Typically with SSL, the public key is transferred to the other party during the SSL "handshake." However, ebXML specifications require the actual transfer of the public key certificate file.
If you are using the Direct Trust model, then your certificate should be self-signed. You can leave the TrustAnchors section blank and proceed to Step 8.
If you are using the CA Trust model, then proceed to the next step, Step 5.
- In the Anchor Certificate field, specify the keyname for a trust anchor certificate from the certificate authority that guarantees the specified server certificate.
- Click New to add the specified trust anchor to the table of trust anchor certificates.
- Repeat Step 5 and Step 6 above to build a chain of trust anchors, if needed.
Note Depending on the arrangement with your trading partner, you may or may not have to provide the actual trust anchor files to your trading partner.
- Navigate to the Message Security page, also available under the Local Party node of the Agreement Editor and specify a keyname for the Signing Certificate.
Figure 7-5 Agreement Editor, Message Security Page
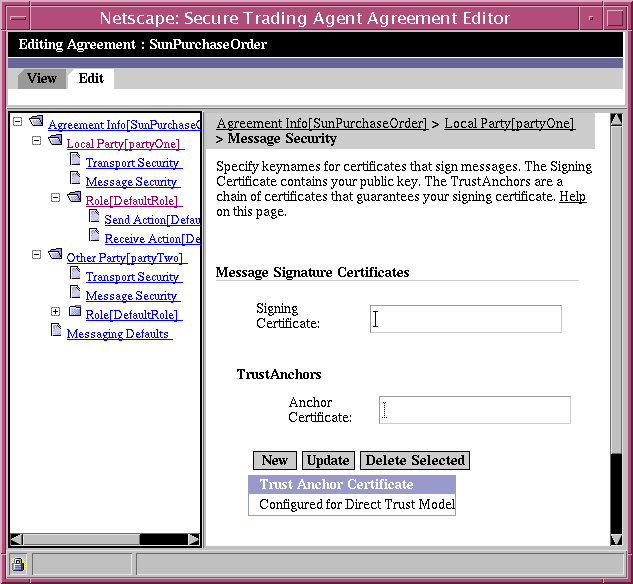
The signing certificate contains your public key and is used to sign ebXML messages. The keyname is a reference to the actual certificate file. Unlike the keyname for the server certificate, the keyname for the signing certificate must match the alias name in your private key (keystore) file.
You must use the same keyname in the Communications Center to resolve the keyname to the certificate file, as explained in the following section, "Resolving Certificate Keynames".
You must also provide the actual public key certificate file to the other party during the negotiation of the agreement, as explained in "Negotiating Agreements".
If you are using the CA Trust model, then the certificate should be self-signed. You can skip the next step, which specifies TrustAnchor certificates.
- Specify TrustAnchor certificates for the Signing Certificate, as explained in Step 4 through Step 7 for the Server Certificate.
After specifying certificate information using the Agreement Editor, you must resolve the specified keynames to the actual binary files representing the certificates and keystores, as described in the following section, "Resolving Certificate Keynames." You must resolve these names before you deploy the agreement.
Resolving Certificate Keynames
This section describes how to resolve keynames specified in an ebXML agreement to the actual certificate files they represent. An agreement can contain keynames that reference local party certificates, other party certificates, and trust anchor certificates for both the local and other party. Each keyname must be resolved to the actual binary file on your system that the keyname references. Additionally, you must resolve a keyname to the keystore file that contains your private key.
Before you can deploy an agreement, all keynames referenced in the agreement must be resolved.
To resolve certificate keynames to certificate files
- Open the Communications Center, and navigate to the Certificates page, available from the Administration Tab.
Figure 7-6 Communications Center, Certificates
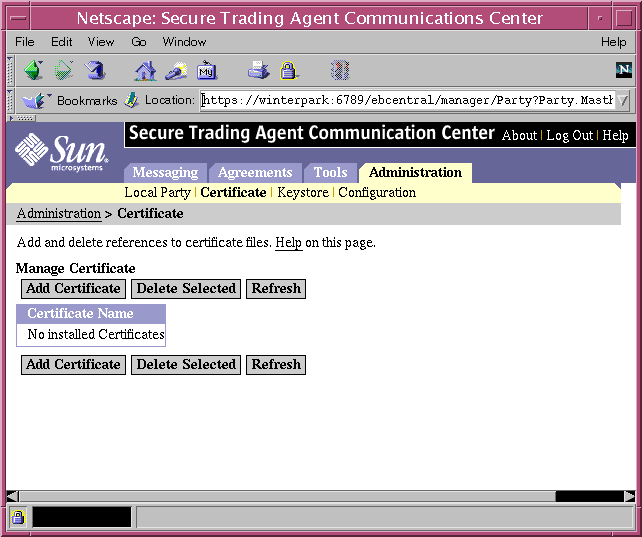
- Select Add Certificate.
The Add Certificate page displays.
Figure 7-7 Communications Center, Adding Certificates
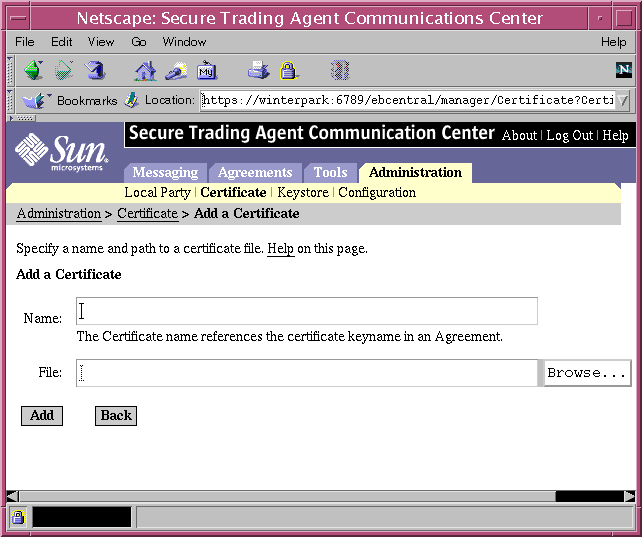
- Specify the keyname for a certificate, specify the path to the binary file for the certificate, and select Add.
The keyname should match the keyname specified in the Agreement Editor, as explained in the previous section, "Specifying Certificate Information in the Agreement Editor".
The other party is responsible with providing you with their public key certificate files that are referenced in the agreement.
- Repeat Step 2 and Step 3 for all certificates and trust anchors specified in the agreement.
- Navigate to the Keystore page, available from the Administration tab and select Add Keystore.
The Add Keystore page displays.
Figure 7-8 Communications Center, Add Keystore
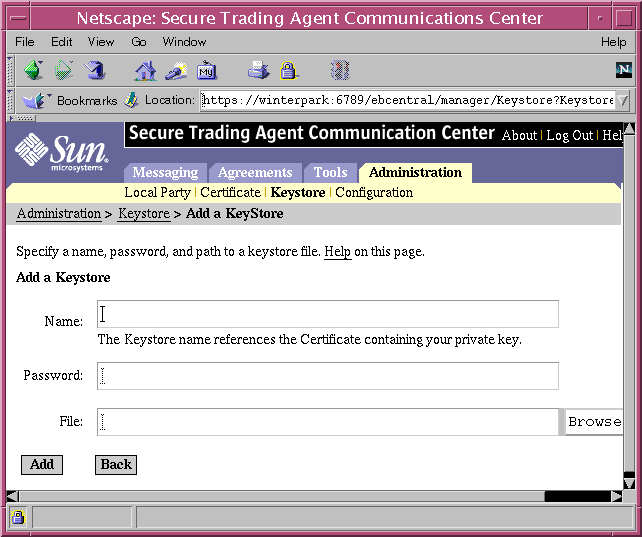
- Specify the same keyname you used for the local party certificate, but this time navigate to the keystore file containing your private key.
You also have to specify the password to your private key.
After you complete these steps, you are ready to deploy the agreement.
Using the Command Line Utility, ebScript
ebScript is a command line utility that allows you to write scripts to automate many of the Secure Trading Agent tasks. You can also use ebScript interactively as an alternative to the Communications Center.
After starting ebScript, as described in the following procedures, you must log in to the utility. As with the Communications Center, the tasks available to you depend on whether you are a Secure Trading Agent administrator or a regular user.
To start ebScript on Windows Platforms
- Make sure that Secure Trading Agent is installed and properly configured on your system.
Refer to "Installing Secure Trading Agent", "Configuring Secure Trading Agent" or the Secure Trading Agent Installation Guide for information on installing and configuring your system.
- From the Start > Programs menu, select: Sun Microsystems > Secure Trading Agent > Applications > ebScript.
The ebScript command window opens, as illustrated below:
To start ebScript on Solaris
- Navigate to the location where you installed Secure Trading Agent.
The default location is:
/opt/SUNWebXML/
- cd to the following location:
ebXML/bin
- Execute the following command:
ebscript
ebScript prints copyright information and then displays an ebScript prompt.
To log into ebScript
- From an ebScript prompt, issue the following command:
login <user_id>
user_id is your user Id on your system. You are then prompted for your password to complete the login procedure.
Or...
- Start ebScript from the command line specifying your user Id as illustrated below:
ebscript -u <user_id>
ebScript Commands
To list the ebScript commands that are available, from an ebScript prompt issue the help command, as illustrated in Code Example 7-4.
To get help on a specific ebScript command, at an ebScript prompt issue the Help command followed by the command name. Code Example 7-5 shows how to get help on the ImportCpa command.
ebScript Command Reference
Refer to the Secure Trading Agent Command Reference for documentation on each ebScript command. The Command Reference is available as a web document at the following location:
<InstallationDirectory>/docs/reference/commands.html
InstallationDirectory is the location where you installed Secure Trading Agent.
The Command Reference is also available in PDF format at the same location.
Sample ebScript Session
Code Example 7-6 illustrates an ebScript session that does the following tasks:
- adds a local party ID
- imports an agreement
- deploys an agreement
- lists deployed agreements
- sends a message
- lists messages
- retrieves a document from a message
Automated Processing of ebScript Commands
The commands listed in Code Example 7-6 can be placed in a file for automated processing, as illustrated in Code Example 7-7, which lists the contents of a file named sendHello.ebs.
Code Example 7-7 Listing of sendHello.ebs
AddLocalPartyID SecureTrader
ImportCPA HelloEbxmlCPA.xml HelloEbxml
DeployCPA HelloEbxml
Send HelloEbxml TraderService HelloQuery /park1/docs/hello.txt
Code Example 7-8 shows how to specify sendHello.ebs as an input file to ebScript. In this example, sendHello.log contains the output from executing the commands in sendPurchaseOrder.ebs.
Code Example 7-8 Executing ebScript batched commands
% ebscript -i sendHello.ebs -o sendHello.log
Listing CPAs, Services, and Actions
The send command requires you to specify the agreement name, service, and action that you are using to send the message. The following ebScript commands are useful in determining the required options for the send command.
ListCPAs
ListServices <CPA Name>
ListActions <CPA Name> <Service>
Note A service is a required element in an ebXML agreement. The ebXML Agreement Editor automatically generates a default service name. Typically, you do not need to edit the service name.