| C H A P T E R 4 |
|
Configuring and Using BIOS Firmware |
This chapter describes how to use the BIOS (Basic Input Output System) to configure the blade server.
This chapter contains the following topics:
This section describes how to view and modify the BIOS settings.
The BIOS has a Setup utility stored in the BIOS flash memory. The Setup utility reports system information and can be used to configure the BIOS settings. The configured data is provided with context-sensitive help and is stored in the system's battery-backed CMOS RAM. If the configuration stored in the CMOS RAM is invalid, the BIOS settings will default to the original state specified at the factory.
The BIOS Setup utility contains seven menu screens, which are displayed in this order: Main, Advanced, PCI/PnP, Boot, Security, Chipset, and Exit. See Appendix B for a BIOS menu tree and illustrations of the screens.
Use the left and right arrow keys to move sequentially through the seven BIOS screens. Fields that can be reconfigured are displayed in color. All other fields are non-configurable. Use the up and down arrow keys to scroll through a screen's menu. Use the Tab key to move across columns.
This section contains special considerations regarding the system BIOS.
The Sun Netra CP3220 blade server has an option ROM for each of the following components:
The AMD PowerNow! feature, which is accessed from the BIOS Setup utility Advanced menu, is enabled by default on the Sun Netra CP3220 blade server. Some problems have been observed when using this feature on certain operating systems. If you want to disable this feature, first refer to the Sun Netra CP3220 Blade Server Product Notes (820-1980) for any outstanding known issues for your operating system.
TABLE 4-1 contains summary descriptions of the first-level BIOS Setup screens. For more information about the BIOS screens and screen illustrations, see Appendix B.
You can change the BIOS configuration by using a terminal (or terminal emulator connected to a computer) through the serial console port on the front of the Sun Netra CP3220 blade server.
| Note - Using the ANSI terminal emulation mode provides the best viewing of the BIOS screens. |
1. To change the system’s parameters, enter the BIOS Setup utility by pressing the F2 key while the system is performing the power-on self-test (POST).
Refer to TABLE 4-1 for summary descriptions of the BIOS screens.
The first BIOS Setup menu screen is displayed.
2. Highlight the field to be modified using the arrow and Tab keys.
3. Press Enter to select the field.
A dialog box is displayed. The box displays the options that are available for the setup field that you have chosen.
4. Modify the setup field and close the screen.
5. To modify other setup parameters, use the arrow and Tab keys to navigate to the appropriate screen and menu item, and repeat Step 2 through Step 4.
Otherwise, go to Step 6.
6. Press and release the right arrow key until the Exit menu screen is displayed.
7. Follow the instructions on the Exit menu screen to save your changes and exit the Setup utility.
Before beginning this procedure, ensure that you have installed the serial cable as described in Section 2.2.4, Connecting External I/O Cables.
| Note - See Section 4.1.3, Description of the BIOS Screens for descriptions of the first-level BIOS menu screens. See Appendix B for a BIOS menu tree and illustrations of the first-level and second-level BIOS screens. |
1. Use terminal emulation software to configure the serial COM1 settings.
Use the ANSI terminal type setting.
2. Set the serial communication settings to 9600 baud, 8 bit, 1 stop bit, no parity, and no handshake.
3. Power on or reset the ATCA shelf.
4. Press the F2 key to interrupt the boot and access the BIOS Main menu (FIGURE 4-1).

5. Using the arrow keys, move across the top of the screen to the Boot menu and press the Enter key.
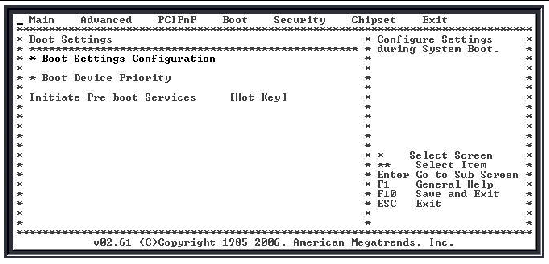
The Boot Settings menu is displayed (FIGURE 4-2).

6. Move down the list, select the Boot Device Priority option, and press Enter.
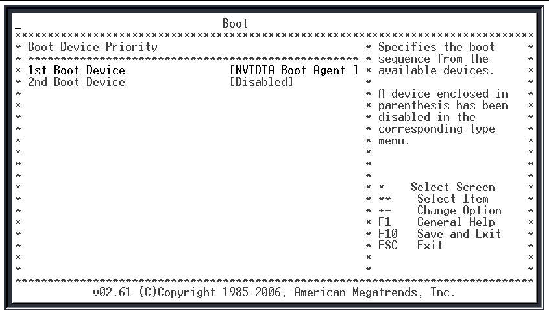
The Boot Device Priority menu is displayed (FIGURE 4-3).
FIGURE 4-3 Boot Device Priority Menu

7. Select the NVIDIA Boot Agent device as the 1st Boot Device.
8. Disable all unneeded boot devices in the menu.
9. Use the arrow keys to move to the Exit menu, and press Enter.
The confirmation dialog box is displayed.
The BIOS boots the selected device. The operating system on the selected boot device loads.
11. Configure the operating system by providing a locale, system name, IP address, and other information.
Refer to the documentation for your operating system for information on configuring the operating system.
Traditionally, the BIOS of a PC would go through the list of bootable devices and try to boot up the OS. If all devices failed to boot, BIOS would print a message to inform the user and wait for user intervention. In the ATCA environment, there is typically no one watching the console screen when a blade is booting. Therefore. it is preferred for the BIOS to retry and walk through the boot list continuously. The continuous boot feature is implemented in the AMI BIOS for ATCA blades.
The Continuous Boot feature is activated by default. At the end of the boot list, if all devices fail to boot, BIOS will pause for a few seconds to make sure the user has a chance to see the message, and continue the boot process by going through the boot list again.
Users can specify how long the pause is in seconds by changing the Continuous Boot CMOS setting in the Advanced Setup or the Boot menu.
If the value is set to disabled, the feature is disabled and the BIOS will not retry the boot list automatically.
 To change the setting, press F2 when prompted at the beginning of the boot process, move the cursor to highlight Continuous Boot, then press Enter to select a new value.
You must set the Supervisor password before you can set the User password. The Supervisor password sets the desired access level for the User password.
To reset any BIOS passwords, clear the CMOS settings by resetting Jumper 1. See Section 2.3.10.1, Clearing the CMOS Setting Using Jumper 1 for further details.
1. Enter the BIOS Setup utility by pressing the F2 key on the keyboard while the system is performing the power-on self-test (POST).
2. Using the arrow keys, move across the top of the screen to the Security menu and press the Enter key.
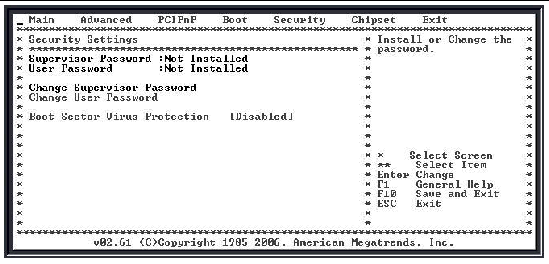
The Security Settings Menu is displayed (FIGURE 4-4).
FIGURE 4-4 Security Settings Menu

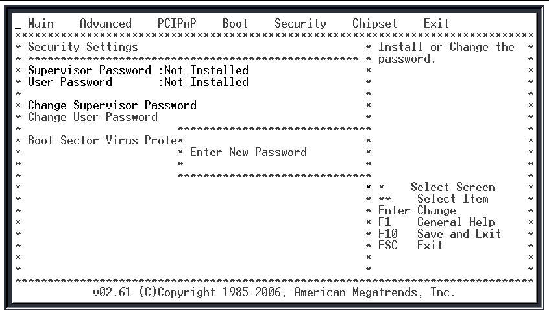
FIGURE 4-5 Change Password Menu

3. Move down the list, select the Change Supervisor Password or Change User Password option, and press Enter.
The Change Password menu is displayed (FIGURE 4-5).
4. Type a password, then press Enter.
5. Use the arrow keys to move to the Exit Menu.
6. Select OK to confirm the changes you made.
1. Enter the BIOS Setup utility by pressing the F2 key while the system is performing the power-on self-test (POST).
2. Press and release the right arrow key until the Exit menu is selected. Press the Enter key.
3. Select the Load Optimal Defaults option and press the Enter key.
4. Use the arrow keys to return to the BIOS Main Menu.
5. Use the arrow keys to move down the main menu and reset the System Time and System Date fields.
6. Use the arrow keys to move to the Exit Menu.
7. Choose Save Changes and Exit.
8. Select OK to confirm the changes you made.
When they become necessary, updated BIOS images will be available as patches on the following web site:
Use the Solaris BIOS Update Utility or the Linux BIOS Update Utility to implement the updates. For more information, see the Sun Netra CT 900 Server Product Notes (819-1180).
The Sun Netra CP3220 blade server provides dual 1-Mbyte BIOS chips that support redundant BIOS images for increased reliability. The default chip (page 0) acts as the primary BIOS chip and is automatically selected for update during a firmware upgrade. The secondary BIOS chip (page 1) retains the original BIOS image, and can be used through manual configuration in the unlikely case where the primary BIOS becomes corrupt.
If the primary BIOS becomes unbootable, use the secondary BIOS to boot the blade server:
1. Log into the Shelf Manager.
2. To select the secondary BIOS image, type:
3. To boot the blade server from the Shelf Manager, type:
| Note - Once the blade server is booted, reset the blade server to use the primary BIOS image (page 0). |
To upgrade the BIOS firmware while retaining the current BIOS image, follow these steps:
1. Switch the BIOS image from page 0 to page 1.
See Section 4.9, Use the Secondary BIOS Image.
2. Use the Solaris BIOS Update Utility to upgrade the page 1 BIOS image.
See Section 4.7, Updating the BIOS.
3. Reboot the system into the updated page 1 BIOS.
See Section 2.3.12, Resetting the Sun Netra CP3220 Blade Server.
The system provides a rudimentary power-on self-test (POST) that runs each time the blade server boots to check the basic devices required for the system to operate.
The progress of the self-test is indicated by a series of POST codes. These codes appear at the bottom right corner of the system’s VGA screen (once the self-test has progressed far enough to initialize the video monitor).
You can configure the level of POST testing and some POST display features through the BIOS menus. For more information, see Section 4.12, Changing POST Options.
These instructions are optional, but you can use them to change the operations that the server performs during POST testing.
1. Initialize the BIOS Setup utility by pressing the F2 key while the system is performing the power-on self-test (POST).
The BIOS Main Menu screen is displayed.
2. From the BIOS Main Menu screen, select the Boot menu.
3. From the Boot Settings screen, select Boot Settings Configuration.
4. On the Boot Settings Configuration screen (FIGURE B-17), you can enable or disable the options shown in TABLE 4-2
Copyright © 2009 Sun Microsystems, Inc. All rights reserved.