| SunVTS 7.0 Software User’s Guide for Initial Release Through Patch Set 7 |
| C H A P T E R 7 |
|
SunVTS 7.0 Tests |
Oracle’s Sun Validation and Test Suite (SunVTS) software performs multiple diagnostic hardware tests from a single user interface. SunVTS verifies the connectivity and functionality of controllers and devices.
SunVTS 7.0 contains individual tests that support testing of a wide range of products and peripherals. This chapter describes SunVTS 7.0 tests. Topics include:
The SunVTS 7.0 tests are supported on Solaris 10 5/08 and later releases. The operating system kernel must be configured to support all peripherals that are to be tested.
Some tests have special requirements, such as connectors, installation of test media, or the availability of disk space. These requirements are listed for all the applicable tests.
The Disk test verifies the functionality of different types of disk drives such as ATA, SATA, SAS, and SSD using Media subtest and File System subtest.
The Media subtest selects the biggest partition on the disk to run these tests: ReadOnly, CompareRead, or WriteRead. If the disk partition has a file system on it, disktest will run the ReadOnly or CompareRead test. If the disk is raw, then Media subtest might run WriteRead if the unsafe testing is enabled. Each of the three modes can run two different methods of disk testing: synchronous I/O and asynchronous I/O.
Disk test runs the ReadOnly test by default. To run the Write/Read test on the disks, you must enable the unsafe testing option. The Unsafe option should be used with care. Unsafe testing will overwrite existing data on the hard disks. If the unsafe testing is enabled, the test automatically selects the largest partition for running the Write/Read test. The selection is based on the following rules:
If any of the above conditions are not met, Disk test runs ReadOnly test on the disk partition . For more information about Unsafe test options, see Safe and Unsafe Options.
| Note - To run the Write/Read test, be sure that you remove the file system on all the partitions of the disk. |
The file system subtest verifies the disk file system integrity. This subtest exercises mounted disk partitions carrying the file system. By default, the test runs only on system-mounted partitions, it does not premount any additional partitions. If you want SunVTS to premount all of the unmounted partitions that have a file system, you have to set the environment variable BYPASS_FS_PROBE to 0 (zero). The test creates two temporary files of the size specified by the File System File Size, writes the data patterns, and compares the two files against each other.
The Disk test supports the following test modes:
|
Test performs a basic check verifying the functionality of the connected disk devices. |
|
No special setup is required to run this test.
The Disk Devices option lists the devices registered under Disk test options. This option provides a way to Select or Deselect the devices.
The Removable Disk test verifies the functionality of USB flash drives, CF (Compact Flash) cards, secure digital (SD) cards and USB disks using subtests like Media, File System, and Asynchronous I/O.
Media subtest runs ReadOnly, ReadCompare, and WriteRead tests on different USB storage devices, CF & SD cards. Each of the three modes can run two different methods of testing: synchronous I/O and asynchronous I/O.
If you enable unsafe testing, the test selects partitions automatically and runs WriteRead tests. The Unsafe option should be used with care. Unsafe testing can cause data corruption. The test will always run ReadOnly tests by default.
The test will select a suitable raw partition to run the WriteRead tests. Partitions for WriteRead tests are selected based on the following criteria:
The partition will not be selected if it is mounted or has a file system.
For more information about Unsafe test options, see Safe and Unsafe Options.
The file system subtest verifies the file system integrity. This subtest exercises mounted partitions carrying the file system. By default, the test only runs on system-mounted partitions, it does not premount any additional partitions.
If you want SunVTS to premount all of the unmounted partitions that have a file system, you have to set the environment variable BYPASS_FS_PROBE to 0 (zero).
The test creates two temporary files and the file sizes are specified by the File System.File Size, writes the data patterns, and compares the two files against each other.
The Disk test supports the following test modes:
|
Performs a basic check verifying the functionality of the connected devices. |
|
The Environmental test exercises and validates the following system hardware:
You must have the SUNWpiclh, SUNWpiclr, SUNWpiclu, and SUNWpiclx picl packages installed correctly before running the test to verify I2C devices. Verify that the picld daemon is running by typing:
If the daemon is not running, restart it by typing the following:
To test the LG PC-10 camera, the system must already be running a window environment, such as JDS. If the system has no windowing environment, or is only displaying the login window, the test will neither pass nor fail. If you are working in JDS, you can change your system to 24-bit depth by editing the file /usr/dt/config/Xservers or /etc/dt/config/Xservers. The file /etc/dt/config/Xservers overrides the file /usr/dt/config/Xservers, which currently supports the LG PC-10 camera.
Edit the appropriate file to include the following line (type in one continual line):
:0 Local local_uid@console root /usr/openwin/bin/Xsun :0 -nobanner -dev /dev/fbs/ffb0 defdepth 24 defclass TrueColor |
X Windows for Microsoft Windows must be shut down before testing a SunPCi II card.
The Environment test supports the following test modes:
|
Test performs read-write and all other subtests. Full set of tests are run. |
| Note - The Environment test is not available for all subsystems for all platforms. The coverage is dependent on the availability of system interfaces to the hardware. |
The Graphics test verifies the functionality of graphics adapters. Currently supported adapters include:
The Graphics test supports the following test modes:
To run the Graphics test as superuser, you must use the console device or start the desktop with the -ac option.
 You must disable all screen savers before testing any graphics device. To disable the Solaris screen saver, type the following at a UNIX prompt:
1. Type the following at a UNIX prompt:
The display resolution must be 1280x1024. To change resolution, type:
| Note - To perform graphicstest on kfb frame buffers, the desktop must be running on each kfb device in the system. |
To run the Graphics test on an x86 system, you must either start the BUI or the GUI and run the Graphics test at the system console, or use the Java remote console from ILOM. See Starting the Browser User Interface or Starting the Graphical User Interface.
The Host Bus Adapters (HBA) test verifies the functionality of the HBAs in the system.
The Host Bus Adapters test supports the following test modes:
Some HBA tests, such as those for Emulex, JNI Fibre-Channel, and Qlogic HBA, provide external connector testing capability. For these tests, you must connect an external connector before enabling the external subtests.
See Appendix A for information on connectors.
The Interconnect test verifies all interconnects and different ASICs on the system board. If you enable unsafe testing, the interconnect test runs WriteRead tests. Unsafe tests can cause data corruption on the hard disks and hence, should be enabled only if unsafe testing is required to be performed. For more information about Unsafe tests see Safe and Unsafe Options.
The Interconnect test supports the following test modes:
|
Test runs less stressful tests and performs basic checks on the detected hardware. |
|
|
Test runs more stressful tests in sequence on all detected hardware. |
No special setup is required to run this test.
The IOports test verifies the following:
The IOports test supports the following test modes:
|
Test performs a basic check verifying the functionality of the devices connected. |
|
|
Test runs more stressful tests in parallel on all detected hardware along with the other tests. |
The on-board serial ports support connector testing. The connector test requires the null modem and plug connectors described in Appendix A.
There are a variety of connector loopback paths available. The internal loopback paths do not require an external connector. The availability of the loopback paths depends on the device. The zs(7D) device has an internal path for synchronous mode and the se(7D) device has an internal path for asynchronous mode. The exact type of loopback connector required depends on the system I/O panel.
The connector for the null modem A-to-B option is a female-to-female plug. The pin configuration is the same as the one described for the section 9-Pin to 9-Pin port-to-port loopback cable (see 9-Pin to 9-Pin Port-to-Port Cable).
The connector for the plug A-to-A option is described in the section 9-Pin female single-port loopback plug (see 9-Pin Female Single-Port Plug).
The Sbus and PCI bus SunHSI boards also support connector testing.
Appendix A of contains more information on SunLink loopback cables and connectors.
The Media test verifies the following hardware:
| Note - CD and DVD are the only supported optical disc tests: blue ray discs are not supported in Media test. |
The Media test supports the following test modes:
Optical disk drives must have the supported media inserted into the optical disk drive. If the media or disk in the drive is changed, then the drive must reprobe to recognize the new media.
Tape media should be present inside the tape drive for tape drive testing.
The media could be blank or used. If the media has been used, the media test performs a read-only test. If the media is blank, media test performs a read/write test. Media test can also perform a CD/DVD read test and a CD/DVD Read/Write test.
The Memory test is used to test the DRAMs, the memory subsystem, virtual memory, and the swap partitions of disks in system. This test achieves large memory bandwidths and performs a mix of read and write MARCH operations to the memory. This test also uses background patterns to bring out pattern sensitive faults in the DRAMs. A part of the test uses the Solaris valloc (page aligned) system call to allocate, write, read, and compare virtual memory. The system call causes heavy paging activity in the system and simulates a stressful environment for the OS. The test reports hard and soft error correction (ECC) errors, memory read errors and addressing problems.
The swap space required for the Memory test is 400 KB.
The Memory test supports the following test modes:
|
Test runs more stressful tests in sequence on all detected hardware. |
The Memory test does not support any options.
The Network test verifies the following:
The Network test supports the following test modes:
|
Test runs a basic check verifying the functionality of the devices connected. |
|
For a complete functionality test of some of the hardware listed above, you might need a connector as described in Appendix A.
The Network Tests option lists the devices registered under network test options and provides a way to select or deselect the devices. This section describes options of the Network Test and Network Loopback options.
1. Follow the steps described in Changing Test Specific Options (FIGURE 5-5) to reach the network test options.
The Network options menu is displayed (FIGURE 7-1).
2. Use the arrow keys to reach the Network Test Options menu (FIGURE 7-1) and press Return.
3. Use the arrow keys to highlight the Device Options menu and press Return.
By default, all network devices are selected for testing (FIGURE 7-2). Devices can be deselected if you intend to run the test only on specific devices.
4. Press Return to save the selected devices.
If you do not want to save the changes, press Esc. In either case, the curser will return to the Network test options screen.
5. Select Apply to save the Network test options.
Otherwise, press the Esc key to return to the Network test options screen.
FIGURE 7-1 Network Test Options Menu
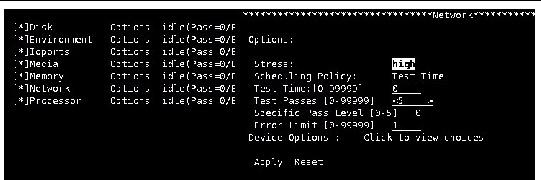
FIGURE 7-2 Device Options Menu
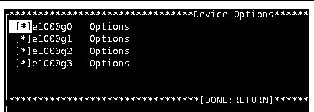
The target option enables you to select the target devices registered under Network Test.
1. To reach the Network Test Options menu, follow the steps in Changing Test Specific Options.
The Network Test options menu is displayed (FIGURE 7-1).
2. Use the arrow keys to select the Network Test Options menu and press Return.
3. Use the arrow keys to highlight the Device Options menu and press Return (FIGURE 7-2).
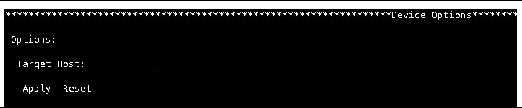
4. Select the target that you need, for example e1000g0, and press Return.
5. Enter the target name or IP address (FIGURE 7-3).
6. Select Apply, to save the target name.
7. Choose your final selection:
FIGURE 7-3 Target Options Menu
The Loopback option enables you to choose Auto, Internal, and External loopback connections for the devices registered under Network Test.
1. To reach the Network Test Options menu, follow the steps as described in Changing Test Specific Options and (FIGURE 5-5).
2. Use the arrow keys to reach the Network Test Options menu and press Return (FIGURE 7-1).
3. Use the arrow keys to highlight the Device Options menu and press Return (FIGURE 7-2).
4. Select a target, for example e1000g1, and press Return.
The Loopback Option menu is displayed (FIGURE 7-2).
FIGURE 7-4 Loopback Option Menu

5. Press Return to select the Internal or External Loopback options (FIGURE 7-5).
FIGURE 7-5 Auto, Internal, or External Loopback Option Menu
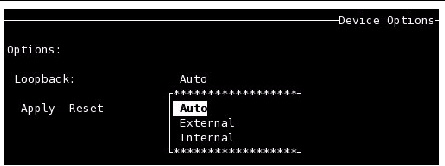
6. Select Apply to save the loopback option.
7. Select Apply to save the Network Test Options.
Otherwise, press the Esc key to return to the Network Test Options screen.
The Processor test primarily targets the following features:
The Processor test supports the following test modes:
|
Test runs a basic check verifying the functionality of the devices connected. |
|
| SunVTS 7.0 Software User’s Guide for Initial Release Through Patch Set 7 | 820-0012-20 |
Copyright © 2010, Oracle and/or its affiliates. All rights reserved.
 To Disable the Solaris Screen Saver