Configuring File Types and Programs
Use the File Types and
Programs preference tool to specify how files of various types
are created, displayed, and edited. For example, you can specify that if a
file is a plain text file, the file is launched in a text editor.
Nautilus and other GNOME applications check
the contents of a file to determine the type of a file. If the first lines
do not determine the type of the file, then the application checks the file
extension.
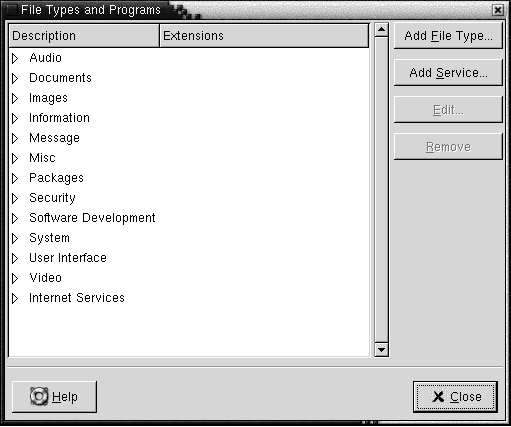
Figure 10–2 File Types and Programs Preference Tool

Table 10–2 describes the elements
on the File Types and Programs preference tool.
|
Element |
Description |
|---|---|
|
Table |
To view the contents of a category of file types, click on the right arrow next to the category name. The category expands, and displays a description of each file type, and the file extension that is associated with the file type. To select a file type that you want to work with, click on the file type. |
|
Add File Type |
Click on this button to add a file type. For more information, see To Add a File Type. |
|
Add Service |
Click on this button to add a service. For more information, see To Add a Service. |
|
Edit |
To edit a file type, a service, or a file type category, select the item that you want to edit, then click Edit. |
|
Remove |
To remove a file type or a service, select the item that you want to remove, then click Remove. |
To Add a File Type
To add a file type, perform the following steps:
-
Choose Applications -> Desktop Preferences -> Advanced -> File Types and Programs to start the
File Types and
Programs
preference tool. -
Click on the Add file type button. The Add file type dialog is displayed.
-
Enter the properties of the file type in the dialog. The following table describes the dialog elements on the Add file type dialog:
Option
Function
No Icon
Choose an icon to represent the file type. To choose an icon, click on the No Icon button. An icon selector dialog is displayed. Choose an icon from the dialog. Alternatively, to choose an icon from another directory, click Browse. When you choose an icon, click OK.
Description
Type a description of the file type.
MIME Type
Enter the MIME type for this type of file.
Category
Enter the category to which you want the file type to belong in the
File Types and Programspreference tool. Click on the Choose to choose a category from the Choose a file category dialog.Filename Extensions
Enter the filename extensions to associate with the file type. Enter a filename extension in the field on the left side, then press Return. To delete a filename extension, select the filename extension in the field on the right side, then click on the Remove button.
Viewer Component
Information to be supplied in a future release.
Default action
Information to be supplied in a future release.
Program to Run
Specify a program to associate with the file type. Enter the command to start the program in this field. Alternatively, to choose a command that you entered previously, click the down arrow button, then choose the command to run.
You can also use the Browse button to choose a command to run.
Run in Terminal
Select this option to run the program in a terminal window. Choose this option for a program that does not create a window in which to run.
-
Click OK.
To Add a Service
To add a service, perform the following steps:
-
Choose Applications -> Desktop Preferences -> Advanced -> File Types and Programs to start the
File Types and Programspreference tool. -
Click on the Add service button. The Add service dialog is displayed.
-
Enter the properties of the service in the dialog. The following table describes the dialog elements on the Add service dialog:
Option
Function
Description
Type a description of the service.
Protocol
Enter the protocol for the service.
Program
Specify the program to associate with the service. Enter the command to start the program in this field. Alternatively, to choose a command that you entered previously, click the down arrow button, then choose the command to run.
You can also use the Browse button to choose a command to run.
Run in Terminal
Select this option to run the program in a terminal window. Choose this option for a program that does not create a window in which to run.
-
Click OK.
- © 2010, Oracle Corporation and/or its affiliates
