| Building Enterprise JavaBeans Components |
| Building Enterprise JavaBeans Components |
| C H A P T E R 8 |
|
Preparing Enterprise Beans for Deployment |
The foregoing chapters have focused on creating individual enterprise beans. However, before one or more finished beans can be assembled into an application and deployed on a J2EE-compliant application server in a production environment, the following tasks remain to be done:
1. Configure individual beans. Furnish information about each bean's external dependencies and operating requirements. This information becomes part of the bean's deployment descriptor, which is described in the next section.
2. Form an EJB module around a bean or group of beans that need to work cooperatively in an application, and configure the module. By packaging the beans into an EJB module, you generate a deployment descriptor. This deployment descriptor identifies the runtime services that the module's components need from the application server, such as container-managed persistence.
3. Add one or more EJB modules to a J2EE application (and, if necessary, add other components such as web modules).
4. Configure the J2EE application and its included modules to work with each other and with other resources such as a database.
This book focuses on the deployment considerations for enterprise beans and EJB modules. It also touches briefly on creating and configuring a J2EE application around one or more EJB modules. For complete scenarios and details on application design, assembly, and configuration, refer to these three books: Building Web Services, Building Web Components, and Building J2EE Applications. Also, you'll find the Sun ONE Studio 5 applications and tutorials helpful (go to http://forte.sun.com/ffj/documentation/tutorialsandexamples.html).
You can test-run an individual enterprise bean, using the automated testing feature of the Sun ONE Studio 5 IDE. The IDE generates an EJB module and an application strictly for the purpose of testing your bean, but you can easily substitute your production components and test them. The testing feature is described in Chapter 9.
Ordinarily, enterprise beans are assembled into an EJB module, one or more EJB modules are assembled into an application, and the application is deployed to an application server. However, an individual EJB module can also be deployed.
The deployment information you specify in the property sheets for an enterprise bean or EJB module becomes part of the deployment descriptor. This is an XML-based text file that captures information about a J2EE component's structure and its internal and external dependencies, that is, its relationships to other components inside and outside its immediate environment. The deployment descriptors for an enterprise bean and its EJB module contain all the instructions an application server needs when the bean's application is deployed. Any change in this descriptor can change the bean's behavior in the application.
You automatically generate a deployment descriptor for an enterprise bean when you use the EJB Builder wizard to create the bean, as described in the foregoing chapters. The wizard generates the bean's basic descriptor.
When you place enterprise beans in an EJB module (as explained in Creating and Configuring an EJB Module), the IDE automatically generates a deployment descriptor for the module as well. This descriptor file captures:
When you deploy an application to an application server, the server adds its own deployment descriptor with information about the datasource on which the application's entity beans are based.
By changing the EJB module's descriptor, you can change the application's behavior without touching the source code or even the deployment descriptor of the component beans.
The contents of a deployment descriptor are accessible through the property sheets of the corresponding bean or module. If necessary, you can also edit an EJB module's descriptor directly. The following three sections describe how you can see and affect the deployment descriptor.
To see the XML-based file that constitute the deployment descriptor of an enterprise bean:
 In the Explorer window, select a bean's logical node, right-click, and choose View Deployment Descriptor. (Or, select an EJB module's logical node, right-click, and choose Deployment Descriptor
  View.)
The Source Editor displays the file as read-only.
The recommended way to change a bean's or EJB module's deployment descriptor is to use property sheets. (Those instructions start in Using Properties to Edit a Deployment Descriptor.) When you use Properties, all you have to do is specify file or object names and values. You don't see the actual descriptor file, and you don't have to write any XML. You make your selections using a dialog box, and the IDE automatically applies the changes across all the appropriate components of the EJB module.
It's also possible to edit the deployment descriptor directly. After a direct edit, you can no longer add or delete beans from the module or use the property sheets to change the descriptor. However, you can revert to the generated descriptor.
If you need to make a direct edit in the deployment descriptor file of an EJB module, do it as follows:
Right-click the EJB module's node and choose Deployment Descriptor Final Edit.
After directly editing an EJB module's deployment descriptor, you can still use the property sheets to make changes that don't affect the deployment descriptor. For example, you can still go to the Sun ONE AS tab of the EJB module's property sheet and specify or change the connection with the data source used by an entity bean in the module. However, fields that represent items in the deployment descriptor are closed to edits in the property sheets.
If you have used the Final Edit feature, but now want to go back to the last generated version of the deployment descriptor and continue from there to make changes in the property sheets, do as follows:
Right-click the EJB module's node and choose Deployment Descriptor Revert to Generated.
|
Note - If you choose Revert to Generated, any edits you made directly in the deployment descriptor file are lost. |
To use property sheets to add to, edit, or complete an enterprise bean's or an EJB module's descriptor, do as follows:
Select the bean's or EJB module's logical node, right-click, and choose Properties.
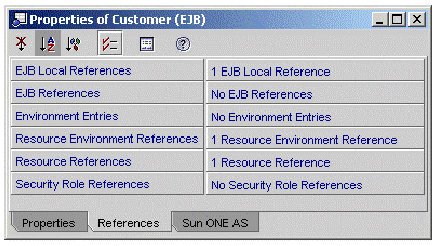
In the case of an enterprise bean, the Properties dialog box appears, showing at least three tabs:
You also see a tab for any other application server's plugin module that has been installed with the IDE.
For an EJB module node or a J2EE application node, there are two default tabs:
The default tabs for enterprise beans are described next.
Before you create an EJB module around cooperating enterprise beans, you might need to configure individual beans by specifying one or more properties on the beans. These properties are discussed tab by tab in the following sections: Using the Properties Tab, Using the References Tab, and Using the Sun ONE AS Tab.
Notice that any properties that are dimmed or read-only have been set automatically by the EJB Builder and can't be changed. If, for example, you decide your CMP entity bean should manage its own persistence, you must go to the EJB Builder wizard and recreate it as a BMP entity bean.
Since you're familiar with your bean's code, you'll probably recognize most of the fields in the Properties tab. Also notice the following:
If you want your bean to use another existing class, you can override one of the classes shown in these Properties fields.
If you want to change the name of a class but retain the same class content, you must either make the change in the property editor for that class (not the property editor for the logical bean node) or directly edit the class code in the Source Editor.
Some property types in this tab are unique to specific bean types, and these properties are discussed next.
In the Properties tab for any entity bean, you also see the following fields:
In the Properties tab for a CMP entity bean, you also see the following fields:
In the Properties tab for a session bean, you also see the following fields:
In the Properties tab for a message-driven bean, you also see the following fields:
To prepare your enterprise bean for assembly and deployment, you complete this tab's fields, which represent many of the enterprise bean's external dependencies. Some of the information can be stated at the bean level and then overridden at the module or application level.
One example of a References tab is shown next.
 [ D ]
[ D ]
Each field in this tab is described next, with instructions for completing the field.
This field and the following one contain information about any other enterprise beans whose methods your bean calls. You use the EJB Local References field to specify references to beans that reside within the same JVM. An EJB local reference accesses the local interface of a bean running in the same JVM, although the two beans might be in different EJB modules. (For contrast, see Specifying EJB References.)
You can specify the name of the implementing enterprise bean at development time, and, if necessary, that setting can be overridden when your bean is assembled into an EJB module.
In the bean's code, you use the JNDI interface to look up the local home interface of another bean. Before enclosing the bean in an EJB module, you also link the beans by specifying those same references in the bean's property sheet. The person who assembles the application looks at the EJB References field to see which other beans your bean must have access to in order to work as designed. The references specified here at the bean level can be used or overridden at the module level, as needed in the target environment.
|
Note - Before enclosing multiple beans in an EJB module, be sure the bean-to-bean references are coded in the bean class and the EJB references are specified in the property sheet. |
To specify EJB local references in the property sheet, do as follows:
1. Click the EJB Local References field, then the ellipsis (...) button.
The EJB Local References property editor appears.
The Add EJB Local Reference dialog box appears.
The following fields are mandatory.
The description field is optional. That information might be helpful to the person who assembles your EJB module into an application.
In the EJB References field, you specify links to any enterprise beans that reside outside your bean's JVM but whose methods your bean calls. You use the field as you would the EJB Local References field, except that the reference you name here points to the remote interface of a bean running in the another JVM.
An environment entry, stored in your bean's runtime environment, is a named data value that depends on policy or procedure at the deployment site. Environment entries can alter the behavior of an enterprise bean at deployment time without modifying the source bean's code. Any values that you set here in the property sheet can be overridden at deployment time in the deployment descriptor of an EJB module or an application.
For example, the Account bean can use the environment entry overdraftAllowed (of type boolean). This variable might indicate whether or not a particular bank that uses the Account bean allows customers to overdraw their account balances. The Account bean looks up the value of overdraftAllowed to decide what should happen if a customer's request causes an overdraft.
To add an environment entry, do as follows for each environment:
1. Click the Environment Entry field and then the ellipsis (...) button.
The Environment Entry property editor appears.
The Add Environment Entry dialog box appears.
The following two fields are mandatory.
You can also complete the other two fields.
Use this field to specify any administered object your bean needs to use, such as a JMS destination (a queue or topic). The resource environment reference is the queue's or topic's logical name.
This logical name must map to the name that appears in your bean class's InitialContext.lookup method. (Notice that this logical name can be either the actual JNDI name or merely a reference name such as myQueue, just as long as it matches what is in the lookup code.)
When your bean needs the resource that you specify in this field, an instance of the resource is created by the factory mentioned in the next section.
To add a resource environment reference, do as follows for each object that you want your bean to use:
1. Click the Resource Environment Reference field and then the ellipsis (...) button.
The Resource Environment References property editor appears.
The Add Resource Environment Reference dialog box appears.
The following fields are mandatory.
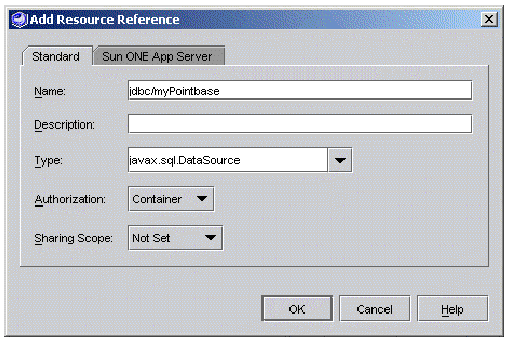
This field contains the name of the factory that creates a connection to a resource that your been needs. This resource might be a datasource (such as a relational database), an administered object (such as a queue or topic), a JavaMail session, a URL, or a J2EE connector (which lets you connect your bean to another application system or EIS). The information in the Resource Reference field must correspond to a JNDI lookup method call in your bean class code. However, in this field you don't have to specify the resource by its actual JNDI name. It's a reference name, and it must simply match what you've written into your bean class code.
To add a resource factory reference, do as follows for each resource that your bean needs:
1. Click the Resource Factory Reference field and then the ellipsis (...) button.
The Resource Factory References property editor appears.
The Add Resource Reference dialog box appears.
The following fields are mandatory.
javax.naming.InitialContext myContext = new javax.naming.InitialContext(); javax.sql.DataSource mySource = (javax.sql.DataSource) myContext.lookup("java:comp/env/jdbc/myPointbase"); |
The following field is optional.
If your enterprise bean does its own security checking, that is, if it checks to see if the user has the authority to use your bean to perform a task, you must provide security-role references in this field. (A message-driven bean needs no security role; it merely propagates whatever security information came from a client in a message. Any needed security checking is done later by either the container or the enterprise bean from which the message-driven bean requests work.)
To use this field, you must also have provided corresponding code (programmatic security) in your bean class. For example, your code might include the following method from the javax.ejb.EJBContext interface:
In that case, you also need to add all applicable role names as security-role references in this property sheet.
Security roles can also be defined at the module level. For more information, refer to Building J2EE Applications.
To add a security role at the bean level, do as follows:
1. Click the Security Role Reference field and then the ellipsis (...) button.
The Security Role References property editor appears.
The Add Security Role Reference dialog box appears.
The tab for Sun ONE Application Server (the Sun ONE AS tab) shows properties that are automatically assigned when you use the EJB Builder to create an enterprise bean. Many of these properties contain default values based on how the server understands the type of enterprise bean. Also, any non-local EJB references that you've declared between enterprise beans appear automatically as EJB Reference Mappings in the Sun ONE AS tab.
You'll rarely need to specify any properties on the Sun ONE AS tab for an individual enterprise bean. The application server requires more information on an EJB module that contains one or more CMP beans. There, you see the IDE's generated instructions to the container on how to intercede between the bean and its underlying data storage.
First, let's consider the property-field values in the Sun ONE AS tab for individual enterprise beans. Then, starting in Creating and Configuring an EJB Module, we will explore how to create an EJB module around enterprise beans, and how to set a CMP entity bean's database-related properties at the EJB-module level.
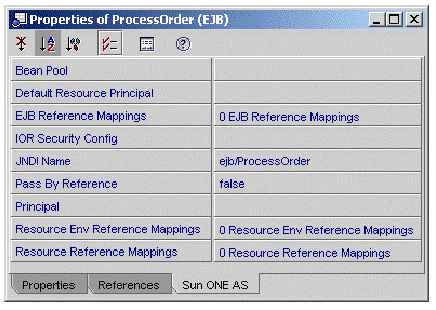
For a session bean, a CMP bean, or a BMP bean, the Sun ONE AS tab displays the properties shown next. The following example uses a session bean called Process Order.
The plugin supplies values in the following fields if they have been specified in the bean's other property sheets or source code:
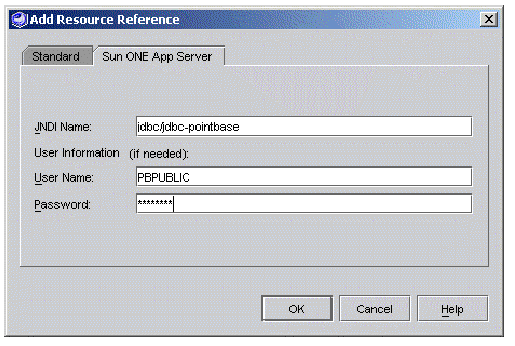
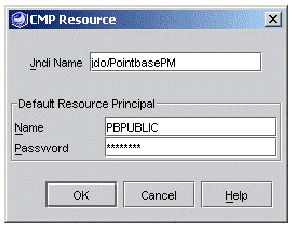
For an entity bean, this is where you specify the data source by two names: the reference name and the actual JNDI name. When you open the properties editor, you see a dialog box with two tabs, as shown in the next two figures.
In the example in FIGURE 8-3, the data source's actual JNDI name is jdbc/jdbc-pointbase. Both the default user name and the default password are PBPUBLIC (all capitals). After you type the password, press the Enter or Return key.
In most cases, you don't need to change the values of the other properties in the Sun ONE AS tab. However, if you need details, refer to the documentation on Sun ONE Application Server. The remaining properties in this tab allow you to do the following:
The relationship between an enterprise bean and its underlying data storage is controlled through properties specified on the EJB module that contains the bean, not through the individual bean's properties. Before you deploy an enterprise bean to any server, you must first create an EJB module to hold the bean, whether you do this within the context of testing (see ) or for production purposes. See Setting Database-related Properties for CMP Entity Beans for details.
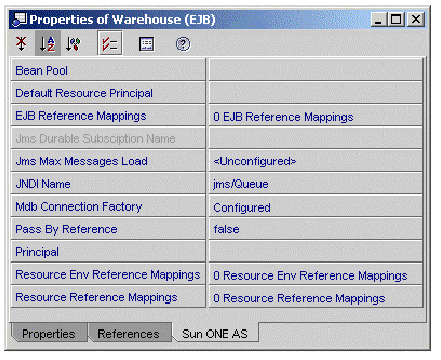
The Sun ONE AS tab for a message-driven bean also contains properties that describe the kinds of messages the bean consumes and the resources the bean uses.
Most of the time, you will need to consider only the following properties:
For details on the other properties, refer to the documentation for Sun ONE Application Server 7.
To deploy an enterprise bean, you must first create an EJB module around the bean. EJB modules are discussed next.
Perhaps you have designed an enterprise bean to work on its own, or perhaps you have designed several beans to work cooperatively. In either case, you must package your enterprise beans in an EJB module to deploy it to an application server. In the case of multiple cooperating beans, the module ensures that the right beans are kept together and that all necessary information about the beans' operating requirements is packaged with them.
Enterprise beans don't have to be in the same module to work together; they can run in different modules and even in different JVMs. However, sometimes it's more convenient to keep cooperating beans together in the same module.
If you need to have multiple CMP beans working together within an EJB module, it's best to start by using the EJB Builder wizard to create a set of related CMP beans from a database or database schema. At the same time, the wizard creates the surrounding EJB module. When you approach the task that way, the IDE automatically preserves all the relationships between the beans.
An EJB module is a logical entity in the IDE, a symbolic representation of its physical counterpart, which is an EJB JAR (a standard Java archival file with the extension .jar). The EJB module contains a J2EE deployment descriptor, which it uses to track cooperating enterprise beans, the beans' source code and interconnections, and properties that reflect the deployment environment, that is, information specific to an application server. However, neither the beans nor copies of them actually reside in the EJB module.
The beans in an EJB module can be in the same directory or in several directories, even in different filesystems.
An EJB module is the smallest unit of enterprise beans that can be deployed to an application server. Ordinarily, the unit that executes on an application server is a J2EE application containing several EJB modules, each of which contains one or more enterprise beans.
Here are some general guidelines for deciding how many enterprise beans to package in a single EJB module. (For details, refer to the documentation for the Java 2 Platform, Enterprise Edition.) You might want to package your beans for any of the following results.
If you are going to use the IDE's testing feature on a CMP bean, consider whether you want to create the bean's EJB module first and use it in testing, or wait until after you have tested the bean.
The testing process creates an EJB module for you. This is not a module you can deploy in production, but one that lets you test your CMP bean's code and all its deployment settings. You might save time by running your CMP bean through the testing process, finding out how the properties you set there work, and afterward replicating those settings in a "real" EJB module that you generate for production purposes, following the instructions in this section.
Or, if you would rather not do the process twice, you can create a production EJB module according to the instructions in this chapter and substitute it for the module that the testing feature provides.
For information on testing enterprise beans, see Chapter 9.
To create an EJB module around a single enterprise bean, do as follows:
1. In the Explorer window, right-click the bean's logical node and choose Create New EJB Module.
2. In the New EJB Module dialog box, rename the module if necessary.
3. Select a location for the module from the tree view of your filesystem.
To create an EJB module around multiple cooperating enterprise beans, follow the steps above, but use the Control or Shift key to select at the same time all the beans you want in the module.
Another way to create an EJB module around several beans is to right-click the beans' Java package and choose New All Templates. In the New wizard, expand the J2EE node and select EJB Module. The IDE creates a new, empty EJB module in the package. Right-click the module node and choose Add EJB. In the file chooser that appears, use the Control or Shift key to select all the beans you want to include in the EJB module.
See the contents of the module by expanding its node in the Explorer.
If you need to add one enterprise bean to a module you've already created, do as follows:
1. In the Explorer window, right-click the EJB module's node and choose Add EJB.
A file chooser appears, showing a tree view of your filesystem.
2. Select an enterprise bean from the tree view.
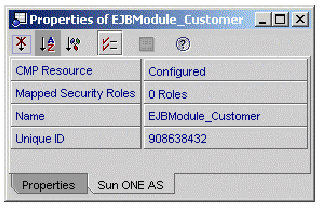
The server-related properties for a CMP entity bean are provided at the level of the EJB module.
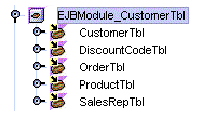
FIGURE 8-4 shows the Sun ONE AS tab for an EJB module called EJBModule_Customer. This EJB module, as you will see a little later, contains several related CMP beans.
 [ D ]
[ D ]
In a CMP bean's Sun ONE AS tab, you can edit the following properties:
 [ D ]
[ D ]
Sun ONE Application Server 7 automatically generates its own SQL to handle your CMP beans' queries to the database. Ordinarily, you don't need to be concerned with those SQL statements.
However, it's possible for your application to use a CMP entity bean that was created in the EJB 1.1 environment, or a CMP bean that was created using an earlier version of the Sun ONE Studio IDE. Or, you might have based a CMP bean in your application on a bean class of version 1.x (for details on creating such a CMP bean, see Chapter 4).
If your application contains such CMP beans, you can treat them the same as you do EJB 2.0 CMP beans, with one important change. You need to go to the server's generated SQL and adjust a statement relating to the bean's finder or selector methods. For these methods of CMP 1.1 beans, Sun ONE Application Server 7 uses an extended version of the Java Data Objects query language (JDO QL).
The application server exposes that query language in the property sheet for the CMP 1.1 bean's finder method. Look in the Sun ONE AS tab for properties relating to this method.
|
Note - Be sure that none of your beans (tables) or their fields (columns) have names that are reserved words in SQL. |
For details, refer to the documentation for Sun ONE Application Server 7.
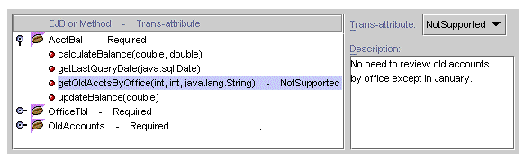
Transaction attributes tell the EJB container how to control a CMT bean's transactions. In a session bean that manages its own transactions (a BMT bean), you must explicitly code the bean's transactions. In a CMT bean, you include no explicit code for transactions; instead, you let the container control them based on transaction attributes you assign to your bean's methods.
By default, the IDE sets all bean methods to use the Required attribute. You can assign different transaction attributes at the bean level or at the method level. For example, if you don't want a particular method to be included in the context of a transaction, you can change that method's attribute from Required to Not Supported.
The transaction attributes are stored in the deployment descriptor, and they can be edited using the EJB module's property sheet. Before an EJB module that contains CMT beans is assembled into an application, you should make sure that the appropriate transaction attributes are specified for that module.
When you change a transaction attribute for an individual bean or for a method in a bean, the attribute is changed only for execution within that EJB module. The bean's source code has not been changed. If you reuse that bean within another EJB module, you can apply a different set of transaction attributes.
To change a CMT bean's transaction attributes within an EJB module, do as follows:
1. In the Explorer window, right-click the bean's EJB module and select Properties.
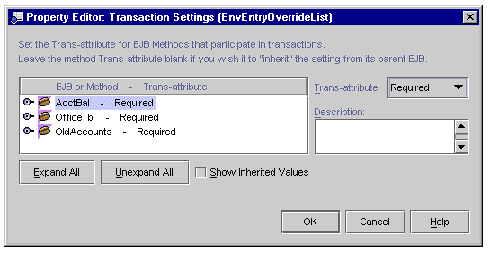
In the Properties tab, notice that the Transaction Settings field displays the value Container-transaction.
2. In the Properties tab, click the Container-transaction field, and click the ellipsis (...) button.
The Transaction Settings dialog box appears. Notice that the larger panel displays the module's enterprise beans that use CMT, each bean with a transaction attribute that applies to the entire bean.
While you're working in the Transaction Settings dialog box, you can take the opportunity to provide the application assembler a description of the transaction settings for individual beans or methods in the module. For example, you might want to explain why you've changed a particular transaction attribute in this EJB module.
3. Click OK when you're finished with transaction attributes.
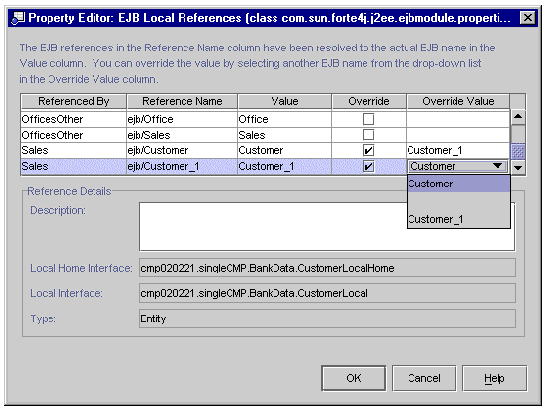
In Specifying EJB Local References and Specifying EJB References, you saw how references between enterprise beans are declared at the level of the individual bean. Those references also can be overridden as follows:
This feature is handy if, for example, you want to package a particular enterprise bean in three different EJB modules to be used variously by one or more applications.
To use this feature, you must provide the EJB module (or application) two or more enterprise beans whose interfaces are the same. The feature works for local, remote, or local and remote interfaces, but the beans' interfaces must be identical, while the bean classes or properties (deployment information) can differ.
To override a bean reference within the EJB module, do as follows:
1. In the Explorer window, right-click the bean's EJB module and select Properties.
2. Click the applicable references field (EJB Local References or EJB References) and then click the ellipsis (...) button.
The appropriate property editor appears.
3. Find the enterprise bean whose reference you want to override and click the Override checkbox.
4. Click the Override Value field.
Below the Override Value field appears a combo box containing the names of the enterprise beans you can select from. An example is shown in FIGURE 8-6.
 [ D ]
[ D ]
5. Select the reference you want the enterprise bean to use, and click OK.
To override a bean reference at the application level, do as follows:
1. In the Explorer window, right-click the bean's application and select Properties.
2. Click the applicable references field (EJB Local References or EJB References) and then click the ellipsis (...) button.
The appropriate property editor appears.
The property editors for EJB references and EJB local references are the same at the module and application level. Continue with the same steps as described in the previous section.
When you select an enterprise bean and create an EJB module around it, or when you add enterprise beans to an EJB module, the module's class closure feature takes care of finding and including all of the bean's source code, including helper classes.
Look at the classes included in a module as follows:
1. In the Explorer window, select the EJB module.
2. Right-click and select Calculate EJB JAR Contents.
A window opens to display all the included classes.
However, in a few cases, class closure might not pick up all the files you want in the module. For example, you might want to add an image file from elsewhere. You can add extra files by hand.
Add a file to an EJB module as follows:
1. In the Explorer, display the property sheet for the EJB module.
2. Click the Extra Files field and then the ellipsis (...) button.
The Extra Files property editor appears.
3. In the Source pane, select a file and click Add.
The file appears in the Files To Be Added pane.
When you deploy the EJB module, this file is included in the EJB module.
An EJB module is a standard JAR file (see Creating and Configuring an EJB Module for more discussion). An individual EJB module can be deployed to an application server. Or, you might want to hand off an EJB module to another part of the organization for application assembly. You can create an EJB JAR file in which to export the module and its contents for use by the assembly people.
Create an EJB JAR file to house an EJB module as follows:
1. In the Explorer window, select the EJB module.
2. Right-click the module node and select Export EJB JAR File.
The Specify Location and Application Server Type window appears.
3. Accept the default location or navigate to another place you want the resulting JAR file to live.
4. Select the appropriate server in the Application Server Type field.
5. Specify which types of files to include: all files or just JAR files. Then, accept the resulting JAR file name or specify another.
If you select All JAR files, the resulting JAR file appears in the large pane. Select it and its file name appears in the File Name field. Specify another name here if you wish.
If you select All Files, all the files in the folder appear in the large pane. Select a file to export, renaming the result unless you want to replace the original file.
The Output Window appears and shows you the progress as the module and its contents are compiled. Notice any error messages in this window.
After the EJB JAR file has been created, you can still adjust the module or its contents for use in this or another EJB JAR file.
One or more EJB modules can be placed in a J2EE application and deployed. For details on assembly and deployment, refer to Building J2EE Applications.
When you have one or more EJB modules containing all the enterprise beans that will be needed to produce a desired result, you are ready to create a J2EE application around all the components. Normally, what is deployed on an application server is an application containing one or more EJB modules and one or more web modules.
The IDE automatically generates an EAR file for each J2EE application. The EAR file is the portable archive of the application's contents, and it includes a deployment descriptor for the application as a whole. You can separately configure the properties on the application.
For details about assembling EJB modules and other types of modules into an applications and for details on their configuration, refer to Building J2EE Applications.
| Building Enterprise JavaBeans Components | 817-2330 |
Copyright © 2003, Sun Microsystems, Inc. All rights reserved.