| C H A P T E R 9 |
|
Testing Enterprise Beans |
As you develop enterprise beans, you might find it expedient to test them before doing a full-scale application assembly and deployment to an application server for production purposes. Using the Sun ONE Studio 5 IDE, you can generate a J2EE application for testing purposes, including a web module with JavaServer Pages (JSP
(JSP ) test pages and an EJB module for your bean. You then use the test feature to display the JSP page's resulting HTML page in a web browser. In the HTML page, you can create instances of an enterprise bean and exercise the bean's methods.
The objects that the IDE creates for you are designed for use only during the test process. They are not intended for deployment in a production environment.
You can use the IDE's testing feature with any supported database and application server. The following instructions and example use PointBase as the test database, Sun ONE Application Server 7 (which is hereafter referred to as the application server) as the test server, and Netscape Navigator as the web browser.
Notice that you can also deploy and execute production applications on the application server. Refer to Building J2EE Applications for details.
Your testing set-up can vary depending on which type of enterprise bean you want to test. Some preparation pointers follow.
Variations on the set-up for enterprise bean tests are described in If You Want to Test a CMP or BMP Bean.
To use the IDE's testing feature on an enterprise bean, you must be able to deploy your bean's application to the application server. Sun ONE Application Server 7 was installed automatically when you installed the IDE. (If you intend to use another application server for testing, you must have installed it.) Before you start testing your enterprise bean, the admin server and at least one server instance must be running.
Start the application server as follows:
1. Go to the Runtime tab of the IDE's Explorer.
2. Expand the nodes for Server Registry, Installed Servers, and Sun ONE Application Server 7.
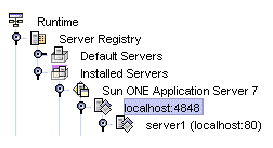
Under the Sun ONE Application Server 7 node is the admin server node, and under that node is the server instance node. An example is shown in FIGURE 9-1.
3. Right-click the admin server node and choose Start.
The admin server node is labeled app-server-host:admin-server-port. In FIGURE 9-1, the admin server node is localhost:4848.
Below it, the application server instance node is labeled server1 (app-server-host:app-server-instance-port). In FIGURE 9-1, the server instance node is server1(localhost:80).
Depending on how your environment is set up, you might or might not have to start the server instance separately. If the server instance does not start automatically when you deploy an application, follow these steps:
4. Right-click the application server instance node and choose Status.
The Sun ONE Application Server Instance Status dialog box appears.
5. Click the Start Server button.
The admin server opens the server instance code window and displays messages as the server instance is starting. When it's finished, you see the message Application OnReady complete.
6. Minimize the code window if you like.
However, don't close the code window, as that stops the server. Close the server instance status window.
If you need detailed instructions for starting the application server, refer to Sun ONE Studio 5, Standard Edition Getting Started Guide.
You can use the PointBase database, which is included in the IDE, to test any enterprise bean that needs access to a database. (Normally, the database is needed only for testing entity beans.)
Set these properties as follows:
1. In the Explorer's Filesystems tab, select the EJB module node (the node that isn't included under a test application node) and display its Properties.
The module's property sheet appears.
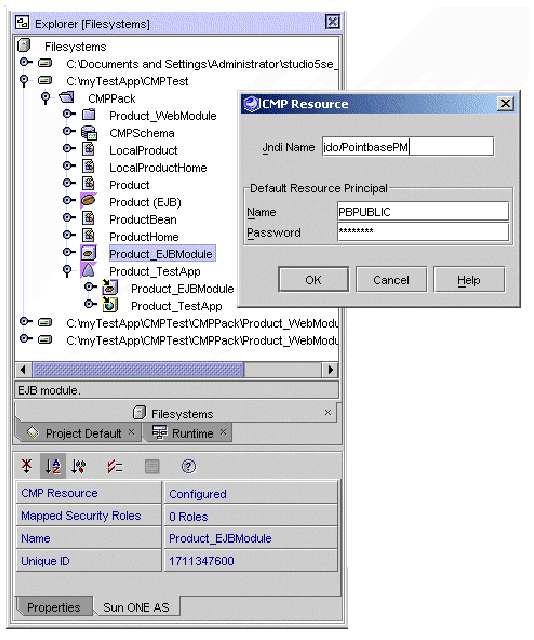
2. In the Sun ONE AS tab of the EJB module's property sheet, display the property editor of the CMP Resource property.
3. In the property editor, specify a connection to the database as follows:
|
Note - Here, type Pointbase with an initial capital only. After you type the password, press Enter. |
4. Save your work with File  Save All.
Start the PointBase server, connect to the database, and start the PointBase console. Then, launch a web browser from inside or outside the IDE.
To start the PointBase database server:
 Choose Tools
  PointBase Network Server
  Start Server from the main menu.
When the PointBase server window appears, you can minimize it.
1. In the Runtime tab of the Explorer, expand the Databases node.
2. Right-click the node whose label starts jdbc:pointbase:server:// and choose Connect.
The broken icon changes to appear whole.
To start the PointBase console:
1. Choose Tools  PointBase Network Server
  Start Console from the main menu.
The console window appears behind the Connect to Database window.
2. Click OK to use the default (sample) database.
The Connect to Database window closes and the console window remains. You can minimize the console window.
Don't close down either the console window or the server window until you're finished with your testing activities. However, you can minimize those windows.
To launch a web browser from inside the IDE:
 Choose View
  Web Browser from the main menu.
Now you're ready to use the IDE's wizard to create the EJB module, the web module, and the application with which you will test your enterprise bean.
Follow these steps to generate test objects for your enterprise bean:
1. In the Explorer window, select the bean's logical node, right-click, and choose Create New EJB Test Application.
A wizard appears, showing default values for all the components needed to test your application.
|
Note - If you right-click one bean and see that the Create New EJB Test Application menu item is disabled, the bean probably has no remote interfaces. Follow the directions in Adding Remote Interfaces to a Bean and try again. |
Notice that the Package field displays the current package name where your bean resides. You can move the EJB module and test application objects that the wizard is about to create by typing other package names into those fields.
In the next fields, you can also specify other package and module names if necessary. However, if you plan to substitute an existing EJB module for the one that this feature will generate, don't specify the existing module here. Instead, you'll use the application's property sheets later in the process.
Notice the selections in the application server combo box. All extant application server instances appear there, and you can deploy your test application to any of them.
2. Mark the Auto Deploy checkbox or leave it blank.
If you select the checkbox, the IDE automatically deploys your bean's testing module to the server as soon as you've finished creating it in the wizard. You might find this approach efficient if the bean you're testing is stand-alone and needs no other beans to do its work.
If you leave the checkbox unselected, you will handle the deployment yourself in a later step. If your bean needs to be tested in conjunction with other beans, leave the checkbox blank.
3. Click OK to generate the EJB module, the web module, and the application, and (if applicable) to deploy the application automatically.
A progress monitor tells you how the module generation and deployment are going. When deployment is complete, a message appears in the IDE's log window.
Dismiss the information window telling you an alternate view is available.
FIGURE 9-2 shows an example of how generated testing objects might appear for a session bean called Converter. In this example, the wizard has been allowed to place in the bean's package all the testing objects it produced.
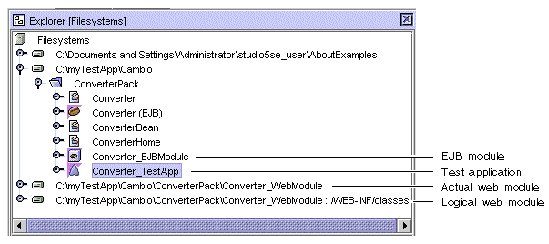
Notice the generated objects that have been added to the bean's package:
Unless you specified otherwise in the wizard, the IDE has placed the web module in a new filesystem of its own, as shown next. When you expand the filesystem node, you see the web module as the first subnode, labeled WEB-INF. Under it, you see the JSP pages. Within the WEB-INF subnode, you see the helper Java classes.
You have now generated the basic test application. If your bean references any other beans, add them to the EJB module as follows:
4. In the Explorer window, select the generated EJB module node, right-click, and choose Add EJB.
5. In the tree view, navigate to the referenced enterprise bean, select it, and click OK.
The referenced bean is added to the EJB module, and a reference to the bean is added to the test application.
Repeat Step 4 and Step 5 for each referenced bean.
Now, unless you marked the Auto Deploy checkbox in Step 2, you're ready to deploy your test application to a server. Or, if you prefer, you can deploy and execute the application in one step. The following sections describe each approach.
To deploy your test application to the application server, do the following:
 In the Explorer window, select the J2EE application node, right-click, and choose Deploy.
A progress monitor tells you how the deployment is going. When the progress monitor disappears, look in the server instance tab of the output window for a message indicating that deployment was successful.
Now, follow the steps under Executing the Test Application.
To deploy your test application to a server and start it executing at the same time, do the following:
 In the Explorer window, select the J2EE application node, right-click, and choose Execute.
A progress monitor and output window tell you how the deployment and execution are going. You see messages, for example, indicating that the application server has been contacted, the enterprise bean or beans have been deployed on the server (notice that the server instance is referred to by a name such as localhost), the wrapper and RMI-IIOP code have been compiled, the JAR or JARs for the server and client have been made, the web server has been contacted and asked to run the test application, and all the generated code has been saved.
When this double step is complete, a web browser appears and opens to the test client, a JSP page that contains the GUI for testing your enterprise beans. An example is shown in FIGURE 9-3.
Continue at Using the Test Client to Test Your Beans.
If you didn't choose Execute to deploy and execute your test application in one step, you can do the following to test your enterprise bean or beans:
 Open a web browser and type in the appropriate URL.
This URL has the following format if you are using the application server:
http://app-server-host:app-server-port/application_name/
The test application's client, a JSP page, appears in the browser.
You follow the instructions on the test client's JSP page to create instances of your enterprise bean and call its business methods. The following section describes how you might test a very simple session bean called Converter, which converts amounts in U.S. dollars to the equivalent values in Japanese yen at the rate of .009 dollar to the yen.
This example session bean resides in the Java package ConverterPack.The bean's method to be tested is yenToDollar, and its source code looks like this:
public double yenToDollar(double yen) { return yen * .009; } |
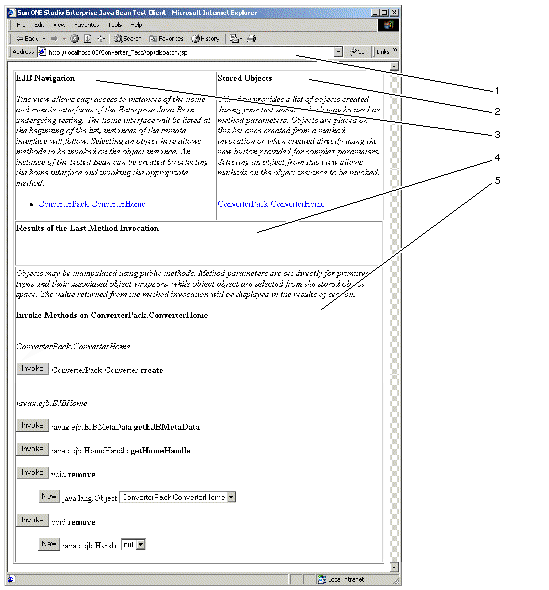
FIGURE 9-3 shows the JSP page that the IDE has created for this particular application client, which was generated to test the Converter session bean.
 [ D ]
[ D ]
As shown in FIGURE 9-3, the parts of the testing window are as follows:
1. The browser's URL field shows the location of the test client's JSP page. Your client's URL is generated automatically by the IDE's testing feature. If you like, you can use this URL to return to this testing window.
2. The Stored Objects frame shows the stack of objects created during your testing sequence by the IDE or by your own actions, for example, when you have called a method on an interface or on a bean class. Right now, only the home interface is shown.
3. The EJB Navigation frame shows the objects that the IDE has generated so that you can test your bean. If the bean you're testing has references to other beans and your EJB module contains more than one bean, this frame lists the created objects in logical order, that is, in the order that one bean in the module calls another.
4. The Results of the Last Method Invocation frame shows, for example, the last method you called and its parameters. Right now, since we haven't yet begun testing the session bean, nothing appears in this frame.
5. The bottom frame shows the methods that are now available for you to test. This frame changes as you place focus on different components of the bean (listed in the EJB Navigation frame).
Now let's test the dollarToYen bean's home interface and business method.
To verify that ConverterPack.ConverterHome correctly creates an instance of the session bean, do as follows:
1. In the EJB Navigation frame, click the home interface name.
2. In the bottom frame, click the Invoke button under the home interface name.
In this case, you click the Invoke button under ConverterPack.ConverterHome.
Notice the following changes in the page's frames:
Now let's test the Converter bean's business method, yenToDollar.
To verify that the instance of ConverterPack.Converter correctly converts Japanese yen amounts to U.S. dollars, call the bean's business method as follows:
1. In the EJB Navigation frame, click the bean name (under the home interface name).
Notice that the Results frame is cleared and that the bottom frame's list of invokable methods now starts with the bean's business method.
2. In the bottom frame, under the business method, type a parameter into the input field and then click the Invoke button.
As shown next, we use the parameter 1000. (The .0 is appended by the IDE.)
After clicking Invoke, notice the following changes in the page's frames:
You can invoke and test any other bean methods that are shown in the Invoke Methods frame.
When you create an object by invoking the bean's other methods, that object can be used to test the bean further. For example, the objects created so far by testing ConverterPack.Converter also appear in a combo box beside the label javax.ejb.EJBObject. You can select one of the objects and create a new class to use for testing.
You can make changes in an enterprise bean and retest it without generating another test application. However, you must redeploy the test application before testing a bean any of whose components you have modified. Do this as follows:
2. In the Source Editor, make your changes in the enterprise bean's code.
3. In the Explorer's Runtime tab, undeploy the test application.
Expand the server instance node and the Deployed Applications node. Right-click the test application's node and choose Undeploy.
4. In the Explorer's Filesystems tab, redeploy and re-execute the test application.
As mentioned in Fulfilling the Prerequisites for Testing, if you're not testing something like a simple session bean that already has its remote interfaces, you need to consider the preparatory steps described next.
You can test an entity bean in one of the following ways:
Either way, when you're testing an entity bean, you must use an EJB module in which the bean's properties are declared. Since the EJB module generated by the testing feature is designed only for test use, you will also have to create a "real" EJB module for your production entity beans. You can do this before or after testing.
If you want to test an enterprise bean that is designed to interact with another bean, (for example, if you're testing a session bean that manages work done by an entity bean), you must make sure the referenced bean is included in the EJB module.
You can take either of the following approaches:
Before you generate the test application, make sure that all necessary EJB references are specified in the beans' property sheets, and that any necessary overrides are specified in the EJB module's property sheet. Otherwise, the test might fail or give mixed results.
See Specifying EJB References for details.
If the bean you're testing has only local interfaces, you can prepare it for testing by copying the local interfaces to create remote ones. Briefly, you use existing interfaces as follows:

|
Caution - Don't try to use this process to add EJB 2.0 features (such as local interfaces or references) to an EJB 1.1 CMP entity bean that has not been fully updated to conform to the current version of the Enterprise JavaBeans Specification. The resulting bean will be invalid and irreparable. See Avoiding the Use of New Features in an Old Bean for details. |
Add remote interfaces one at a time. (These instructions start with the local interface and the corresponding remote interface. Later you will repeat the process with the local home interface and the home interface.)
You can add remote interfaces to a bean using either the Customizer or the bean's property sheets. Each approach is explained next.
1. In the Explorer window, right-click the interface node labeled LocalBean_name and choose Copy from the menu.
2. Select the bean's Java package, right-click, and choose Paste  Copy.
Copy.
A copy of the interface appears in the folder, labeled LocalBean_name_1.
3. Select the copy, right-click, and choose Rename. In the Rename dialog box, name the copied interface according to the J2EE convention: Bean_name.
4. In the Explorer, right-click the bean's logical node and choose Customize.
The Customizer dialog box appears.
Notice that the Customizer deals with many of the properties that are also available in the property sheet that appears when you right-click the bean's logical node and choose Properties. You can change many of the bean's properties in either dialog box. However, the Customizer deals only with properties on the bean itself, not with properties relating to application servers.
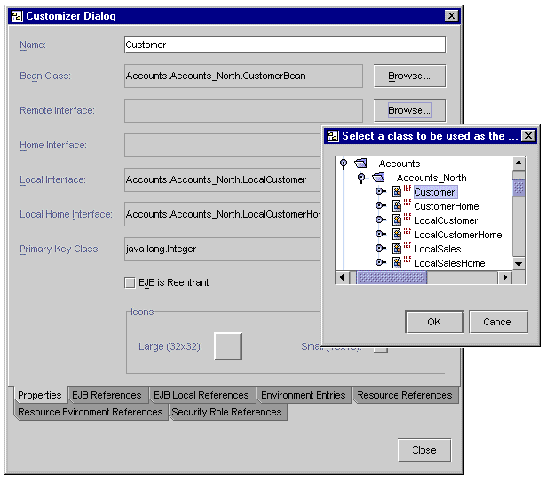
5. In the Customizer dialog box, find the empty Remote Interface field and click the Browse button.
The Select a Class file chooser appears, as shown in FIGURE 9-5. This example uses a CMP entity bean called Customer.
 [ D ]
[ D ]
6. Navigate to the interface class you created by copying and pasting. Select the interface node and click OK.
The class appears in the Remote Interface field.
(You will see later that the Remote Interface field in the bean's property sheet has automatically been updated.)
7. Dismiss the Customizer dialog box.
8. In the Explorer, expand the logical bean node. Expand the Classes node, select the new remote interface (labeled Remote Interface Class), and open it in the Source Editor.
Edit the remote interface class to extend javax.ejb.EJBObject.
9. For each method in the remote class, add the exception java.rmi.RemoteException.
10. Use the same process (Step 1 through Step 13) to create a home interface from a copy of the local home interface.
However, in Step 8, edit the home interface class to extend javax.ejb.EJBHome.
11. For each create method in the home interface, change the return type to the new remote interface.
You don't need to change the ejbCreate method in the bean class.
12. For each of the home interface's finder methods that finds a single object, change the return type to the new remote interface.
13. Compile your enterprise bean and resolve any errors.
|
Note - Be sure to remove from the two new interfaces any methods that cannot be used as remote methods. |
1. In the Explorer window, right-click the logical bean node and display the bean's properties.
2. In the Properties tab, click the Component Interface Set property and select Local and Remote from its combo box.
The logical bean icon appears with a red-X error badge until the actual interface classes are added and a yellow warning badge until you have edited the classes.
3. Right-click the local interface node and choose Copy.
4. Right-click the package node and choose Paste  Copy.
Copy.
5. Rename the copy to reflect that it is a remote interface class (bean_name).
6. Follow Step 4 and Step 5 to create a new home interface class as well.
Rename the copy bean_name_Home like other home interface classes.
7. Follow Step 8 through Step 13 in the previous section to make each of the two new interfaces remote.
Copyright © 2003, Sun Microsystems, Inc. All rights reserved.