| Sun Netra CP3240 Switch Installation Guide |
| C H A P T E R 1 |
|
Getting Started |
This chapter provides information and procedures needed to install and make the Sun Netra CP3240 switch operational. This chapter should be read before using the board.
In addition to this chapter, refer to the following safety documentation:

|
Caution - When the system is plugged in, energy hazards are present on the midplane. Do not reach into the enclosure. |
|
|
Caution - Static electricity can damage electronic components. Wear a wrist strap grounded through one of the system’s ESD ground jacks when removing and replacing hot-swappable components. |
This chapter contains the following topics:
The following sections briefly describe the minimum system requirements and the configurable features. Links are provided to other chapters and appendices containing more detailed information.
The switch can work in any AdvancedTCA shelf. It is mainly designed to be used as hub blade, however, it can also operate a node or a full-mesh blade.
In AdvancedTCA. the hub board defines the system, so it is important that it be put in the correct slot. In all shelves there are two slots specifically designated for hub boards, logical slots 1 and 2. If the slots are not labeled, these slots are easily identifiable because they have a larger number of Zone 2 connectors than the other slots (the only slots with all five Zone 2 connectors).
Base is always routed in a dual star. This means every node slot has a Base channel routed to each of the hub slots. Independent of how the Fabric is used, a hub board is always needed for Base. If full mesh node boards are used in a full mesh shelf, a hub board is not needed for Fabric.
The switch has the following power requirements:
|
Designed max power with 15W RTM, and 100W shared for all AMC sites |
The 48VDC has a tolerance of 0VDC to 75VDC without damage. The switch will operate when 48VDC is 36VDC to 72VDC, inclusive.

|
Caution - Any input voltage outside the range of 0VDC to 75VDC can damage the switch. |
The switch requires air flow. A minimum of 100 LFM should be kept on the board at all times. If an RTM is being used, active RTM cooling is not required.
The switch might contain materials that require regulation upon disposal. Please dispose of this product in accordance with local rules and regulations. For disposal or recycling information, please contact your local authorities or the Electronic Industries Alliance at http://www.eiae.org/.
Check the shipping carton for damage. If the shipping carton or contents are damaged, notify the carrier and Sun. Retain the shipping carton and packing material for inspection by the carrier. Obtain authorization before returning any product to Sun. Refer to the Netra CP3240 Switch Getting Started Guide (820-3254) for return instructions.
|
|
Caution - The system is sensitive to static electricity. To prevent damage to the assembly, always connect an antistatic wrist strap between you and the system. |
|
|
Caution - Do not flex the switches; the surface-mounted components can break if the switch is bent. |
To minimize the amount of switch flexing, observe the following precautions:
|
|
Caution - The heat sinks on a switch can be damaged by improper packaging. When storing or shipping a switch, ensure that the heat sinks have sufficient protection. |
The switch includes several connectors to interface to application-specific devices. Refer to the Chapter B for complete connector descriptions and pin outs.
The switch provides several jumper configuration options for features. Location figures and descriptions are provided in Chapter 3.
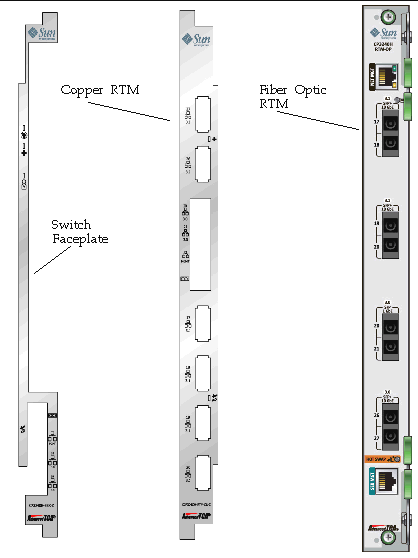
The following shows the Sun Netra CP3240 switch and the copper RTM (XCP3240H-RTM-CU-Z) and the fiber optic RTM (XCP3240H-RTM-OP-Z).
FIGURE 1-1 Switch and RTM Faceplates
There are two front panel Base 10/100/1000Base-T Ethernet uplink ports on the faceplate. They are ports number 18 and 19 on the Base network.
There is a 10/100 management Ethernet port on the faceplate. This port can be used to manage the Base and Fabric. This port and the 10/100 management port on the RTM can be used at the same time.
There is a RS-232 serial management port on the faceplate. This port can be used to manage the Base and Fabric. See Section 4.4, Serial Select for information about how to switch between managing the Base and the Fabric.
The following chart provides the RTM airflow requirements. No alarms are triggered at any of the listed temperatures for the given airflow.
The following graphs plot the impedance curves for the RTMs, per PICMG 3.0 requirements.
FIGURE 1-2 Netra CP3240H-RTM-CU Airflow (Pa)

FIGURE 1-3 Netra CP3240H-RTM-CU Airflow (InchesH20)

FIGURE 1-4 Netra CP3240H-RTM-OP Airflow (Pa)

FIGURE 1-5 Netra CP3240H-RTM-OP Airflow (InchesH20)

This section describes how to remove and install switches.
If you are hot-swapping the rear transition module for a switch, you must remove the switch from the front of the system before removing the rear transition module from the rear of the system. Do not remove the rear transition module without first removing the accompanying switch from the front.
Following are the instructions for removing a switch and, if necessary, the accompanying rear transition module.
1. Move the front cable management bracket to the lower position (FIGURE 1-6).
FIGURE 1-6 Front Cable Management Bracket in Lower Position

2. Disengage the injector/ejector mechanisms at the top and bottom of the board to notify software that the board is about to be removed. Wait for the Hot-Swap LED to light.
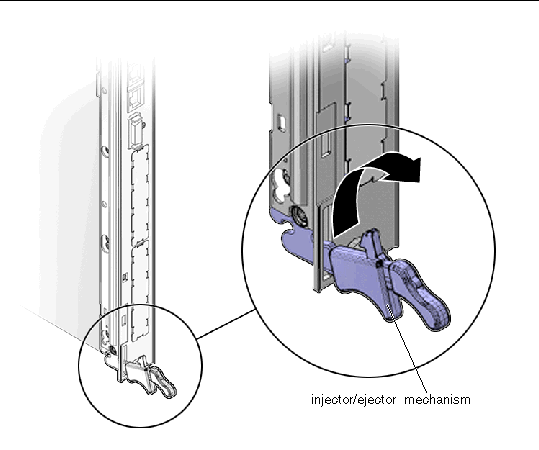
FIGURE 1-7 shows the proper way to remove or insert a hot-swappable board into a system.
FIGURE 1-7 Injector/Ejector on the Switch (Open Position)
3. Disconnect all cables connected to the switch.
4. Loosen the two board retention screws that fasten the board to the enclosure.
5. Open the ejectors fully, rotating the handles outward until the board disengages from the midplane.
6. Slide the board evenly out of the enclosure.
7. Determine if you are going to replace the rear transition module.
1. Remove the switch from the front of the server, if you have not already done so.
Refer to Removing a Switch From the Front of the Server for those instructions. Do not remove the rear transition module until you have first removed the switch.
| Note - Opening the handle on the RTM shuts down both the RTM and the switch. |
2. Disconnect any cables connected to the rear transition module for the switch.
3. Loosen any retention screws that fasten the module to the enclosure.
4. Open the ejectors fully, rotating the handles outward until the board disengages from the midplane.
5. Slide the module evenly out of the enclosure.
6. Install a replacement rear transition module or a filler panel to maintain the enclosure’s shielding and cooling performance.
Refer to Section 1.8.2.1, Installing the Rear Transition Module for a Switch.
|
|
Caution - Failure to cover all rear panel slots with rear transition modules or filler panels can negatively impact the cooling of the system. |
If you have a rear-access server, you must install the rear transition module before installing the front switch.
1. Choose an appropriate slot for the rear transition module.
Rear transition modules must be installed inline behind the accompanying front board. For example, if the accompanying front board is installed in slot 7, its rear transition module must be installed at the back of the system in slot 7.
2. Remove the filler panel, if necessary.
3. Prepare the rear transition module by opening its injector/ejector handles.
4. Carefully align the edges of the board with the guides in the slot.
Look into the enclosure to verify correct alignment of the rails in the guides.
|
|
Caution - Do not force the module into the slot. If it does not fit properly, check to ensure that you have the correct matching RTM for the switch. |
5. Keeping the board aligned in the guides, slide the board in until the injector/ejector mechanisms engage the retention bar.
6. Simultaneously push in the board and rotate the injector/ejector handles to their closed positions (rotate inward) to seat the midplane connectors.
7. Tighten the board retention screws to anchor the board in the shelf.
8. Connect the cables to the rear transition module.
The switches can be inserted only in slot 7 or slot 8 in the Netra CT 900 server.
2. Move the front cable management bracket to the lower position (FIGURE 1-6).
3. Remove the filler panel, if necessary.
4. Prepare the switch by opening its injector/ejector handles (FIGURE 1-7).
5. Carefully align the edges of the board with the guides in the slot.
Look into the enclosure to verify correct alignment of the rails in the guides.
6. Keeping the board aligned in the guides, slide the board in until the injector/ejector mechanisms engage the retention bar.
7. Simultaneously push in the board and rotate the injector/ejector handles to their closed positions (rotate inward) to seat the midplane connectors.
If system power is on, the Hot-Swap LED should light up. The Hot-Swap LED should blink for several seconds, and then go off. If the Hot-Swap LED does not go off after several seconds, push harder on the injector/ejector handles to verify that they are pushed in all the way.
8. Tighten the board retention screws to anchor the board in the shelf.
9. Connect the cables to the switch.
The following sections give the status information for all of the LEDs on the switch.
TABLE 1-3 describes the three LEDs defined by ATCA to monitor board status.
Note that both the OOS and MINOR LEDs are lit when the board is powered but not booted. This includes all Hot-Swap states M1 through M3. Refer to Hot-Swap LED.
This blue LED communicates the Hot-Swap status of the switch. TABLE 1-4 shows the different states of the Hot-Swap LED.
| Note - A board should be hot-swapped only when the LED is solid blue. |
| Sun Netra CP3240 Switch Installation Guide | 820-3251-13 |
Copyright © 2009 Sun Microsystems, Inc. All rights reserved.