| Skip Navigation Links | |
| Exit Print View | |

|
Sun Fire X2270 M2 Server Service Manual |
About This Documentation (PDF and HTML)
Download Server System Tools and Drivers
Sun Fire X2270 M2 Server Service Manual Organization
Sun Fire X2270 M2 Server Overview
Front and Rear External Features and Components
Maintaining the Sun Fire X2270 M2 Server
Preparing for Service and Operation
Powering On and Powering Off the Server
Component Replacement Procedures and Topic
Locations of Internal Server Components
Replacing the System Battery (CRU)
How to Replace the System Battery
Removing and Installing DIMMs (CRU)
Removing and Installing a PCIe Card (CRU)
Removing and Installing the PCIe Riser (CRU)
Removing and Installing a Power Supply (CRU)
How to Remove the Power Supply
How to Install the Power Supply
Removing and Installing a Hard Drive Filler and Hard Drive Assembly (CRU)
How to Remove a Hard Drive Filler
How to Install a Hard Drive Filler
How To Remove a Removable Hard Drive Assembly
How to Install a Removable Hard Drive Assembly
Removing and Installing the Air Duct (CRU)
Replacing a Blower Module (CRU)
How to Install a Blower Module
Replacing the Hard Drive Backplane Assembly (FRU)
How to Remove the Hard Drive Backplane
How to Install the Hard Drive Backplane
Removing and Installing the SP Module (CRU)
Sun Fire X2270 M2 Server Internal Cabling
Replacing the SATA Cable Harness (CRU)
How to Remove the SATA Cable Harness
How to Install the SATA Cable Harness
Replacing the Front I/O Cable (CRU)
How to Remove the Front I/O Cable
How to Install the Front I/O Cable
Replacing the Front I/O Board (FRU)
Removing, Installing, and Adding a CPU and Heatsink (FRU)
How to Remove a CPU and Heatsink
How to Add a New CPU and Heatsink Assembly
Replacing the Motherboard (FRU)
How to Install the Motherboard
Sun Fire X2270 M2 Server Service Procedures and Information
Using the Tools and Drivers CD
How to Backup Motherboard FRUID Information
BIOS Booting and Setup Considerations
Before You Begin
See:
 | Caution - ESD component damage. The CPU is highly sensitive to static electricity. Observe ESD precautions before handling the CPU. See Antistatic Procedures and Precautions. |
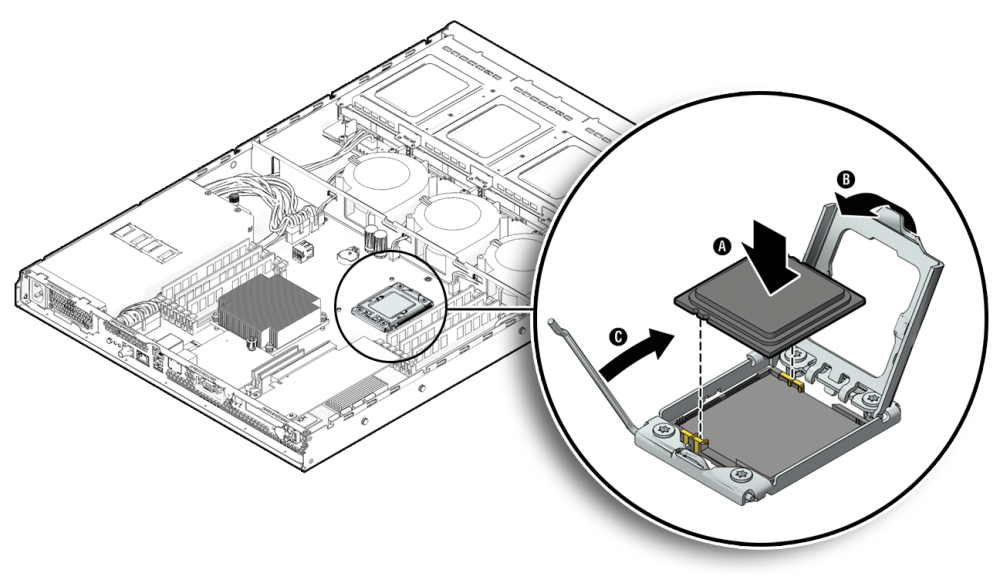
In addition, ensure that the alignment post on the socket engages the semicircular cutout on the CPU.

 | Caution - Component and motherboard damage. Do not force the CPU into the socket. The CPU does not need to be pushed downward. When the CPU is correctly aligned, you should be able to easily place the CPU in the socket and it should have minimal movement within the socket. Forcing a misaligned CPU into the socket can permanently damage the component and the motherboard. |
For best application, use the entire contents of the pre-filled syringe and apply the compound in a star (asterisk) pattern.
After the heatsink contacts the CPU, minimize the movement .
 | Caution - If the heatsink is moved too much during its installation, the layer of thermal compound might become uneven, leading to component damage. |
Alternately turn each screw one full turn until all the screws are tightened fully.
