JavaScript is required to for searching.
Skip Navigation Links
Exit Print View
Sun Fire X2270 M2 Server Service Manual
search filter icon
search icon

Document Information

Preface

Related Books

About This Documentation (PDF and HTML)

Documentation Comments

Download Server System Tools and Drivers

Documents History

Sun Fire X2270 M2 Server Service Manual Organization

Sun Fire X2270 M2 Server Overview

Components and Features

Front and Rear External Features and Components

Maintaining the Sun Fire X2270 M2 Server

Preparing for Service and Operation

Powering On and Powering Off the Server

Component Replacement Procedures and Topic

Locations of Internal Server Components

Replacing the System Battery (CRU)

How to Replace the System Battery

Removing and Installing DIMMs (CRU)

How to Remove a DIMM

How to Install a DIMM

Error Correction and Parity

DIMM Slot Designations

DIMM Population Rules

Removing and Installing a PCIe Card (CRU)

How to Remove a PCIe Card

How to Install a PCIe Card

Removing and Installing the PCIe Riser (CRU)

How to Install the PCIe Riser

How to Remove the PCIe Riser

Removing and Installing a Power Supply (CRU)

How to Remove the Power Supply

How to Install the Power Supply

Removing and Installing a Hard Drive Filler and Hard Drive Assembly (CRU)

How to Remove a Hard Drive Filler

How to Install a Hard Drive Filler

How To Remove a Removable Hard Drive Assembly

How to Install a Removable Hard Drive Assembly

Removing and Installing the Air Duct (CRU)

How to Remove the Air Duct

How to Install the Air Duct

Replacing a Blower Module (CRU)

How to Remove a Blower Module

How to Install a Blower Module

Replacing the Hard Drive Backplane Assembly (FRU)

How to Remove the Hard Drive Backplane

How to Install the Hard Drive Backplane

Removing and Installing the SP Module (CRU)

How to Remove the SP Module

How to Install the SP Module

Sun Fire X2270 M2 Server Internal Cabling

Replacing the SATA Cable Harness (CRU)

How to Remove the SATA Cable Harness

How to Install the SATA Cable Harness

Replacing the Front I/O Cable (CRU)

How to Remove the Front I/O Cable

How to Install the Front I/O Cable

Replacing the Front I/O Board (FRU)

How to Remove the I/O Board

How to Install the I/O Board

Removing, Installing, and Adding a CPU and Heatsink (FRU)

How to Remove a CPU and Heatsink

How to Install a CPU and Heatsink

How to Add a New CPU and Heatsink Assembly

Replacing the Motherboard (FRU)

How to Remove the Motherboard

How to Install the Motherboard

Sun Fire X2270 M2 Server Service Procedures and Information

Using the Tools and Drivers CD

How to Backup Motherboard FRUID Information

LED Locations and Meanings

BIOS Booting and Setup Considerations

Service Procedures

Ordering Components

Sun Fire X2270 M2 Server Specifications

Physical Specifications

Power Specifications

Environmental Specifications

Acoustic Noise Specifications

Index

How to Install the Motherboard

Before You Begin

See:

How to Remove the Motherboard.
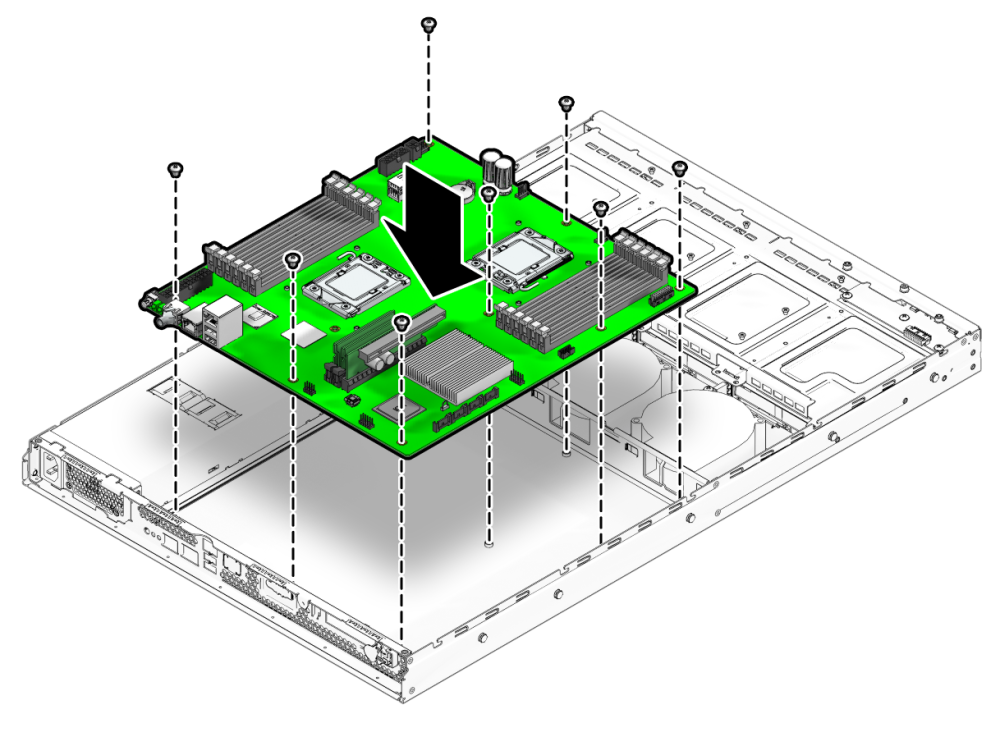
  1. Position the new motherboard so that the ports on the motherboard face the rear of the server.
  2. Align the motherboard in the chassis so that the screw holes align with the threaded standoffs on the chassis.
  3. To secure the motherboard, fully tighten the eight screws.
    image:An illustration showing the installation of the motherboard in the server.
  4. Install the CPU and heatsink. See How to Install a CPU and Heatsink.
  5. Connect the cables to the motherboard. See Sun Fire X2270 M2 Server Internal Cabling.
  6. Install the DIMMs. See How to Install a DIMM.
  7. Install the PCIe riser. See How to Install the PCIe Riser.
  8. Install the PCIe card. See How to Install a PCIe Card.
  9. Install the SP module. See How to Install the SP Module.
  10. Install the air duct. See How to Install the Air Duct.
  11. Prepare the server for operation. See How to Prepare for Operation.
  12. Enter the standby-power mode. See Power Modes.
  13. To restore FRUID information, enter Service mode and type the following command:

    copypsnc BACKUP1 PRIMARY

    The MAC address stored in BACKUP1 is incorrect, because it is the address for the old MB.

  14. To obtain the MAC address of the new motherboard, log in to the ILOM CLI and enter the following command:

    show /SYS/MB/NET0

    The MAC address appears in the list.

  15. Make note of the MAC address.
  16. In Service mode, type the following command:

    setpsnc -m new-mac_address

    where, new-mac_address is the MAC address of the new motherboard.

  17. Backup the MB FRUID information. See How to Backup Motherboard FRUID Information.
  18. Prepare the server for operation. See How to Prepare for Operation.