| Skip Navigation Links | |
| Exit Print View | |

|
Sun Fire X2270 M2 Server Installation Guide |
About This Documentation (PDF and HTML)
Download Server System Tools and Drivers
Sun Fire X2270 M2 Server Installation Guide
Installation Overview and Preparation
Safety and Compliance Information
External Features and Components
Installing the Server Into a Rack With Optional Slide Rails
Optional Slide Rail Compatibility
How to Disassemble the Slide Rails Before Installation
How to Install the Mounting Brackets on the Server
How to Attach the Slide Rail Assemblies to the Rack
How to Verify the Operation of the Slide Rails
How to Remove the Server from the Rack
About Server Management Tool Options
Communicating With the ILOM and the System Console
Connecting Cables and Powering On to Standby-Power Mode
ILOM SP IP Address and the ILOM Interfaces
Connecting to the System Console
Setting Up Platform Operating System and Driver Software
Configuring the Factory--Installed Oracle Solaris 10 Operating System
The Oracle Solaris OS Installation Worksheet
Configuring the Factory-Installed Oracle Solaris 10 Operating System
Updating Supplemental Drivers and Firmware
Getting Started on the Oracle Solaris OS
Powering On and Powering Off the Server
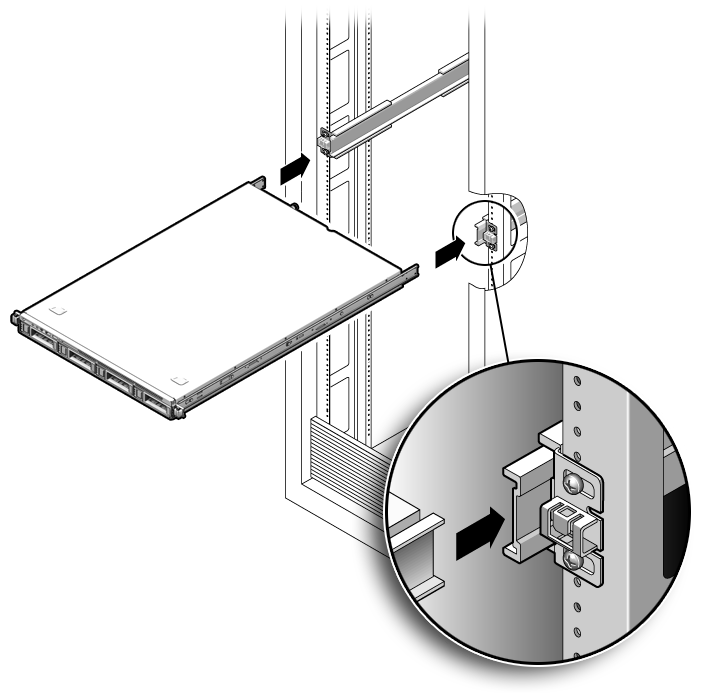
Use this procedure to install the server chassis, with mounting brackets, into the slide rail assemblies that are mounted to the rack.
 | Caution - This procedure requires a minimum of two people because of the weight of the server. Attempting this procedure alone could result in equipment damage or personal injury. |
 | Caution - Always load equipment into a rack from the bottom up so that it does not become top-heavy and tip over. Deploy your rack’s anti tilt bar to prevent the rack from tipping during equipment installation. |
Before You Begin
You must have already installed the mounting brackets on the server to perform this step. See How to Install the Mounting Brackets on the Server.
Push the slide rails into the slide rail assemblies and then collapse the assemblies.

You hear an audible click.
 | Caution - Verify that the server is securely mounted in the rack and that the slide rails locks are engaged with the mounting brackets before continuing. |