| C H A P T E R 4 |
|
Configuring the Sun Blade 6048 Modular System Management Network |
This chapter describes how to configure the chassis monitoring module (CMM) with an IP address using the Sun Integrated Lights Out Manager (ILOM). Specifically, it walks you through the steps of establishing a connection with a CMM using ILOM. It then describes how to configure the CMM with static or dynamic (DHCP) IP addresses.
| Note - The instructions and illustrations in this chapter refer to installing modules into one of the four subassemblies in the Sun Blade 6048 chassis. The instructions for each shelf are identical. |
Topics discussed in this chapter include:
The Integrated Lights Out Manager (ILOM) is a built-in system management tool that enables you to monitor and manage the components installed in a Sun Blade 6048 shelf. The ILOM is accessed through the CMM service processor. For instance, in the CMM ILOM, you can configure network information, view and edit hardware configurations, monitor vital system information, and manage user accounts.
The CMM ILOM is accessible through command-line interfaces (CLI), the ILOM web interface, and IPMI.
Any user with a valid user account can access the CMM ILOM. The first time you access the CMM ILOM, you need to use the preconfigured ILOM administrator account.
For more information about the tasks that you can perform in the CMM ILOM, see the Sun Integrated Lights Out Manager 2.0 User’s Guide, 820-1188. For more information about the preconfigured ILOM administrator account, see About the Preconfigured CMM ILOM Administrator Account.
Each Sun Blade 6048 shelf includes one preconfigured CMM ILOM administrator account with the following log in:
User name: root
Password: changeme
You cannot change the preconfigured administrator account (root) other than changing its default password. This account offers built-in administrative privileges (read and write access) to all CMM ILOM functions, features, and commands.
The first time you access ILOM at the CMM level or server module level you need to log in as root with the default password changeme. After you have logged in to the CMM ILOM and established network connectivity to the system, change the password associated with the ILOM root account to prevent your system from unauthorized access.
For more information about resetting the ILOM root account password, see Changing the CMM ILOM Root Account Default Password.
To set up CMM and server modules with initial network configuration information, you must establish a connection through ILOM to the CMM.
Until the CMM has an IP address assigned to it, you must use a serial connection to communicate with the CMM. After establishing a serial connection to the CMM, you can choose to configure the CMM and server modules with static or DHCP IP addresses.
This section includes the following topics:
This section includes the following topics:
Before assigning IP addresses, ensure that you have completed the following installation tasks:
|
When you first apply power, the CMM ILOM broadcasts a DHCP request for an IP address. If a DHCP server receives this request, it will supply an address and other network information. If server modules are powered up at the same time, they also broadcast the DHCP request and receive individual IP addresses.
| Note - Refer to the server module documentation for information about assigning a DHCP address to a server module SP. |
Follow these instructions when using DHCP to assign IP addresses:
1. Make sure that your DHCP server is configured to accept new media access control (MAC) addresses. Refer to the documentation supplied with your DHCP server software.
2. Make sure that the Ethernet cable is plugged into the NET MGT port on the active CMM.
3. To obtain the DHCP IP addresses assigned to the CMM and server module SPs via the CMM serial connection:
a. Using a serial console attached to the rear panel of the CMM, log in to the CMM ILOM as the administrator.
The preconfigured administrator username is root and its default password changeme.
b. To set the working directory for the active CMM, type:
cd /CMM/network
c. To view the active CMM IP address, type:
show
| Note - You can also view the IP addresses via the DHCP server logs. Refer to the DHCP server documentation for details. |
|
If you want to use static addresses instead of the dynamic addresses provided by your DHCP server, you can assign the static IP address at the following times:
Follow these instructions when assigning a static IP address to a CMM through a serial connection:
1. Verify that your serial connection to the active CMM is operational.
For information about attaching a serial console to a CMM, see To Attach CMM Network and Serial Console Cables.
2. Log in to the CMM ILOM as an administrator by entering an administrator user name (default: root) and password (default: changme), and then press Enter.
The default prompt appears (->), and the system is ready for you to run the CLI commands to establish network settings.
3. To set a static IP address on the CMM through ILOM using the CLI, type the following command to set the working directory:
4. Use the following commands to specify the IP, netmask, and gateway addresses.
After the CMM has been assigned IP addresses, use these IP addresses to communicate with the CMM ILOM. Specifically, the management network IP address is the IP address assigned to the service processor of the CMM.
In addition to the management network IP addresses, you will also have IP addresses associated with the data network. The data network IP addresses are configured after you install the host operating system on a server module. It is important to distinguish the data network IP addresses from the management network IP addresses since they serve different purposes.
You need to specify the IP address of the CMM when you want to perform management operations at the chassis level. To perform management operations at a server module level, you need to specify the IP addresses of the server module service processor.
For further information about specifying IP addresses for the server modules, refer to the server module documentation. For more information about management tasks that you can perform at the chassis level, see the Sun Integrated Lights Out Manager 2.0 User’s Guide, 820-1188.
The following procedures describe how to change the default password for the ILOM using the CLI or the ILOM web interface.
For information about creating new user accounts and assigning a role (privileges) to a user account, see the Sun Integrated Lights Out Manager 2.0 User’s Guide,
820-1188, and the documentation for the server modules that you have installed.
|
To change the changeme password:
1. Using a serial console attached to the rear panel of the CMM, log in to the CMM ILOM as the administrator at the login prompt.
The preconfigured administrator username is root and its default password changeme.
2. Change the password for the CMM by typing:
set /CMM/users/root password=password
password: The new password that you want to assign.
3. Repeat Steps 1 and 2 for each CMM as necessary.
|
Follow these steps to change the password for the root account:
1. Open a web browser, and type the IP address of the CMM.
The Login page for the ILOM web interface appears.
2. In the ILOM Login page, do the following:
a. Type the default user name (root) and password (changeme).
The ILOM web interface appears.
3. Click CMM in the left navigation pane.
4. In the ILOM web interface, choose User Management --> User Accounts.
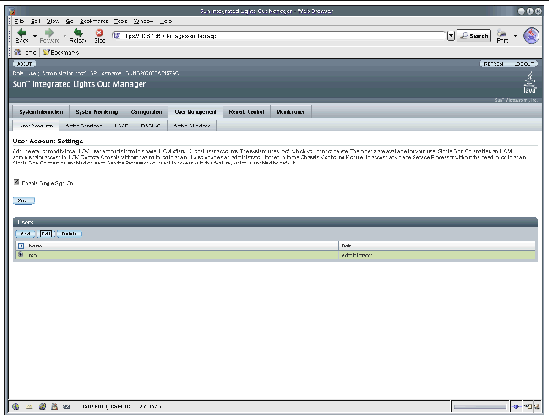
The User Account Settings page appears.
FIGURE 4-1 User Account Settings Page
Graphic showing User radio button selected for password edit

5. In the User Account Settings page, select the radio button next to root, then click Edit.
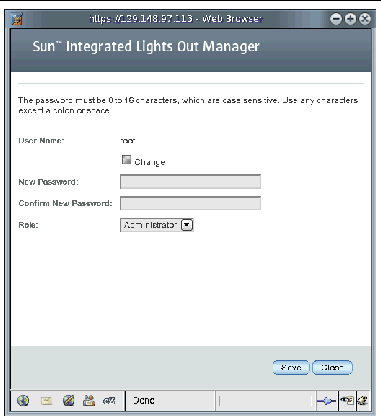
6. Click OK to continue. The User Account Password dialog appears.
FIGURE 4-2 User Account Password Dialog

7. In the User Account password dialog, do the following:
b. In the New Password field, type the new password.
c. In the Confirm Password field, type the new password again.
The new password is activated for the root Administrator account.
8. If necessary, use this procedure to change the password for each installed CMM.
After configuring network information for each Sun Blade 6048 shelf, you are ready to set up the server modules with an operating system. For details, see the documentation for the server modules that are installed in the Sun Blade 6048 modular system.
Copyright © 2007, Sun Microsystems, Inc. All Rights Reserved.