|
|
| Sun ONE Web Services Platform Developer Edition Developer's Guide |
Logistics Sample Application: Deploy and RunThis section describes how to set up the development environment for the Logistics Sample Application, and how to compile, package, and deploy the application to the Sun™ ONE Application Server.
This section contains the following topics:
- Overview
- Setting Up the Environment
- Setting Up the Logistics Configuration Files
- Creating Resources for Logistics
- Quick Install - The Install Scripts and the Ant Targets
- Sun ONE Studio Experience: Compiling, Assembling, and Deploying the Logistics Sample Application
- Running Logistics
- Uninstalling
- Setting Up the Logistics Sample Application in a Multi-Machine Environment
Overview
The Logistics Sample Application is developed using the Sun ONE Studio software and is deployed to the Sun ONE Application Server.
This document describes in detail the various steps involved in:
- Setting up the development environment for the Logistics Sample Application.
- Compiling the application.
- Packaging the application.
- Deploying the application to the Sun ONE Application Server.
This document walks you through the steps involved in using the Sun ONE Studio software as the development environment to mount the source code, create resources, and deploy the packaged application on the Sun ONE Application Server.
Alternatively, you can use the Ant-based build system to set up and run the Logistics Sample Application without using the Sun ONE Studio software. The Ant targets can be invoked from the Sun ONE Studio and from the command line.
The following table shows the paths to use when the default location is utilized, and when the user enters the <install_root> directory.
The following table shows the paths to use when the default location is used and when the user enters the <install_root> directory.
For more details, see the Installing on Solaris and the Installing on Windows sections of the Sun ONE Web Services Platform Developer Edition Installation Guide.
Setting Up the Environment
This section describes the set up tasks required to run the Logistics Sample Application.
This section contains the following topics:
- Set Environment Variables
- Start the Servers
- Configure the Sun ONE Studio Software
- Start the Database Instance
Set Environment Variables
- Set JAVA_HOME to the appropriate JDK (use JDK 1.4.0_02).
Refer to the following table which shows JAVA_HOME locations.
However, during installation, if you chose an existing JDK, use that one instead.
JAVA_HOME Locations
Solaris
Windows
/usr/j2se
<install-location>\WebServicesPlatform\jdk
- Set ANT_HOME to the appropriate Ant (use Ant version 1.4.1).
Refer to the following table which shows the ANT_HOME locations.
ANT_HOME Locations
Solaris
Windows
/usr/sfw
<install-location>\AppServer7\lib\ant
Note You may not find Ant in a multi-machine client configuration.
In this case, download Ant from http://ant.apache.org.
- Append JAVA_HOME/bin and ANT_HOME/bin to your PATH environment variable.
Start the Servers
Make sure that all of the servers (Sun ONE Application Server and Sun ONE Identity Server) are up and running.
The servers can be started by running <install_root>/utils/startservers.sh (.bat).
Configure the Sun ONE Studio Software
- Access the Sun ONE Studio software by running <studio_home>/bin/runide.sh (.bat).
Note In Windows, you can start the Sun ONE Studio software by clicking the desktop Sun ONE Studio icon, or by accessing Start > Programs.
- Configure the Sun ONE Application Server as the default J2EE server for the Sun ONE Web Services Platform Developer Edition.
Verify that the Sun ONE Application Server is running.
You can start the Sun ONE Application Server by running <install_root>/utils/startservers.sh (.bat)
In the Explorer Window in the Sun ONE Studio (left pane), click Editing.
Click the Runtime tab that appears below.
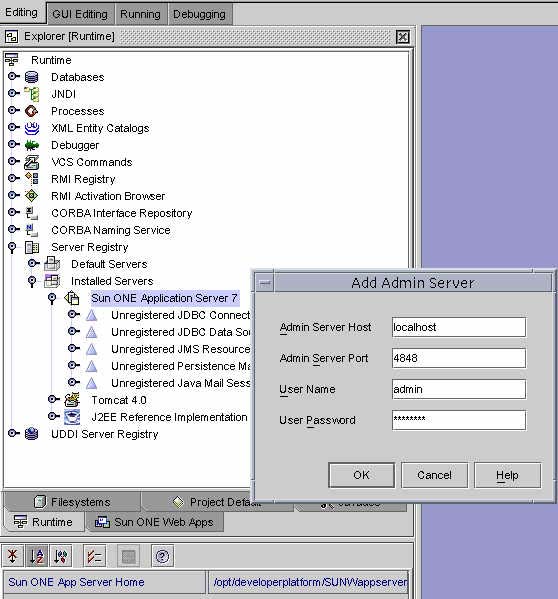
Click Server Registry > Installed Servers > Sun ONE Application Server 7. Select the Sun ONE Application Server.
Right-click Add Admin server.
If you are prompted to add the Sun ONE AppServer home, enter the installation location of the Sun ONE Application Server (<appserver-home>).
Enter the admin hostname, port, admin user (admin) and password (which was entered while installing the Sun ONE Web Services Platform Developer Edition software).
Expand the admin node, and click the server instance (server1).
Right-click and select it as Set Default Server.
Set Default Server
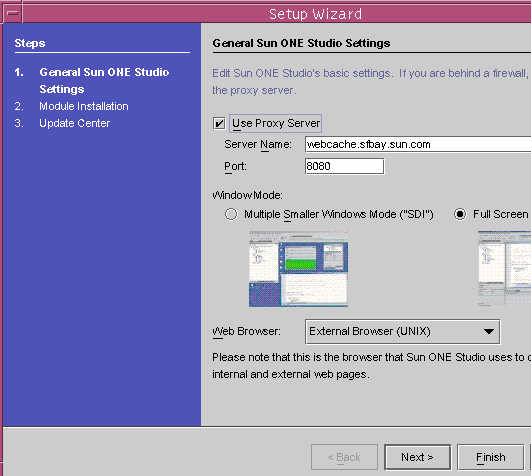
- If you have a proxy server to connect to the Internet, set the proxy server settings in the Sun ONE Studio software.
Click Tools from the Menu bar.
See Set Proxy Server Settings figure below.
Set Proxy Server Settings
Start the Database Instance
The Logistics Sample Application has two databases:
- One is for Cargo Line.
This is started at 9099 port.
- The other is for the Insurance Agency.
This is started at port 9098.
The two database servers must be started up.
This section lists the steps required to start the two instances of the PointBase database.
- Start the Cargo Line database.
Copy the file <appserver-home>/pointbase/server/StartServer.sh (.bat) to StartCargoline.sh (.bat).
Edit StartCargoline.sh (.bat).
Change port number 9092 to 9099.
Start the Cargo Line database instance by running <appserver-home>/pointbase/server/StartCargoline.sh (bat).
- Start the Insurance Agency database.
Setting Up the Logistics Configuration Files
The following configuration files must be set up for the Logistics Sample Application:
common.properties File
This file is used as the main properties file in the Ant build scripts. The build scripts generally read inputs from this file. Installation specific information such as various homes, host names, ports, and so on, are kept as name=value pairs in this file.
The best way to set the common.properties file is by using the setup target in the common.xml build file. However, this target can only be invoked from the command line.
To run the target, do the following:
- cd <install_root>/samples/logistics
- ant -buildfile common.xml setup
You can manually open and edit the file using your favorite editor.
The following table shows the common.properties file entries and their descriptions, which you can refer to while making manual changes.
Note For Windows 2000:
Property values that involve a path require one additional backslash (\).
For example:
C:\\Sun\\WebServicesPlatform
ia.properties File
This file is used by the Insurance Client and keeps name, value pairs, such as imq broker host, port, database host, port, and so on.
Edit ia.properties.
This file is in <install_root>/samples/logistics/insurance/src/client.
The following table shows the ia.properties files with their descriptions.
The broker port can be found by using the Sun ONE Application Server administrative console.
- Expand the JMS section under the server instance.
- Click Services to find the port.
- Save the changes.
config.xml File
This file has properties for the Web Services client, and contains the location attribute of WSDL.
This file is located at <install_root>/samples/logistics/insurance/src/client.
- Open the file with your favorite editor and locate the following text:
location=http://host:port/CLWS/CLWS?WSDL
- Replace the host with the Sun ONE Application Server fully qualified host name.
- Replace the port with the default server instance port number.
dtd.properties File
This file is a placeholder for various name, value pairs in constructing the URL for the message XML dtd. This is read by the ShipmentFacadeBean.
Other Web Properties Files
The mappings.properties file is used as a properties file by the cargoline-admin module. Similarly, logout.properties is used as a properties file by the Order Center module.
Edit the following files:
<source.dir>/cargoline/src/apps/admin/WEB-INF/mappings.properties and <source.dir>/cargoline/src/apps/ordercenter/WEB-INF/logout.properties
The following table shows the properties and descriptions for the above mentioned files.
Creating Resources for Logistics
This section lists all of the steps that are necessary to create the resources for the Logistics Sample Application.
In addition to creating resources, this process also involves configuring various components.
Using Ant Build Scripts
You can avoid this manual process and achieve the same results by using the Ant targets, as follows:
- cd <install_root>/samples/logistics
- ant create-resources
Before running the above target, log in to the Sun ONE Application Server Administration.
For example:
http://<host>:<admin-port>/ and make certain that no JMS physical destination with the name logisticsQueue exists.
Note Make certain that the common.properties file is updated prior to running the create-resources target.
You can edit the file manually, or you can use the Ant target setup in the buildfile common.xml.
For details, see "High Level Targets".
Creating Resources Manually
This section contains the following topics:
- Set Up the Databases
- Create LDAP Data
- Configure DSAME
- Copy the DTD File in the Sun ONE Application Server
- Edit the AMAgent.properties File
- Create the JDBC Connection Pool (cargoline-pool, ordercenter-pool)
- Create JDBC Resources (jdbc/cargoline, jdbc/ordercenter)
- Create a Persistent Manager
- Set Up the Message Queue
Set Up the Databases
Create the Cargo Line Database
- Start the database server using the script <appserver_home>/pointbase/server/StartCargoline.sh (.bat)
- Run <appserver_home>/pointbase/client_tools/PB_console.sh (.bat) Create the database for Cargo Line as: URL: jdbc:pointbase://<host-name> :9099/cargoline
- User: PBPUBLIC
- Password: PBPUBLIC
- Check Create New database or Overwrite existing database.
- Click OK.
- Exit PB_console.sh (.bat).
Create the Insurance Agency Database
- Start up the database server using the script <appserver_home>/pointbase/server/StartInsurance.sh (.bat).
- Run <appserver_home>/pointbase/client_tools/PB_console.sh (.bat) Create the database for Insurance as: URL: jdbc:pointbase://<host-name> :9098/insurance
- User: PBPUBLIC
- Password: PBPUBLIC
- Check Create New database or Overwrite existing database.
- Click OK.
- Exit PB_console.sh (.bat).
Create the Cargo Line Schema
- Run PB_console.sh.
Connect to the Cargo Line database.
- Click File > Open.
- Select <install_root>/samples/logistics/cargoline/src/data/cargoline.sql.
- Click SQL > Execute all.
This executes all SQL commands, which create the tables and populate the database.
Create Insurance Agency Schema
- Run PB_console.sh.
Connect to the insurance database.
- Click File > Open.
- Select <install_root>/samples/logistics/insurance/src/sql/insurance.sql.
- Click SQL > Execute all.
This executes all SQL commands, which create the tables and populate the database.
Create LDAP Data
There are two ways to load/unload the org-data from the Directory.
- Use the Ant targets.
- Use the amadmin utility of the Sun ONE Identity Server.
Using Ant Targets
To Load Data
- cd <install_root>/sample/logistics
- asant -buildfile resources.xml create-cargoline-org
To Delete Data
- cd <install_root>/sample/logistics
- asant -buildfile resources.xml delete-cargoline-org
Using amadmin Utility
Additionally, you can load/unload the same using the Identity Server amadmin command.
The syntax of this command follows:
<identity-home>/bin/amadmin -u <admin-user> -w <password> -v -t <xml file>
where the xml-file is the input file.
These input files are located under <install_root>/samples/logistics/cargoline/src/data:
- create-cargoline.xml
- delete-cargoline.xml
Configure DSAME
Authentication into the Cargo Line Order Center and Administration module is done using the Sun ONE Identity Server.
For this, the Login and Logout pages are configured by the Sun ONE Identity Server.
The default DSAME login pages do not look good for an application like the Logistics Sample Application. DSAME allows customization of these pages at an Organization level. For the Logistics Sample Application, customize the pages for Cargoline, which is an organization created in DSAME.
The custom pages are in <install_root>/samples/logistics/cargoline/src/custom/dsameConfig.zip.
The following steps need to be performed:
- Unzip the file under <identity_home>/web-apps/services/WEB-INF/config/auth
- Copy the images from <identity_home>/web-apps/services/WEB-INF/config/auth/Cargoline/ima es to <identity_home>/web-apps/services/images.
- Copy the *css files from <identity_home>/web-apps/services/WEB-INF/config/auth/Cargoline to <identity_home>/web-apps/services.
Copy the DTD File in the Sun ONE Application Server
The message passed to Insurance Agency is an XML message, and is parsed by the Message listener using a validating parser.
The DTD must be made available to the Insurance Agency.
This is done by making it available under docroot of the server1 instance of the Sun ONE Application Server.
The following steps need to be performed:
- Create the directory cargoline/src/dtds under <instance_home>/domains/domain1/server1/docroot.
- Copy the file <install_root>/cargoline/src/dtds/msgXML.dtd to <instance_home>/domains/domain1/server1/docroot/cargoline/src/dtds.
Edit the AMAgent.properties File
The AMAgent.properties file is found under: <policy_home>/SUNWam/asAgent/amAgent/config is updated.
The following table shows two properties to be set in the AMAgent.properties files.
Create the JDBC Connection Pool (cargoline-pool, ordercenter-pool)
- Go the Application Server's administration screen http://<host>:4848/ and login as admin.
- Go to App Server Instances > server1 > JDBC > Connection pool.
- Create a new jdbc connection pool.
- Click New.
- In the Name field, enter cargoline-pool, Database Vendor as PointBase.
- Select Next.
- Configure the following properties:
user: PBPUBLIC
password: PBPUBLIC
databaseName: jdbc:pointbase://<host>:9099/cargoline
- Click FINISH.
- Repeat steps 1 through 6 to create ordercenter-pool (change pool name in step 4).
Create JDBC Resources (jdbc/cargoline, jdbc/ordercenter)
- After creating the jdbc pool in step b2, create a jdbc resource.
- Go to App Server Instances > <instance> (server1) > JDBC > JDBC Resource, and click New.
- Enter the JNDI name as jdbc/cargoline.
- Select the pool name as cargoline-pool.
The datasource enabled check box should be checked.
- Click OK.
- Repeat steps 1 through 4 for the jdbc/ordercenter (enter this in step 3).
Create a Persistent Manager
- Go to App Server Instances > <instance> (server1) > Persistence Managers.
Click New.
- JNDI resource name =jdo/cargoline.
- Enter connection pool=cargoline-pool.
- Click OK.
Set Up the Message Queue
From the Application Server's administration console, create the JMS Connection Factory and Destination Resource.
Create the Connection Factory
- Go to server-instance (server1) > JMS > Connection Factory.
- Click New.
- Enter the JNDI Name: jms/logisticsQueueConnectionFactory
- Type: javax.jms.QueueConnectionFactory.
- Check the Resource Enabled check box.
- Click OK.
Create a Destination Resource
- Go to server-instance (server1) > JMS > Destination resource.
- Click New.
- Enter JNDI Name: jms/logisticsQueue.
- Type: javax.jms.Queue.
- Click OK.
Add Property to the Newly Created Destination Resource
- Click server-instance (server1) > JMS > Destination resource.
- Click jms/logisticsQueue to update.
- Add property: property name is imqDestinationName, value is logisticsQueue.
- Click OK.
- Click Save.
Quick Install - The Install Scripts and the Ant Targets
Install Scripts
The Logistics Sample Application can be deployed using the new install scripts. There are two install scripts, one each for Windows (install_logistics.bat) and Solaris (install_logistics.sh). These install scripts can be found under <install_root>/samples/logistics.
These scripts are used to configure and deploy the Logistics Sample Application. Before running the script, make sure that all of the instructions in the Setting Up the Environment section above are complete.
To run the script in Solaris:
- cd <install_root>/samples/logistics
- ./install_logistics.sh
To run the script in Windows:
- cd <install_root>samples/logistics
- install_logistics.bat
You are now ready to run the Logistics Sample Application (see Running Logistics).
The scripts do the following, in the order listed:
- Prompt user for inputs.
For example:
Sun ONE Application Server fully qualified host name, Admin User, Password, Installation Directory of the Platform
It is important that the scripts be given proper inputs.
- Update common.properties based on the inputs.
For more information see the common.properties File section.
- Call Ant targets to create resources, and compile, assemble, and deploy the Logistics Sample Application.
Build Files and Ant Targets
The Logistics Sample Application comes bundled with a set of build files, each build file serving a particular purpose.
The following table shows the Build Files and their descriptions.
For a complete list of all of the available Ant targets in all of the build files, see the Appendix.
The following table shows a list of high level Ant targets from the default build file build.xml.
Using Ant Through the Command Line
To run the Ant targets from the command line, use the Ant utility.
The command takes the following general form:
ant -buildfile <filename><target>
Note If you do not specify the -buildfile option in Ant, the default build file is build.xml.
For <target>, see the table shown immediately above.
For a complete list of all available targets in individual build files, refer to "High Level Targets".
The deploy-all command deploys the entire Logistics Sample Application. Make certain that the PB_console windows are closed.
For the available targets, refer to the High Level Ant Targets from the build.xml File table shown immediately above.
Run the Target From the Sun ONE Studio
- Bring up the IDE.
- Make certain that all of the instructions in the Setting Up the Environment section above are complete.
- Make certain that the Logistics configuration files are set up correctly.
For information, see Sun ONE Studio Experience: Compiling, Assembling, and Deploying the Logistics Sample Application.
- Make certain that the PB_console windows are closed.
Install the Application
- Right-click build.
- Click Execute.
The default target that gets executed is deploy-all.
Path to Follow to Install the Application

After performing a deploy-all, you are ready to run the Logistics Sample Application.
Refer to the Running Logistics section.
Sun ONE Studio Experience: Compiling, Assembling, and Deploying the Logistics Sample Application
This section lists the tasks required to compile and deploy the Logistics Sample Application through the Sun ONE Studio software. It guides you through the steps needed to mount the filesystems, and compile, package, and deploy the modules into the Sun ONE Application Server.
Make certain that the instructions detailed in the Setting Up section above are complete. Also make certain that the Configuration files have been set up properly, as listed in the previous section.
This section contains the following topics:
- Mounting the File Systems
- Compiling, Packaging, and Deploying via the Sun ONE Studio Software
- Cargo Line Customer Ordering System or Order Center
- Cargo Line Web Services
- Insurance Client
Mounting the File Systems
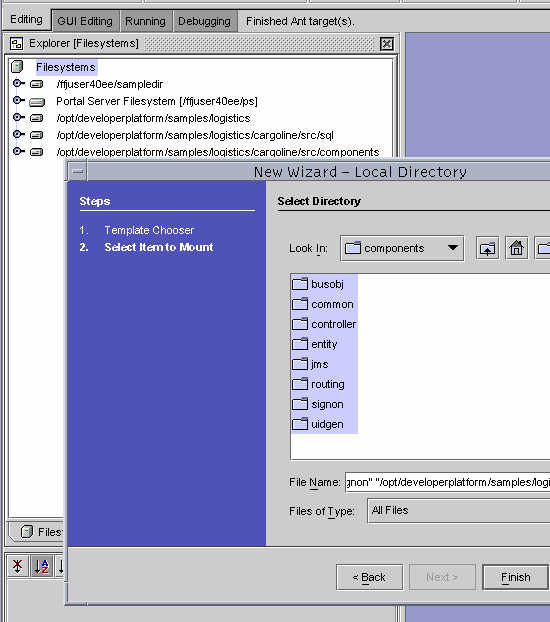
To develop the Logistics Sample Application using the Sun ONE Studio software, the file systems must be mounted in the Sun ONE Studio.
Each file system represents either a module, a package, or some component in the source code of the Logistics Sample Application.
To mount the filesystems, click File > Mount Filesystem > Local Directory > Next (see Explorer Filesystems figure).
The Logistics Sample Application File Systems are as follows:
<install_root>/samples/logistics/
<install_root>/samples/logistics/cargoline/src/data
<install_root>/samples/logistics/cargoline/src/components/
<install_root>/samples/logistics/cargoline/src/components/entity
<install_root>/samples/logistics/cargoline/src/components/busobj
<install_root>/samples/logistics/cargoline/src/components/common
<install_root>/samples/logistics/cargoline/src/components/signon
<install_root>/samples/logistics/cargoline/src/components/controller
<install_root>/samples/logistics/cargoline/src/components/routing
<install_root>/samples/logistics/cargoline/src/components/uidgen
<install_root>/samples/logistics/cargoline/src/components/jms
<install_root>/samples/logistics/cargoline/src/apps/admin
<install_root>/samples/logistics/cargoline/src/apps/ordercenter
<install_root>/samples/logistics/cargoline/src/apps/webservices
<install_root>/samples/logistics/insurance/src/common
<install_root>/samples/logistics/insurance/src/client
Additional JAR Files
The additional JAR files required to compile and deploy the Logistics Sample Application are as follows:
<identity-home>/lib/am_services.jar
<identity-home>/lib/am_sdk.jar
<identity-home>/lib/am_sso_provider.jar
<identity-home>/lib/jss311.jar
<identity-home>/lib/crimson.jar
<dsame-home>/java/ldapjdk.jar
<appserv-home>/imq/lib/imq.jar
<appserv-home>/imq/lib/jms.jar
Note If you do not find the JAR files that you need in the Additional JAR Files list above, mount those files from <sample-home>/lib.
Tip You can mount multiple folders at once by pressing the Control key, as shown in the image below.
Explorer Filesystems
Compiling, Packaging, and Deploying via the Sun ONE Studio Software
This section describes the tasks required to compile, package, and deploy via the Sun ONE Studio software.
This section contains the following topics:
- Core Backend EJB Module
- Packaging Common Components
- Cargo Line Administration Web Module
- Cargo Line Customer Ordering System or Order Center
- Cargo Line Web Services
- Insurance Client
In this release, there are five main components of the Logistics Sample Application:
- The EJB module that contains all the EJBs and backend classes.
- The admin application.
- The ordercenter application.
- The Web services modules.
- The insurance client module.
Note Before you proceed, make certain that all the required resources have been created (see Setting Up the Logistics Sample Application in a Multi-Machine Environment).
Core Backend EJB Module
- Deploy the EJB module.
This is the core backend of Cargo Line. Deploying this module is a prerequisite for deploying any other Logistics Sample Application module.
Make certain that all of the resources are created before deploying the EJB. This can be done by the Ant target create-resources.
To deploy this module:
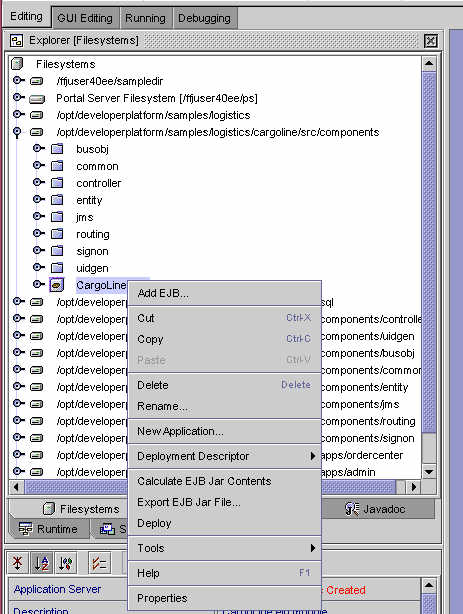
Go to the CargoLineJAR node:
<install_root>/samples/logistics/cargoline/src/components/CargoLineJAR.
Add the dtd.properties file to the module.
Right-click the CargoLineJAR node and select Properties.
Browse through the mounted file system <logistics-home>/cargoline/src/components/common until you see the dtd.properties file.
Select and add this file.
Right-click and select Deploy.
CargoLineJAR Node
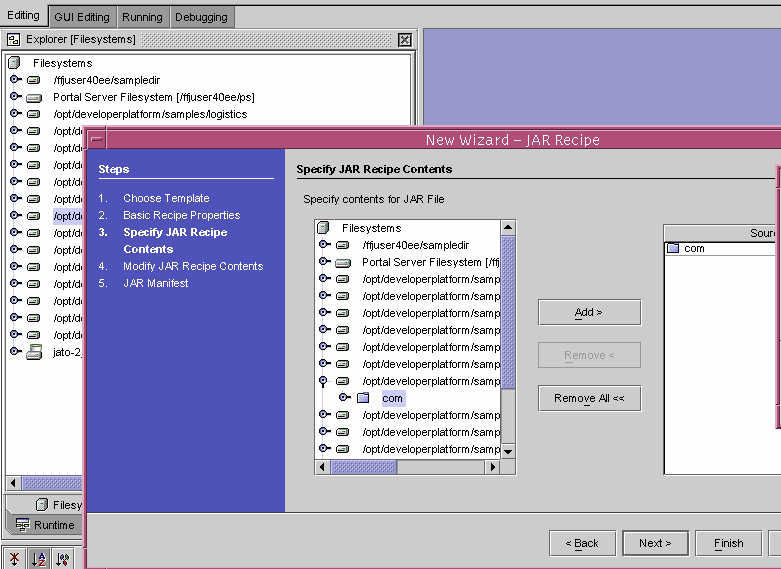
Packaging Common Components
Generate Common Components Archive: common.jar
- Right-click <install_root>/samples/logistics/cargoline/src/components/common.
- Click new > Jar packager > JAR Recipe.
- Enter the recipe name as common.
- Select Next.
- Select the com directory under <install_root>/samples/logistics/cargoline/src/components/common.
- Click Add.
- Click Finish.
A jar recipe named common with an icon appears under the file system node <install_root>/samples/logistics/cargoline/src/components/common.
- Right-click common jar recipe and compile.
The common.jar file is created under the file system.
common.jar File
Cargo Line Administration Web Module
- Copy EJB client to <install_root>/samples/logistics/cargoline/src/apps/admin/WEB-INF/lib.
This file is obtained from the deployed area <instance_root>/domains/domain1/server1/applications/j2ee-modules/CargoLineJAR_1/CargoLineJARClient.jar.
Note In a multi-machine environment, this file is on the server side and needs to be copied to the client machine manually.
- Copy the common.jar file created above, and copy it to <install_root>/samples/logistics/cargoline/src/apps/admin/WEB-INF/lib
- Change the mapping.properties file (see the Other Web Properties Files section).
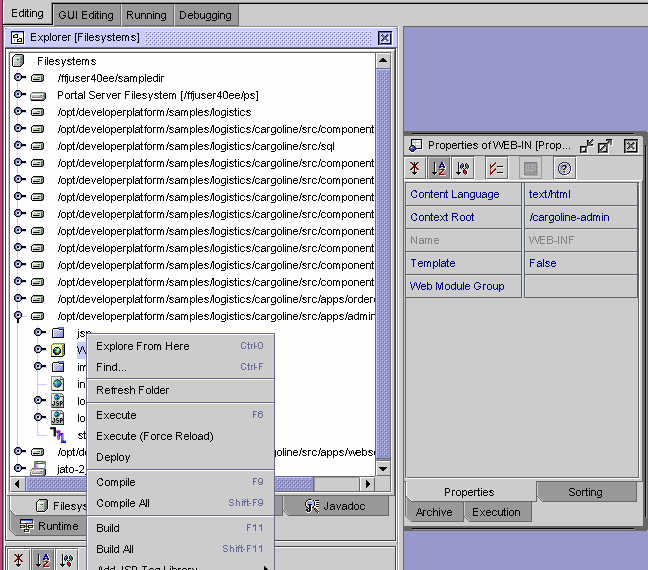
- Deploy the Admin Web Module.
Expand <install_root>/samples/logistics/cargoline/src/apps/admin.
Right-click the WEB-INF node and select Properties from the pop-up menu.
Select the context root field on the Properties window and enter /cargoline-admin as the value.
Right-click the WEB-INF node again and select Deploy.
Run the administration module to verify that it is successfully deployed.
Note The Web module needs to be redeployed if there are changes to the EJB Module (see Core Backend EJB Module) or common components (see Packaging Common Components).
Changes in the EJB module implies that there is a new EJB Client (Step 1).
Similarly, changes in common components need to be reflected in the Web module (Step 2).
Deploy the Admin Web Module
Cargo Line Customer Ordering System or Order Center
- Copy the EJB client to <install_root>/samples/logistics/cargoline/src/apps/ordercenter/WEB-INF/lib.
This file is obtained from the deployed area <instance_root>/domains/domain1/server1/applications/j2ee-modules/CargoLineJAR_1/CargoLineJARClient.jar.
Note In a multi-machine environment, this file is on the server side and needs to be copied over to the client machine manually.
- Copy the common.jar file created above and copy to <install_root>/samples/logistics/cargoline/src/apps/ordercenter/WEB-INF/lib.
- Change the logout.properties file (see the Other Web Properties Files section).
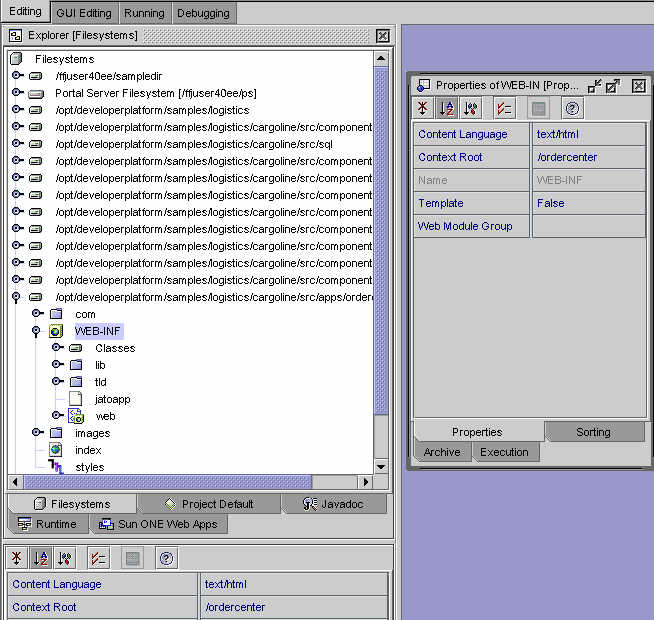
- Deploy the Order center Web Module.
Expand <install_root>/samples/logistics/cargoline/src/apps/ordercenter
Right-click the WEB-INF node and select Properties from the pop-up menu.
Select the context root field on the Properties window, enter /ordercenter as the value.
Right-click the WEB-INF node again and select deploy.
- Verify that the Order Center module is successfully deployed by running it.
Note The Web module needs to be redeployed if there are changes to the EJB Module (see Core Backend EJB Module) or common components (see Packaging Common Components).
Changes in the EJB module implies that there is a new EJB Client (Step 1).
Similarly, changes in common components need to be reflected in the Web module (Step 2).
Deploy the Order Center Web Module
Cargo Line Web Services
- Select CLWS node under cargoline/src/apps/webservices/WEB-INF/classes/com/sun/developerplatform/logistics/cargoline/webservice on Studio.
- In the Properties window, modify SOAP RPC URL to show your machine name.
It should read http://hostname.domainname:port/CLWS/CLWS.
- Select the CLWS node, and right-click to get the Context menu.
- Click Add References.
- Navigate to <install_dir>\samples\logistics\cargoline\src\apps\webservice\WEB-INF\lib, and select CargoLineJARClient.jar and common.jar.
Note In a multi-machine environment, you must copy over the CargoLineJARClient.jar file from the server machine to the client machine.
- Click OK to exit the Add References window.
- Select the CLWS node and right-click to access the Context menu.
- Click Deploy to deploy the Web Service.
This brings up a Progress bar which indicates that Web Service is being deployed.
The CLWS.wsdl file is an outcome of the step above.
This is used in the client generation.
- Test the Web service:
Go to http://host.domain:port/CLWS/CLWS.
Note
- If there are any changes to the EJB module or common components, this module must be redeployed.
Changes in the EJB module implies that there is a new EJB Client (Step 1), and any changes in common components also must be reflected in this module (Step 2).
- While deploying Cargo Line Web Services from the Sun ONE Studio, if you see a java.lang.ClassNotFoundException for com.sun.developerplatform.logistics.cargoline.webservice.CLWSImpl, unmount <usr_dir>/sampledir and <usr_dir>/ps.
Insurance Client
- Make certain that the Insurance Agency folders are mounted (see Mounting the File Systems).
- Generate stubs for Web services.
Go to <install_dir>/samples/logistics/insurance/src/client
Navigate to com > sun > developerplatform > logistics > insurance > client.
Copy the CLWS.wsdl file into the com > sun > developerplatform > logistics > insurance > client package.
This file is generated as a part of the manual deployment of the CLWS Web service.
You can access the same file using the following URL:
http://FULL_HOSTNAME_NAME:PORT/CLWS/CLWS?WSDL.
Also make sure to save the file as CLWS.wsdl.
You may find the .wsdl file under the <server-instance>/applications/j2ee-modules/CLWS_1/WEB-INF folder.
Select client, and right-click to access the Contextual menu.
Choose New > Web Services > Web Service Client to access the New Wizard - Web Service Client window.
In this window, do the following:
Enter CLWSClnt for the Name field.
Choose the Local WSDL File radio button for the Create From option.
Click Next to access the Select Local WSDL File frame.
Navigate to the insurance > client package, and choose CLWS.wsdl file.
Click Finish to exit the window and generate the Web Service client.
Select the CLWSClnt node, and right-click to access the Contextual menu.
Select the Properties menu option to access the Properties of Client window.
Set False to Generate Presentation property, and exit the window.
Right click the CLWSClnt node and click the Assemble menu option to generate the needed client stubs.
These are created in a directory called CLWSClntGenClient.
- Compile Insurance Client.
Open the InsuranceAgency.java file and make the following changes:
Change the line
import import com.sun.developerplatform.logistics.cargoline.webservice.*; to import com.sun.developerplatform.logistics.insurance.client.CLWSClntGenClient.*;In the method getShipmentDetails make the following changes:
Change getCLWSIFPort to getCLWSRPCPort.
Change the type of stub variable to CLWSRPC instead of CLWSIF.
The stub variable should be type casted to CLWSRPC instead of CLWSIF.
Save the file.
- Select <install_dir>/samples/logistics/insurance/src/client, and right-click to get the Contextual menu.
- Choose the Build All menu item to build the insurance client.
Running Logistics
This section describes the tasks required to run the Cargo Line administrator interface.
This section contains the following topics:
- Run the Cargo Line Administrator Interface
- Run the Cargo Line Consumer Interface
- Run Insurance Client
Run the Cargo Line Administrator Interface
- Go to the following URL:
http://<host>:<appserver_instance_port>/cargoline-admin/index.html
- You can login as follows:
Customer agent: cagent/ cagent (for shipments and customers)
Routing Agent: ragent/ ragent (for ships, routes, voyages, and ports)
Manager: manager/manager (for agents and all of the above)
Depending on the access privileges, you see different set of functionalities that are available as a Manager, Routing agent or customer agent.
Run the Cargo Line Consumer Interface
- Go to the following URL: http://<host>:<appserver_instance_port>/ordercenter/index.html
- Login as the following:
Customer: sam/sam or alex/alex
Refer to the sample data at the end of document for a list of valid values.
Run Insurance Client
Start the JMS Listener From the Command Line
Follow these steps if compilation and deployment was done by Ant.
- Go to <install_root>/samples/logistics/assemble/insuranceclient.
- Run startmessagelistener.sh (.bat) <host-name> 7676 <host-name> 9098. Make sure that the shell script has execute permissions.
Start the JMS Listener Via the Sun ONE Studio Software
These steps should be performed if the Logistics Sample Application was compiled and deployed via the Sun ONE Studio software.
- Select <install_root>/samples/logistics/insurances/src/common.
- Navigate to JMSConsumer (for example, com > sun > developerplatform > logistics > insurance > common > JMSConsumer. Select the JMSConsumer node.)
- Click the Execution tab (at the bottom of the properties window).
- In the Arguments field, enter <host-name> 7676 <host-name> 9098 as the value.
- Right-click the JMSConsumer node and select Execute to start the JMS listener.
Start the Insurance Client
The following section describes the steps that are required to start the standalone Insurance client.
Start insurance client from the command line.
Follow these steps if the compilation and deployment was done by Ant.
- Go to <install_root>/samples/logistics/assemble/insuranceclient.
- Run insuranceclient.sh (.bat) <host-name> 9098 PBPUBLIC PBPUBLIC. Make sure that the shell script has execute permissions.
Start Insurance Client from the Sun ONE Studio.
These steps should be done if the Logistics Sample Application was compiled and deployed via the Sun ONE Studio software.
- Select <install_root>/samples/logistics/insurance/src/client.
- Navigate to InsuranceAgency (for example, com > sun > developerplatform > logistics > insurance > client > InsuranceAgency. Select the InsuranceAgency node.)
- Click the Execution tab (at the bottom of the properties window).
- In the Arguments field, enter <host-name> 9098 PBPUBLIC PBPUBLIC as the value from the default setting.
- Right-click the InsuranceAgency node.
- Select Execute to bring up the insurance client as a stand-alone JFC based rich client.
Uninstalling
To uninstall the Logistics Sample Application, use the Ant target undeploy-all as follows:
cd <install_root>/samples/logistics
ant undeploy-all
This undeploys all of the modules and deletes all resources.
It also removes the build and assemble directories under the Logistics Sample Application. These directories are created when the Logistics Sample Application is deployed using the Ant build scripts.
Setting Up the Logistics Sample Application in a Multi-Machine Environment
A multi-machine setup is one in which you install the Sun ONE Studio on the Windows 2000 platform, and all other Sun ONE servers on a Solaris platform.
Using the Install Scripts
Server Side
- cd <sample-home>/logistics
- Run the following targets:
ant -buildfile common.xml setup
Note Enter y or Y (yes) when prompted: Is it a multi-machine setup (Y/N)
ant -buildfile resources.xml setup-server
Client Side
As a prerequisite, you might want to set up your development environment.
See the Setting Up the Environment section.
- Set ANT_HOME (see Set Environment Variables).
- Run install_logistics.bat.
Note Enter y or Y (yes), when prompted: Is it a multi-machine setup (Y/N)
Setting Up Manually
Follow the instructions under Sun ONE Studio Experience: Compiling, Assembling, and Deploying the Logistics Sample Application, but note the following exception:
Exception
Under Insurance Client, mounting imq.jar and jms.jar files:
Mount these JAR files from <sample-home>\lib (as opposed to <appserver_home>\imq\lib for Windows).