|
|
| Sun ONE Web Services Platform Developer Edition Developer's Guide |
Logistics Sample Application: CustomizeThis section describes the modifications you can make to customize the Logistics Sample Application.
This section contains the following topics:
Overview
The objective of this section is to guide you through steps to add a new screen and its functionality to the Cargo Line Admin and Order Center modules through two specific examples. For the your convenience, source code is given in each step and it only serves as a sample. You can implement you own code to better model your business requirement.
You should have your Logistics Sample Application set up and running prior to following the instructions in this section. For information on how to setup and running the Logistics Sample Application, refer to the Logistics Sample Application: Deploy and Run section.
Customizing the Cargo Line Administration Module
There are four existing operations that can be performed on a shipment.
- Search
- Add
- View
- Delete
This section provides specific instructions to add the update operation on the shipment screen.
Updating a shipment in the Cargo Line system is an advanced feature that involves re-applying the routing algorithm to find the correct voyage for the shipment, and updating the voyage, the shipment_voyage, and the shipment tables.
However, for the purpose of training, a simple shipment update is used that allows end users to edit certain fields in shipment data that have no impact on the routing of the shipment.
These fields are:
- Insurance Flag
- Insurance Amount
- TEU Quantity
- Cargo Description
- Value
Add the shipment update functionality to the Cargo Line Administration module via the Sun ONE Studio by doing the following:
- Add a New JSP Page
- Modify the mapping.properties File
- Modify shipmentList.jsp
- Modify ShipmentHandler.java
- Modify ShipmentFacade.java and ShipmentFacadeBean.java
- Build and Deploy
Add a New JSP Page
To add a new screen to the Cargo Line Administration module (for example, shipmentEdit.jsp), you need to create a new JSP page representing the screen you want to add.
Every JSP page must include the following:
- A styles.css file in the header.
This style sheet defines the format of the fonts and fields of the application user interface.
- A processForm.js file in the header.
This file contains a collection of javascript helper functions to submit requests.
Include this file if you intend to use this method.
- A banner.jsp file in the body.
This JSP defines the top portion of the page which covers the company logo and tabs.
- A message.jsp file in the body.
This file defines the area on the screen where application-related messages are displayed.
- The actual content of your screen that you have to write.
- A footer.jsp file in the body.
This file reserves the area at the bottom of the screen where you can place your company ads or copyright for example. Currently the file has no content in it.
The following JSP code illustrates the JSP template used in the Cargo Line Administration module.
<%--
/*
* Copyright © 2002 Sun Microsystems, Inc.
* All rights reserved.
*
* Use is subject to license terms.
*
*/
--%><%@page contentType="text/html"%>
<%@ page import="java.util.*, com.sun.developerplatform.logistics.cargoline.busobj.*" %>
<jsp:useBean id="shipmentBean" class="com.sun.developerplatform.logistics.cargoline.admin.bean.ShipmentBean" scope="request" /><html>
<head><title>Cargoline Admin</title>
<link href="styles.css" rel="stylesheet" type="text/css">
<script language = "JavaScript" src="jsp/default/processForm.js"></script>
</head>
<body bgcolor="#FFFFFF" leftmargin="0" topmargin="0" marginwidth="0" marginheight="0"><!-- banner area -->
<%@ include file = "banner.jsp" %><BR>
<!-- message (error/warning/confirm) area -->
<%@ include file = "message.jsp" %><!-- actuall body is from here -->
<form action='CargolineFrontController' method=POST >
........</form>
<!-- footer area -->
<%@ include file = "footer.jsp" %></body>
</html>A complete JSP code that defines the shipment update screen is found in shipmentEdit.jsp.
To add the JSP file to the Admin Web module:
- Save the shipmentEdit.jsp file from the link above to a staging directory on your local machine.
- Copy shipmentEdit.jsp from the staging directory to the <sample_home>/logistics/cargoline/src/apps/admin/jsp/default directory.
Modify the mapping.properties File
Modifying the mapping.properties file defines the screen flow for the request to update the shipment.
The screen flow of the Cargo Line Admin user interface is defined in the mapping.properties file and is located under the <sample_home>/logistics/cargoline/src/apps/admin/WEB-INF directory.
The file is mapping an action of an event with a screen name. When an event action is sent to the server, the server looks up its mapping screen name and renders the screen to display it to the client. In the example of the shipment update, the event is shipment, and the actions are edit, editdone, and editcancel. The mappings of shipment actions are listed as follows:
shipment.edit=shipmentEdit.jsp
shipment.editdone=shipmentList.jsp
shipment.editcancel=shipmentList.jspModify the mappings.properties file to add the above lines to the file if they are not already defined in the file. You can modify the file either through the Sun ONE Studio or from the command line.
Modify shipmentList.jsp
Modify shipmentList.jsp to add Update buttons to the page.
To access the update screen where the client can modify the shipment data, you need to add an Edit Button on every shipment line shown on the shipment search screen, so that when the client clicks the edit button, the system displays the update shipment screen.
To add Edit buttons to the shipment search result:
- Open shipmentList.jsp file in Sun ONE Studio.
shipmentList.jsp in <sample_home>/logistics/cargoline/src/apps/admin/jsp/default directory
- Add the line below (shown in bold) between the lines of the View button and Delete button.
<td nowrap="nowrap" bgcolor="#ffffff">
<input name="button4" type="button" value="View" onclick="submitFormElement(this.form, 'shipment', 'view', '<%= shipmentId %>'); return false;">
<input name="button6" type="button" value="Edit" onclick="submitFormElement(this.form, 'shipment', 'edit', '<%= shipmentId %>'); return false;" >
<input name="button5" type="button" value="Delete" onclick="deleteConfirm(this.form, 'shipment', '<%= shipmentId %>'); return false;">
</td>Modify ShipmentHandler.java
ShipmentHandler.java is the shipment event handler with all of the actions of the shipment being processed.
As mentioned in the Modify the mapping.properties File section, there are three more actions for the shipment update:
- edit
- editdone
- editcancel
You need to modify ShipmentHandler.java to handle these actions.
- Open ShipmentHandler.java in the Sun ONE Studio.
The file is in the <sample_home>/logistics/cargoline/src/apps/admin/WEB-INF/classes/com/sun/developerplatform/logistics/cargoline/admin/handler directory.
- Modify the handleRequest() method to add the block of code (shown in bold) to the if, else if statement as follows:
try {
if (eventAction.equals(KeyDef.ADD)) {
isSuccessful = processAddShipment();
} else if (eventAction.equals(KeyDef.ADD_DONE)) {
isSuccessful = createShipment();
} else if (eventAction.equals(KeyDef.DELETE)) {
isSuccessful = deleteShipment();
} else if (eventAction.equals(KeyDef.VIEW) ) {
isSuccessful = viewShipment();
} else if (eventAction.equals(KeyDef.SEARCH) || eventAction.equals(KeyDef.ADD_CANCEL) || eventAction.equals(KeyDef.EDIT_CANCEL) || eventAction.equals(KeyDef.VIEW_DONE)) {
isSuccessful = listShipment(null);// code for customization
} else if (eventAction.equals(KeyDef.EDIT)) {
isSuccessful = viewShipment();
} else if (eventAction.equals(KeyDef.EDIT_DONE)) {
isSuccessful = editShipment();
// end code for customization} else {
String params[] = {eventAction};
addMessage(KeyDef.ERROR,MessageMap.INVALID_REQUEST, params, null);
req.setAttribute(KeyDef.NEXT_SCREEN, KeyDef.DEFAULT_ERROR);
isSuccessful = false;
}
} catch (RemoteException e) {
...................
}
- Add editShipment() method to handle the editdone event action using the following code:
// start code for customization
/**
* Processes the data entered on the request shipment form. Validates the data and
* update the shipment thru the call to the ShipmentFacade.
* @return booean returns true if the process of updatingshipment is successful; false otherwise.
* @exception RemoteException
*/private boolean editShipment() throws RemoteException {
ShipmentBean shipmentBean = new ShipmentBean ();
boolean result = true;try{
getAdminFacade();
getPortDataList();
getShipmentFacade();// extract data from the request object
shipmentBean = extractData();String requestDateStr = shipmentBean.getRequestDate();
Date requestDate = mLocaliser.getDateFromString( requestDateStr, mLocaliser.getLocalisedMessage(MessageMap.DISPLAYED_DATE_FORMAT) );
String neededByDateStr = shipmentBean.getNeedByDate();
Date neededByDate = mLocaliser.getDateFromString( neededByDateStr, mLocaliser.getLocalisedMessage(MessageMap.DISPLAYED_DATE_FORMAT) );// convert neededByDate from DISPLAYED_DATE_FORMAT to a string of DATE_FORMAT for validation to work
neededByDateStr = mLocaliser.getLocalisedDate(neededByDate, dateFormatStr);
boolean isInsured = ("true".equals(shipmentBean.getIsInsured()));// validate the data
validateData(new Integer(0), new Integer(1), requestDate, neededByDateStr,
shipmentBean.getCustomerLogin(), isInsured, shipmentBean.getInsuranceAmount(),
shipmentBean.getQuantity(), shipmentBean.getCargoContent(), shipmentBean.getValue());// convert data to the appropriate types
int id = Integer.parseInt(shipmentBean.getShipmentId());
double TEUquantity = Double.parseDouble(shipmentBean.getQuantity());
double value = Double.parseDouble(shipmentBean.getValue());
String amountStr = shipmentBean.getInsuranceAmount();
amountStr = ((amountStr != null && amountStr.length() > 0 )? amountStr.trim() : new String("0"));
double insuranceAmt = Double.parseDouble(amountStr);// call the session facade mehotd to update the shipment
ShipmentData shipmentData = shipmentF.updateShipment(id , shipmentBean.getCargoContent(),
TEUquantity, value , new Boolean(isInsured), insuranceAmt);// prepare data to list the updated shipment on the search screen
if (shipmentData != null) {
Collection sList = new ArrayList(1);
sList.add(shipmentData);
result = listShipment(sList);
} else {
// will never happen
result = listShipment(null);
}} catch (Exception e) {
if (e instanceof ValidationException ) {
ValidationException e1 = (ValidationException) e;
setMessage (KeyDef.ERROR, e1.getErrorList());
} else if (e instanceof CargoLineException ) {
CargoLineException e1 = (CargoLineException) e;
setMessage( KeyDef.ERROR, e1.getErrorCode());
// e.printStackTrace();
} else if (e instanceof java.rmi.RemoteException) {
throw ((RemoteException) e);
}req.setAttribute("shipmentBean", shipmentBean);
result = false;
}return result;
}
// end code for customization training
- Add the extractData() method called by the editShipment() method as follows:
// start code for customization training
/**
* Extract shipment data from the request object and put the data to the ShipmentBean object
* @return ShipmentBean
*/
private ShipmentBean extractData() {ShipmentBean sBean = new ShipmentBean();
sBean.setShipmentId((String) req.getParameter("id"));
sBean.setCustomerLogin((String) req.getParameter("customerLogin"));
sBean.setCustomerFirstName((String) req.getParameter("firstName"));
sBean.setCustomerLastName((String) req.getParameter("lastName"));
sBean.setSourcePort((String) req.getParameter("sourcePort"));
sBean.setDestinationPort((String) req.getParameter("destinationPort"));
String desc = (String) req.getParameter("cargoContent");
sBean.setCargoContent((desc != null ? desc.trim() : new String()));
sBean.setQuantity((String) req.getParameter("quantity"));
sBean.setValue((String) req.getParameter("value"));
sBean.setRequestDate((String) req.getParameter("requestDate"));
sBean.setNeedByDate((String) req.getParameter("needByDate"));
sBean.setIsInsured((String) req.getParameter("isInsured"));
sBean.setInsuranceAmount((String) req.getParameter("insuranceAmount"));
sBean.setStatus((String) req.getParameter("status"));return sBean;
}
// end code for customization trainingModify ShipmentFacade.java and ShipmentFacadeBean.java
Modify ShipmentFacade.java and ShipmentFacadeBean.java to add updateShipment() method as follows:
- Open ShipmentFacade.java in the Sun ONE Studio.
The file is under <sample_home>/logistics/cargoline/src/components/controller/com/sun/developerplatform/logistics/cargoline/controller.
- Add the line of code below to the file.
public ShipmentData updateShipment(int id, String cargoContent, double teuQuantity, double value, java.lang.Boolean insuranceFlag, double insuranceAmount) throws java.rmi.RemoteException, CargoLineException;
- Open ShipmentFacadeBean.java in the Sun ONE Studio.
The file is in the same directory as that of ShipmentFacade.java.
- Add the implementation code of updateShipment() method to the file.
The code is shown below.
// code for customization
public ShipmentData updateShipment(int id, String cargoContent, double teuQuantity, double value, Boolean insuranceFlag, double insuranceAmount)throws java.rmi.RemoteException, CargoLineException {
try {
ServiceLocator sl = new ServiceLocator();
LocalShipmentHome shipmentHome = ( LocalShipmentHome ) sl.getLocalHome(JNDINames.SHIPMENT_HOME );
LocalShipment shipment = shipmentHome.findByPrimaryKey(new Integer(id));
ShipmentData shipmentData = shipment.getShipmentData();double oldTeuQuantity = shipmentData.getQuantity().doubleValue();
boolean teuQtyChanged = (oldTeuQuantity != teuQuantity);if (teuQtyChanged) {
// if the TEU quanty has changed, recalculate the total cost and update it in the shipment data
double totalCost = 0.0;
// get the voyage assigned to this shipment
Collection svc = shipment.getShipmentVoyage();
if (svc != null && svc.size() !=0) {
Iterator it = svc.iterator();
while (it.hasNext()) {
LocalShipmentVoyage sv = (LocalShipmentVoyage) it.next();
ShipmentVoyageData svData = sv.getShipmentVoyageData();
VoyageData voyageData = svData.getVoyageData();
totalCost += teuQuantity * voyageData.getUnitPrice().doubleValue();
}
shipmentData.setTotalCost(new Double(totalCost));
}
}// update shipment data
shipmentData.setDescription(cargoContent);
shipmentData.setQuantity(new Double(teuQuantity));
shipmentData.setValue(new Double(value));
shipmentData.insured(insuranceFlag);
shipmentData.setInsuranceAmount(new Double(insuranceAmount));
shipment.setShipmentData(shipmentData);// update voyage should the TEU quantitiy has changed
if (teuQtyChanged) {
// add code to update the voyages assigned to this shipment here.
}
return shipment.getShipmentData();
}catch (ServiceLocatorException sle) {
throw new RemoteException(sle.getMessage());
}catch (FinderException fe){
throw new CargoLineException(MessageMap.SHIPMENT_NOT_FOUND, fe.getMessage());
}}
// end code for customizationBuild and Deploy
After finishing all of the code modification, you can redeploy the Logistics Sample Application using Ant through Sun ONE Studio.
Refer to the Run the Target From the Sun ONE Studio section for information on how to run Ant targets.
If you already have the Logistics Sample Application up and running, select the Ant target redeploy-application from the Run Target menu to redeploy the EJB and the Web modules.
Customizing the Order Center Module
This section describes how to customize the Sun ONE Application Framework application by adding in a Register Customer page to the existing Order Center module.
This section contains the following topics:
Create Register Customer Page
The Sun ONE Application Framework plugin for the Sun ONE Studio presents all Sun ONE Application Framework projects in a separate tab in the Explorer window called Sun ONE Web Apps.
All steps in this section are executed within the Sun ONE Web Apps tab.
- Click File > New.
The Choose Template page appears.
Choose Template Page
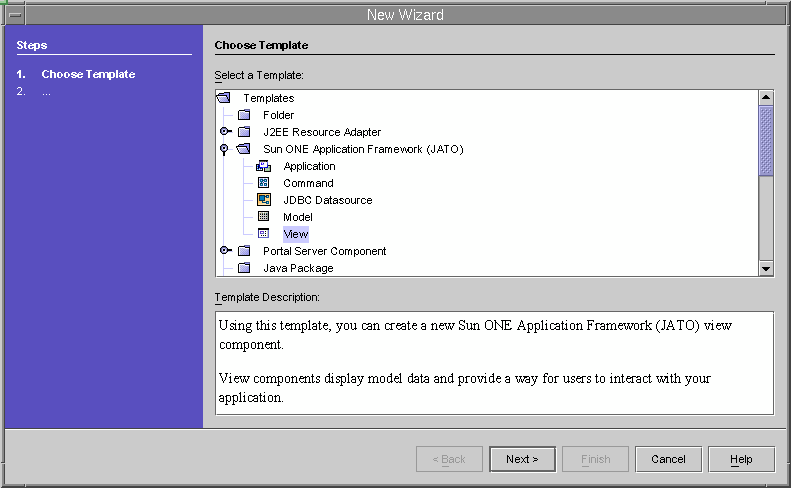
- Select Sun ONE Application Framework (JATO) > View.
- Click Next.
The Select View Type page appears.
Select View Type Page
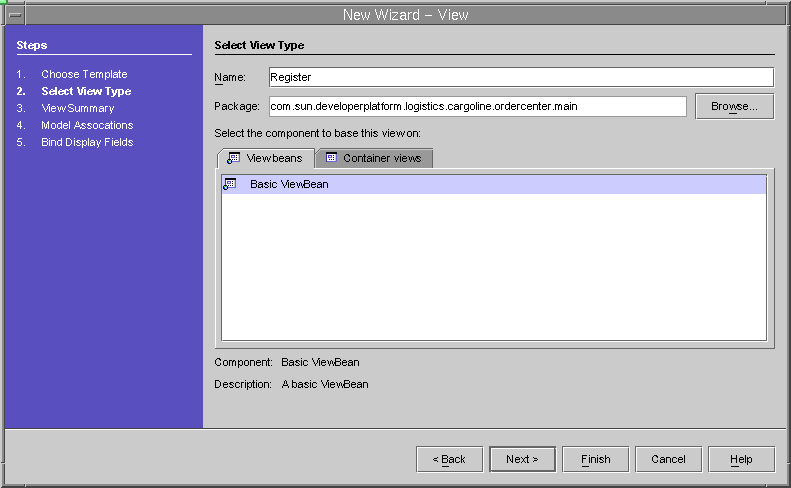
- Enter Register as the Name value.
- Select Basic ViewBean.
- Click Next.
The View Summary page appears.
View Summary Page
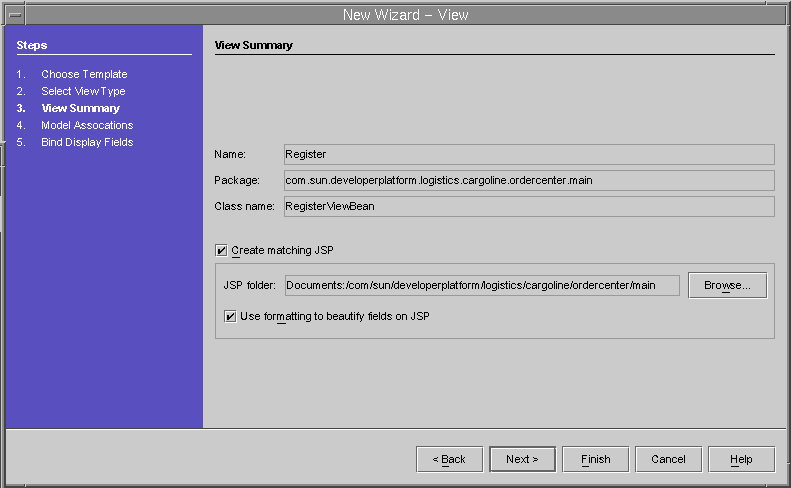
This page allows you to create the view beans peer JSP page.
- Accept the default values.
- Click Use formatting to beautify fields on JSP if desired.
- Click Next.
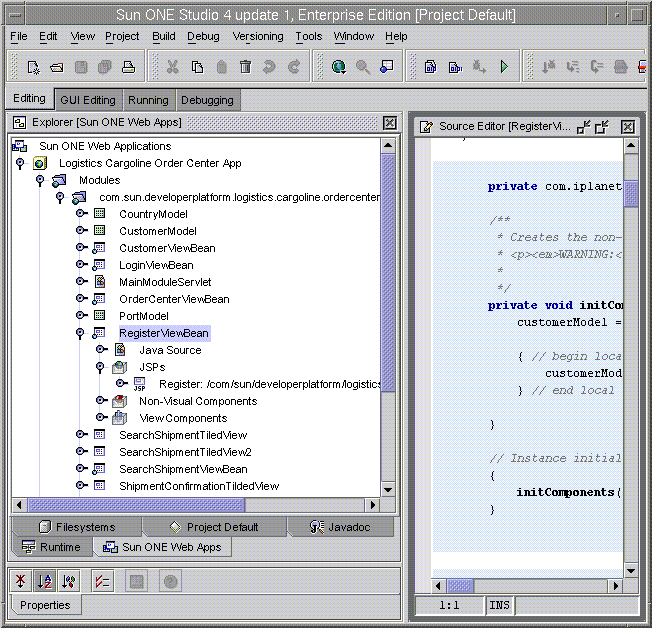
- In the Explorer window, you see the RegisterViewBean added to the list of classes.
Note that the peer JSP page has also been created.
RegisterViewBean Added to Classes
- The model display field binding created the view beans view components (text fields for the user address, user name, and so on).
Next, add some additional view components to the view bean.
These are buttons for Register, Clear, and Cancel actions.
- To add a view component, right-click the RegisterViewBean > ViewComponent node, and select Add View Component.
The Component Browser appears.
This is where you choose a component from a list of choices.
Component Browser
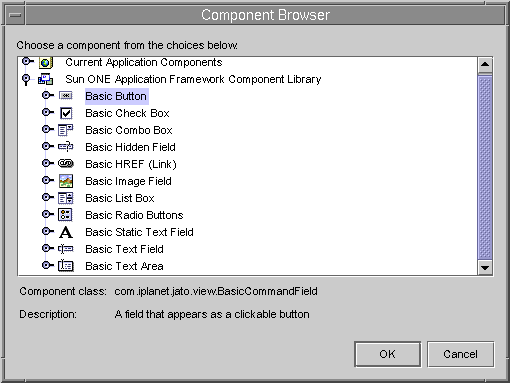
- Select Sun ONE Application Framework Component Library > Basic Button.
The Explorer window appears.
From the Explorer Sun ONE Web Apps tab, the button names appear as generic names (for example, button1, button2, and so on).
Explorer Sun ONE Web Apps Tab
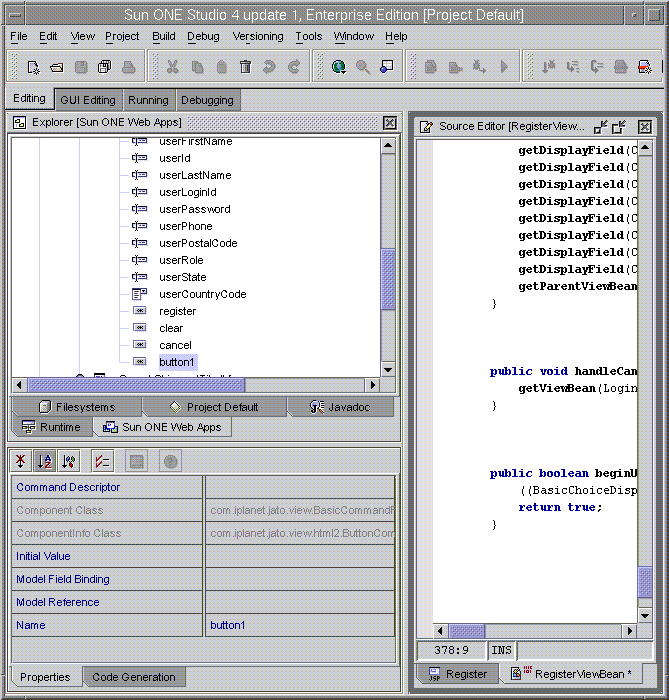
- Select and highlight button1.
- In the property editor, enter the value Clear for the Name attribute and Clear for the Initial Value attribute.
- Do the same for the other two buttons, entering:
Cancel and Register values respectively for the Name attributes
Cancel and Register respectively for the Initial Value attributes.
Make the userCountryCode view component into a choice display component rather than the text field component as initially chosen.
- Delete the existing view component.
Right-click RegisterViewBean > ViewComponents > userCountryCode, and select Delete.
- Add a new view component to the RegisterViewBean as in Step 12 above, however, choose the Basic Combo Box component instead of Basic Button.
The new view component has the name comboBox1.
- Select and highlight comboBox1.
In the property editor, change its property values with the values shown below.
Property Editor
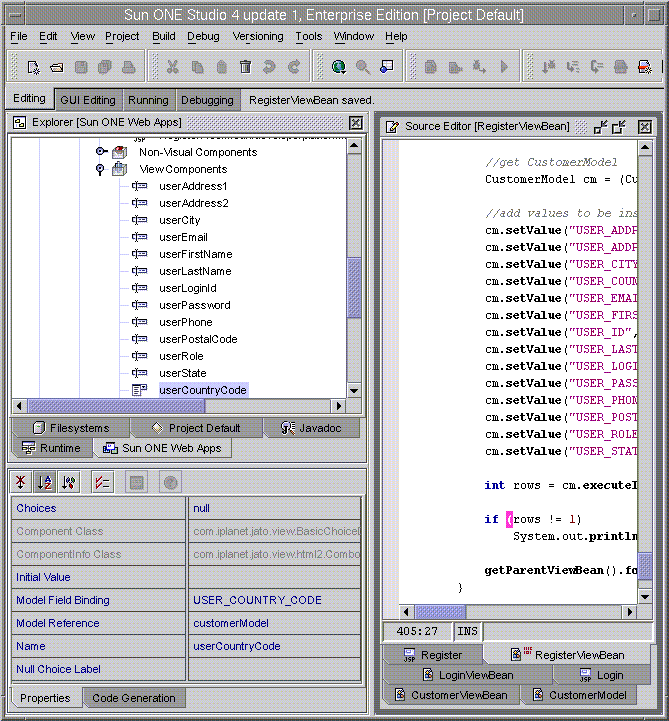
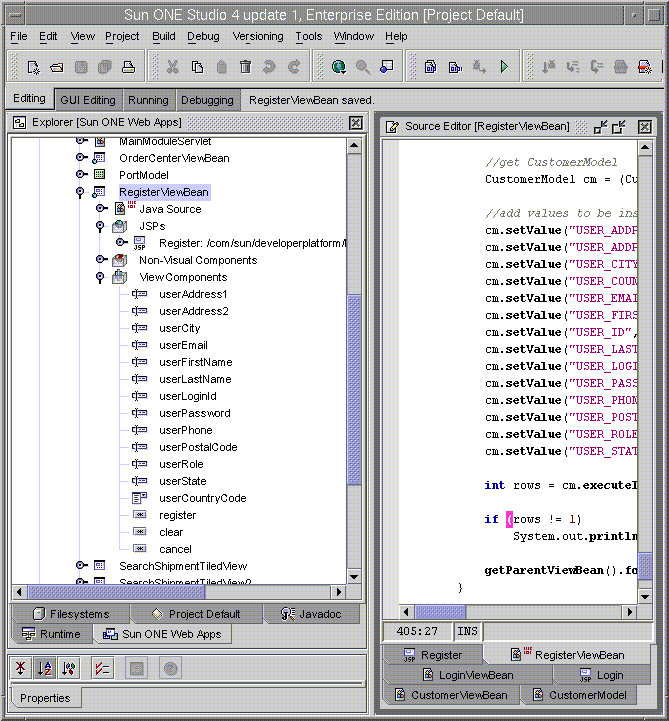
The RegisterViewBean's view components should look like the image shown below.
RegisterViewBean's View Components
- Add implementation code for the additional view components added in Step 12.
- Right-click RegisterViewBean > ViewComponents > userCountryCode, and select Events > beginDisplay.
The source editor brings up the RegisterViewBean source file, and adds a method called beginUserCountryCodeDisplay() with a default implementation.
- Replace the default implementation with the code shown in the table below.
public boolean beginUserCountryCodeDisplay(ChildDisplayEvent event) throws Exception {
((BasicChoiceDisplayField)getDisplayField(CHILD_USER_COUNTRY_CODE)).setChoices(MainModuleServlet.countryChoices);
return true;}
- Right-click RegisterViewBean > ViewComponents > cancel, and select Events > handleRequest.
A new method called handleCancelRequest() is added with a default implementation.
- Replace the default implementation with the code shown below.
public void handleCancelRequest(RequestInvocationEvent event) throws Exception {
RequestDispatcher rd = getRequestContext().getRequest().getRequestDispatcher("/index.html");
rd.forward(getRequestContext().getRequest(), getRequestContext().getResponse());}
The implementation tells the Sun ONE Application Framework software to display the login page when the Cancel button is clicked.
- Right-click RegisterViewBean > ViewComponents > clear, and select Events > handleRequest.
A new method called handleClearRequest() is added with a default implementation.
- Replace the default implementation with the code shown below.
public void handleClearRequest(RequestInvocationEvent event) throws Exception {
getDisplayField(CHILD_USER_ADDRESS1).setValue("");
getDisplayField(CHILD_USER_ADDRESS2).setValue("");
getDisplayField(CHILD_USER_CITY).setValue("");
getDisplayField(CHILD_USER_EMAIL).setValue("");
getDisplayField(CHILD_USER_FIRST_NAME).setValue("");
getDisplayField(CHILD_USER_ID).setValue(new Integer(-1));
getDisplayField(CHILD_USER_LAST_NAME).setValue("");
getDisplayField(CHILD_USER_LOGIN_ID).setValue("");
getDisplayField(CHILD_USER_PASSWORD).setValue("");
getDisplayField(CHILD_USER_PHONE).setValue("");
getDisplayField(CHILD_USER_POSTAL_CODE).setValue("");
getDisplayField(CHILD_USER_ROLE).setValue("");
getDisplayField(CHILD_USER_STATE).setValue("");
getDisplayField(CHILD_USER_COUNTRY_CODE).setValue("");getParentViewBean().forwardTo(getRequestContext());
}
- Right-click RegisterViewBean > ViewComponents > register, and select Events > handleRequest.
A new method called handleRegisterRequest() is added with a default implementation.
- Replace the default implementation with the code shown below.
public void handleRegisterRequest(RequestInvocationEvent event) throws Exception {
try {
String userId = (String)getDisplayFieldStringValue(CHILD_USER_LOGIN_ID);
String f_name = (String)getDisplayFieldStringValue(CHILD_USER_FIRST_NAME);
String l_name = (String)getDisplayFieldStringValue(CHILD_USER_LAST_NAME);
String email = (String)getDisplayFieldStringValue(CHILD_USER_EMAIL);
String password = (String)getDisplayFieldStringValue(CHILD_USER_PASSWORD);
String phone = (String)getDisplayFieldStringValue(CHILD_USER_PHONE);
String address = (String)getDisplayFieldStringValue(CHILD_USER_ADDRESS1);
String city = (String)getDisplayFieldStringValue(CHILD_USER_CITY);
String state = (String)getDisplayFieldStringValue(CHILD_USER_STATE);
String postalCode = (String)getDisplayFieldStringValue(CHILD_USER_POSTAL_CODE);
String countryCode = (String)getDisplayFieldStringValue(CHILD_USER_COUNTRY_CODE);String countryName = null;
Choice[] choices = MainModuleServlet.countryChoices;
int size = MainModuleServlet.countryChoices.length;
for (int i=0; i<size; i++) {
if (MainModuleServlet.countryChoices[i].getValue().equals(countryCode)){
countryName = MainModuleServlet.countryChoices[i].getLabel().toString();
System.out.println(" country name" + countryName);
break;}
}
CountryData countryData = new CountryData(countryCode, countryName);UserData userData = new UserData(userId, userId, password, f_name, l_name, address,
"", city, state, postalCode, countryData, phone, email, "CST");System.out.println("user data in order center to create " + userData);
InitialContext ic = new InitialContext();
UserFacadeHome ufh = (UserFacadeHome) ic.lookup(MainModuleServlet.USER_FACADE);
UserFacade uFacade = ufh.create();uFacade.createUser(userData);
System.out.println(" after create user");}
catch (ValidationException ve) {
Collection eList = ve.getErrorList();
Iterator it = eList.iterator();
String errMsg = new String();while (it.hasNext()) {
errMsg += (String)it.next() + " ";
}
//getDisplayField(CHILD_MESSAGE).setValue(errMsg);
isError = true;}catch (Exception e) {
e.printStackTrace();
//getDisplayField(CHILD_MESSAGE).setValue(localiser.getLocalisedMessage(MessageMap.CUST_PROFILE_UPDATE_FAIL));
isError = true;
}
RequestDispatcher rd = getRequestContext().getRequest().getRequestDispatcher("/index.html");
rd.forward(getRequestContext().getRequest(), getRequestContext().getResponse());
}
- Finally, add appropriate import statements.
Change the class in which the RegisterViewBean extends.
The RegisterViewBean's new superclass should be OrderCenterViewBean.
import com.sun.developerplatform.logistics.cargoline.busobj.UserData;
import com.sun.developerplatform.logistics.cargoline.busobj.CountryData;
import com.sun.developerplatform.logistics.cargoline.controller.*;
import javax.naming.InitialContext;
import javax.naming.NamingException;
import com.sun.developerplatform.logistics.cargoline.common.MessageMap;
import com.sun.developerplatform.logistics.cargoline.common.Localiser;
import com.sun.developerplatform.logistics.cargoline.common.ValidationException;
public class RegisterViewBean extends OrderCenterViewBean {
...Build and Deploy
- Follow the build and deploy steps to deploy Order Center Web module.
- Modify Policy Agent configuration:
Locate the AMAgent.properties file.
- Add /ordercenter/main/Register to the not-enforced-list.
com.iplanet.amagent.config.filter.global.notEnforcedList[0]=/ordercenter/main/Register
- Restart the Sun ONE Application Server and access http://host.domain/ordercenter/main/Register.