
This chapter provides periodic maintenance and troubleshooting information for the GT Graphics Subsystem.
-------------------------------------------------------


Periodic Maintenance                          page 55

Graphics Tower Air Filter Cleaning Procedure  page 56

Troubleshooting                               page 58

Internal Self Test                            page 60

gtprobe Test                                  page 65

SunDiag Diagnostics                           page 67

-------------------------------------------------------
Periodic maintenance on the GT Graphics Subsystem is limited to cleaning or replacing the Graphics Tower air filter.
Caution -

During normal use, the air filter in the bottom of the Graphics Tower may collect dust and become clogged. A clogged filter limits the ability of the tower fans to cool the boards. The environment in which your GT Graphics Subsystem is installed determines the frequency of cleaning, as described in Table 7-1.
Table 7-1 Graphics Tower Filter Cleaning Schedule
-----------------------------------------------------------------


Room Cleanliness                              Clean Filter Every
-----------------------------------------------------------------
Closed room; filtered air, cleaned regularly  9 months

Office environment; cleaned regularly         6 months

Industrial site; dusty, seldom cleaned        3 months

-----------------------------------------------------------------
To clean the filter:
See Figure 7-1.
Note - Check the wire mesh screen on the bottom of the tower. If this screen is dirty, vacuum it clean of any dust and debris. Dust particles that get through the filter can accumulate on the screen over time. Also, operating the tower without a filter can cause the screen to get dirty.
If necessary, the filter may be washed. Rinse and dry thoroughly before replacing in the Graphics Tower.
Under normal conditions, the filter can be cleaned several times before it needs to be replaced. To replace the filter, order Sun Part Number 340-1545.
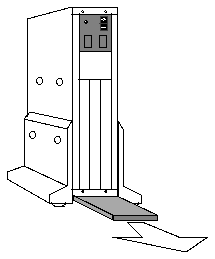
Figure 7-1 Removing the Graphics Tower Air Filter
If you experience problems with your GT Graphics Subsystem after installation, verify that you have installed the GT Graphics Subsystem according to the installation procedures detailed in chapters 3 through 5.
The troubleshooting guide in Table 7-2 describes possible causes and remedies for a few common system problems. The remedies are not exhaustive, but rather suggestions of possible remedies.
Table 7-2 Troubleshooting Guide
-------------------------------------------------------------------------------------------------------------------------


Problem                         Possible Cause/Solution
-------------------------------------------------------------------------------------------------------------------------
No display on the monitor.      1. The monitor may not be turned on. Verify that the monitor is plugged in and
                                turned on.


                                2. The Graphics Tower may not be turned on. Verify that the Graphics Tower is
                                plugged in and turned on. Verify that the Graphics Tower fans are turning and that
                                the power indicator is on (the power indicator is to the left of the ac power switch on
                                the Graphics Tower rear panel). If the Graphics Tower powers-up, run the internal
                                self test described on page 60.


                                3. Cables may not be installed properly. See "Connect the Cables" on page 40.


                                4. The system may have been powered up out of sequence. See "Power on the
                                System" on page 48.


                                5. The kernel probe may not have found the gt system on power up. Run the gtprobe
                                test described on page 65

Display is distorted or         1. Most likely a faulty monitor. If possible try a different monitor.
shrunken, even in the window
system.

                                2. The system may have been powered up out of sequence - see "Power on the
                                System" on page 48.


                                3. Possibly faulty board. Run the internal self test described on page 60.

Graphics Tower will not power   1. The Graphics Tower may not be receiving ac power. Check the power cable and
up.                             supply outlet. Verify that the ac power switch is "ON." The on position is with the
                                side marked "1" pushed in. Check to see if the power indicator is on. The power
                                indicator is to the left of the ac power switch. Check to see if the fans are turning.


                                2. The fuse may be blown. To check the fuse, power down the system (see Chapter 3)
                                and unscrew the fuse from the fuseholder. The fuseholder is located to the left of the
                                ac power switch on the rear panel. If necessary, replace the fuse with one of the exact
                                same style and rating. For fuse sizes, see Table 1-2 on page 4.

-------------------------------------------------------------------------------------------------------------------------
Before calling Sun Customer Support to report a problem with the GT Graphics Tower, run the internal self test described below.
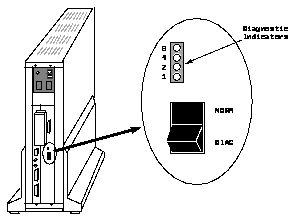
When the Graphics Tower is powered-up with the diagnostic switch in the DIAG position, four LED indicators on the rear of the Graphics Tower indicate the diagnostic status of the GT Graphics Subsystem. Figure 7-2 shows the location of the diagnostic switch and indicators.
To run the internal self test:
Wait at least two minutes after turning the power off before turning the power back on again to allow the unit to reset.
The internal self test displays patterns on the monitor, which must be connected to the GT Graphics Tower.
The switch is in the DIAG position when the bottom half of the switch is pressed in.
If the diagnostics detect a problem, testing halts with the failure identified by the diagnostic indicators. See Table 7-3.
Note - If there are no failures, the entire test sequence takes 4 minutes 45 seconds to finish.
When you first start the diagnostic, the diagnostic indicators all flash on and off three times before the test sequence begins. Each test displays for a minimum of one second so you can observe the test progression.
If a monitor is attached, you can observe patterns as the tests progress. These patterns are identified in the table and shown in the two figures following the table.
If the diagnostic indicators do not all come on at the end of the test (the test takes 4 minutes 45 seconds), note the state of the diagnostic indicators and contact Sun Customer Support.
To resume normal system operation after the internal self test:
The switch is in the NORM position when the top half of the switch is pressed in.
Table 7-3 Graphics Tower Diagnostic Indicators

Figure 7-3 shows the eight blocks that display as the result of the Frame Buffer test of the plane groups. As the tests progress, the screen will flicker and flash. This is normal.
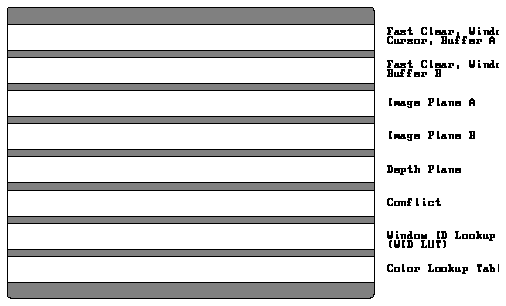
Figure 7-3 Console View of Plane Groups Test
Figure 7-4 shows the patterns displayed by the Rendering Pipeline and Frame Buffer tests. Wherever the colors Red, Green, and Blue are identified, they should be the pure RGB colors.
Three anti-aliased lines run diagonally from the upper left to the lower right. The line in the middle is red, the other two are green, Three non-anti-aliased lines run diagonally from the top right to the bottom left. These lines are red at one end and blue at the other, with all the blending colors in between.
There are four equilateral triangles. The top triangle is green and flat-shaded. The right triangle is a vertex-shaded, non-anti-aliased. The left and bottom triangles are vertex-shaded, anti-aliased.
There are four purple dots in the center of the intersections of the six lines.

Figure 7-4 Console View of Patterns Tests
The gtprobe test is a stand-alone utility that checks for proper operation of the interface to the GT Graphics Subsystem.
Note - This test must be run from an attached auxiliary terminal or from a remote log in terminal. If you can see anything on the attached system monitor, gtprobe probably won't find any problems.
The gtprobe command is as follows:
gtprobe -v
where -v is the verbose option which causes gtprobe to print several sequence messages in addition to the basic messages.
To run the gtprobe test:
For SunOS 4.x, type:

For Solaris 2.x, type:

You should see a series of messages something like this:

At start up, gtprobe prints all devices that are installed in each SBus slot (slots 1, 2, and 3). If gtprobe doesn't find a GT device, it will default to the first empty SBus slot.
In the above example, the gt is found in SBus slot 1. If gtprobe found the SBus slot, accept the default (press Return). If gtprobe did not find the SBus slot, the GT openboot SBus probe sequence did not detect a GT device during boot time. Type the slot number you believe to have the SBus Adapter Board and press Return.
When you press Return, you should now see a series of messages something like this:
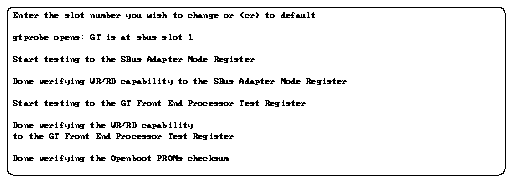
If you don't see the complete message, all the way to
Done verifying the Openboot PROM's checksum
gtprobe has found a problem. The problem is most likely one of the following:
If you do see the complete message, the gtprobe test has passed without finding any errors.
The GT SunDiag diagnostic probes the system kernel for installed hardware devices then displays a control panel with the devices it found. The GT SunDiag diagnostics consist of a sequence of subtests that can accurately locate and identify failing field-replaceable units. All tests are non-destructive and maintain the system integrity during and after the tests are run.

Note - The GT SunDiag diagnostic requires approximately 1.5M bytes of disk space in the /tmp directory to extract its working files. If this space is not available, the diagnostic will fail and report warning and error messages indicating lack of disk space.
The following information is written with the assumption that you are familiar with the SunDiag On-line System Exerciser. If not, read the SunDiag User's Guide.
To start SunDiag (from within SunView or OpenWindows):
For SunOS 4.x, type:

For Solaris 2.x, type:

Figure 7-5 shows an example SunDiag window.
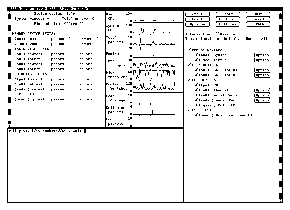
Figure 7-5 The SunDiag Interface
See Figure 7-6.
SunDiag automatically probes for available devices. A check mark means that the device is enabled for testing. If the gt device is not shown, the GT Graphics Subsystem may not be properly installed.
Figure 7-6 The SunDiag Control Panel
To test the GT Graphics Subsystem, enable the "Graphics Tower GT0" test under "User Tests" on the SunDiag control panel. SunDiag 2.0.4 does not allow you to make sub-test selections for the GT diagnostics. By default, SunDiag runs all of the available tests, except the interactive tests. The tests take about 12 minutes to run.
Subsequent versions of SunDiag will allow you to select specific tests by way of an Option button.
Note - If you are running SunDiag as a result of suspected errors with the GT Graphics Subsystem, enable only the "Graphics Tower GT0" test for the first pass. This will prevent any complications with other potential hardware problems and make the test run faster.
Error messages display in the console window (lower left corner of the interface menu).
