
This appendix gives the procedures for connecting the power cord to a SCSI Expansion Pedestal and connecting the pedestal to a SPARCstation, where the system meets the following criteria:
Note - If your system does not meet these criteria, go to Chapter 4, "Connecting to a SPARCstation," and follow the procedures in that chapter.
Note - If you have differential SCSI disks installed in the bottom tray of your SCSI Expansion Pedestal (such as 2.1 Gbyte disk drives), you will not be able to connect your SPARCstation to the SCSI Expansion Pedestal using these procedures.
In order to connect a SCSI Expansion Pedestal to a SPARCstation with these characteristics, you will have to disconnect the internal hard disk drives' data cables in the SPARCstation to avoid problems with SCSI address conflicts. This procedure is covered in detail in this appendix.
Note - Connecting a SPARCstation to a SCSI Expansion Pedestal using this procedure will result in a SCSI cabling length in excess of 6 meters. This configuration has been tested, however, and it has been determined that there is no data loss as a result of this excess in SCSI cabling length.
Follow the procedures in the following sections to prepare the system for cabling.
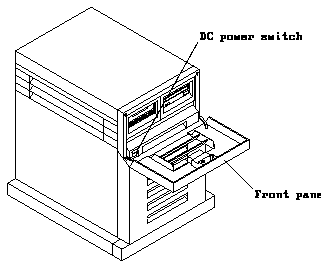
Place your hand in the top vent of the front panel and lift upward on the release latch (see Figure B-1).

Figure B-1 Release Latch Location

The DC power switch is located behind the front panel (see Figure B-2).
The AC power switch is located at the rear of the pedestal next to the power receptacle (see Figure B-3).
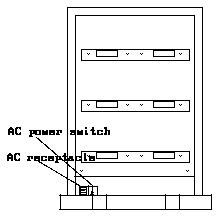
Figure B-3 Location of the AC Receptacle and AC Power Switch on the SCSI Expansion Pedestal
Note - Systems shipped inside the US and Canada have an AC power cord with a three-slot female plug at one end and a three-pronged male plug at the other end. Systems shipped outside of the continental US may have different power cords shipped in a separate kit. See the instructions provided with the kit for details.
The power cord provides a ground path which will keep the drives and boards installed in your unit from being damaged from static electricity.


Follow the procedures in the following sections to prepare the SPARCstation for cabling.
Since you will need to disconnect the data cables from the hard disk drives in your SPARCstation in this procedure, you will need to be able to restore the data from those hard disk drives once you have connected and powered on your SCSI Expansion Pedestal.
Refer to the installation manual you received with the SPARCstation for the location of the power switch.
If the power switch is in the ON (|) position, refer to the installation manual you received with the SPARCstation for instructions on powering down the system before proceeding with this section.
Refer to the installation manual you received with the SPARCstation for the location of the AC receptacle. The power cord provides a ground path which will keep the SCSI devices installed in your unit from being damaged by static electricity.
If the power cord for your SPARCstation is not plugged into a grounded wall outlet, plug the three-prong, female end of the AC power cord in the AC receptacle on the SPARCstation. Plug the other end of the AC power cord into a grounded wall outlet.

Refer to the manual you received with the SPARCstation for the procedure for removing the cover from the unit.
The ESD kit should have been shipped with your system.
Make sure the adhesive side is against your skin. A wrist strap is a device that provides grounding between your body and the chassis of the system unit. Boards and modules can be damaged by harmful static electrical charges if you do not wear a wrist strap.

Figure B-4 Attaching the Wrist Strap
Refer to the manual received with the SPARCstation for the location of the power supply in the unit.
Refer to the manual you received with your SPARCstation for the location of the hard disk drive(s).
Note - Do not disconnect the hard disk drive's power cable from the main logic board, since this provides the necessary load on the power supply to maintain regulation.
Store it for future use.
Refer to the manual you received with your SPARCstation for the procedure for replacing the cover on the unit.
Before you can connect your SCSI Expansion Pedestal to your SPARCstation, you must verify that you have a SCSI host adaptor card installed in one of the SBus slots in your SPARCstation.
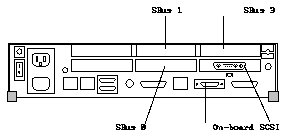
Figure B-5 shows the location and order of the SBus slots on a three-slot SPARCstation and Figure B-6 shows the location and order of the SBus slots on a four-slot SPARCstation; for the location and order of the SBus slots on other types of SPARCstations, refer to the manual you received with the unit.

If you do not have a SCSI host adaptor card installed in an SBus slot in your SPARCstation, you can order one through Sun Microsystems. Refer to the manual you received with the card for installation instructions.
Since you have SCSI devices installed in all three trays in your SCSI Expansion Pedestal, perform the procedures given in each of the following sections.
Follow these instructions to connect the bottom tray of your SCSI Expansion Pedestal to the on-board SCSI port in your SPARCstation:
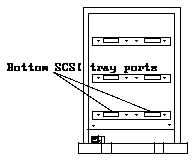
Figure B-7 shows the location of the ports on the bottom tray in the SCSI Expansion Pedestal. Either port can be used as the "SCSI IN" port, so plug the cable into the port that is most convenient for you.
Refer to Figure B-5 for the location of the on-board SCSI port on a three-slot SPARCstation and Figure B-6 for the location of the on-board SCSI port on a four-slot SPARCstation; for the location of the on-board SCSI port on other types of SPARCstations, refer to the manual you received with the unit.
Figure B-8 shows the proper connection if the bottom tray was connected to the on-board SCSI port on a three-slot SPARCstation.
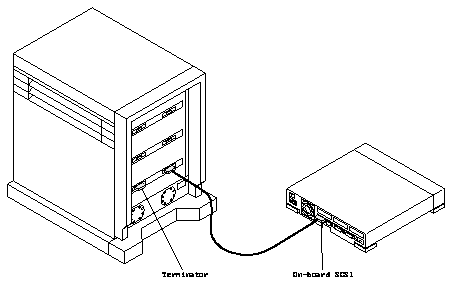
Figure B-8 Connection for the Bottom SCSI Tray
The procedure for connecting the bottom tray of your SCSI Expansion Pedestal to your SPARCstation is now complete.
Refer to the next section, "Connecting the Middle Tray," for instructions on connecting the middle tray of the pedestal to your SPARCstation.
Note - Do not connect a separate SCSI device between your SCSI Expansion Pedestal and your SPARCstation, since this could result in a conflict in SCSI addressing.
Follow these instructions to connect the middle tray of your SCSI Expansion Pedestal to a SCSI host adaptor card installed in your SPARCstation:
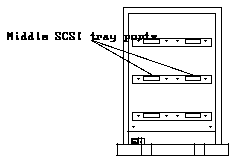
Figure B-9 shows the location of the ports on the middle tray in the SCSI Expansion Pedestal. Either port can be used as the "SCSI IN" port, so plug the cable into the port that is most convenient for you.
Refer to Figure B-5 for the location of the SBus slots on a three-slot SPARCstation and Figure B-6 for the location of the SBus slots on a four-slot SPARCstation; for the location of the SBus slots on other types of SPARCstations, refer to the manual you received with the unit.
Figure B-10 shows the proper connection if the SCSI host adaptor card was installed in the SBus 1 slot of a three-slot SPARCstation.

Figure B-10 Connection for the Middle SCSI Tray
The procedure for connecting the middle tray of your SCSI Expansion Pedestal to your SPARCstation is now complete.
Refer to the next section, "Connecting the Top Tray," for instructions on connecting the top tray of your SCSI Expansion Pedestal to your SPARCstation.
Note - Do not connect a separate SCSI device between your SCSI Expansion Pedestal and your SPARCstation, since this could result in a conflict in SCSI addressing.
Because there is only one SBus slot available on your SPARCstation, you must connect the top tray of your SCSI Expansion Pedestal to the bottom tray; the bottom tray of the pedestal should already be connected to the on-board SCSI port on the SPARCstation.
Follow these instructions to connect the top tray of your SCSI Expansion Pedestal to the bottom tray:
Figure B-7 shows the location of the ports on the bottom SCSI trays in your SCSI Expansion Pedestal.
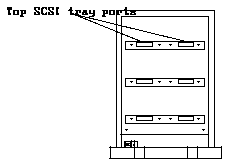
Figure B-11 shows the location of the ports on the top tray in the SCSI Expansion Pedestal.
The procedure for connecting the top tray of the SCSI Expansion Pedestal to the bottom tray of pedestal is now complete.
Refer to the next section, "What's Next," for instructions on routing the cables and finishing the connection procedure for your SCSI Expansion Pedestal.
Note - Do not connect a separate SCSI device between your SCSI Expansion Pedestal and your SPARCstation, since this could result in a conflict in SCSI addressing.
You have connected all the trays that contain SCSI devices in your SCSI Expansion Pedestal to your SPARCstation. Figure B-12 shows how a typical system would look with all the SCSI trays in the SCSI Expansion Pedestal connected to a three-slot SPARCstation.

Figure B-12 Connection for All the SCSI Trays
You should now route the cables through the cable clamps located along both sides of the inside rear bezel of the SCSI Expansion Pedestal. These cable clamps are used to restrain the cables.
Follow these steps to route the cables through the cable clamps:
The cable clamps should be installed along both sides of the inside rear bezel of your SCSI Expansion Pedestal. The cable clamp you will use varies depending on which tray the cable is connected to.
If you are securing a cable coming out from the bottom tray, use the middle cable clamp located along the inner bezel that is closest to the cable. Figure B-13 shows how you would secure a cable that is connected to the bottom right SCSI port - securing a cable on the opposite side of the pedestal would be the same.
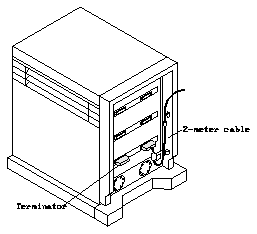
Figure B-13 Securing a Cable from the Bottom Tray
If you are securing a cable coming out from the middle tray, use the bottom cable clamp located along the inner bezel that is closest to the cable. Figure B-14 shows how you would secure a cable that is connected to the middle right SCSI port - securing a cable on the opposite side of the pedestal would be the same.

Figure B-14 Securing a Cable from the Middle Tray
If you are securing a cable coming out from the top tray, use the top and bottom cable clamps located along the inner bezel that is closest to the cable. Figure B-15 shows how you would secure a cable that is connected to the top left and bottom left SCSI ports - securing a cable on the opposite side of the pedestal would be the same.
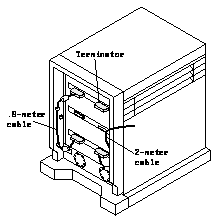
Figure B-15 Securing a Cable from the Top Tray
Note - Make sure the connector is level with the floor when routing the cable through the clamp. If the connector is bent too far up or down, release the cable from the clamp and take up or let out the slack in the cable until the connector is level, then clamp the cable again.
Refer to Chapter 7, "Powering the System On and Off," for instructions on powering on the system.