
This chapter provides the information necessary to prepare the system for servicing. Included are a tool list, safety precautions, system power down, and trim removal and replacement procedures.
The following list of tools and test equipment represents the minimum requirement for field service of the cabinet.
Ensure that the voltage and frequency of the power outlet used matches the electrical rating labels on the cabinet.
Wear anti-static wrist straps when handling any magnetic storage devices.
Only use properly grounded power outlets as described in the Sun
Microsystems Site Preparation Guide manual.

Caution -

Before turning off the system power, you must halt the operating system. See the section entitled "When You Need Help with UNIX(TM) Commands" in the Preface of this manual for a references to documentation that contains the correct procedure.
Follow these steps to power off your system:
To open the front panel, place your hand in the top vent of the front panel and lift upward on the release latch (see Figure 1-1).
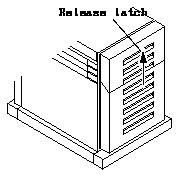
Figure 1-1 Release Latch Location

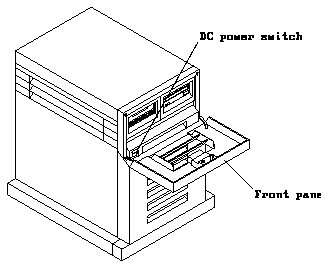
The DC power switch is located behind the front panel (see Figure 1-2).
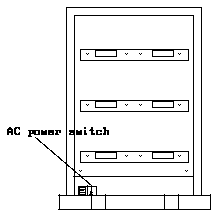
The AC power switch is located on the back panel of the pedestal next to the power receptacle (see Figure 1-3).

The SCSI Expansion Pedestal is connected to the host system by data cables. A terminator must be added to the end of each SCSI daisy chain at the SCSI Expansion Pedestal.
Refer to the Sun SCSI Expansion Pedestal Installation Manual (P/N 800-7285) for system wiring configurations and terminator locations.
To remove or replace the cables, proceed as follows:
Reverse these procedures to replace the external cables.
To remove or replace the terminators, remove the terminators from the back panel.
Reverse these procedures to replace the external terminators.
The SCSI Expansion Pedestal outer panels, (shown in Figure 1-4 through Figure 1-9), consist of the following parts collectively referred to as trim.
Figure 1-4 shows in detail what you will need to remove before accessing the subassemblies.

Figure 1-4 Trim Removal/Replacement

Note - The top cover, front panel, left and right side panels, rear bezel, and rear bumper snap on and off. You must remove the top cover prior to removing the side panels. The front panel, rear bezel and bumper can be removed without removing other panels.
Remove the top cover and side panels as shown in Figure 1-5 and Figure 1-6:
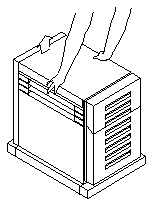
Figure 1-5 Removing the Top Cover
Note - At this point the side panels can be removed as shown in Figure 1-6, however it is not necessary to remove the side panels in order to remove the front panel.
To replace the top cover and side panels, reverse the above procedure.
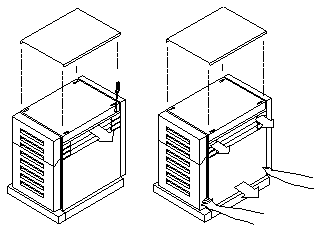
Figure 1-6 Removing the Side Panels
Remove the front panel and bumper assembly as shown in Figure 1-7:
To replace the front panel and bumper assembly, reverse the above procedure.
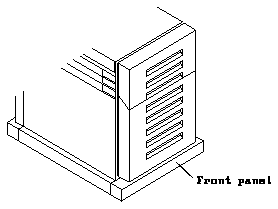
Figure 1-7 Removing the Front Panel and Bumper Assembly
Remove the tape or blank bezels as shown in Figure 1-8.
The bezels are a press fit. By exerting gentle pressure to the top surface of the bezels they are easily removed. There are two tangs on the bottom surface of the bezels which fit into corresponding slots on the front panel and bumper assembly.
When installing a SCSI tape drive or SunCD(TM), a tape bezel is installed at each location.
When there is no device loaded in either of the locations in the upper shelf, a blank bezel is installed there in the front panel and bumper assembly.
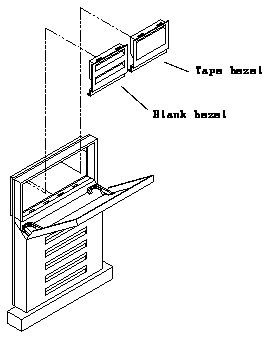
Figure 1-8 Tape and Blank Bezel Installation
Remove the rear bumper and rear bezel as shown in Figure 1-9:
To replace the rear bumper and rear bezel, reverse the above procedure.
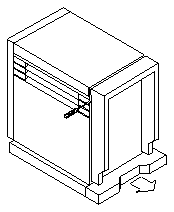
Figure 1-9 Removing the Rear Bumper and Bezel
The SCSI Expansion Pedestal has been equipped with threaded inserts for securing the cabinet permanently. As shown in Figure 1-10, there are four 1/4- 20 threaded inserts in the exterior base of the cabinet. Sun Microsystems, Inc. does not provide any additional hardware beyond the inserts. To utilize this feature, the customer provides additional hardware such as levelling feet or brackets.
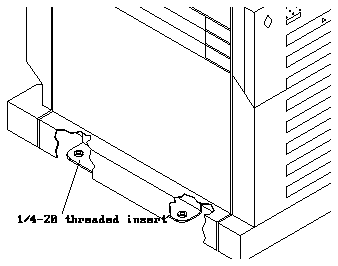
Figure 1-10 Secure Installation Hardware Location
