
This chapter provides the information you need to remove the system unit
cover, set the clock speed jumpers, and remove and install a SuperSPARC
module on the following systems:
Note -
Variations of the module may be referred to as MBus module, SPARC
module, SuperSPARC module, and SuperSPARC/SuperCache MBus module.
These terms may be used interchangeably in this chapter.
Caution -

Dual module configurations have a module in both the upper and
lower MBus slots, and both modules must be the same. Different modules can
not be installed on the same MLB.
Caution -

See the "Shutting Down the System" section in Chapter 2 to make
sure the system is shut off. The green light-emitting diode (LED) at the front of
the system unit should not be lit.
Caution -

The system chassis power must be turned off and the power cord
must remain plugged in to ensure a proper ground. Do not disconnect the
power cord from the system unit power outlet or the wall socket. This
connection provides the ground path necessary to safely remove and install the
printed circuit boards and components.
Caution -


Make sure that power to your system unit is turned off. The power
cord must remain plugged into the system unit and to the power source to
ensure a proper ground.
1. Use a #2 Phillips screwdriver to fully loosen the captive screw holding the
cover to the back panel.
The screw will remain attached to the back panel after it is fully loosened
from the cover.

Figure 4-1
Location of Captive Screw on the Rear Panel
2. Use the Phillips screwdriver to press the retainer clip while you loosen
the cover from the back panel with your other hand.

Figure 4-2
Location of the Retainer Clip
3. Grasp the sides of the cover from the rear and lift the cover as shown in
Figure 4-3. Push the cover forward until its hinge tabs are free of the
system unit.
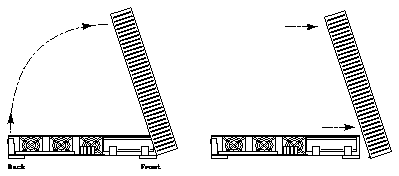
Figure 4-3
Removing the System Unit Cover, Side View
Warning -

Before powering on your system again, be sure to install the cover.
See section 4.5, "Replacing the System Unit Cover." It is not safe to operate the
SPARCstation 10 or SPARCserver 10 system without the top cover in place.
Warning -

The heatsinks on the SuperSPARC modules may be hot. Use
caution when removing or installing SuperSPARC modules and avoid contact
with the heatsinks. Hold SuperSPARC modules only by the edges.
Caution -

Printed circuit boards are made of delicate electronic components
that are extremely sensitive to static electricity. Ordinary amounts of static from
your clothes or work environment can destroy the boards.
Caution -

Wear a grounding wrist strap when handling the boards. Attach the
wrist strap to the metal casing of the power supply at the rear of the unit top.
Handle boards only by the edges. Do not touch the components themselves or
any metal parts.
Caution -

Do not disconnect the power cord from the system unit power outlet
or from the wall socket. This connection provides the ground path necessary to
safely remove and install the printed circuit boards and components. In
addition, keep the internal power supply cable connected to the MLB.
Caution -

Make sure that the system unit power is turned OFF by checking
that the green LED at the front of the chassis is not lit and the fan in the power
supply is not running.
To remove a SuperSPARC or other MBus module from a system unit:
1. Check that the green LED at the front of the chassis is not lit.
2. Check that the system power cord remains connected to the system and
the wall outlet.
3. Remove the system unit cover.
Caution -

Place the antistatic mat (shiny side up) on a work surface near the
system. Attach the wrist grounding strap as described in Chapter 2.
4. Push back both card retainers for the module. See Figure 4-4.
If the system has two modules (slot 1 on top of slot 0), remove the top
module first.
5. Install the card extractor on the module. See Figure 4-4.
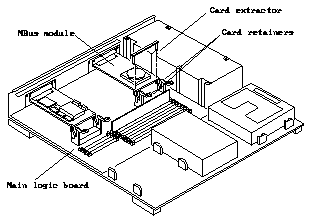
Figure 4-4
MBus Module - Card Retainers and Card Extractor
6. Hold both ends of the card extractor with your fingers and pull on both
corners of the module until the connector is out of the slot.
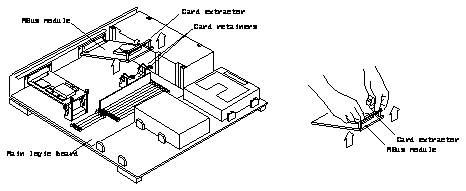
Figure 4-5
Removing the MBus Module
7. Remove the card extractor from the module.
Save the card extractor for future use.
8. Place the module on the antistatic mat supplied with the SuperSPARC
module kit.
9. Follow steps 4 - 8 to remove the module from the second slot if two
modules were installed.
Note -
Dual module configurations using the SMxx SPARC module are not
supported under SunOS 4.x (Solaris 1.x). Dual module configurations require
Solaris 2.1 (or later) or other compatible operating system.
See Table 2-1 on page 2 of Chapter 2 for software requirements specific to your
system.
You must set the system clock speed jumpers on the main logic board to assure
correct operation of the SuperSPARC or other MBus module. The following
sections describe the jumper settings for the two different types of main logic
boards.
4.3.1
Board with Three Jumpers
One type of board has three jumpers: J1401, J1403, and J1404. All three
jumpers must be set as indicated in Figure 4-6 to assure correct operation of the
SuperSPARC module.
4.3.2
Board with One Jumper
The other type of board has one jumper: J1401. This jumper must be set as
indicated in Figure 4-6 to assure correct operation of the SuperSPARC module.
Note -
If the clock speed jumpers are not set correctly, the system may fail to
boot.
Use needle-nose pliers to set the clock speed jumpers after referring to
Figure 4-6 to determine the correct jumper settings.
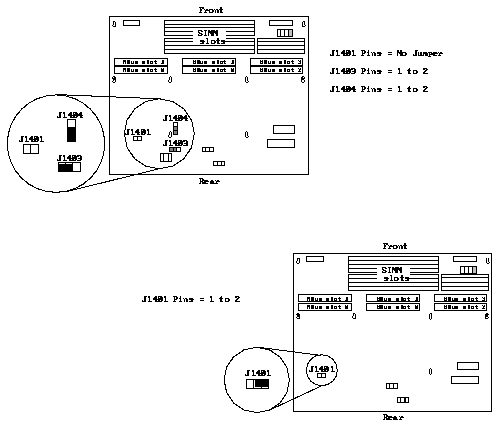
Figure 4-6
Location and Setting of Clock Speed Jumpers
4.4.1
Installing the SuperSPARC Module in MBus Slot 0 (Lower Slot)
Warning -

The heatsinks on the SuperSPARC modules may be hot. Use
caution when removing or installing SuperSPARC modules and avoid contact
with the heatsinks. Hold SuperSPARC modules only by the edges.
To install a SuperSPARC module in the lower slot:
1. Make sure the wrist strap is securely attached to your wrist and the metal
casing of the power supply.
The wrist strap comes with your SuperSPARC module.
2. Make sure the card retainers for the module are pushed back.
See Figure 4-7.
3. Open the protective packaging and take out the SuperSPARC module.
4. Insert the back edge of the module between the metal (lower) and plastic
(upper) tabs on the back panel.
The connector on the module should be facing MBus slot 0, the lower slot.
See Figure 4-7.
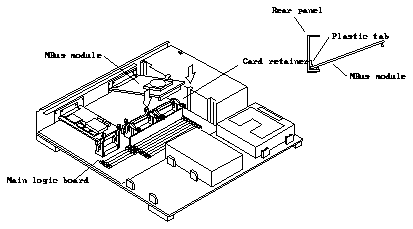
Figure 4-7
Installing the MBus Module
5. Push the module connector down into the socket as shown in Figure 4-7.
Hold the corners of the MBus module and press down firmly until the
module is seated.
Caution -

Excessive force may bend or damage the pins.
Note -
MBus slot 0, the lower slot, must have a module installed or the system
will not work.
The top, upper slot (MBus slot 1) is optional and is used only for systems with
a dual module configuration. Dual module configurations using the SMxx
SPARC module are not supported under SunOS 4.x (Solaris 1.x).
See Table 2-1 on page 2 of Chapter 2 for software requirements specific to your
system.

Figure 4-8
Locking Down Card Retainers for the MBus Module
6. Lock the arms of the card retainers on the module by pushing them over
the edge of the module as shown in Figure 4-8.
If the system has two modules (slot 1 on top of slot 0), install the module in
slot 0 first.
Note -
Make sure the module is fully inserted into the slot. If the module is not
fully inserted into the MBus slot connector, the card retainers may not lock
over the edge of the module.
7. If a module was removed from slot 0, place the exchanged module in the
antistatic bag you set aside when unpacking the SuperSPARC module.
8. Detach the wrist strap and remove and store the antistatic mat.
4.4.2
Installing the SuperSPARC Module in MBus Slot 1 (Upper Slot)
Warning -

The heatsinks on the SuperSPARC modules may be hot. Use
caution when removing or installing SuperSPARC modules and avoid contact
with the heatsinks. Hold SuperSPARC modules only by the edges.
To install a SuperSPARC module in the upper slot:
1. Securely attach the wrist strap that came with your module to your wrist
and the metal casing of the power supply.
2. Make sure the card retainers for the module are pushed back. See
Figure 4-11.
3. Check the inside surface of the MBus filler panel on your system. See
Figure 4-9 and Figure 4-10.
-
If the inside surface of the MBus filler panel is black, go to step 4.
-
If the inside surface of the MBus filler panel is white, you must remove the
panel and replace it with the module grounding filler panel that came with
your SuperSPARC module.
Note -
The module grounding filler panel, p/n 340-2963-xx, has a black inside
surface.
To remove and replace a filler panel that has a white inside surface:
-
Remove the two screws from the outside rear surface of the MBus filler
panel using the #1 Phillips screwdriver. See Figure 4-9.
Save the screws to use with the replacement grounding filler panel.
-
Install the grounding filler panel with the black inside surface into the upper
MBus slot opening. Secure the filler panel with the two screws.
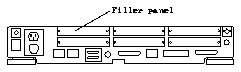
Figure 4-9
Upper MBus Slot (Slot 1) Filler Panel - Rear Surface
Note -
The module grounding filler panel, part number 340-2963-xx, reduces
electromagnetic interference and is required for regulatory compliance.
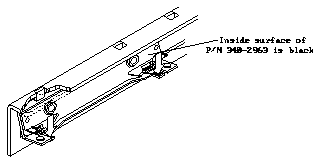
Figure 4-10
Module Grounding Filler Panel - Inside View
4. Open the protective packaging and take out the SuperSPARC module.
5. Insert the back edge of the module between the metal (lower) and plastic
(upper) tabs on the module grounding filler panel.
The connector on the module should be facing MBus slot 1, the upper slot.
See Figure 4-11.

Figure 4-11
Installing the MBus Module
6. Push the module connector down into the socket as shown in Figure 4-11.
Hold the corners of the MBus module and press down firmly until the
module is seated.
Caution -

Excessive force may bend or damage the pins.
Note -
MBus slot 0, the lower slot, must have a module installed or the system
will not work.
The top, upper slot (MBus slot 1) is optional and is used only for systems with
a dual module configuration. Dual module configurations using the SMxx
SPARC module are not supported under SunOS 4.x (Solaris 1.x).
See Table 2-1 on page 2 of Chapter 2 for software requirements specific to your
system.
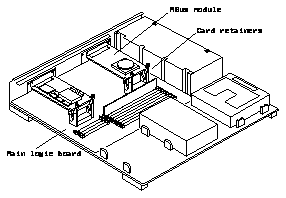
Figure 4-12
Locking Down Card Retainers for the MBus Module
7. Lock the arms of the card retainers on the module by pushing them over
the edge of the module as shown in Figure 4-12.
If the system has two modules (slot 1 on top of slot 0), install the module in
slot 0 first.
Note -
Make sure the module is fully inserted into the slot. If the module is not
fully inserted into the MBus slot connector, the card retainers may not lock
over the edge of the module.
8. If a module was removed from slot 1, place the exchanged module in the
antistatic bag you set aside when unpacking the SuperSPARC module.
9. Detach the wrist strap and remove and store the antistatic mat.
Note -
The card retainers on the module should be pushed down over the edge
of the module.
1. Hold the cover approximately at an angle as shown in Figure 4-13, and
gently guide the hinge tabs on the cover into the tab slots on the front of
the system unit. Continue to hold onto the cover.
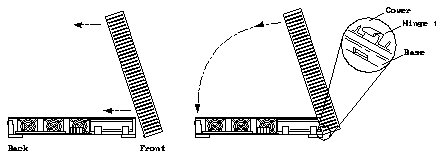
Figure 4-13
Installing the System Unit Cover
2. Slowly lower the cover onto the system unit.
3. Guide the cover down so that the plastic retainer clip snaps the cover to
the rear panel. Push down on the left and right sides of the cover.
See Figure 4-14.
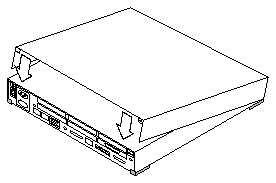
Figure 4-14
Pushing Down on the Cover Sides, Rear View
4. Tighten the captive screw on the rear panel. See Figure 4-15.
Do not over tighten the screw.

Figure 4-15
Location of Captive Screw on the Rear Panel
5. Push down on the unit top along the right and left edges so that the top
cover seals properly to the system chassis.
Warning -

Before powering on your system again, be sure to install the cover.
It is not safe to operate the SPARCstation 10 or SPARCserver 10 system
without the top cover in place.
Warning -

This device is equipped with a 3-wire grounded power cord. To
reduce the risk of electrical shock, always plug the power cord into a properly
grounded power outlet.
Caution -

Always allow 10 seconds between turning off the power and turning
the power back on. This pause prevents possible damage to power supply
components in your system unit.
Turn the power switches on in this order:
-
External drives (if applicable)
1. Set the power switch on the chassis to the ON position.
Note -
Once power-on self tests are completed and functional modules are
recognized, the operating system will configure itself automatically to take
advantage of all available processors.
2. Watch the boot information displayed on the screen to confirm that all
processors are recognized. For example:
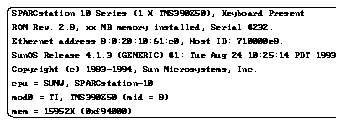
Note -
The screen display is an example only. The actual message displayed on
the screen will depend on the software running on the system.
The numbers in parenthesis, 1 x TMS390Z50, indicate the number of
processors running (one), and the revision number of the SPARC module
that is installed (TMS390Z50).
The mod0 entry indicates the system recognizes one SPARC module that is in
MBus slot 0. If two SPARC modules were installed (two processors), the
system would recognize the two modules - one in MBus slot 0 and one in
MBus slot 1.
3. Wait for the system to boot. When the login: prompt is displayed, log
in and resume operations.
