
This chapter tells how to install DSIMMs in a SPARCclassic, SPARCclassic X, or SPARCstation LX system. Be sure to perform the procedures in Chapter 2, "Preparations," before proceeding with the installation.
Caution -

To install a DSIMM:
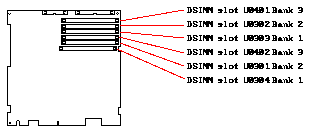
Figure 3-1 DSIMM Slot Locations
The bag that the DSIMM is packed in makes a good antistatic surface.
See the configuration matrices shown in Table 3-1 and Table 3-2. Table 3-1 shows memory configurations for a SPARCclassic or SPARCstation LX system. Table 3-2 shows memory configurations for a SPARCclassic X terminal.
To identify DSIMMs by part number, see Table 3-3.
Note - You may need to relocate existing DSIMMs to match one of the configurations shown.
Caution -

Table 3-1 Memory Configuration Matrix - SPARCclassic and SPARCstation LX

Table 3-3 Identifying DSIMMs by Part Number

Each DSIMM is held in its slot by metal clips. To release a DSIMM, pry open the clips with your fingernails while pushing the top of the module gently forward about 30 degrees from the vertical position (see Figure 3-2). Then pull the DSIMM out of its socket and place it on the antistatic surface.

Figure 3-2 Removing a DSIMM
Note - The DSIMMs are closely spaced. In order to remove a DSIMM, you may find it necessary to remove adjacent DSIMMs first. Keep track of which DSIMMs should be installed in which slots.
Since the DSIMMs are closely spaced, they must be installed in the proper order. Start with the slot closest to the center of the main logic board and work outward toward the board's front edge.
Hold each DSIMM at its edges and insert it into the plastic guides at an angle about 30 degrees from the vertical position (see Figure 3-3). Then, by pushing gently on its top edge, rotate the DSIMM into an upright position. You should hear it click into place.
Note - Each DSIMM is keyed so it can only be installed in one way.

Figure 3-3 Installing a DSIMM

Turn to Chapter 5, "Finishing Up," to complete the installation procedure.

