
The nonvolatile single inline memory module (NVSIMM) is installed in the
SPARCstation 10 (TM)/SPARCserver 10 and SPARCstation 20 (TM)/SPARCserver
20 system units to allow the user to take advantage of the Prestoserve software.
The NVSIMM provides battery backed-up memory used as a cache for disk
drive access. The NVSIMM and the Prestoserve software together allow these
systems to accelerate both NFS and UFS disk access.
Caution -

The NVSIMM and Prestoserve software can only be used on
systems running the Solaris 2.2 or later operating system.
Physically, the NVSIMM is comprised of SRAM chips and a battery, with
power control circuitry grouped together in a single inline memory module.
Each NVSIMM contains 2 Mbytes of memory, a battery, and power controller
circuitry, which insure that the memory is not lost when the system is shut
down or halts because of an abnormal condition. The NVSIMM plugs into a
double-wide memory slot located on the main logic board of the system unit.
Caution -

The NVSIMM for your system is specifically designed to operate in
it. Do not remove an NVSIMM from a different Sun system and install it in a
SPARCstation 10/SPARCserver 10 or SPARCstation 20 (TM)/SPARCserver 20
system.
When you remove an NVSIMM from the shipping box, you should have the
following:
-
NVSIMM in an antistatic bag
-
Prestoserve software and the Prestoserve User's Guide
After unpacking the NVSIMM store the box and its packing material for future
use. Set the Prestoserve software and User's guide aside. You will use the
Prestoserve User's Guide to install the Prestoserve software after you have
successfully installed the NVSIMM.
Caution -

The NVSIMM is made of delicate electronic components that are
extremely sensitive to static electricity. Ordinary amounts of static from your
clothes or work environment can destroy an NVSIMM. Handle an NVSIMM
only by the edges. Do not touch the components on the NVSIMM or any metal
parts. Wear a grounding strap before unpacking and during handling of an
NVSIMM. Do not disconnect the power cord from the system unit. The
power cord should be left plugged in to a grounded power outlet. This
connection provides the ground path necessary so that you can safely remove
and install the NVSIMM and other components. Be sure that the system unit
power is turned off by observing that the green light-emitting diode (LED) at
the front of the chassis is not lit.
The NVSIMM comes in special packaging to protect it from harmful electrical
charges.
Before you attempt to install a new NVSIMM or replace a defective one, make
sure that you have the right item. Each NVSIMM consists of a double-wide
card mounted with a round, non-replaceable battery on one side. The part of
the card that plugs into the double-wide memory slot has gold contacts.
Figure 1-1 shows the battery side of the NVSIMM. Because the NVSIMM is not
symmetrical around the bottom notch, it can only be installed one way.

Figure 1-1
NVSIMM - Battery Side
Caution -

The NVSIMM is designed to operate in a specific system. Do not
remove an NVSIMM from a different Sun system and install it in a
SPARCstation 10/SPARCserver 10 or SPARCstation 20/SPARCserver 20
system.
In addition to the tools that come with the NVSIMM, you will also need a
Phillips screwdriver to complete installation.
Note -
The following procedure is for the current release of the Solaris
operating system running on your machine. The procedure for halting your
system may vary with other operating systems.
Caution -

When the operating system or any other stand-alone program has
already booted, do not use the Stop [(L1)-A] keys to halt your system.
Abruptly aborting program execution can damage your files.
1. Quit any applications that will lose information when your system halts.
See your Sun System User's Guide for more information about ending a work
session.
2. Halt the system using the appropriate commands.
3. Wait for the system-halted message and the boot monitor prompt.
For more information on system administration (such as methods for shut-
down and backup) refer to the System and Network Administration for the Sun
Workstation.
4. Turn off the power to your system components in the following sequence:
a. Monitor
b. External drive unit (if you have one)
c. System unit
Caution -

Do not disconnect the power cord from the power outlet on your
system or from the wall outlet. This connection provides the ground path
necessary to remove and install the printed circuit board and components
without damaging them with static electricity.
Warning -

Before powering up your system again, be sure to replace the cover
using the procedure in "Closing the System Unit." It is not safe to operate the
system without its top cover in place.
SPARCstation 10/SPARCserver 10
The top cover of the system unit attaches to the chassis at the front with
molded plastic hooks and to the back panel with a plastic tab and a captive
screw. To remove the cover from the system unit:
1. Ensure that the power switch is in the off position.
Refer to Figure 1-2.
2. Loosen the captive screw holding the cover to the back panel.
3. With one hand, press the plastic tab forward with a screwdriver while
lifting the cover from the back panel with your other hand.
4. When the cover clears the tab, grasp the sides of the cover and lift up until
the cover is at a 60-degree angle to the chassis. Push the cover forward
until it is free of the chassis.
The top cover of the system unit attaches to the chassis at the front with
molded plastic hooks and to the back panel with a lock block and a screw. To
remove the cover from the system unit:
1. Ensure that the Power On/Standby switch is in the Standby position.
Refer to Figure 1-3.
2. Loosen the screw holding the cover to the back panel.
3. Remove the lock block from the back panel of the system unit.
4. Grasp the sides of the cover and lift it up and away from the back panel.
When the cover is at a 60-degree angle to the chassis, push the cover
forward until it is free of the chassis.
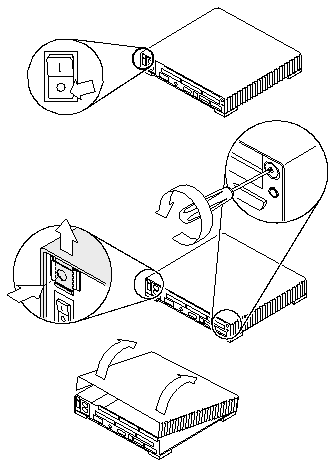
Figure 1-2
Opening the SPARCstation 10/SPARCserver 10 System Unit
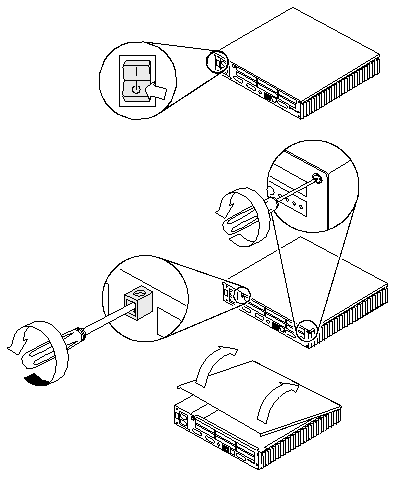
Figure 1-3
Opening the SPARCstation 20/SPARCserver 20 System Unit
You must attach the antistatic wrist strap to both yourself and the system to
prevent damage to your system. The wrist strap provides a ground for static
electricity between your body and the chassis of your system.
Caution -

If you do not wear a wrist strap, the board and its components can
be damaged by electrical charges.
To attach the wrist strap to your wrist and the system:
1. Wrap the wrist strap twice around your wrist with the conductive
adhesive tape.
The adhesive side must be against your skin. Refer to Figure 1-4.
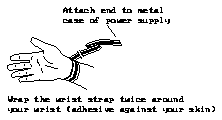
Figure 1-4
Attaching the Wrist Strap
2. Attach the adhesive copper strip to the metal casing of the power supply
inside your system.
Facing the rear of the system, the power supply is on the left rear side.
Preparation for Installation
To install the NVSIMM:
1. Locate the NVSIMM slots on the main-logic board.
The SPARCstation 10 and SPARCserver 10 main logic board has four
double-wide SIMM connectors. However, only two of the small slots have
contacts installed. Install the NVSIMM in the fourth slot, J0301, as shown in
Figure 1-5.
The SPARCstation 20 and SPARCserver 20 main logic board has two double-
wide NVSIMM connectors. Install the NVSIMM in SIMM slot J0305, which
is the slot closest to the SBus connectors. The SIMM slot next to J0305 is
J0304. Slot J0304 is usually reserved for a video SIMM (VSIMM) as shown in
Figure 1-6.
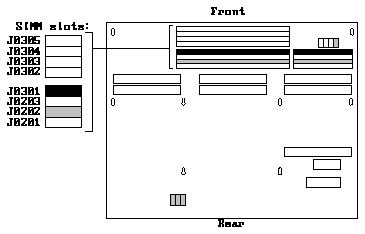
Figure 1-5
NVSIMM Slot Location on Main Logic Board in SPARCstation 10 and
SPARCserver 10

Figure 1-6
NVSIMM Slot Location on Main Logic Board in SPARCstation 20 and
SPARCserver 20
2. Make sure the wrist strap is securely attached to your wrist and the metal
casing of the power supply, as described in "Attaching the Wrist Strap" on
page 1-8.
3. Open the protective packaging and take out the NVSIMM.
4. Place the NVSIMM on the static shielding bag.
5. Enable the battery using the procedure described in the next section.
Note -
Be sure that the NVSIMM in SPARCstation 10/SPARCserver 10 is
installed in slot J0301 as shown in Figure 1-5. If a DSIMM is installed in slot
J0301, remove the DSIMM before proceeding. Place the DSIMM that you
removed in the next available SIMM slot.
Note -
Be sure that the NVSIMM in SPARCstation 20/SPARCserver 20 is
installed in slot J0305 as shown in Figure 1-6. If a DSIMM is installed in slot
J0305, remove the DSIMM before proceeding. Place the DSIMM that you
removed in the next available SIMM slot.
Enabling the Battery
Before installing NVSIMMs you must first activate the battery to insure data
retention.
To enable the battery:
1. Locate the jumper on the battery side of the NVSIMM.
Refer to Figure 1-7.
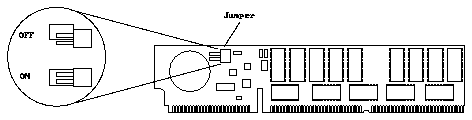
Figure 1-7
SPARCstation 10/SPARCserver 10 and SPARCstation 20/SPARCserver 10
NVSIMM - Battery Side
2. Move the jumper to the battery ON position.
Once the jumper is in the ON position, proceed with the installation as
described in the following sections.
Caution -

Once you turn the battery ON do not move or remove the jumper.
Any data contained in the NVSIMM memory will be lost if the jumper is
moved.
Inserting the NVSIMM
To insert the NVSIMM:
1. Holding the NVSIMM at its edges, line up the notch with the area
between the two SIMM sockets.
When the NVSIMM is properly installed in the SPARCstation 10 and
SPARCserver 10, the surface with the battery must face the system unit front
panel and the notched edge of the SIMM will be near the edge of the system
board. Refer to Figure 1-8.
When the NVSIMM is properly installed in the SPARCstation 20 and
SPARCserver 20, the surface with the battery must face the system unit back
panel.
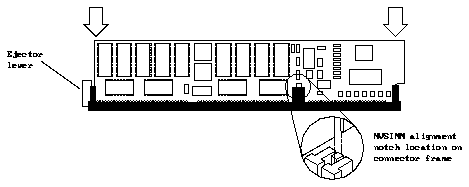
Figure 1-8
Aligning the NVSIMM in the Socket
Note -
Use care when lining up the center notch on the NVSIMM with the
connector frame. If the notch is not properly lined up the NVSIMM could be
damaged when you attempt to press it firmly in place.
2. Identify the insertion tool and its two surfaces.
Refer to Figure 1-9 and Figure 1-10.
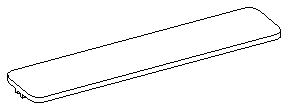
Figure 1-9
Insertion Tool, Pushing Surface
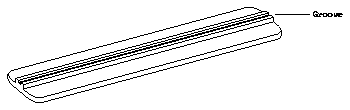
Figure 1-10
Installation Tool, Grooved Surface
3. Place the grooved surface of the insertion tool at a 90-degree angle,
centered on the top edge of the NVSIMM.
Refer to Figure 1-11. The top edge of the NVSIMM should be aligned with
the groove on the insertion tool. The insertion tool is not as long as the
NVSIMM, therefore the tool should be centered on the NVSIMM to ensure
even pressure on the board during insertion.
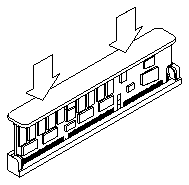
Figure 1-11
Using the Insertion Tool
4. Place the heel of each hand on each side of the insertion tool's pushing
surface, and press firmly with both hands on the tool until the NVSIMM
snaps into place.
Apply an equal force with both hands to prevent damage to the NVSIMM
and socket.
Caution -

Ensure that the NVSIMM is firmly seated in the socket. If it is not,
serious errors may occur when you power on the system.
5. Place the insertion tool aside in a tool box or other storage place. Do not
leave the tool inside the system.
Warning -

Before powering on your system again, be sure to replace the top
cover using the procedure in the next section. It is not safe to operate the
SPARCstation 10/SPARCserver 10 or SPARCstation 20/ SPARCserver 20
system without its top cover in place.
6. After you have installed the NVSIMM, remove the wrist strap from your
wrist and from the power supply.
SPARCstation 10/SPARCserver 10
1. Hold the cover at a 60 degree angle to the system unit. Gently guide the
hinge hooks into the tab slots on the front of the system unit.
Refer to Figure 1-12.
2. Carefully lower the cover onto the system unit.
3. Push down on the cover's left and right side so that the plastic tab snaps
the cover to the back panel. Tighten the captive screw on the back panel to
secure the cover.
Caution -
Be careful not to over-tighten the captive screw or you could
damage the system cover.
SPARCstation 20/SPARCserver 20
1. Hold the cover at a 60 degree angle in relation to the system unit. Gently
guide the hinge hooks on the cover into the tab slots on the front of the
system unit. Continue to hold the cover with your hands. Carefully lower
the cover onto the system unit.
Refer to Figure 1-13.
2. Re-install the lock block and tighten the screw on the back panel to secure
the cover.
Caution -
Be careful not to over-tighten the screw or you could damage the
system cover.
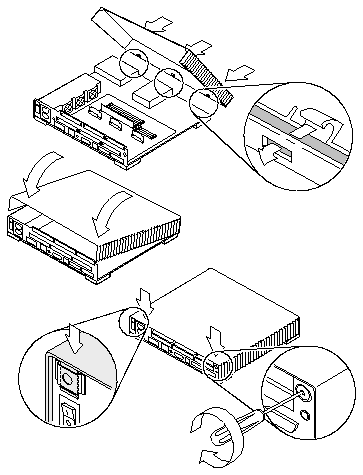
Figure 1-12
Closing the SPARCstation 10/SPARCserver 10 System Unit
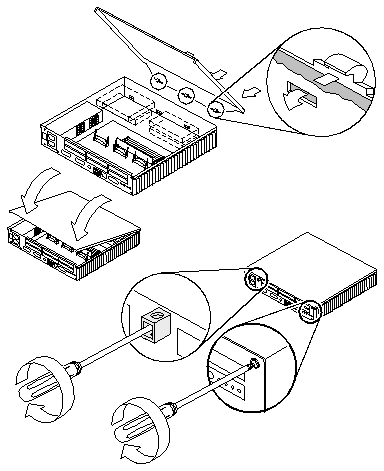
Figure 1-13
Closing the SPARCstation 20/SPARCserver 20 System Unit
