5 Desktop Disk Pack


This chapter has two parts. The first part explains how to connect the Desktop Disk Pack to your computer system. The second part explains how to remove and install the disk drive, power supply, and I/O assembly. Figure 5-1 shows the Desktop Disk Pack.

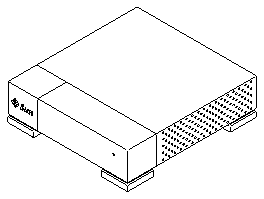
    Figure 5-1 Desktop Disk Pack

Connecting the Desktop Disk Pack to the Computer System

To connect the Desktop Disk Pack to your computer system you must:

Planning the Installation

Desktop Disk Packs can be connected directly to a desktop system, or connected in series (daisy chained) with SCSI cables and stacked on top of each other. This section describes issues to consider before you set up and connect your unit:

Determining the Power and Grounding Requirements

Desktop Disk Packs use nominal input voltages of 100 - 120 Vac or 200 - 240 Vac. Sun products are designed to work with single-phase power systems having a grounded neutral conductor. To reduce the risk of electrical shock, do not plug Sun products into any other type of power system. Contact your facilities manager or a qualified electrician if you are not sure what type of power is supplied to your building.

Warning
- Not all power cords have the same current ratings. Household extension cords do not have overload protection, and are not meant for use with computer systems. Do not use household extension cords with your Desktop Disk Pack.

When planning equipment placement, remember that each of the following items requires access (by way of a separate power cord) to a power outlet:

Determining the Cable Length

Data cables supplied with Sun equipment are usually long enough to meet the needs of most installations. If the cables packed with your equipment are too short for your particular installation, ask your Sun sales representative about the availability of alternate-length cables.

Some of the cables supplied with your Sun equipment must be of specific lengths to conform with engineering and safety standards. Replacing those cables may cause damage and may degrade the performance of your equipment. See Appendix A for descriptions of SCSI ports, types of connections, SCSI termination, and SCSI cable length.

Unpacking the Desktop Disk Pack

    1. Remove the contents from the shipping carton.

    Save the carton and the packing material. You will need them if you ever want to ship your Desktop Disk Pack.

    2. Check the contents and the packing slip to make sure you have these items:

Note - If the unit is not installed in the United States or Canada, you may have to use a country-kit power cord. Consult your Sun sales representative for further information.

Setting the SCSI Target Address

    1. Locate the target address switch on the rear panel.

    See Figure 5-2.

    Figure 5-2 Locating the SCSI Target Address Switch on the Desktop Disk Pack

    2. Make sure you have determined assigned SCSI addresses.

    See Chapter 1, "Before You Start."

    3. Set the switch to an unused SCSI address. Press the button on the top or on the bottom of the switch until the desired address number appears in the window.

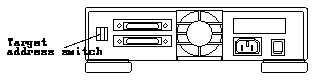
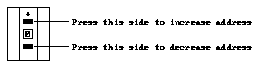
    The most common settings for a disk drive are 0 or 2. If you are running the Solaris 1.1 (SunOS 4.1.3) operating system or a later Solaris 1.x operating system release, you can only use SCSI addresses 0, 1, 2, or 3. Figure 5-3 displays an address of 0.

    Figure 5-3 Setting the SCSI Target Address Switch on the Desktop Disk Pack

Hooking Up the SCSI Cable and SCSI Terminator

    1. Shut down the system. See the handbook for your operating system.
    2. Power off the computer system and all peripherals connected to it.

    Make sure the power cord is connected to the system unit and to a wall outlet.

    3. If required for your configuration, install an SBus card with a SCSI host adapter port on it into your computer system.

    Follow the instructions that came with the SBus card or to your computer system documentation.

    4. Connect the Desktop Disk Pack to the computer system.

    Connect the supplied SCSI cable to one of the SCSI ports on the Desktop Disk Pack and to the computer system. Connect the regulated SCSI terminator to the other SCSI port of the Desktop Disk Pack. For more information, see Appendix A, "Small Computer Systems Interface Information."

    5. Power on the units in this order:
    6. Configure the disk drive.

    See the section in the handbook for your operating system about setting up disk drives.

Installing and Removing the Disk Drive, Power Supply, and I/O Assembly

The second part of this chapter describes how to remove and install a disk drive, power supply, and I/O assembly.

Removing the Cover

    1. If you are going to install a disk drive, make sure you have determined the assigned SCSI addresses.

    See Chapter 1, "Before You Start."

    2. Shut down the system.

    See the appropriate handbook for your operating system.

    3. Turn the power switch to the computer system, the Desktop Disk Pack, and all attached peripherals to the off (O) position.
    4. Remove the external SCSI cable and the regulated SCSI terminator from the SCSI ports.
    5. Locate the holes on both of the side vented panels. See Figure 5-4.
    6. Press down on the back of the unit between the cover and the unit bottom with your thumb nail while pulling up on the cover. With your other hand, insert a small (2 to 3mm) screwdriver or a straightened large paper clip into the third hole from the rear (top row) over the internal latch and press the catch.

    Repeat on the other side to release that catch, allowing that end of the cover to come up.

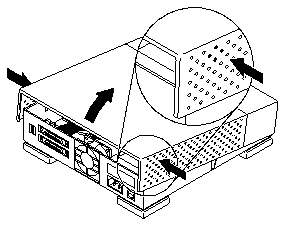
    Figure 5-4 Removing the Desktop Disk Pack Cover

    7. Lift up the rear of the cover slightly. Push it forward off of the front tabs.

Attaching the Wrist Strap

    1. Unwrap the first two folds of the wrist strap. Wrap the adhesive side firmly against your wrist. See Figure 5-5.

    Figure 5-5 Attaching the Wrist Strap to Your Wrist

    2. Peel the liner from the copper foil at the opposite end of the wrist strap.
    3. Attach the copper end of the wrist strap to the top of the metal casing of the power supply. See Figure 5-6.

    Figure 5-6 Attaching the Wrist Strap to the Desktop Disk Pack Power Supply

Removing the Disk Drive

    1. Shut down and power off the system.

    See the handbook for your operating system.

    2. Power off the Desktop Disk Pack.
    3. Disconnect the Desktop Disk Pack from the computer system.

    Disconnect the SCSI cable and the SCSI terminator.

    4. Remove the cover.

    See "Removing the Cover" earlier in this chapter.

    5. Disengage the retaining clip on the bottom of the Desktop Disk Pack by reaching under the Desktop Disk Pack and pulling down on the clip to clear it from the mounting plate.

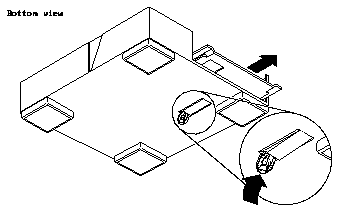
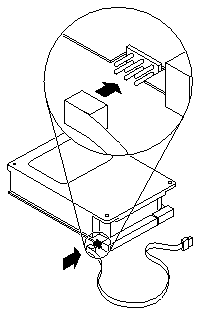
    Use a coin to pull down the clip to allow you to slide out the mounting plate. See Figure 5-7.

    Figure 5-7 Releasing the Retaining Clip on the Desktop Disk Pack

    6. Slide the disk drive assembly, consisting of the disk drive and the mounting plate, forward 1 to 2 inches only.

    Do not completely remove the drive assembly. You just want to create a little room to disconnect the cables before removing the assembly completely.

Note - The mounting plate may have to be removed before you can disconnect the SCSI cables.

    7. Disconnect the flex cable of the SCSI target address switch from the I/O assembly.

    See Figure 5-8. Handle the flex cable carefully.

    Figure 5-8 Connecting the Other End of the Desktop Disk Pack Flex Cable

    8. Disconnect the power supply cable from the disk drive.

    See Figure 5-9.

    9. Disconnect the internal SCSI cables from the disk drive.

    See Figure 5-9.

    10. Disconnect the LED cable from the power supply.

    Figure 5-9 Desktop Disk Pack Internal Cable Locations

    11. Remove the disk drive assembly.

    On the unit bottom, push down on the retaining clip that holds the drive bracket while sliding the disk drive assembly toward the front of the unit. See Figure 5-10.

    Figure 5-10 Sliding Out the Desktop Disk Pack Drive Assembly

    12. Turn the disk drive assembly over and remove the four screws securing the drive to the mounting plate.

Installing the Disk Drive

Caution -

This section contains procedures that must be performed by qualified service-trained maintenance providers.

    1. Determine assigned SCSI address.

    See Chapter 1, "Before You Start."

    2. Shut down and power off the system.

    See the handbook for your operating system.

    3. Power off the Desktop Disk Pack.
    4. Disconnect the Desktop Disk Pack from the computer system.

    Disconnect the SCSI cable and the SCSI terminator.

    5. Remove the cover and attach a wrist strap.

    See the sections "Removing the Cover" and "Attaching the Wrist Strap" earlier in this chapter.

    6. Remove the disk drive.

    See "Removing the Disk Drive."

    7. Unpack the replacement drive.
      a. Remove the disk drive from the packing material.

      Compare the packing list with the equipment you received. Save the box and the packing material in case you have to ship the disk drive at a future date.

      b. Place the drive on an antistatic surface, such as the antistatic bag the drive was shipped in, with the PCB side up.
    8. Verify that the configuration jumpers are set correctly.

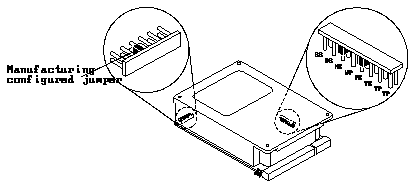
    See Figure 5-11 and Table 5-1.

    Table 5-1 Description of Configuration Jumpers

---------------------------------------
Acronym Description ---------------------------------------
         
SS       Reserved
         
DS       Delayed Start
         
ME       Motor Enable (Remote Spin-Up)
         
WP       Write Protect
         
PE       Parity Enable
         
TE       Enable Terminators
         
TP       Term Power from Disk Drive
         
TP       Term Power to SCSI Bus

---------------------------------------

    Figure 5-11 Configuration Jumper Settings for the Desktop Disk Pack

    9. Remove the SCSI address jumpers.

    See Figure 5-12.

    Figure 5-12 Removing the Desktop Disk Pack SCSI Address Disk Drive Jumper

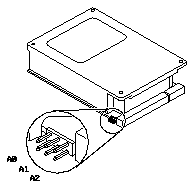
    Table 5-2 Descriptions of Factory-Set SCSI Target Address Jumpers

-----------------------------------------------
Target Address Jumper Description Factory Set -----------------------------------------------
                                    
A0                     ID Select    Yes
                                    
A1                     ID Select    Yes
                                    
A2                     ID Select    No

-----------------------------------------------
    10. Connect one end of the flex cable to the disk drive.

    See Figure 5-13.

    Figure 5-13 Connecting the Flex Cable to the Disk Drive of the Desktop Disk Pack

    11. Fold the flex cable towards the rear of the disk drive.
    12. Attach the mounting plate to the bottom of the disk drive by aligning the holes in the plate with the screw holes in the drive. Install four screws.

Note - The disk drive front panel must be aligned so that it is on the same end as the notch cut into the mounting plate as the notches for the retainer tab in the Desktop Disk Pack.

    13. Slide the disk drive assembly partially into place.

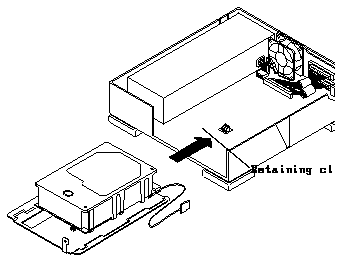
    Figure 5-14 Sliding In the Disk Drive Assembly

    14. Connect the SCSI data cable and the power cable to the disk drive.

    See Figure 5-15. The connectors are keyed so they will only fit one way.

    15. Connect the SCSI address flex cable to the SCSI target address switch.

    See Figure 5-15.

    16. Connect the LED cable to the power supply.

    Figure 5-15 Connecting Cables

    17. Slide the disk drive assembly completely into the base, making sure the assembly engages the retaining clip on the interior floor.

    See Figure 5-14.

Caution - Make sure that the cables are not pinched between the disk drive assembly and the stops on the base. Be sure that all cables are clear of the fan and will not "relax" into the fan.

Caution - Be sure the drive assembly snaps securely in place with the retaining clip. If the drive is not placed back in the base all the way, the cover will not close properly and it could damage the front tabs.

    18. Determine if you have a 44 watt power supply installed (P/N 300-1105). Upgrade to a 44 watt power supply.

    The 2.1 Gbyte disk drive may fail with an older power supply. See the section "Removing the Power Supply."

    19. Replace the cover and reconnect the unit to the computer system.

    See the section "Replacing the Cover."

    20. Power on.

    See the handbook for your operating system.

Removing the Power Supply

Note - Be sure to shut down the computer system and turn off power to the computer system and the Desktop Disk Pack before you begin.

    1. Shut down the computer system.

    See the handbook for your operating system.

    2. Power off the computer system and the Desktop Disk Pack.
    3. Remove the cover.

    See the section "Removing the Cover" earlier in this chapter.

    4. Make sure that the wrist strap is disconnected from your wrist and from the chassis.
    5. Disconnect the external power cord.
    6. Disconnect the power supply cable from the disk drive assembly.

    See Figure 5-16.

    7. Disconnect the power supply cable to the fan assembly, mounted on the I/O assembly.

    See Figure 5-16.

    8. Disconnect the LED cable.

    See Figure 5-16.

    9. Remove the power supply. Pull the plastic tab forward at the end of the power supply, opposite the power switch.

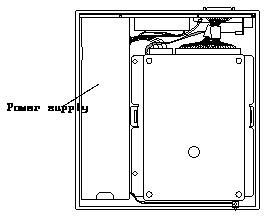
    Lift the power supply up and out.

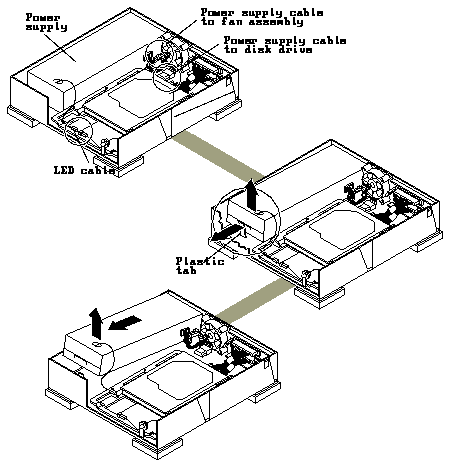
    Figure 5-16 Removing the Power Supply

Installing a Power Supply Assembly

    1. Disconnect the external power cord.
    2. Remove the cover.

    See "Removing the Cover" earlier in this chapter.

    3. Make sure that the wrist strap is disconnected from your wrist and from the chassis.
    4. Lower the power supply into the base assembly in the proper orientation.

    Push down on the power supply until the plastic tab on the base assembly clicks into place.

    5. Connect the smaller cable on the power supply to the fan assembly.

    See Figure 5-17.

    6. Connect the larger cable on the power supply to the disk drive.

    See Figure 5-17.

    7. Connect the LED cable.

    See Figure 5-17.

    8. Replace the cover.

    See the section "Replacing the Cover" later in this chapter.

    9. Power on in this order.

Caution - Desktop Disk Packs shipped with 2.1 Gbyte disk drives include 44W power supplies (P/N 300-1105). Some older Desktop Disk Pack models do not contain these power supplies and should not be upgraded with the 2.1 Gbyte disk drive without upgrading the power supply to a 44W power supply also. The improper power supply may cause the 2.1 Gbyte disk drive to fail.

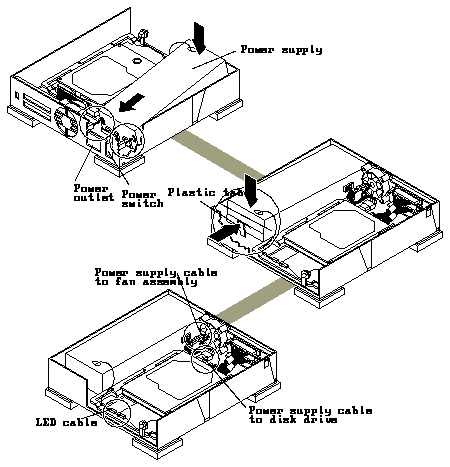
    Figure 5-17 Installing the Power Supply

Removing the I/O Assembly

    1. Shut down and power off the system.

    See the handbook for your operating system.

    2. Power off the Desktop Disk Pack.

    Turn the power switch to the off (O) position.

    3. Remove the cover and attach a wrist strap.

    See the sections "Removing the Cover" and "Attaching the Wrist Strap" earlier in this chapter.

    4. Remove the disk drive assembly from the unit.

    See the section "Removing the Disk Drive" earlier in this chapter.

    5. Disconnect the power supply cable of the fan assembly, mounted on the I/O assembly.

    See Figure 5-18.

    6. Remove the I/O assembly.

    See Figure 5-18.

      a. Push the I/O assembly forward by putting pressure on the assembly while pressing the lower tabs on the unit bottom with a small flatblade screwdriver.
      b. Lift the I/O assembly up and out, being careful not to damage the upper plastic holding tabs.

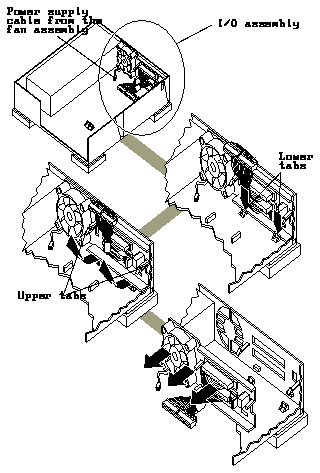
    Figure 5-18 Removing the I/O Assembly

Installing the I/O Assembly

    1. Remove the cover and attach a wrist strap.

    See the sections "Removing the Cover" and "Attaching the Wrist Strap" earlier in this chapter.

    2. Lower the I/O assembly into the base assembly. Press the I/O assembly down and back until the four tabs pop up over the latches.

    You may have to push up on the middle tab underneath the Desktop Disk Pack. See Figure 5-19.

    3. Connect the smaller cable on the power supply to the fan assembly.

    See Figure 5-17.

    4. Install the disk drive assembly into the unit.

    See the section "Installing the Disk Drive" earlier in this chapter.

    5. Detach the wrist strap and replace the cover.

    See the section "Replacing the Cover" later in this chapter.

    6. Reconnect the unit to the computer system.

    Connect the SCSI cable to the computer system and to one of the SCSI ports of the Desktop Disk Pack. Connect the regulated SCSI terminator to the other SCSI port of the Desktop Disk Pack. For more information, see Appendix A, "Small Computer Systems Interface Information."

    7. Power on the computer system, the Desktop Disk Pack, and other peripherals connected to the computer system.

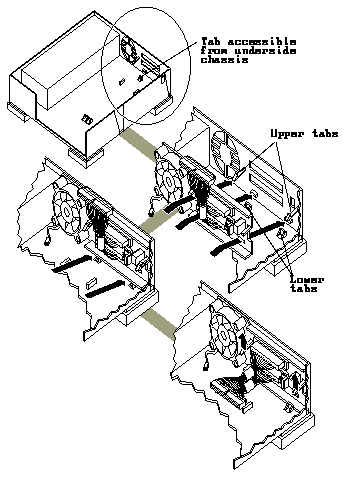
    Figure 5-19 Installing the I/O Assembly

Replacing the Cover

    1. Make sure all cables are inside of the unit and will not be pinched by the cover and are clear of the fan so that the cables will not "relax" into the fan.
    2. Holding the cover at an angle, engage the front tabs of the cover with the front of the unit.

    See Figure 5-20.

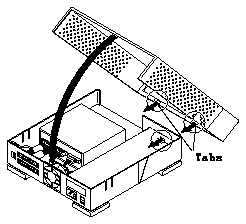
    Figure 5-20 Closing the Desktop Disk Pack Cover

    3. Lower the rear of the cover.
    4. Press down firmly on the back end of the cover until you hear a click of both cover catches engaging.
    5. Reattach the SCSI cable and the regulated SCSI terminator.

Configuring the System and the Disk Drive

System Configuration

System configuration occurs after a system is successfully powered on. If the system shutdown was performed according to the procedure in the software handbook, your system should automatically configure when you power on the system.

Disk Drive Configuration

After installing the disk drive, you must configure it. To configure the disk drive in your Desktop Disk Pack:

    Go to the handbook for your operating system.

    See the section about setting up the disk drive.