
1. Make sure you have determined the assigned SCSI addresses.
See Chapter 1, "Before You Start."
2. Make sure you have shut down the system.
See the appropriate handbook for your operating system.
3. Make sure the power switch is in the off (O) position.
4. Remove the two Phillips-head screws holding the cover to the back panel.
See Figure 2-1.
5. Grasp the sides of the cover from the rear and tilt the cover until the
security loop clears the chassis.
6. Gently push the cover forward about 1/2 inch (13 mm) so that the plastic
tabs clear the chassis.
7. Remove the cover by lifting vertically.
See Figure 2-1.
8. Attach a wrist strap to your wrist and a metal part of the chassis.
See "Attaching the Wrist Strap" in this chapter.

Figure 2-1
Removing the SPARCstation 2 System Cover
1. Unwrap the first two folds of the wrist strap. Wrap the adhesive side
firmly against your wrist. See Figure 2-2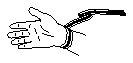
Figure 2-2
Attaching the Wrist Strap to Your Wrist
2. Peel the liner from the copper foil at the opposite end of the wrist strap.
3. Attach the copper end of the wrist strap to the top of the metal casing of
the power supply. See Figure 2-3.
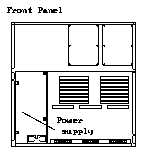
Figure 2-3
SPARCstation 2 Power Supply Location
1. Complete all steps in the sections "Removing the Cover" and "Attaching
the Wrist Strap" in this chapter.
2. Unpack the disk drive. See Chapter 1, "Before You Start."
3. Determine which disk drive position to use. See Figure 2-4.
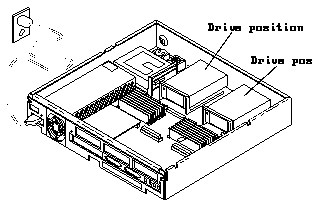
Figure 2-4
SPARCstation 2 System Disk Drive Positions
4. Set the SCSI address jumpers. See Figure 2-5 or Figure 2-6. 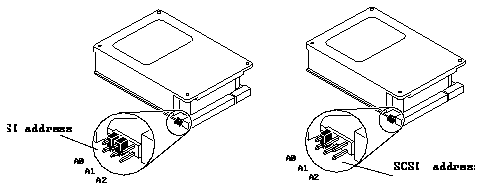
Figure 2-5
SCSI Address Jumper Settings for the Disk Drives in the SPARCstation 2
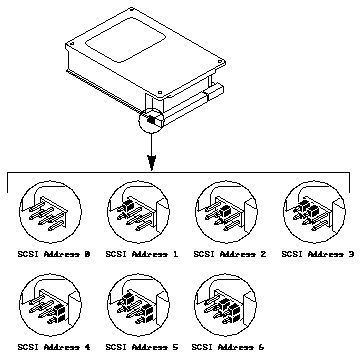
Figure 2-6
SCSI Address Jumper Settings for the Disk Drives in the SBus Expansion
Subsystem
5. Verify and set if necessary the configuration jumpers.
See Figure 2-7 and Table 3-1.

Figure 2-7
Configuration Jumper Settings for the Disk Drives in the SPARCstation 2
System
Table 2-1
Configuration Jumper Acronym Definitions
---------------------------------------


Acronym  Definition
---------------------------------------
SS       Reserved

DS       Delay Motor Start

ME       Motor Enable (Remote Spin-up)

WP       Write Protect

PE       Parity Enable

TE       Enable Terminators

TP       Term Power from Drive

TP       Term Power to SCSI Bus

---------------------------------------
1. Shut down the system. See the appropriate handbook.
2. Make sure that the power cord is connected to the system unit and to a
wall outlet.
3. Remove the cover and attach a wrist strap.
See the sections "Removing the Cover" and "Attaching the Wrist Strap"
earlier in this chapter.
4. Disconnect the hard disk drive power and SCSI data cables from the main
logic board.
5. Grasp the hard disk drive mounting bracket handle and pull it up slightly
to release the locking tabs on the bottom of the mounting bracket.
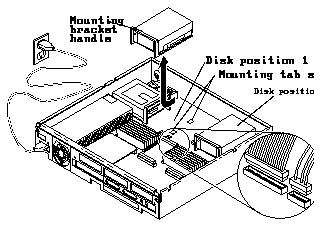
Figure 2-8
Removing a Hard Disk Drive from the SPARCstation 2 System
6. Slide the hard disk drive toward the rear of the chassis and lift the hard
disk drive out of the chassis.
1. Complete all steps in the sections "Removing the Cover" and "Attaching
the Wrist Strap" in this chapter.
2. Fasten the bracket to the drive by inserting and tightening the four screws
of the bracket to the bottom of the drive.
See Figure 2-9.
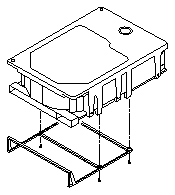
Figure 2-9
Attaching the Disk Drive Bracket to the SPARCstation 2 System
3. Connect the power and data cables to the drive. See Figure 2-10.
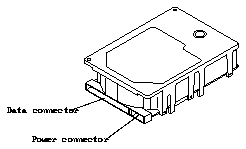
Figure 2-10
Connecting Cables to the Drive in the SPARCstation 2 System
4. Lower the drive into the chassis. See Figure 2-11.
Align the four mounting tabs on the bottom of the mounting bracket with
the slots in the bottom of the chassis.
5. Slide the disk drive forward by pressing the front of the bracket toward
the front of the chassis.
You will hear a click when the two rear locking tabs are seated firmly in
their slots.

Figure 2-11
Installing a Drive in a SPARCstation 2 System
6. Connect the data and power cables to the main logic board connectors.
See Figure 2-11.
For the drive in position 0:
a. Connect the power cable plug to the socket on the SPARCstation 2
controller board labeled J0703.
b. Connect the data cable plug to the socket labeled J0402.
For the drive in position 1:
a. Connect the power cable plug to the socket on the SPARCstation 2
controller board labeled J0702.
b. Connect the data cable plug to the socket labeled J0401.
7. Disconnect the wrist strap first from your wrist, then from the power
supply of the system unit.
8. Replace the cover.
See "Replacing the Cover" later in this chapter.
9. If you have an SBus Expansion Subsystem:
a. Connect the SCSI cable from the computer system SCSI connector to
one of the SBus Expansion Subsystem SCSI connectors.
b. Connect the regulated SCSI terminator to the other SCSI connector. If
you have other SCSI devices, connect the other SCSI devices to the
unused SCSI connector and plug in (replace) the SCSI terminator on
the last device in the daisy-chain with the regulated SCSI terminator.
See Figure 2-12.
10. If you have a SPARCstation 2 system:
a. If you have one or more external SCSI devices daisy-chained to your
system, replace the SCSI terminator on the last device in the daisy-
chain with a regulated SCSI terminator (P/N 150-1785).
A regulated SCSI terminator has the word "REGULATED" stamped on it.
See Figure 2-12.
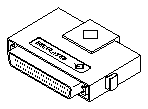
Figure 2-12
Regulated SCSI Terminator
1. Hold the cover at an angle of approximately 30 degrees in relation to the
system unit chassis (front end down, back end up). See Figure 2-13.
Gently guide the plastic tabs on the front of the cover into the tab slots on
the front of the chassis while continuing to hold the cover.
2. Lower the cover slowly onto the chassis.
Be sure the security loop clears the diskette drive (if installed) and seats into
the security loop slot on the bottom of the chassis.
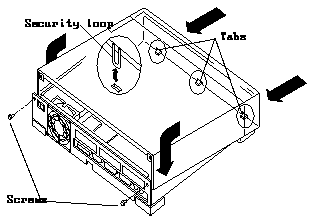
Figure 2-13
Replacing the SPARCstation 2 System Cover
Caution -

Holding the cover at angles greater than 30 degrees can prevent
inserting the tabs into the tab slots. Once the tabs are in the slots, raising the
cover to angles greater than 30 degrees can break the tabs.
3. Insert and tighten the two screws that hold the top cover to the back
panel. You are ready to power on the system.
